3.5.2.1.18. Filter
In this section:
The Filter is a versatile tool for filtering lists of entities extracted from a database to display in a tabular form. The component enables quick data filtering by arbitrary conditions, as well as creating filters for repeated use.
Filter should be connected to a CollectionContainer with a loader or a CollectionDatasource containing a JPQL query. Its logic is based on the modification of the query in accordance with the criteria provided by the user. Thus, filtering is done at the database level when the SQL query is executed, and only selected data is loaded to the Middleware and Client tiers.
Using a Filter
A typical filter is shown below:
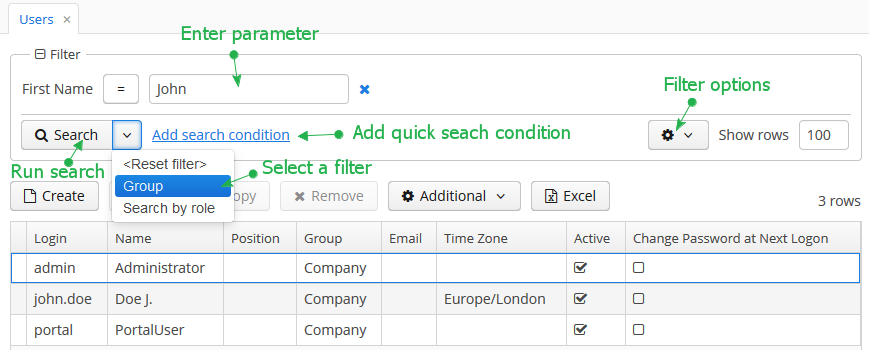
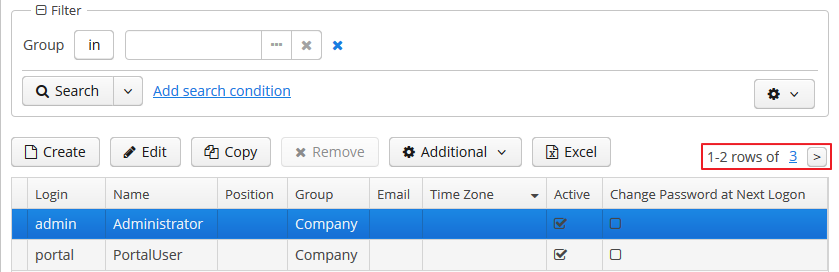
By default, the component is in quick filter mode. This means that a user can add a set of conditions for a one-off data search. After the screen is closed, the conditions will disappear.
To create a quick filter, click Add search condition link. The condition selection screen will be displayed:
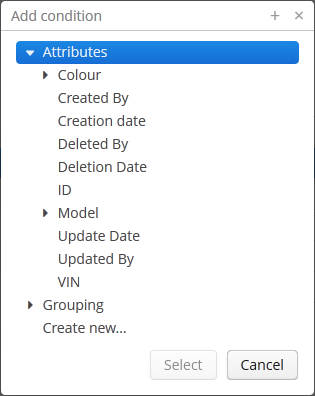
Possible condition types are described below:
-
Attributes – attributes of this entity and related entities. Only persistent attributes are displayed. They should also either be explicitly set in the
propertyelement of the filter XML descriptor, or comply with the rules specified in the properties element. -
Custom conditions – conditions specified by developer in the
customelements of the filter XML descriptor. -
Create new… – enables creating a new arbitrary JPQL condition. This option is only available to users having the specific
cuba.gui.filter.customConditionspermission.
Selected conditions are displayed at the top of the filter panel. The  icon will appear next to each condition field, allowing them to be removed from the set.
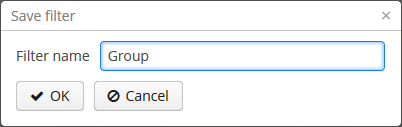
Quick filters can be saved for further re-use. In order to save a quick filter, click the filter settings icon, select Save/Save as and provide a new filter name in the popup dialog:
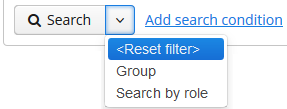
After that, the filter will be saved and will appear in the drop-down menu of the Search button.
The Reset filter menu lets you reset all currently applied search conditions.
The filter settings popup button provides the list of options for filter management:
-
Save – save changes to the current filter.
-
Save with values – save changes to the current filter using the values in parameter editors as filter default values.
-
Save as – save the filter under a new name.
-
Edit – open the filter editor (see below).
-
Make default – make the filter default for this screen. The filter will be automatically displayed on the filter panel when the screen is opened.
-
Remove – delete the current filter.
-
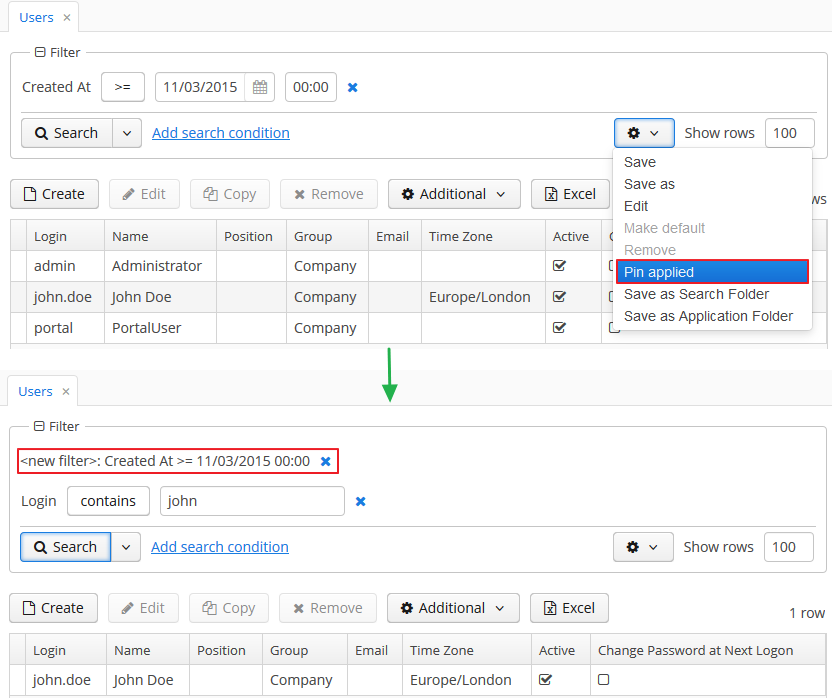
Pin applied – use the results of the last search for sequential data filtering (see Applying Filters Sequentially).
-
Save as search folder – create a search folder based on the current filter.
-
Save as application folder – create an application folder based on the current filter. This option is available to users having the specific
cuba.gui.appFolder.globalpermission only.
The Edit option opens the filter editor, allowing advanced configuration of the current filter:
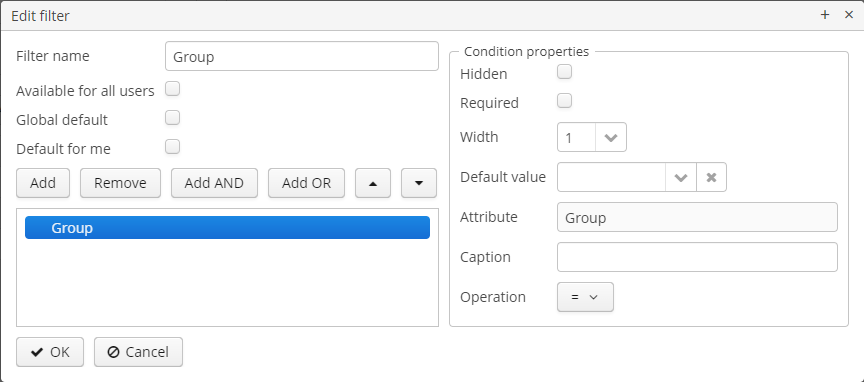
Filter name should be provided in the Name field. This name will be displayed in available filters list for the current screen.
Filter can be made global (i.e., available to all users) using the Available to all users checkbox and global default using the Global default checkbox. These operations require a specific permission called CUBA > Filter > Create/modify global filters. If the filter is marked as global default then it will be automatically selected when users open the screen. Users can set their own default filters using the Default for me checkbox. This setting overrides the global default one.
The filter conditions are contained in the tree. They can be added using the Add button, swapped using  /
/ or removed using the Remove button.
AND or OR grouping conditions can be added with the help of the corresponding buttons. All top level conditions (i.e., without explicit grouping) are joined with AND.
Selecting a condition in the tree opens the list of its properties in the right part of the editor.
The conditions can be made hidden or required by means of corresponding checkboxes. The hidden condition parameter is invisible to the user, so it should be provided when the filter is being edited.
Width property enables selecting the width of the parameter field on the filter panel for the current condition. By default, conditions on the filter panel are displayed in three columns. The field width equals to the number of columns it will occupy (1, 2 or 3).
Default parameter value for the current condition can be selected in the Default value field.
A custom caption for filter condition can be provided in the Caption field.
Operation field enables selecting the condition operator. The list of available operators depends on the attribute type.
If an entity has an attribute of the DateTime type with no @IgnoreUserTimeZone annotation, the the user’s time zone will be respected in filters for this attribute by default. As for the Date type, you can define whether the user’s time zone should be respected by using the special Use time zone flag in the custom condition editor.
Filter Component
XML name of the component: filter.
An example of component declaration in XML screen descriptor is shown below:
<data readOnly="true">
    <collection id="carsDc" class="com.haulmont.sample.core.entity.Car" view="carBrowse">
        <loader id="carsDl" maxResults="50">
            <query>
                <![CDATA[select e from sample_Car e order by e.createTs]]>
            </query>
        </loader>
    </collection>
</data>
<layout expand="carsTable" spacing="true">
    <filter id="filter" applyTo="carsTable" dataLoader="carsDl">
        <properties include=".*"/>
    </filter>
    <table id="carsTable" width="100%" dataContainer="carsDc">
        <columns>
            <column id="vin"/>
            <column id="colour"/>
            <column id="model"/>
        </columns>
        <rowsCount/>
    </table>
</layout>
In the example above, a data container is defined in the data layer of the screen. The container selects Car entity instances using JPQL query. The data loader which provides data to be filtered is specified in the filter component’s loader attribute. Data is displayed using the Table component, which is connected to the same data container.
filter may contain nested elements. They describe conditions available for user selection in Add Condition dialog:
-
properties– multiple entity attributes can be made available for selection. This element has the following attributes:-
include– required attribute. It contains a regular expression, which should match an entity attribute name.
-
exclude– contains a regular expression. If an attribute matches the expression, it will be excluded from previously included (usinginclude).
-
excludeProperties– contains a comma-separated list of property paths that should be excluded from filtering. As opposed toexclude, it supports traversing the entity graphs, for example:customer.name.
-
excludeRecursively- defines if an attribute fromexcludePropertiesshould be excluded recursively for the whole object graph. Iftrue, an attribute and all its nested attributes with the same name will be excluded.For example:
<filter id="filter"
        applyTo="ordersTable"
        dataLoader="ordersDl">
    <properties include=".*"
                exclude="(amount)|(id)"
                excludeProperties="version,createTs,createdBy,updateTs,updatedBy,deleteTs,deletedBy"
                excludeRecursively="true"/>
</filter>
To exclude properties programmatically, use the
setPropertiesFilterPredicate()method of theFiltercomponent:filter.setPropertiesFilterPredicate(metaPropertyPath -> !metaPropertyPath.getMetaProperty().getName().equals("createTs"));
The following entity attributes are ignored when
propertieselement is used:-
Not accessible due to security permissions.
-
Collections (
@OneToMany,@ManyToMany). -
Non-persistent attributes.
-
Attributes that do not have localized names.
-
Attributes annotated with
@SystemLevel. -
Attributes of type
byte[]. -
The
versionattribute.
-
-
property– explicitly includes an entity attribute by name. This element has the following attributes:-
name– required attribute, containing the name of entity attribute to be included. It can be a path (using ".") in the entity graph. For example:<filter id="transactionsFilter" dataLoader="transactionsDl" applyTo="table"> <properties include=".*" exclude="(masterTransaction)|(authCode)"/> <property name="creditCard.maskedPan" caption="msg://EmbeddedCreditCard.maskedPan"/> <property name="creditCard.startDate" caption="msg://EmbeddedCreditCard.startDate"/> </filter>
-
caption– localized entity attribute name displayed in filter conditions. Generally it is a string with themsg://prefix in accordance with MessageTools.loadString() rules.If the
nameattribute is specified as an entity graph path (using ".") , thecaptionattribute is required.
-
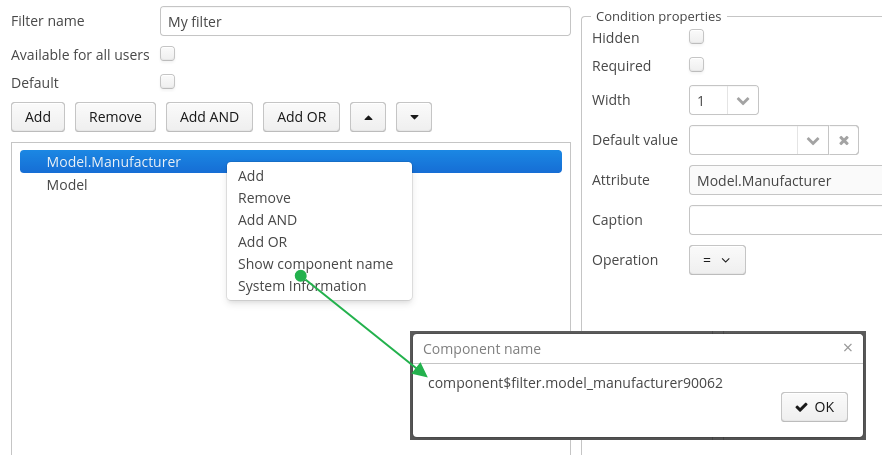
paramWhere− specifies the JPQL expression which is used to select the list of condition parameter values if the parameter is a related entity. The{E}placeholder should be used in the expression instead of the alias of the entity being selected.For example, let’s assume that
Carhas a reference toModel. Then possible condition parameter values list can be limited toAudimodels only:<filter id="carsFilter" dataLoader="carsDl"> <property name="model" paramWhere="{E}.manufacturer = 'Audi'"/> </filter>Screen parameters, session attributes and screen components including those showing other parameters can be used in JPQL expression. Query parameters specification rules are described in Dependencies Between Data Components and CollectionDatasourceImpl Queries.
An example of session and screen parameters usage is shown below:
{E}.createdBy = :session$userLogin and {E}.name like :param$groupNameWith the
paramWhereclause, you can introduce dependencies between parameters. For example, let’s assume thatManufactureris a separate entity. That isCarhas a reference toModelwhich in turn has a reference toManufacturer. Then you may want to create two conditions for the Cars filter: first to select a Manufacturer and second to select a Model. To restrict the list of models by previously selected manufacturer, add a parameter to theparamWhereexpression:{E}.manufacturer.id = :component$filter.model_manufacturer90062The parameter references a component which displays Manufacturer parameter. You can see the name of the component showing condition parameter by opening context menu on a condition table row in the filter editor:
-
paramView− specifies a view, which will be used to load the list of condition parameter values if the parameter is a related entity. For example,_local. If view is not specified,_minimalview will be used.
-
-
customis an element defining an arbitrary condition. The element content should be a JPQL expression (JPQL Macros can be used), which will be added to the data container query’swhereclause. The{E}placeholder should be used in the expression instead of the alias of the entity being selected. The condition can only have one parameter denoted by "?" if used.A value of custom condition can contain special characters, for example "%" or "_" for "like" operator. If you want to escape these characters, add
escape '<char>'to your condition, for example:{E}.name like ? escape '\'Then if you use
foo\%as a value of the condition parameter, the search will interpret "%" as a character in your name and not as a special character.An example of a filter with arbitrary conditions is shown below:
<filter id="carsFilter" dataLoader="carsDl"> <properties include=".*"/> <custom name="vin" paramClass="java.lang.String" caption="msg://vin"> {E}.vin like ? </custom> <custom name="colour" paramClass="com.company.sample.entity.Colour" caption="msg://colour" inExpr="true"> ({E}.colour.id in (?)) </custom> <custom name="repair" paramClass="java.lang.String" caption="msg://repair" join="join {E}.repairs cr"> cr.description like ? </custom> <custom name="updateTs" caption="msg://updateTs"> @between({E}.updateTs, now-1, now+1, day) </custom> </filter>customconditions are displayed in the Custom conditions section of the Add condition dialog: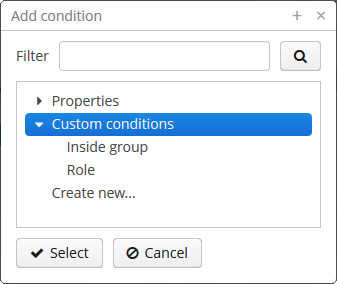
Attributes of
custom:-
name− required attribute, condition name.
-
caption− required attribute, localized condition name. Generally it is a string with themsg://prefix in accordance with MessageTools.loadString() rules.
-
paramClass− Java class of the condition parameter. If the parameter is not specified, this attribute is optional.
-
inExpr− should be set totrue, if the JPQL expression containsin (?)conditions. In this case user will be able to enter several condition parameter values.
-
join− optional attribute. It specifies a string, which will be added to the data container queryfromsection. This can be required to create a complex condition based on an attribute of a related collection.joinorleft joinstatements should be included into the attribute value.For example, let’s assume that the
Carentity has arepairsattribute, which is a related entityRepairinstances collection. Then the following condition can be created to filterCarbyRepairentity’sdescriptionattribute:<filter id="carsFilter" dataLoader="carsDl"> <custom name="repair" caption="msg://repair" paramClass="java.lang.String" join="join {E}.repairs cr"> cr.description like ? </custom> </filter>If the condition above is used, the original data container query
select c from sample_Car c order by c.createTswill be transformed into the following one:
select c from sample_Car c join c.repairs cr
where (cr.description like ?)
order by c.createTs
Also, you can create a custom condition with an unrelated entity and use this entity later in the
wheresection of the condition. In this case, you should use", "instead ofjoinorleft joinstatements in thejoinattribute value.Below is an example of a custom condition to find cars that were assigned to drivers after the specified date:
<filter id="carsFilter" dataLoader="carsLoader" applyTo="carsTable"> <custom name="carsFilter" caption="carsFilter" paramClass="java.util.Date" join=", ref$DriverAllocation da"> da.car = {E} and da.createTs >= ? </custom> </filter> -
paramWhere− specifies a JPQL expression used to select the list of condition parameter values if the parameter is a related entity. See the description of thepropertyelement’s attribute of the same name. -
paramView− specifies a view, which will be used when a list of condition parameter values are loaded if the parameter is a related entity. See the description of thepropertyelement’s attribute of the same name.
-
filter attributes:
-
editable– if the attribute value isfalse, the Edit option is disabled.
-
applyImmediately– specifies when the filter is applied. If the attribute value isfalse, the filter will be applied only after the Search button is clicked. If the attribute value istrue, filter is applied immediately after changing the filter conditions. General cases when a filter is applied immediately:-
After the parameter field’s value changing;
-
After changing condition operation;
-
After removing a condition from the filter;
-
After the Show rows field changing;
-
When you click on the OK button in the filter editor dialog;
-
After clearing all values.
In the immediate mode, the Refresh button is used instead of Search.
The
applyImmediatelyattribute takes precedence over the cuba.gui.genericFilterApplyImmediately application property. -
-
manualApplyRequired− defines when the filter will be applied. If the attribute value isfalse, the filter (default or empty) will be applied when the screen is opened. It means that the data container will be refreshed and linked components (e.g.Table) will display data. If the value istrue, the filter will be applied only after the Search button is clicked.This attribute takes precedence over the cuba.gui.genericFilterManualApplyRequired application property.
-
useMaxResults− limits the page size of entity instances loaded into the data container. It is set totrueby default.If the attribute value is
false, the filter will not show the Show rows field. The number of records in the data container (and displayed in the table accordingly) will be limited only by theMaxFetchUIparameter of the entity statistics, which is set to 10000 by default.If the attribute is not specified or is
true, the Show rows field will be displayed only if the user has specificcuba.gui.filter.maxResultspermission. If thecuba.gui.filter.maxResultspermission is not granted, the filter will force selecting only the first N rows without user to be able to disable it or specify another N. N is defined byFetchUI,DefaultFetchUIparameters. They are obtained from the entity statistics mechanism.A filter shown below has the following parameters:
useMaxResults="true", thecuba.gui.filter.maxResultspermission is denied, andcuba.gui.filter.maxResultsDefaultFetchUI = 2.
-
textMaxResults- enables using the text field instead of the drop-down list as the Show rows field.falseby default.
-
folderActionsEnabled− if it is set tofalse, the following filter actions will be hidden: Save as Search Folder, Save as Application Folder. By default, the attribute value istrue, and Save as Search Folder, Save as Application Folder are available.
-
applyTo− optional attribute, contains the identifier of a component associated with the filter. It is used when access to related component presentations is required. For example, when saving the filter as a search folder or as an application folder, the presentation that will be applied when browsing this folder can be specified.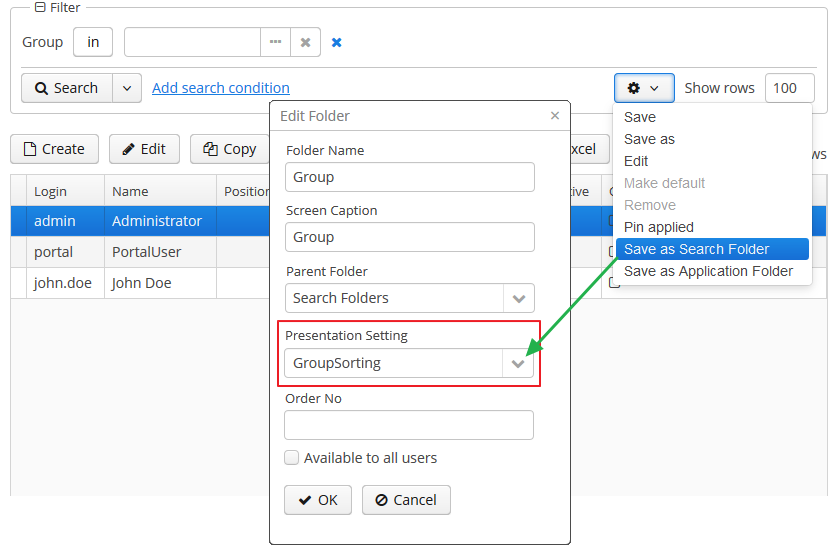
-
caption- enables setting a custom caption for the filter panel.
-
columnsCount- defines the number of columns for conditions on the filter panel. Default value is 3.
-
defaultMode- defines the filter default mode. Possible values aregenericandfts. Whenftsvalue is set then the filter will be opened in the full text search mode (if the entity is indexed). The default value isgeneric.
-
modeSwitchVisible- defines the visibility of the checkbox that switches the filter to the full text search mode. If full text search is unavailable then the checkbox will be invisible despite of the defined value. Possible values aretrueandfalse(trueby default).
Methods of Filter interface:
-
setBorderVisible()- defines if the filter border should be displayed. The default value istrue.
Listeners of Filter:
-
ExpandedStateChangeListener- enables tracking the expanded state changes.
-
FilterEntityChangeListener- is triggered when a filter is selected for the first time on a component initialization or later from the list of saved filters.
The appearance of the Filter component can be customized using SCSS variables with $cuba-filter-* prefix. You can change these variables in the visual editor after creating a theme extension or a custom theme.
- Attributes of filter
-
applyImmediately - applyTo - caption - captionAsHtml - columnsCount - css - dataLoader - datasource - defaultMode - description - descriptionAsHtml - editable - enable - box.expandRatio - folderActionsEnabled - id - manualApplyRequired - margin - modeSwitchVisible - settingsEnabled - stylename - textMaxResults - useMaxResults - visible - width
- Elements of filter
-
custom - properties - property
- Attributes of properties
- Attributes of property
-
caption - name - paramView - paramWhere
- Attributes of custom
-
caption - name - inExpr - join - paramClass - paramView - paramWhere
- API
-
addExpandedStateChangeListener - addFilterEntityChangeListener - applySettings - getMargin - saveSettings - setMargin
User Permissions
-
To create/change/delete global (available to all users) filters, user must have the
cuba.gui.filter.globalpermission. -
To create/change
customconditions user must have acuba.gui.filter.customConditionspermission. -
To change the maximum number of rows per table page using the Show rows field, user must have the
cuba.gui.filter.maxResultspermission. See also the useMaxResults filter attribute.
For specific permissions configuration information, see Security Subsystem.
External Filter Control Parameters
-
System-wide parameters
The following application properties affect filter behavior:
-
cuba.gui.genericFilterApplyImmediately allows controlling the default search mode for the filter. See also applyImmediately filter attribute.
-
cuba.gui.genericFilterManualApplyRequired − disables automatic applying of the filter (i.e., data loading) when the screen is opened. See also manualApplyRequired filter attribute.
-
cuba.gui.genericFilterChecking − enables the check that at least one condition is filled before applying the filter.
-
cuba.gui.genericFilterControlsLayout − defines an internal layout of the filter controls.
-
cuba.allowQueryFromSelected enables switching off sequential filters application mechanism.
-
cuba.gui.genericFilterColumnsCount - sets the default number of columns for placing conditions on the filter panel. See also columnsCount filter attribute.
-
cuba.gui.genericFilterConditionsLocation - defines the location of the conditions panel.
-
cuba.gui.genericFilterPopupListSize - defines the maximum number of items displayed in the popup list of the Search button.
-
cuba.gui.genericFilterTrimParamValues - defines whether all generic text filters should trim input values.
-
-
Screen invocation parameters
It is possible to specify a filter and its parameters which should be applied when the screen is opened. For this purpose, the filter should be created in advance, stored in the database, and a corresponding record in the
SEC_FILTERtable should have a value in theCODEfield. Screen invocation parameters are set in theweb-menu.xmlconfiguration file.In order to store the filter in the database, the insert script for the filter should be added to the
30.create-db.sqlscript of the entity. To simplify the script creation, find the filter in the Entity Inspector section of the Administration menu, in the filter’s context menu choose System Information, click Script for insert button and copy the script.Then you can adjust the screen to use the filter by default. To specify a filter code, pass to the screen a parameter with the same name as filter component identifier in this screen. Parameter value should be the code of the filter.
To set filter parameter values, pass to the screen parameters with the names equal to parameter names and their values in string format.
An example of main menu item descriptor is shown below. It sets a filter with the
FilterByVINcode to thecarsFiltercomponent of thesample_Car.browsescreen which it opens. It also setsTMAvalue to thecomponent$carsFilter.vin79216condition:<item id="sample_Car.browse"> <param name="carsFilter" value="FilterByVIN"/> <param name="component$carsFilter.vin79216" value="TMA"/> </item>It should be noted that a filter with a defined
CODEfield has some specifics:-
It cannot be edited by users.
-
Name of this filter can be displayed in several languages. To achieve this, specify a string with key equal to the filter code in the application main message pack.
-
Applying Filters Sequentially
If the cuba.allowQueryFromSelected application property is enabled, the last applied filter and the current filtered results can be pinned via the component’s user interface. After that another filter or other parameters of the current filter can be selected and applied to the currently selected records.
This approach helps to achieve two aims:
-
Decompose complex filters, which may lead to better performance as well.
-
Apply filters to the records selected using application or search folders.
Take the following steps to use sequential filters. First, choose and apply one of the filters. Next click the filter settings button and select Pin applied. The filter will be pinned at the top of the filter panel. Then another filter can be applied to the selected records and so on. Any number of filters can be applied sequentially. Filters can also be removed using  button.
The sequential filters implementation is based on the ability of DataManager to run sequential queries.
API for Working with Filter Parameters
The Filter interface provides methods for reading and writing of filter parameter values in a screen controller:
-
setParamValue(String paramName, Object value) -
getParamValue(String paramName)
paramName - filter parameter name. Parameter name is a part of component name that displays a parameter value. The procedure of getting a component name was described above. Parameter name is placed after the last dot in a component name. For example, if the component name is component$filter.model_manufacturer90062, then the parameter name is model_manufacturer90062.
Note that you cannot use these methods in the InitEvent handler of the screen controller, because the filter is not initialized at that moment. A good place to work with filter parameters is the BeforeShowEvent handler.
Full-Text Search Mode in Filter
If a filter data container contains entities that are indexed by the full-text search subsystem (see CUBA Platform. Full Text Search), then a full-text search mode is available in the filter. Use the Full-Text Search checkbox to switch to this mode.
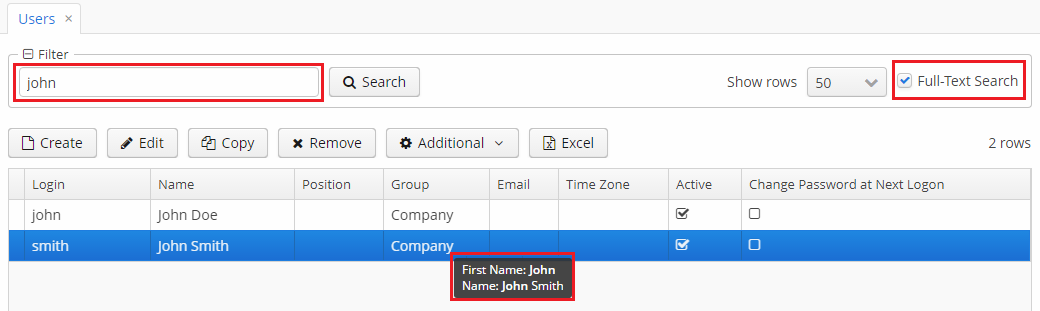
In the full-text search mode, the filter contains text fields for search criteria, and the search is performed in entity fields indexed by the FTS subsystem.
If a table is defined in the applyTo attribute, then placing the mouse cursor on the table row will display a tooltip with the information what entity attributes satisfy the search criteria.
For hiding the filter mode checkbox, set false value to the modeSwitchVisible filter attribute.
If you want the filter to be opened in the full-text search mode by default, set fts value to the defaultMode filter attribute.
Full-text search can be used combined with any number of filter conditions:
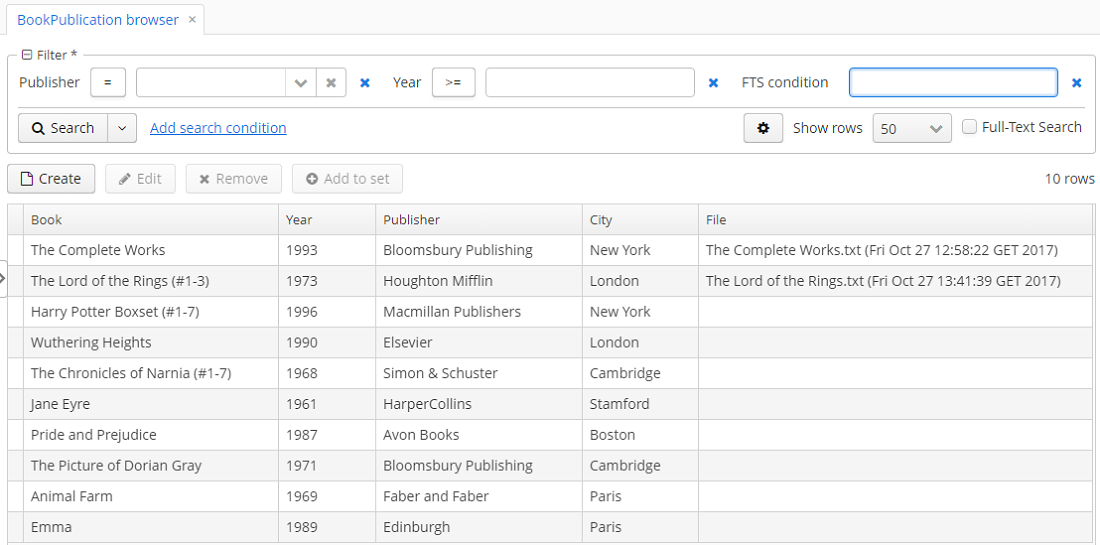
The FTS condition can be selected in the conditions selection window.