3.5.2.1.19. Form
The Form component is designed for the joint display and editing of multiple entity attributes. It is a simple container similar to GridLayout, it can have any number of nested columns, the type of nested fields is defined declaratively in XML, the fields' captions are located to the left of the fields. The main difference from GridLayout is that Form enables binding all nested fields to one data container.
Form is used instead of FieldGroup by default in generated editor screens since the framework version 7.0.
XML-name of the component: form
Below is an example of defining a group of fields in an XML screen descriptor:
<data>
<instance id="orderDc" class="com.company.sales.entity.Order" view="order-edit">
<loader/>
</instance>
</data>
<layout>
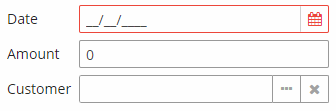
<form id="form" dataContainer="orderDc">
<dateField property="date"/>
<textField property="amount" inputPrompt="Enter value..."/>
<pickerField property="customer"/>
</form>
</layout>In the example above, the form component shows attributes of the entity loaded into the orderDc data container. Nested form elements define visual components bound to entity attributes using the property XML attribute. Captions will be created automatically based on the localized names of entity attributes. The nested components can have any specific attributes like inputPrompt shown in the example.
Attributes of form:
-
childrenCaptionWidth– specifies fixed captions width for all nested columns and their child elements. Set-1to use auto size.
-
captionPosition- defines the fields' caption position:TOPorLEFT.
-
dataContainer- sets the data container for nested fields.
Elements of form:
-
column– optional element that allows you to position fields in multiple columns. For this purpose, nested fields should be placed not immediately within theform, but within acolumn. For example:<form id="form" dataContainer="orderDc"> <column width="250px"> <dateField property="date"/> <textField property="amount"/> </column> <column width="400px"> <pickerField property="customer"/> <textArea property="info"/> </column> </form>In this case, fields will be arranged in two columns; the first column will contain all fields with the width of
250px, the second one with the width of400px.Attributes of
column:-
id– an optional column identifier, which allows you to refer to it in case of screen extension.
-
width– specifies the field width of a column. By default, fields have the width of200px. In this attribute, the width can be specified both in pixels and in percentage of the total horizontal width of the column.
-
childrenCaptionWidth– specifies fixed captions width for nested fields. Set-1to use auto size.
-
Methods of the Form interface:
-
add()- enables adding fields to theFormprogrammatically. It takes aComponentinstance as a parameter, and you can also define the position of the new field by addingcolumnandrowindexes.Data container is not assigned to the components added programmatically, so you have to use the component’s
setValueSource()method for data binding.For example, if you have declared a form with the
namefield:<data> <instance id="customerDc" class="com.company.demo.entity.Customer"> <loader/> </instance> </data> <layout> <form id="form" dataContainer="customerDc"> <column> <textField id="nameField" property="name"/> </column> </form> </layout>You can add an
emailfield to the form programmatically in the screen controller as follows:@Inject private UiComponents uiComponents; @Inject private InstanceContainer<Customer> customerDc; @Inject private Form form; @Subscribe private void onInit(InitEvent event) { TextField<String> emailField = uiComponents.create(TextField.TYPE_STRING); emailField.setCaption("Email"); emailField.setWidthFull(); emailField.setValueSource(new ContainerValueSource<>(customerDc, "email")); form.add(emailField); }
- Attributes of form
-
align - box.expandRatio - caption - captionAsHtml - captionPosition - childrenCaptionWidth - colspan - contextHelpText - contextHelpTextHtmlEnabled - css - dataContainer - description - descriptionAsHtml - editable - enable - height - icon - id - responsive - rowspan - stylename - visible - width
- Attributes of column
- API