5.5.2.1.40. Table
The Table component presents information in a table view, sorts data, manages table columns and headers and invokes actions for selected rows.
XML-name of the component: table
The component is implemented for both Web Client and Desktop Client.
An example of component definition in an XML-descriptor of a screen:
<dsContext>
<collectionDatasource id="ordersDs"
class="com.sample.sales.entity.Order"
view="order-with-customer">
<query>
select o from sales$Order o order by o.date
</query>
</collectionDatasource>
</dsContext>
<layout>
<table id="ordersTable" width="300px">
<columns>
<column id="date"/>
<column id="customer.name"/>
<column id="amount"/>
</columns>
<rows datasource="ordersDs"/>
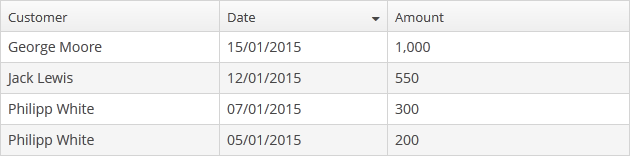
</table>In the example the dsContext element defines collectionDatasource, which selects Order entities using JPQL query. The rows element defines the data source, while columns element defines which entity attributes are used as table columns.
table elements:
-
rows– a required element; itsdatasourceattribute defines the data source to be used by the table.Each row can have an icon in an additional column on the left. Create an implementation of the
ListComponent.IconProviderinterface in the screen controller and set it for the table:@Inject private Table<Customer> table; @Override public void init(Map<String, Object> params) { table.setIconProvider(new ListComponent.IconProvider<Customer>() { @Nullable @Override public String getItemIcon(Customer entity) { CustomerGrade grade = entity.getGrade(); switch (grade) { case PREMIUM: return "icons/premium_grade.png"; case HIGH: return "icons/high_grade.png"; case MEDIUM: return "icons/medium_grade.png"; default: return null; } } }); }
-
columns– a required element defining the set of columns for a table.Each column is described in a nested
columnelement with the following attributes:-
id− a mandatory attribute, contains the name of an entity attribute displayed in the column. Can be either an attribute of the entity from the data source or a linked entity – object graph traversal is indicated with a dot. For example:<columns> <column id="date"/> <column id="customer"/> <column id="customer.name"/> <column id="customer.address.country"/> </columns>
-
caption− an optional attribute containing the column caption. If not specified, a localized attribute name will be displayed.
-
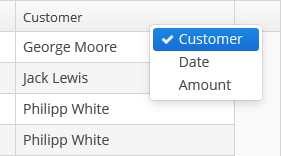
collapsed− an optional attribute; hides the column by default when set totrue. Users can control column’s visibility using the menu available via a button in the top right part of the table when the table’s
 columnControlVisibleattribute is notfalse. By default,collapsedisfalse.
-
width− an optional attribute controlling default column width. May contain only numeric values in pixels.
-
align− an optional attribute that sets text alignment of column cells. Possible values:LEFT,RIGHT,CENTER. Default isLEFT.
-
editable− an optional attribute allowing editing of the corresponding column in the table. In order for a column to be editable, the editable attribute of the entire table should be set totrueas well. Changing this property at runtime is not supported.
-
sortable− an optional attribute to disable sorting of the column. Takes effect if the whole table has sortable attribute set totrue(which is by default).
-
maxTextLength– an optional attribute allowing to limit the number of characters in a cell. If the difference between the actual and the maximum allowed number of characters does not exceed the 10 character threshold, the "extra" characters remain unhidden. To see the entire record, users need to click on its visible part. An example of a column with a 5 character limitation: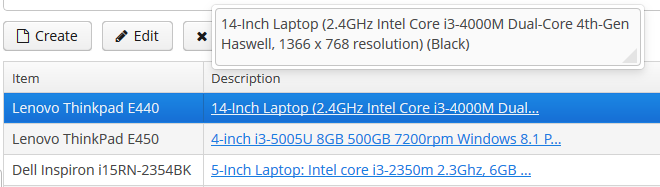
-
link- if set totrue, enables displaying a link to an entity editor in a table column (supported for Web Client only). Thelinkattribute may be set to true for primitive type columns, too; in this case, the main entity editor will be opened. This approach may be used to simplify navigation: the users will be able to open entity editors simply by clicking on some key attributes.
-
linkScreen- contains the identifier of the screen that is opened by clicking the link enabled in thelinkattribute.
-
linkScreenOpenType- sets the screen opening mode (THIS_TAB,NEW_TABorDIALOG).
-
linkInvoke- invokes the controller method instead of opening the screen.public void linkedMethod(Entity item, String columnId) { Customer customer = (Customer) item; showNotification(customer.getName()); }
-
captionProperty- the name of an entity attribute which should be shown in the column instead of specified by id. For example, if you have a reference to thePriorityentity with thenameandorderNoattributes, you can define the following column:<column id="priority.orderNo" captionProperty="priority.name" caption="msg://priority" />In this case, the column will display the priority name, but the sorting of the column will be done by the priority order.
-
an optional
generatorattribute contains the link to a method in the screen controller that creates a visual component to be shown in table cells:<columns> <column id="name"/> <column id="imageFile" generator="generateImageFileCell"/> </columns>public Component generateImageFileCell(Employee entity) { Embedded embedded = componentsFactory.createComponent(Embedded.class); embedded.setType(Embedded.Type.IMAGE); FileDescriptor userImageFile = entity.getImageFile(); FileDataProvider dataProvider = new FileDataProvider(userImageFile); embedded.setSource(userImageFile.getId() + "." + userImageFile.getExtension(), dataProvider); return embedded; }It can be used instead of providing an implementation of
Table.ColumnGeneratorto the addGeneratedColumn() method. -
columnelement may contain a nested formatter element that allows you to represent the attribute value in a format different from the standard for this Datatype:<column id="date"> <formatter class="com.haulmont.cuba.gui.components.formatters.DateFormatter" format="yyyy-MM-dd HH:mm:ss"/> </column>
-
-
rowsCount− an optional element adding theRowsCountcomponent for the table; this component enables loading the table data in pages. Page size can be defined by limiting the number of records in the data source usingCollectionDatasource.setMaxResults()method. Typically, this is performed by a Filter component linked to the table’s data source. However, if there is no generic filter, this method can be called directly from the screen controller.RowsCountcomponent can also show the total number of records returned by the current query from the datasource without extracting the records themselves. It invokesAbstractCollectionDatasource.getCount()when user clicks the ? icon, which results in performing a database query with the same conditions as the current query, but using aCOUNT(*)aggregate function instead. The number retrieved is displayed instead of the ? icon.
-
actions− an optional element describing the actions, related to the table. In addition to custom arbitrary actions, the element supports the following standard actions, defined inListActionTypeenum:create,edit,remove,refresh,add,exclude,excel.
table attributes:
-
multiselectattribute enables setting multiple selection mode for table rows. Ifmultiselectistrue, users can select multiple rows in the table using keyboard or mouse holding Ctrl or Shift keys. By default, multiple selection mode is switched off.
-
sortableattribute enables sorting data in the table. By default, it is set totrue. If sorting is allowed, clicking a column header will show a /
/ icon to the right of the column name. You can disable sorting for a particular column by using its sortable attribute.
Table sorting can be performed differently depending on whether all the records can be placed on one page or not. If they can, sorting is performed in memory without database queries. If there is more than one page, sorting is performed in the database by sending a new query with the corresponding
ORDER BYcondition.A table column may refer to a local attribute or a linked entity. For example:
<table id="ordersTable">
    <columns>
        <column id="customer.name"/> <!-- the 'name' attribute of the 'Customer' entity -->
        <column id="contract"/>      <!-- the 'Contract' entity -->
    </columns>
    <rows datasource="ordersDs"/>
</table>
In the latter case, the database sorting will be performed by attributes defined in the
@NamePatternannotation of the related entity. If the entity has no such annotation, the sorting will be performed in memory only within the current page.If the column refers to a non-persistent entity attribute, the database sorting will be performed by attributes defined in the
related()parameter of the@MetaPropertyannotation. If no related attributes are specified, the sorting will be performed in memory only within the current page.If the table is connected to a nested datasource that contains a collection of related entities, the collection attribute must be of ordered type (
ListorLinkedHashSet) for table to be sortable. If the attribute is of typeSet, thesortableattribute has no effect and the table cannot be sorted by users.
-
presentationsattribute controls the mechanism of presentations. By default, the value isfalse. If the attribute value istrue, a corresponding icon is added to the top right corner of the table . The mechanism of presentations is implemented for the Web Client only.
-
If the
columnControlVisibleattribute is set tofalse, users cannot hide columns using the drop-down menu of the button in the right part of the table header. Currently displayed columns are marked with checkmarks in the menu.
-
If the
reorderingAllowedattribute is set tofalse, users cannot change columns order by dragging them with a mouse.
-
If the
columnHeaderVisibleattribute is set tofalse, the table has no header.
-
If the
showSelectionattribute is set tofalse, a current row is not highlighted.
-
contextMenuEnabledattribute enables the context menu. By default this attribute is set totrue. The context menu shows table actions (if any) and the System Information item containing information on the selected entity (if the user hascuba.gui.showInfopermission).
-
Setting
multiLineCellstotrueenables multi-line display for cells containing several lines of text. In this mode, the web browser will load all the rows of the current table page at once, instead of lazy-loading the visible part of the table. It is required for proper scrolling in the Web Client. The default value isfalse.
-
aggregatableattribute enables aggregation for table rows. The following operations are supported:-
SUM– calculate the sum -
AVG– find the average value -
COUNT– calculate the total number -
MIN– find the minimum value -
MAX– find the maximum value
The
aggregationelement should be set for aggregated table columns with thetypeattribute, which sets the aggregation function. By default, only numeric data types are supported in aggregated columns, such asInteger, Double, LongandBigDecimal. The aggregated table values are shown in an additional row at the top of the table. An example of an aggregated table description:<table id="itemsTable" aggregatable="true"> <columns> <column id="product"/> <column id="quantity"/> <column id="amount"> <aggregation type="SUM"/> </column> </columns> <rows datasource="itemsDs"/> </table>The
aggregationelement can also contain thestrategyClassattribute specifying a class implementing theAggregationStrategyinterface (see below the example of setting an aggregation strategy programmatically).A Formatter can be specified to display the aggregated value in the format other than the standard for this Datatype:
<column id="amount">
    <aggregation type="SUM">
        <formatter class="com.company.sample.MyFormatter"/>
    </aggregation>
</column>
The
aggregationStyleattribute allows you to specify the location of the aggregation row:TOPorBOTTOM.TOPis used by default.In addition to the operations listed above, you can define a custom aggregation strategy by implementing the
AggregationStrategyinterface and passing it to thesetAggregation()method of theTable.Columnclass inside theAggregationInfoinstance. For example:public class TimeEntryAggregation implements AggregationStrategy<List<TimeEntry>, String> { @Override public String aggregate(Collection<List<TimeEntry>> propertyValues) { HoursAndMinutes total = new HoursAndMinutes(); for (List<TimeEntry> list : propertyValues) { for (TimeEntry timeEntry : list) { total.add(HoursAndMinutes.fromTimeEntry(timeEntry)); } } return StringFormatHelper.getTotalDayAggregationString(total); } @Override public Class<String> getResultClass() { return String.class; } }AggregationInfo info = new AggregationInfo(); info.setPropertyPath(metaPropertyPath); info.setStrategy(new TimeEntryAggregation()); Table.Column column = weeklyReportsTable.getColumn(columnId); column.setAggregation(info); -
-
editableattribute enables switching the table to in-place editing mode. In this mode, the columns witheditable = trueattribute show components to edit the attributes of the corresponding entity.The component type for each editable column is selected automatically based on the type of the corresponding entity attribute. For example, for string and numeric attributes, the application will use TextField, for
Date– DateField, for lists – LookupField, for links to other entities – PickerField.For a
Datetype editable column, you can additionally definedateFormatorresolutionattributes similar to the ones described for the DateField.optionsDatasource and captionProperty attributes can be additionally defined for an editable column showing a linked entity. If
optionsDatasourceis set, the application will use LookupField instead of PickerField.Custom configuration (including editing) of a cell can be performed using
Table.addGeneratedColumn()method – see below.
-
In Web Client with a Halo-based theme,
stylenameattribute enables setting predefined styles to theTablecomponent either in the XML descriptor or in the screen controller:<table id="table" stylename="no-stripes"> <columns> <column id="product"/> <column id="quantity"/> </columns> <rows datasource="itemsDs"/> </table>When setting a style programmatically, select one of the
HaloThemeclass constants with theTABLE_prefix:table.setStyleName(HaloTheme.TABLE_NO_STRIPES);Table styles:
-
borderless- removes the outer border of the table.
-
compact- reduces the white space inside the table cells.
-
no-header- hides the table column headers.
-
no-horizontal-lines- removes the horizontal divider lines between the table rows.
-
no-stripes- removes the alternating row colors.
-
no-vertical-lines- removes the vertical divider lines between the table columns.
-
small- small font size and reduced the white space inside the table cells.
-
Methods of the Table interface:
-
addColumnCollapsedListener() method is useful for tracking the columns visibility with the help of theColumnCollapsedListenerinterface implementation.
-
getSelected(),getSingleSelected()return instances of the entities corresponding to the selected rows of the table. A collection can be obtained by invokinggetSelected(). If nothing is selected, the application returns an empty set. Ifmultiselectis disabled, it is more convenient to usegetSingleSelected()method returning one selected entity ornull, if nothing is selected.
-
addGeneratedColumn()method allows you to define custom representation of data in a column. It takes two parameters: identifier of the column and an implementation of theTable.ColumnGeneratorinterface. Identifier can match one of the identifiers set for table columns in XML-descriptor – in this case the new column is inserted instead of the one defined in XML. If the identifier does not match any of the columns, a new column is added to the right.generateCell()method of theTable.ColumnGeneratorinterface is invoked for each row of the table. The method receives an instance of the entity displayed in the corresponding row.generateCell()method should return a visual component which will be displayed in the cell.Example of using the component:
@Inject
protected Table carsTable;

@Inject
protected ComponentsFactory componentsFactory;

@Override
public void init(Map<String, Object> params) {
    carsTable.addGeneratedColumn("colour", new Table.ColumnGenerator() {
        @Override
        public Component generateCell(Entity entity) {
            LookupPickerField field = componentsFactory.createComponent(LookupPickerField.NAME);
            field.setDatasource(carsTable.getItemDatasource(entity), "colour");
            field.setOptionsDatasource(coloursDs);
            field.addLookupAction();
            field.addOpenAction();
            return field;
        }
    });
}
In the example above, all cells within the
colourcolumn in the table show the LookupPickerField component. The component should save its value into thecolourattribute of the entity which instance is displayed in the corresponding row. For this purposegetItemDatasource()method is used to get the datasource for the current entity instance from the table and pass it to theLookupPickerFieldcomponent.If you want to display just dynamic text, use special class
Table.PlainTextCellinstead of the Label component. It will simplify rendering and make the table faster.If
addGeneratedColumn()method receives the identifier of a column which is not declared in XML-descriptor, the header for the new column to be set as follows:carsTable.getColumn("colour").setCaption("Colour");Consider also using a more declarative approach with the generator XML attribute.
-
requestFocus()method allows you to set focus on the concrete editable field of a certain row. It takes two parameters: an entity instance which identifies the row and the column identifier. Example of requesting a focus:table.requestFocus(item, "count");
-
scrollTo()method allows you to scroll table to the concrete row. It takes one parameter: an entity instance identifying the row.Example of scrolling:
table.scrollTo(item);
-
setClickListener()method can save you from adding generated columns with components when you need to draw something in cells and receive notifications when a user clicks inside these cells. TheCellClickListenerimplementation passed to this method receives the selected entity and the column identifier. The cells content will be wrapped in span element withcuba-table-clickable-cellstyle which can be used to specify the cell representation.
-
setStyleProvider()method enables setting table cell display style. The method accepts an implementation ofTable.StyleProviderinterface as a parameter.getStyleName()method of this interface is invoked by the table for each row and each cell separately. If the method is invoked for a row, the first parameter contains the entity instance displayed by the row, the second parameter isnull. If the method is called for a cell, the second parameter contains the name of the attribute displayed by the cell.Example of setting a style:
@Inject
protected Table customersTable;

@Override
public void init(Map<String, Object> params) {
    customersTable.setStyleProvider(new Table.StyleProvider() {
        @Nullable
        @Override
        public String getStyleName(Entity entity, @Nullable String property) {
            Customer customer = (Customer) entity;
            if (property == null) {
                // style for row
                if (hasComplaints(customer)) {
                    return"unsatisfied-customer";
                }
            } else if (property.equals("grade")) {
                // style for column "grade"
                switch (customer.getGrade()) {
                    case PREMIUM: return "premium-grade";
                    case HIGH: return "high-grade";
                    case MEDIUM: return "medium-grade";
                    default: return null;
                }
            }
            return null;
        }
    });
}
Then the cell and row styles set in the application theme should be defined. Detailed information on creating a theme is available in Themes. For web client, new styles are defined in the
styles.scssfile. Style names defined in the controller, together with prefixes identifying table row and column form CSS selectors. For example:.v-table-row.unsatisfied-customer { font-weight: bold; } .v-table-cell-content.premium-grade { background-color: red; } .v-table-cell-content.high-grade { background-color: green; } .v-table-cell-content.medium-grade { background-color: blue; }
-
addPrintable()method enables setting a custom presentation of the data within a column when exporting to an XLS file via theexcelstandard action or directly using theExcelExporterclass. The method accepts the column identifier and an implementation of theTable.Printableinterface for the column. For example:ordersTable.addPrintable("customer", new Table.Printable<Customer, String>() { @Override public String getValue(Customer customer) { return "Name: " + customer.getName; } });getValue()method of theTable.Printableinterface should return data to be displayed in the table cell. This is not necessarily a string – the method may return values of other types, for example, numeric data or dates, which will be represented in the XLS file accordingly.If formatted output to XLS is required for a generated column, an implementation of the
Table.PrintableColumnGeneratorinterface passed to theaddGeneratedColumn()method should be used. The value for a cell in an XLS document is defined in thegetValue()method of this interface:ordersTable.addGeneratedColumn("product", new Table.PrintableColumnGenerator<Order, String>() { @Override public Component generateCell(Order entity) { Label label = componentsFactory.createComponent(Label.NAME); Product product = order.getProduct(); label.setValue(product.getName() + ", " + product.getCost()); return label; } @Override public String getValue(Order entity) { Product product = order.getProduct(); return product.getName() + ", " + product.getCost(); } });If
Printablepresentation is not defined for a generated column in one way or another, then the column will either show the value of corresponding entity attribute or nothing if there is no associated entity attribute.
-
The
setItemClickAction()method allows you to define an action that will be performed when a table row is double-clicked. If such action is not defined, the table will attempt to find an appropriate one in the list of its actions in the following order:-
The action assigned to the Enter key by the
shortcutproperty -
The
editaction -
The
viewactionIf such action is found, and has
enabled = trueproperty, the action is executed.
-
-
The
setEnterPressAction()allows you to define an action executed when Enter is pressed. If such action is not defined, the table will attempt to find an appropriate one in the list of its actions in the following order:-
The action defined by the
setItemClickAction()method -
The action assigned to the Enter key by the
shortcutproperty -
The
editaction -
The
viewaction
If such action is found, and has
enabled = trueproperty, the action is executed. -
- Attributes of table
-
align - aggregatable - aggregationStyle - columnControlVisible - columnHeaderVisible - contextMenuEnabled - editable - enable - height - id - multiLineCells - multiselect - presentations - reorderingAllowed - settingsEnabled - showSelection - sortable - stylename - tabIndex - textSelectionEnabled - visible - width
- Elements of table
-
actions - buttonsPanel - columns - rows - rowsCount
- Attributes of column
-
align - caption - captionProperty - collapsed - dateFormat - editable - generator - id - link - linkInvoke - linkScreen - linkScreenOpenType - maxTextLength - optionsDatasource - resolution - sortable - visible - width
- Elements of column
- Attributes of aggregation
- Attributes of rows
- Predefined styles of table
-
borderless - compact - no-header - no-horizontal-lines - no-stripes - no-vertical-lines - small
- API
-
addGeneratedColumn - addPrintable - addColumnCollapseListener - applySettings - generateCell - getSelected - requestFocus - saveSettings - scrollTo - setClickListener - setEnterPressAction - setItemClickAction - setStyleProvider