3.5.5.3. Custom Action Types
You can create your own action types or override existing standard types in your project.
For example, imagine that you need an action that would show the instance name of the currently selected entity in a table, and you would like to use this action in multiple screens by specifying its type only. Below are the steps to create such action.
-
Create an action class and add the
@ActionTypeannotation with the desired type name:package com.company.sample.web.actions; import com.haulmont.cuba.core.entity.Entity; import com.haulmont.cuba.core.global.MetadataTools; import com.haulmont.cuba.gui.ComponentsHelper; import com.haulmont.cuba.gui.Notifications; import com.haulmont.cuba.gui.components.ActionType; import com.haulmont.cuba.gui.components.Component; import com.haulmont.cuba.gui.components.actions.ItemTrackingAction; import javax.inject.Inject; @ActionType("showSelected") public class ShowSelectedAction extends ItemTrackingAction { @Inject private MetadataTools metadataTools; public ShowSelectedAction(String id) { super(id); setCaption("Show Selected"); } @Override public void actionPerform(Component component) { Entity selected = getTarget().getSingleSelected(); if (selected != null) { Notifications notifications = ComponentsHelper.getScreenContext(target).getNotifications(); notifications.create() .withType(Notifications.NotificationType.TRAY) .withCaption(metadataTools.getInstanceName(selected)) .show(); } } } -
In the
web-spring.xmlfile, add<gui:actions>element with thebase-packagesattribute pointing to a package where to find your annotated actions:<beans ... xmlns:gui="http://schemas.haulmont.com/cuba/spring/cuba-gui.xsd"> <!-- ... --> <gui:actions base-packages="com.company.sample.web.actions"/> </beans> -
Now you can use the action in screen descriptors by specifying its type:
<groupTable id="customersTable">
    <actions>
        <action id="show" type="showSelected"/>
    </actions>
    <columns>
        <!-- ... -->
    </columns>
    <buttonsPanel>
        <button action="customersTable.show"/>
    </buttonsPanel>
</groupTable>
|
If you want to override an existing type, just register your new action type with the same name. |
- CUBA Studio support and configurable properties for custom actions
Custom action types implemented in your project can be integrated into user interface of the CUBA Studio’s Screen Designer. Screen Designer provides the following support for custom action types:
-
Ability to select action type in the list of standard actions when adding new action to the screen from the palette or by invoking the +Add → Action in the table.
-
Quick navigation from action usage site to the action class by pressing Ctrl + B or Ctrl-clicking the mouse when the cursor is placed on the action type in the screen descriptor (e.g. on the
showSelectedattribute value in the XML fragment<action id="sel" type="showSelected">). -
Editing of the user-defined action properties in the Component Inspector panel.
-
Generating event handlers and method delegates provided by the action to customize its logic.
-
Support for generic type parameterization. The generic type is determined as the entity class used by the table (action’s owner component).
The @com.haulmont.cuba.gui.meta.StudioAction annotation is used to mark custom action class as containing custom properties. Custom actions should be marked with this annotation, however at the moment Studio doesn’t use any of the @StudioAction annotation attributes.
The @com.haulmont.cuba.gui.meta.StudioPropertiesItem annotation is used to mark setter of the action property as editable action property. Such properties will be displayed and editable in the Component Inspector panel of the Screen Designer. Annotation has the following attributes:
-
name- name of the attribute written to the XML. If not set, it is derived from the setter method name. -
type- type of the property. This attribute is used by the Inspector panel to create appropriate input component providing suggestions and basic validation. Description for all property types is available here. -
caption- caption of the property to be displayed in the Inspector panel. -
description- additional description for the property that will be displayed in the Inspector panel as a mouse-over tooltip. -
category- category of the property in the Inspector panel (not used by the Screen Designer yet). -
required- the property is required, in this case Inspector panel will not allow to input an empty value for this property. -
defaultValue- specifies the value of the property that is implicitly used by the action when the corresponding XML attribute is omitted. The default value will be omitted from XML code. -
options- list of options for the action property, e.g. forENUMERATIONproperty type.
Note that only limited list of Java types is supported for action properties:
-
Primitive types:
String,Boolean,Byte,Short,Integer,Long,Float,Double. -
Enumerations.
-
java.lang.Class. -
java.util.Listof types mentioned above. Studio’s Inspector panel doesn’t have specific input component for this Java class, so it should be input as plain String and marked asPropertyType.STRING.
Examples:
private String contentType = "PLAIN";
private Class<? extends Screen> dialogClass;
private List<Integer> columnNumbers = new ArrayList<>();

@StudioPropertiesItem(name = "ctype", type = PropertyType.ENUMERATION, description = "Email content type", (1)
        defaultValue = "PLAIN", options = {"PLAIN", "HTML"}
)
public void setContentType(String contentType) {
    this.contentType = contentType;
}

@StudioPropertiesItem(type = PropertyType.SCREEN_CLASS_NAME, required = true) (2)
public void setDialogClass(Class<? extends Screen> dialogClass) {
    this.dialogClass = dialogClass;
}

@StudioPropertiesItem(type = PropertyType.STRING) (3)
public void setColumnNumbers(List<Integer> columnNumbers) {
    this.columnNumbers = columnNumbers;
}| 1 | - String property with limited number of options and with default value. |
| 2 | - required property with options limited by classes of screens defined in the project. |
| 3 | - list of integer numbers. The property type is set to STRING as Inspector panel doesn’t have suitable input component. |
Studio also provides support for events and delegate methods in custom actions. Support is the same as for built-in UI components. No annotations are required for declaring an event listener or delegate method in the action class. Declaration example is presented below.
- Example of the customizable action: SendByEmailAction
This example demonstrates:
-
declaration and annotating the custom action class.
-
annotating action’s editable properties.
-
declaration of the custom event produced by the action and its event handler.
-
declaration of the action’s delegate methods.
The SendByEmailAction represents an action that sends email about the entity currently selected in the table owning the action. This action is highly configurable as most of its internal logic can be modified with properties, delegate methods and events.
Action source code:
@StudioAction(category = "List Actions", description = "Sends selected entity by email") (1)
@ActionType("sendByEmail") (2)
public class SendByEmailAction<E extends Entity> extends ItemTrackingAction { (3)

    private final MetadataTools metadataTools;
    private final EmailService emailService;

    private String recipientAddress = "admin@example.com";

    private Function<E, String> bodyGenerator;
    private Function<E, List<EmailAttachment>> attachmentProvider;

    public SendByEmailAction(String id) {
        super(id);
        setCaption("Send by email");
        emailService = AppBeans.get(EmailService.NAME);
        metadataTools = AppBeans.get(MetadataTools.NAME);
    }

    @StudioPropertiesItem(required = true, defaultValue = "admin@example.com") (4)
    public void setRecipientAddress(String recipientAddress) {
        this.recipientAddress = recipientAddress;
    }

    public Subscription addEmailSentListener(Consumer<EmailSentEvent> listener) { (5)
        return getEventHub().subscribe(EmailSentEvent.class, listener);
    }

    public void setBodyGenerator(Function<E, String> bodyGenerator) { (6)
        this.bodyGenerator = bodyGenerator;
    }

    public void setAttachmentProvider(Function<E, List<EmailAttachment>> attachmentProvider) { (7)
        this.attachmentProvider = attachmentProvider;
    }

    @Override
    public void actionPerform(Component component) {
        if (recipientAddress == null || bodyGenerator == null) {
            throw new IllegalStateException("Required parameters are not set");
        }

        E selected = (E) getTarget().getSingleSelected();
        if (selected == null) {
            return;
        }

        String caption = "Entity " + metadataTools.getInstanceName(selected) + " info";
        String body = bodyGenerator.apply(selected); (8)
        List<EmailAttachment> attachments = attachmentProvider != null ? attachmentProvider.apply(selected) (9)
                : new ArrayList<>();

        EmailInfo info = EmailInfoBuilder.create()
                .setAddresses(recipientAddress)
                .setCaption(caption)
                .setBody(body)
                .setBodyContentType(EmailInfo.TEXT_CONTENT_TYPE)
                .setAttachments(attachments.toArray(new EmailAttachment[0]))
                .build();

        emailService.sendEmailAsync(info); (10)

        EmailSentEvent event = new EmailSentEvent(this, info);
        eventHub.publish(EmailSentEvent.class, event); (11)
    }

    public static class EmailSentEvent extends EventObject { (12)
        private final EmailInfo emailInfo;

        public EmailSentEvent(SendByEmailAction origin, EmailInfo emailInfo) {
            super(origin);
            this.emailInfo = emailInfo;
        }

        public EmailInfo getEmailInfo() {
            return emailInfo;
        }
    }
}| 1 | - action class is marked with the @StudioAction annotation. |
| 2 | - action id is set with the help of @ActionType annotation. |
| 3 | - action class has the E type parameter - type of the entity stored in the owning table. |
| 4 | - email recipient address is exposed as action property. |
| 5 | - method that adds the listener for the EmailSentEvent event. This method is detected by the Studio as the declaration of the action’s event handler. |
| 6 | - method that sets the Function object used to delegate (to the screen controller) the logic of generating email body. This method is detected by the Studio as the declaration of the action’s delegate method. |
| 7 | - declaration of another delegate method - in this case it’s used to delegate the logic of creating email attachments. Note that both delegate methods use the E generic type parameter. |
| 8 | - the required delegate method (implemented in the screen controller) is called to generate email body. |
| 9 | - if it is set, the optional delegate method is called to create email attachments. |
| 10 | - this is the actual call to send the email. |
| 11 | - the EmailSentEvent is published after successful sending of the email. If screen controller was subscribed for this event, the corresponding event handler method will be called. |
| 12 | - declaration of the event class, note that it’s possible to add some fields to the event object and thus pass useful data to the event handling logic. |
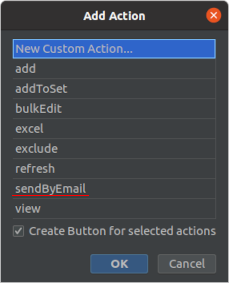
When the code is implemented like presented above, the Studio begins to display new custom action along with standard actions in the action creation dialog:
After the action is added to the screen descriptor, you can select it and edit its properties in the Component Inspector panel:
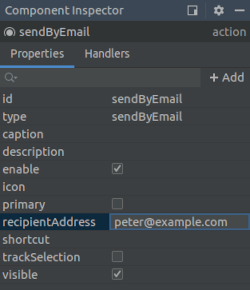
When the custom action’s property is changed in the Inspector, it is written to screen descriptor in the following format:
<action id="sendByEmail" type="sendByEmail">
    <properties>
        <property name="recipientAddress" value="peter@example.com"/>
    </properties>
</action>
Action’s event handlers and delegate methods are also displayed and available for generation in the Component Inspector panel:

The example of the generated logic with delegate methods and event handlers implemented in the screen controller looks like this:
@UiController("sales_Customer.browse")
@UiDescriptor("customer-browse.xml")
@LookupComponent("customersTable")
@LoadDataBeforeShow
public class CustomerBrowse extends StandardLookup<Customer> {

    @Inject
    private Notifications notifications;

    @Named("customersTable.sendByEmail")
    private SendByEmailAction<Customer> customersTableSendByEmail; (1)

    @Subscribe("customersTable.sendByEmail")
    public void onCustomersTableSendByEmailEmailSent(SendByEmailAction.EmailSentEvent event) { (2)
        notifications.create(Notifications.NotificationType.HUMANIZED)
                .withCaption("Email sent")
                .show();
    }

    @Install(to = "customersTable.sendByEmail", subject = "bodyGenerator")
    private String customersTableSendByEmailBodyGenerator(Customer customer) { (3)
        return "Hello, " + customer.getName();
    }

    @Install(to = "customersTable.sendByEmail", subject = "attachmentProvider")
    private List<EmailAttachment> customersTableSendByEmailAttachmentProvider(Customer customer) { (4)
        return Collections.emptyList();
    }
}| 1 | - the correct type parameter is used for the action’s injection point. |
| 2 | - implementation of the event handler. |
| 3 | - implementation of the bodyGenerator delegate method. The Customer type parameter is inserted in the method signature. |
| 4 | - implementation of the attachmentProvider delegate method. |