5.5.2.1.16. FileUploadField
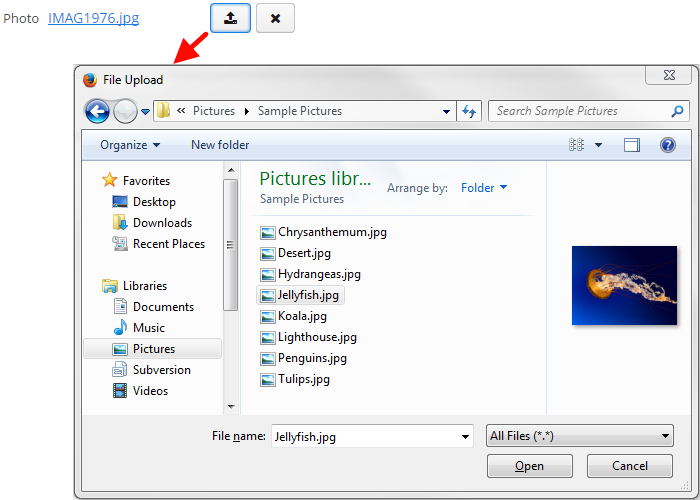
The FileUploadField component allows a user to upload files to the server. The component can contain a caption, a link to uploaded file, and two buttons: for uploading and for clearing the selected file. When the upload button is clicked, a standard OS file picker window is shown, where the user can select a file. In order to upload multiple files, use FileMultiUploadField.
XML name of the component: upload.
The component is implemented for Web Client and Desktop Client.
-
FileUploadFieldis automatically used inside FieldGroup for entity attributes of typeFileDescriptor. In this case, the field looks as shown above and does not require additional configuration. An uploaded file is immediately stored in file storage and the correspondingFileDescriptorinstance is saved to the database. -
You can use the component outside
FieldGroupand connect it to a datasource. For example, here we suppose that thepersonDsdatasource contains an entity with thephotoattribute which is a reference toFileDescriptor:<upload fileStoragePutMode="IMMEDIATE" datasource="personDs" property="photo"/> -
You can also control the saving of file and
FileDescriptorprogrammatically.-
Declare the component in an XML screen descriptor:
<upload id="uploadField"
        fileStoragePutMode="MANUAL"/>
-
-
In the screen controller, inject the component itself, the FileUploadingAPI and DataSupplier interfaces. In the
init()method, add listeners which will react on successful uploads and errors:@Inject private FileUploadField uploadField; @Inject private FileUploadingAPI fileUploadingAPI; @Inject private DataSupplier dataSupplier; @Override public void init(Map<String, Object> params) { uploadField.addFileUploadSucceedListener(event -> { // here you can get the file uploaded to the temporary storage if you need it File file = fileUploadingAPI.getFile(uploadField.getFileId()); if (file != null) { showNotification("File is uploaded to temporary storage at " + file.getAbsolutePath()); } // normally you would want to save the file to the file storage of the middle tier FileDescriptor fd = uploadField.getFileDescriptor(); try { // save file to FileStorage fileUploadingAPI.putFileIntoStorage(uploadField.getFileId(), fd); } catch (FileStorageException e) { throw new RuntimeException("Error saving file to FileStorage", e); } // save file descriptor to database dataSupplier.commit(fd); showNotification("Uploaded file: " + uploadField.getFileName()); }); uploadField.addFileUploadErrorListener(event -> showNotification("File upload error")); }The component will upload the file to the temporary storage of the client tier and invoke the listener added by the
addFileUploadSucceedListener()method. In this listener, aFileDescriptorobject is requested from the component.com.haulmont.cuba.core.entity.FileDescriptoris a persistent entity, which uniquely identifies an uploaded file and is used to download the file from the system.FileUploadingAPI.putFileIntoStorage()method is used to move the uploaded file from the temporary client storage to FileStorage. Parameters of this method are temporary storage file identifier and theFileDescriptorobject. Both of these parameters are provided byFileUploadField.After uploading the file to
FileStorage, theFileDescriptorinstance is saved in the database by invokingDataSupplier.commit(). The saved instance returned by this method can be set to an attribute of an entity related to this file. Here,FileDescriptoris simply stored in the database. The file will be available through the Administration → External Files screen.The listener added by the
addFileUploadErrorListener()method will be invoked if an error occurs when uploading a file to the temporary storage of the client tier.Below is the list of listeners available to track the upload process:
-
AfterValueClearListener,
-
BeforeValueClearListener,
-
FileUploadErrorListener,
-
FileUploadFinishListener
-
FileUploadStartListener,
-
FileUploadSucceedListener, -
ValueChangeListener.
-
fileUploadField attributes:
-
fileStoragePutMode- defines how the file and the correspondingFileDescriptorare stored.-
In the
IMMEDIATEmode it is done right after uploading file to the temporary storage of the client tier. -
In the
MANUALmode, you should do it programmatically in aFileUploadSucceedListener.+The
IMMEDIATEmode is selected by default whenFileUploadFieldis used insideFieldGroup. Otherwise, the default mode isMANUAL.
-
-
uploadButtonCaption,uploadButtonIconanduploadButtonDescriptionXML attributes allow you to set the properties of the upload button.
-
showFileName- controls whether the name of uploaded file is displayed next to upload button. It isfalseby default.
-
showClearButton- controls whether the clear button is visible. It isfalseby default.
-
clearButtonCaption,clearButtonIconandclearButtonDescriptionXML attributes allow you to set the properties of the clear button if it is visible.
-
The
acceptXML attribute (and the correspondingsetAccept()method) can be used to set the file type mask in the file selection dialog. Users still be able to change the mask to "All files" and upload arbitrary files.The value of the attribute should be a comma-separated list of masks. For example:
*.jpg,*.png. -
Maximum upload size is determined by the cuba.maxUploadSizeMb application property and is 20MB by default. If a user selects a file of a larger size, a corresponding message will be displayed, and the upload will be interrupted.
-
The
fileSizeLimitXML attribute (and the correspondingsetFileSizeLimit()method) can be used to set maximum allowed file size specified in bytes.<upload id="uploadField" fileSizeLimit="2000"/>
-
The
permittedExtensionsXML attribute (and the correspondingsetPermittedExtensions()method) sets the white list of permitted file extensions.The value of the attribute should be a comma-separated list of extensions with leading dots. For example:
uploadField.setPermittedExtensions(Sets.newHashSet(".png", ".jpg"));
-
dropZone- allows you to specify a BoxLayout to be used as a target for drag-and-dropping files from outside of the browser. The dropZone can cover the whole layout of a dialog window. The selected container is highlighted when a user drags a file over the container, otherwise it is not visible.<layout spacing="true" width="100%"> <vbox id="dropZone" height="AUTO" spacing="true"> <textField id="textField" caption="Title" width="100%"/> <textArea id="textArea" caption="Description" width="100%" rows="5"/> <checkBox caption="Is reference document" width="100%"/> <upload id="upload" dropZone="dropZone" showClearButton="true" showFileName="true"/> </vbox> <hbox spacing="true"> <button caption="mainMsg://actions.Apply"/> <button caption="mainMsg://actions.Cancel"/> </hbox> </layout>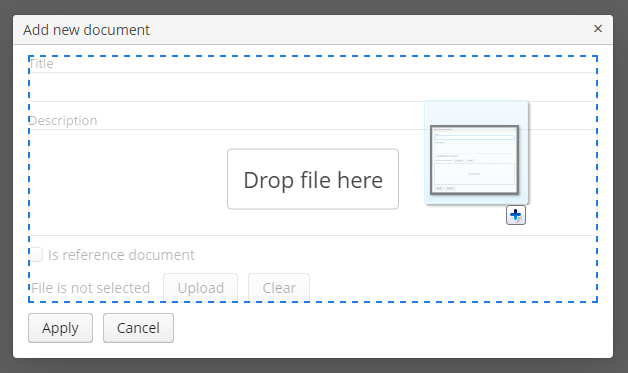
To make a dropZone static and display it permanently, assign the predefined
dropzone-containerstyle to its container. In this case the container should be empty with only thelabelcomponent inside:<layout spacing="true" width="100%"> <textField id="textField" caption="Title" width="100%"/> <checkBox caption="Is reference document" width="100%"/> <upload id="upload" dropZone="dropZone" showClearButton="true" showFileName="true"/> <vbox id="dropZone" height="150px" spacing="true" stylename="dropzone-container"> <label stylename="dropzone-description" value="Drop file here" align="MIDDLE_CENTER"/> </vbox> <hbox spacing="true"> <button caption="mainMsg://actions.Apply"/> <button caption="mainMsg://actions.Cancel"/> </hbox> </layout>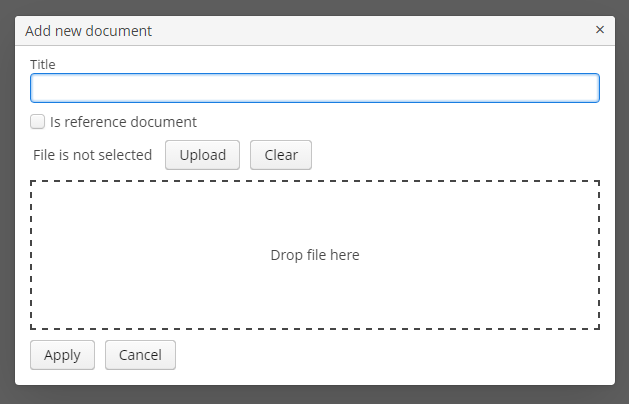
-
pasteZoneallows you to specify a container to be used for handling paste shortcuts when a text input field nested in this container is focused. This feature is supported by Chromium-based browsers.<upload id="uploadField" pasteZone="vboxId" showClearButton="true" showFileName="true"/>
See Loading and Displaying Images for more complex example of working with uploaded files.
- Attributes of upload
-
accept - align - caption - clearButtonCaption - clearButtonDescription - clearButtonIcon - contextHelpText - contextHelpTextHtmlEnabled - datasource - description - dropZone - editable - enable - fileSizeLimit - fileStoragePutMode - height - icon - id - pasteZone - permittedExtensions - property - showClearButton - showFileName - stylename - tabIndex - uploadButtonCaption - uploadButtonDescription - uploadButtonIcon - visible - width
- API
-
addValueChangeListener - commit - discard - isModified - setContextHelpIconClickHandler
- Listeners of upload
-
AfterValueClearListener - BeforeValueClearListener - FileUploadErrorListener - FileUploadFinishListener - FileUploadStartListener - FileUploadSucceedListener