1. Overview
The add-on provides a universal REST API with the following functionality:
-
CRUD operations on entities.
-
Execution of predefined JPQL queries.
-
Execution of service methods.
-
Getting metadata (entities, views, enumerations, datatypes).
-
Getting current user permissions (access to entities, attributes, specific permissions).
-
Getting current user information (name, language, time zone, etc.).
-
Uploading and downloading files.
REST API uses the OAuth2 protocol for authentication and supports anonymous access.
All REST API endpoints work with data according to the authenticated user permissions set in security subsystem.
|
Tip
|
The detailed documentation on the API endpoints is published at http://files.cuba-platform.com/swagger/7.2. |
2. Release Notes
Release 7.2.7
Resolved issues:
-
Update dependencies #3307
Release 7.2.6
Resolved issues:
-
Add-on should depend on Spring Security 5.5 #146
Release 7.2.5
Resolved issues:
Release 7.2.4
Resolved issues:
Release 7.2.3
Resolved issues:
Release 7.2.2
Resolved issues:
-
#108 When sorting by an Association field use the instance name rather than the id
-
#2961 Problems with web anonymous session when deploying web/core separately
-
#120 isNull operator in the /entities/search endpoint doesn’t work with references
-
#117 Decrease log level of unsupported Accept Language header
-
#113 Return 403 response for GET /files endpoint if reading of FileDescriptor entity is forbidden
-
#97 rest-api-swagger.yaml doesn’t fully conform to the specification
-
#102 ServerTokenStoreImpl does not publish refresh token events to cluster
-
#87 Server responds with 500 when filter contains empty conditions array
Release 7.2.1
-
rest-api-access desing-time role that includes
cuba.restApi.enabledspecific permission was added to REST API .
Release 7.2.0
-
Support for CUBA Platform 7.2.x.
Release 7.1.1
Resolved issue:
3. Getting Started
3.1. Installation
To install the add-on in your project follow the instruction below.
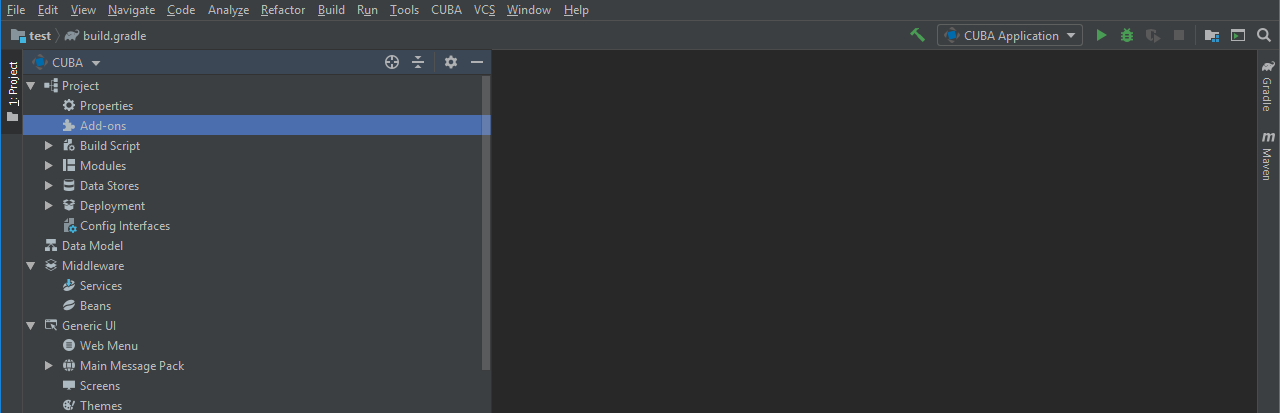
-
Double-click Add-ons in the CUBA project tree.
-
Select Marketplace tab and find REST API add-on.
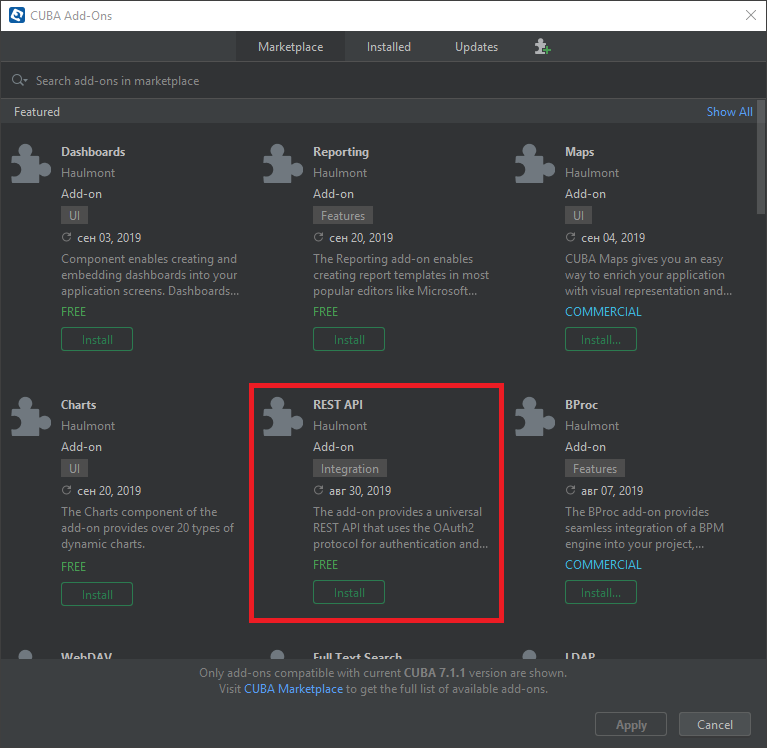
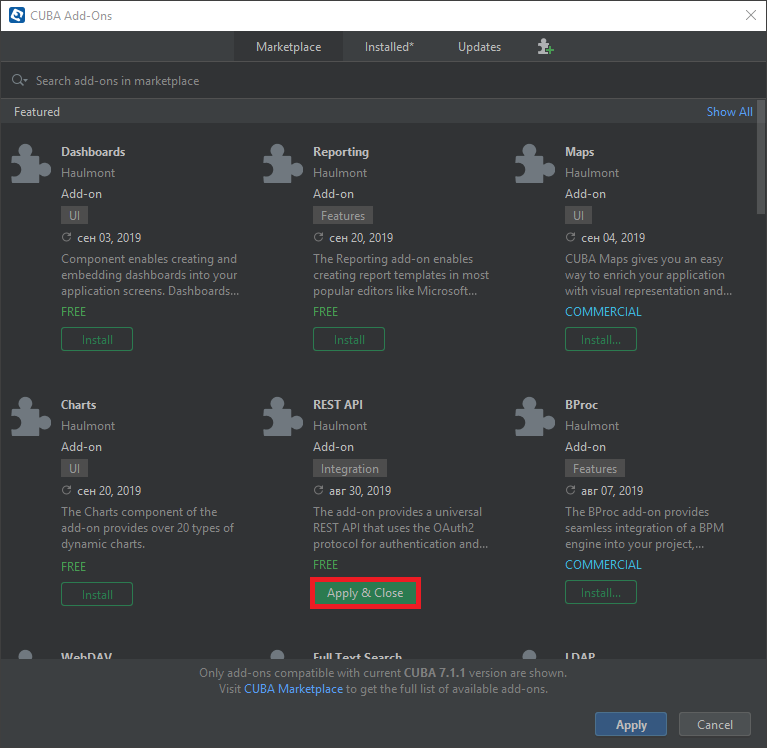
-
Click Install button and then Apply & Close.
-
Click Continue in the dialog.
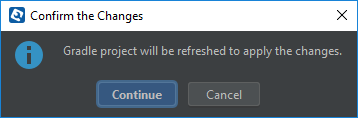
REST API add-on will be installed in your project.
Keep in mind that the add-on is built only for the framework version 7.1 and above. In the earlier versions REST API was included in the core framework.
3.2. Testing Basic Functionality
-
You should see the REST element in the CUBA project tree after Gradle refresh is completed in Studio.
-
Configure security according to Security section:
-
Create a role that includes
cuba.restApi.enabledspecific permission and grants permissions to read the required entities and attributes. -
Assign the created role to the user.
-
-
Start the application and test the REST API using the
curlcommand-line tool:-
curl -X POST \
  http://localhost:8080/app/rest/v2/oauth/token \
  -H 'Authorization: Basic Y2xpZW50OnNlY3JldA==' \
  -H 'Content-Type: application/x-www-form-urlencoded' \
  -d 'grant_type=password&username=admin&password=admin'
You will get a JSON response with some
access_tokenvalue. Use it for further requests in theAuthorizationheader. -
Request the list of roles (replace
<access_token>with the value obtained on the previous step):curl -X GET \ 'http://localhost:8080/app/rest/v2/entities/sec$Role' \ -H 'Authorization: Bearer <access_token>'
The response will contain all registered roles, provided that the user for which the token was obtained has permissions to read the
sec$Roleentity.
-
4. Features
This section covers the REST API features and configuration options. For practical usage examples, see the next section.
4.1. Predefined JPQL Queries Configuration
In the CUBA application, predefined JPQL queries must be specified in files registered in the cuba.rest.queriesConfig application property of the web or portal module (e.g in the web-app.properties file):
cuba.rest.queriesConfig = +com/company/myapp/rest-queries.xmlThe rest-queries.xml file must be placed in the root package of the web or portal module (e.g. com.company.myapp). Its content is defined by the rest-queries.xsd schema, for example:
<?xml version="1.0"?>
<queries xmlns="http://schemas.haulmont.com/cuba/rest-queries.xsd">
    <query name="carByVin" entity="sample_Car" view="carEdit">
        <jpql><![CDATA[select c from sample_Car c where c.vin = :vin]]></jpql>
        <params>
            <param name="vin" type="java.lang.String"/>
        </params>
    </query>
    <query name="allColours" entity="sample_Colour" view="_local">
        <jpql><![CDATA[select u from sample_Colour u order by u.name]]></jpql>
    </query>
    <query name="carsByIds" entity="sample_Car" view="carEdit" cacheable="true">
        <jpql><![CDATA[select c from sample_Car c where c.id in :ids]]></jpql>
        <params>
            <param name="ids" type="java.util.UUID[]"/>
        </params>
    </query>
    <query name="myOrders" entity="sample_Order" view="orderBrowse">
        <jpql><![CDATA[select o from sample_Order o where o.createdBy = :session$userLogin]]></jpql>
    </query>
</queries>
An example of how to configure and execute a query can be found in the Executing a JPQL Query (GET) and Executing a JPQL Query (POST) chapter.
The platform also provides the predefined all query for getting all instances of a specified entity type. It can be used with /count to receive the total number of entity instances, for example:
http://localhost:8080/app/rest/v2/queries/sales_Order/all/count
The query element can have the cacheable attribute that enables caching of the query.
A query can contain predefined parameters that take the values of the current user id and login: session$userId and session$userLogin. You don’t have to declare them in the params element (see the example above).
4.2. Services Configuration
The list of service methods that are available via the REST API must be configured in the CUBA application in files registered in the cuba.rest.servicesConfig application property of the web or portal module (e.g in the web-app.properties file):
cuba.rest.servicesConfig = +com/company/myapp/rest-services.xmlThe content of the rest-services.xml must be placed in the root package of the web or portal module (e.g. com.company.myapp). Its content is defined by the rest-services-v2.xsd schema, for example:
<?xml version="1.0" encoding="UTF-8"?>
<services xmlns="http://schemas.haulmont.com/cuba/rest-services-v2.xsd">
    <service name="myapp_SomeService">
        <method name="sum">
            <param name="number1"/>
            <param name="number2"/>
        </method>
        <method name="emptyMethod"/>
        <method name="overloadedMethod">
            <param name="intParam" type="int"/>
        </method>
        <method name="overloadedMethod">
            <param name="stringParam" type="java.lang.String"/>
        </method>
    </service>
</services>
Method parameter types can be omitted if the service doesn’t contain an overloaded method with the same number of parameters. Otherwise, types must be defined.
If parameter type is a primitive datatype then use a primitive type name (int, double, etc.) in the services config:
<param name="intParam" type="int"/>In case of object or entity use a fully-qualified class name as a parameter type:
<param name="stringParam" type="java.lang.String"/>
<param name="entityParam" type="com.company.entity.Order"/>
In case of entity collection or POJO collection, use the collection type:
<param name="entitiesCollectionParam" type="java.util.List"/>An example of how to configure and invoke a service can be found in the Service Method Invocation (GET) and Service Method Invocation (POST) chapters.
If some service method needs to be invoked without authentication even when the anonymous access to the REST API is disabled, then this method may be marked with the anonymousAllowed="true" attribute in the services configuration file:
<?xml version="1.0" encoding="UTF-8"?>
<services xmlns="http://schemas.haulmont.com/cuba/rest-services-v2.xsd">
    <service name="myapp_SomeService">
        <method name="sum" anonymousAllowed="true">
            <param name="number1"/>
            <param name="number2"/>
        </method>
    </service>
</services>
4.3. Data Model Versioning
REST API can handle data model changes. It is useful when, for example, some entity attribute was renamed, but REST API client doesn’t know about this modification and expects the attribute to have an old name.
For such cases REST API allows you to define transformation rules for entities JSON. If the client application sends the data model version in the request query parameter then the JSON in REST API method response or request body will be transformed according to transformation rules defined for that particular domain model version.
JSON transformation rules must be specified in files registered in cuba.rest.jsonTransformationConfig application property of the web or portal module (e.g in the web-app.properties file):
cuba.rest.jsonTransformationConfig = +com/company/myapp/rest-json-transformations.xmlThe rest-json-transformations.xml file must be placed in the web or portal module (e.g. in package com.company.myapp). Its content is defined by the rest-json-transformations.xsd schema. File example:
<?xml version="1.0"?>
<transformations xmlns="http://schemas.haulmont.com/cuba/rest-json-transformations.xsd">

    <transformation modelVersion="1.0" oldEntityName="sales_OldOrder" currentEntityName="sales_NewOrder">
        <renameAttribute oldName="oldNumber" currentName="number"/>
        <renameAttribute oldName="date" currentName="deliveryDate"/>
        <toVersion>
            <removeAttribute name="discount"/>
        </toVersion>
    </transformation>

    <transformation modelVersion="1.0" currentEntityName="sales_Contractor">
        <renameAttribute oldName="summary" currentName="total"/>
        <renameAttribute oldName="familyName" currentName="lastName"/>
        <fromVersion>
            <removeAttribute name="city"/>
            <removeAttribute name="country"/>
        </fromVersion>
        <toVersion>
            <removeAttribute name="phone"/>
        </toVersion>
    </transformation>

    <transformation modelVersion="1.1" currentEntityName="sales_NewOrder">
        <renameAttribute oldName="date" currentName="deliveryDate"/>
    </transformation>

</transformations>
Standard transformers configured in the config file can perform the following transformations of entity JSON:
-
rename entity
-
rename entity attribute
-
remove entity attribute
JSON transformation works for the following REST API endpoints:
-
/entities - getting entities list, getting a single entity, entity create, entity update, entity delete
-
/queries - entities JSON returned by the query will be transformed
-
/services - JSON transformations will be applied both to entities returned by the service method and to entities passed as a service method argument
JSON transformations are applied if the request to the REST API contains the modelVersion URL parameter with the data model version number.
See the Data Model Versioning Example to understand how to configure data model versioning and use it from the client application.
4.4. CORS Settings
By default, all CORS requests to the REST API are allowed. To restrict the origins list you can define the cuba.rest.allowedOrigins application property.
4.5. Anonymous Access
By default, anonymous access is disabled. To enable it, use the cuba.rest.anonymousEnabled application property. A request is considered to be anonymous if it doesn’t contain an Authentication header. In this case, the SecurityContext will contain an anonymous user session.
To set up permissions for anonymous user you must define roles for the user specified by the cuba.anonymousLogin application property.
4.6. Other REST API Settings
cuba.rest.client.id - defines a default REST API client id.
cuba.rest.client.secret - defines a default REST API client secret.
cuba.rest.client.tokenExpirationTimeSec - defines an access token expiration time for the default client in seconds.
cuba.rest.client.refreshTokenExpirationTimeSec - defines a refresh token expiration time for the default client in seconds.
cuba.rest.client.authorizedGrantTypes - a list of authorized grant types for the default client. To disable refresh tokens remove the refresh_token item from the property value.
cuba.rest.maxUploadSize - defines a maximum file size that can be uploaded with the REST API.
cuba.rest.reuseRefreshToken - specifies whether a refresh token should be reused.
cuba.rest.requiresSecurityToken - indicates that additional system attribute must be sent in JSON. See details in Security Constraints for Collection Attributes.
cuba.rest.tokenMaskingEnabled - specifies whether REST API token values should be masked in application logs.
4.7. Creating Custom OAuth2 Protected Controllers
If you need to create a custom REST controller protected with the OAuth2 authentication then you have to do the following:
-
Suppose you have the following REST controller:
package com.company.test.portal.myapi; import org.springframework.web.bind.annotation.GetMapping; import org.springframework.web.bind.annotation.RequestMapping; import org.springframework.web.bind.annotation.RestController; import com.company.test.services.SomeService; @RestController @RequestMapping("/myapi") public class MyController { @Inject protected SomeService someService; @GetMapping("/dosmth") public String doSmth() { return someService.getResult(); } } -
Create a new Spring configuration file with name
rest-dispatcher-spring.xmlunder the root package (com.company.test) of web or portal module. The content of the file must be as follows:<?xml version="1.0" encoding="UTF-8"?> <beans xmlns="http://www.springframework.org/schema/beans" xmlns:context="http://www.springframework.org/schema/context" xmlns:security="http://www.springframework.org/schema/security"> <!-- Define a base package for your controllers--> <context:component-scan base-package="com.company.test.portal.myapi"/> <security:http pattern="/rest/myapi/**" create-session="stateless" entry-point-ref="oauthAuthenticationEntryPoint" xmlns="http://www.springframework.org/schema/security"> <!-- Specify one or more protected URL patterns--> <intercept-url pattern="/rest/myapi/**" access="isAuthenticated()"/> <anonymous enabled="false"/> <csrf disabled="true"/> <cors configuration-source-ref="cuba_RestCorsSource"/> <custom-filter ref="resourceFilter" before="PRE_AUTH_FILTER"/> <custom-filter ref="cuba_AnonymousAuthenticationFilter" after="PRE_AUTH_FILTER"/> </security:http> </beans> -
Define an additive application property
cuba.restSpringContextConfigin the properties file of the module,.e.g.portal-app.properties:cuba.restSpringContextConfig = +com/company/test/rest-dispatcher-spring.xml -
The new controller runs in the context of the
CubaRestApiServlet. So the URL for controller methods will start with the/rest, i.e. the doSmth() method will be accesed by the URL:http://localhost:8080/app-portal/rest/myapi/dosmth.WarningURL of the custom controller MUST NOT start with the
/rest/v2.
4.8. Security Constraints for Collection Attributes
Let’s consider the following situation:
-
Your data model contains
OrderandOrderLineentities which form the one-to-many composition. -
Your REST client loads an instance of
Ordertogether with the nested collection ofOrderLineinstances. -
There are security constraints that filter out some
OrderLineinstances, so the client does not load them and doesn’t know they exist. Sayline5is not loaded by the client but exists in the database. -
If your client removes, say,
line2from the collection and then saves the whole composition using the/entities/{entityName}/{entityId}endpoint, there are two outcomes:-
If the constraints were not changed since the entities were loaded, the framework restores the filtered
line5instance in the collection and deletes onlyline2, which is the correct behavior. -
If the constraints were changed in a way that
line5is now available to the client, the framework cannot restore the information about filtered collection elements correctly. As a result, bothline2andline5will be deleted.
-
If you are concerned with the case described above, you can eliminate possible data loss by sending a special system attribute in the JSON representing your entities. This attribute is called __securityToken and automatically included in resulting JSON if the cuba.rest.requiresSecurityToken application property is set to true. The responsibility of your REST client is to return this attribute back when saving entities.
An example of entity JSON including security token:
{
  "id": "fa430b56-ceb2-150f-6a85-12c691908bd1",
  "number": "OR-000001",
  "lines": [
    {
      "id": "82e6e6d2-be97-c81c-c58d-5e2760ae095a",
      "description": "Item 1"
    },
    {
      "id": "988a8cb5-d61a-e493-c401-f717dd9a2d66",
      "description": "Item 2"
    }
  ],
  "__securityToken": "0NXc6bQh+vZuXE4Fsk4mJX4QnhS3lOBfxzUniltchpxPfi1rZ5htEmekfV60sbEuWUykbDoY+rCxdhzORaYQNQ=="
}
The __securityToken attribute contains encoded identifiers of filtered instances, so the framework can always restore the required information regardless of changes in constraints.
4.9. Persistent Token Store
By default, OAuth tokens are stored in memory only. If you want to persist them in the database as well, you should set the cuba.rest.storeTokensInDb application property to true. The property value is stored in the database, so you can change its value in the Administration > Application Properties screen.
Expired tokens in the database store must be periodically deleted. The cron expression for scheduled removing of expired tokens is specified in the cuba.rest.deleteExpiredTokensCron application property.
4.10. Project-specific Swagger Documentation
The generic documentation on the REST API is available at http://files.cuba-platform.com/swagger/7.2.
Any running CUBA application also exports the project-specific documentation generated according to the Swagger specification version 2.0.
The documentation is available at the following URLs:
-
/rest/v2/docs/swagger.yaml- YAML version of generic documentation. -
/rest/v2/docs/swagger.json- JSON version of generic documentation. -
/rest/v2/docs/swaggerDetailed.yaml- YAML version of project-specific Swagger documentation. -
/rest/v2/docs/swaggerDetailed.json- JSON version of project-specific Swagger documentation.
For example:
http://localhost:8080/app/rest/v2/docs/swagger.yaml
http://localhost:8080/app/rest/v2/docs/swaggerDetailed.yaml
The documentation can be used to visualize, test or generate a client code for the REST API. See the following tools: Swagger UI, Swagger Inspector, Postman, Swagger Codegen.
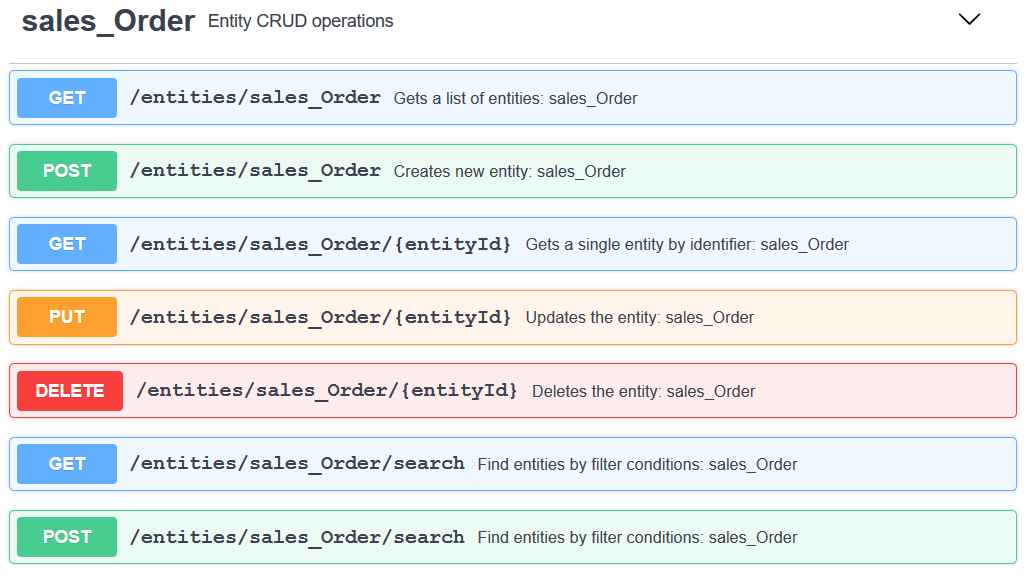
The generated documentation includes:
-
CRUD operations, such as:
-
entity CRUD operations:
-
filtering entities.
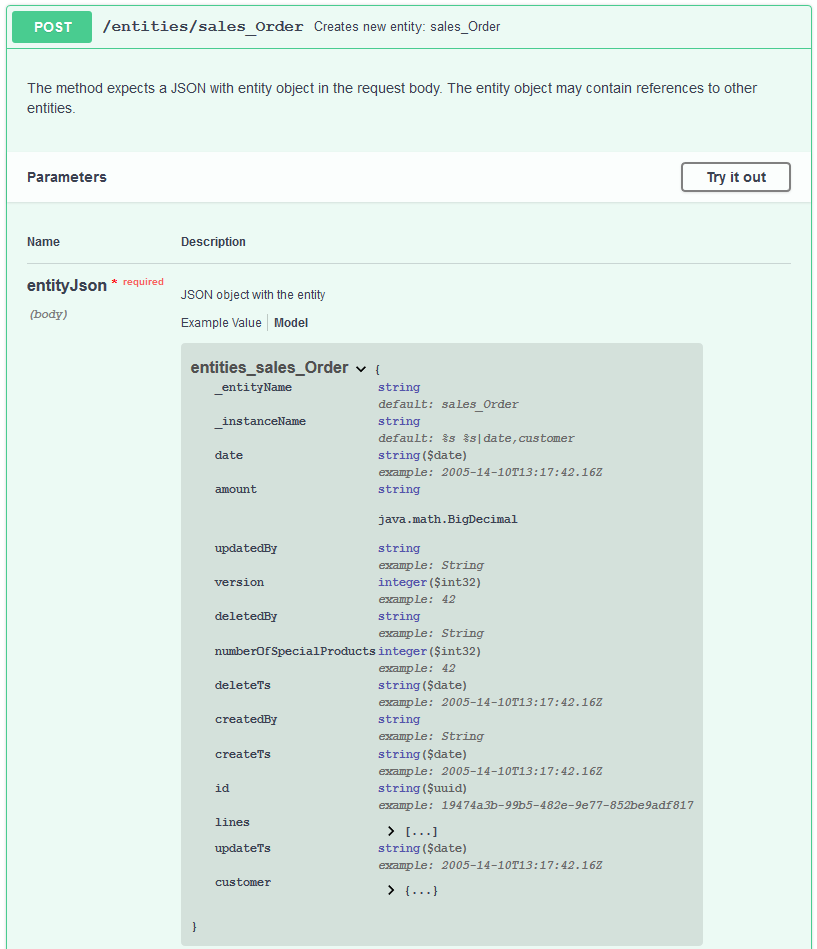
All CRUD parameters and responses have a model available, for example:
-
-
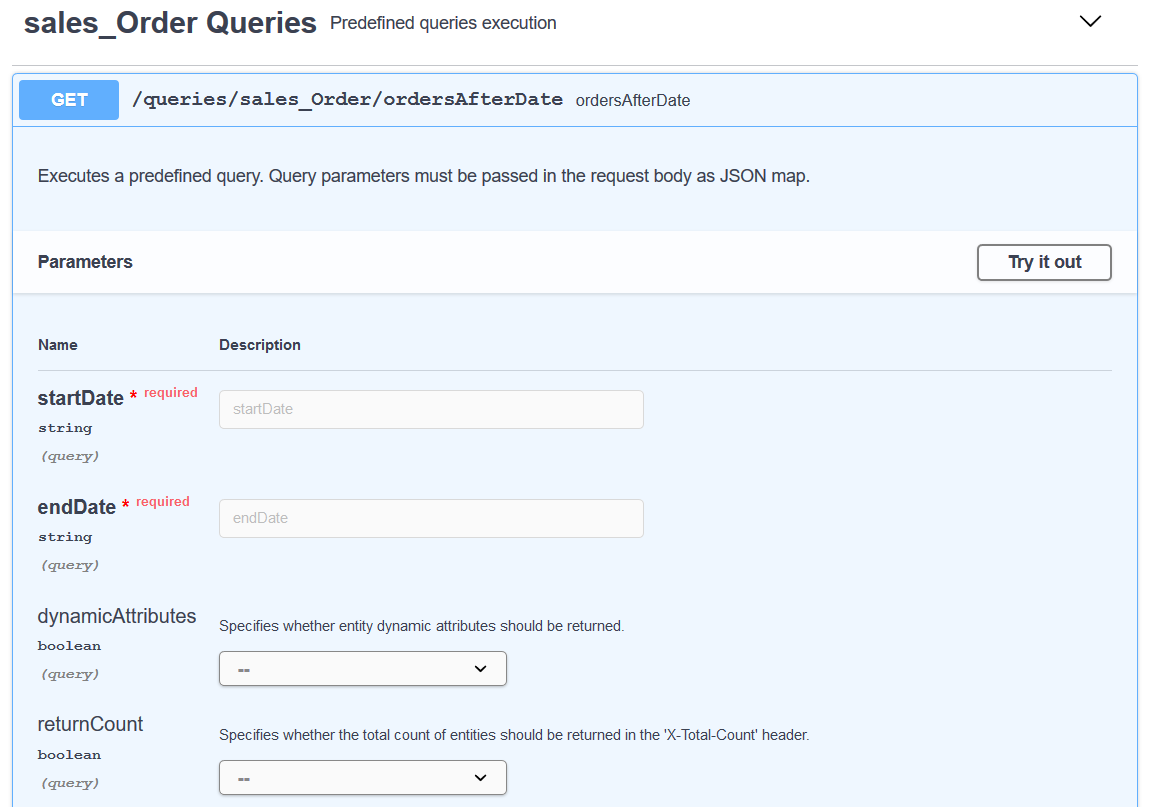
Predefined REST queries:
-
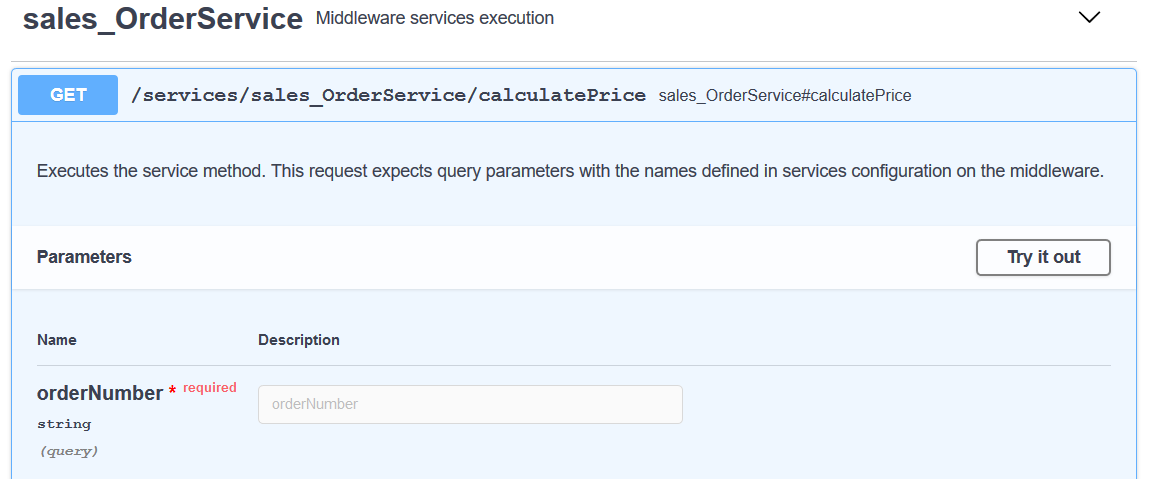
Exposed services:
5. Using REST API
This section contains REST API usage examples.
|
Tip
|
See the detailed documentation on the API endpoints at http://files.cuba-platform.com/swagger/7.2. |
Ensure, that the role with enabled REST API is added to a user.
5.1. Getting an OAuth Token
An OAuth token is required for any REST API method (except when you are using anonymous access). A token can be obtained by the POST request on the address:
http://localhost:8080/app/rest/v2/oauth/token
Access to this endpoint is protected with basic authentication using the REST API client’s identifier and password. Please note that these are not an application user login and password. REST API client id and password are generated when the add-on is added. You can view or change this values in the cuba.rest.client.id and cuba.rest.client.secret application properties of the web-app.properties file. You should pass the client identifier and password, separated by a single colon (":") character, within a base64 encoded string in the Authorization header.
The request type must be application/x-www-form-urlencoded, the encoding is UTF-8.
The request must contain the following parameters:
-
grant_type-password. -
username- application user login. -
password- application user password.
For example, for the values
cuba.rest.client.id=client
cuba.rest.client.secret={noop}secret
the token request looks like this:
POST /oauth/token
Authorization: Basic Y2xpZW50OnNlY3JldA==
Content-Type: application/x-www-form-urlencoded

grant_type=password&username=smith&password=qwerty123
You can also use cURL:
curl -H "Content-type: application/x-www-form-urlencoded" -H "Authorization: Basic Y2xpZW50OnNlY3JldA==" -d "grant_type=password&username=admin&password=admin" http://localhost:8080/app/rest/v2/oauth/tokenMethod returns a JSON object:
{
  "access_token": "29bc6b45-83cd-4050-8c7a-2a8a60adf251",
  "token_type": "bearer",
  "refresh_token": "e765446f-d49e-4634-a6d3-2d0583a0e7ea",
  "expires_in": 43198,
  "scope": "rest-api"
}
An access token value is in the access_token property.
In order to use the access token, put it in the Authorization header with the Bearer type, for example:
Authorization: Bearer 29bc6b45-83cd-4050-8c7a-2a8a60adf251The refresh_token property contains a refresh token value. A refresh token cannot be used for accessing the protected resources, but it has a longer lifetime than an access token and it can be used to obtain new access token when the current one is expired.
The request for getting new access token using the refresh token must contain the following parameters:
-
grant_type-refresh_token. -
refresh_token- a refresh token value.
POST /oauth/token
Authorization: Basic Y2xpZW50OnNlY3JldA==
Content-Type: application/x-www-form-urlencoded

grant_type=refresh_token&refresh_token=e765446f-d49e-4634-a6d3-2d0583a0e7ea
See also the following application properties related to tokens:
5.2. REST API Authentication with LDAP
LDAP Authentication for REST can be enabled using the following properties:
-
cuba.rest.ldap.enabled- whether LDAP authentication is enabled or not. -
cuba.rest.ldap.urls– LDAP server URL. -
cuba.rest.ldap.base– base DN for user search. -
cuba.rest.ldap.user– the distinguished name of a system user which has the right to read the information from the directory. -
cuba.rest.ldap.password– the password for the system user defined in the cuba.web.ldap.user property. -
cuba.rest.ldap.userLoginField- the name of an LDAP user attribute that is used for matching the login name.sAMAccountNameby default (suitable for Active Directory).
Example of local.app.properties file:
cuba.rest.ldap.enabled = true
cuba.rest.ldap.urls = ldap://192.168.1.1:389
cuba.rest.ldap.base = ou=Employees,dc=mycompany,dc=com
cuba.rest.ldap.user = cn=System User,ou=Employees,dc=mycompany,dc=com
cuba.rest.ldap.password = system_user_password
You can obtain OAuth token using the following end-point:
http://localhost:8080/app/rest/v2/ldap/token
Access to this endpoint is protected with basic authentication using the REST API client’s identifier and password. Please note that these are not the application user login and password. REST API client id and password are generated when the add-on is added. You can view or change this values in the cuba.rest.client.id and cuba.rest.client.secret application properties of the web-app.properties file. You should pass the client identifier and password, separated by a single colon (":") character, within a base64 encoded string in the Authorization header.
Request parameters are the same as for standard authentication:
-
grant_type- alwayspassword. -
username- application user login. -
password- application user password.
The request type must be application/x-www-form-urlencoded, the encoding is UTF-8.
Also, standard authentication with login and password can be disabled:
cuba.rest.standardAuthenticationEnabled = false5.3. Custom Authentication
Authentication mechanisms can provide access tokens by key, link, LDAP login and password, etc. REST API uses its own authentication mechanism that cannot be modified. In order to use custom authentication process, you need to create a REST controller and use its URL.
Let’s consider the custom authentication mechanism that enables getting an OAuth token by a promo code. In the following example we will use a sample application that contains the Coupon entity with code attribute. We will send this attribute’s value as an authentication parameter in GET request.
-
Create a
Couponentity with thecodeattribute:@Column(name = "CODE", unique = true, length = 4) protected String code; -
Create a role that includes
cuba.restApi.enabledspecific permission and grants permissions to read the required entities and attributes. -
Create a user with promo-user login on behalf of which the authentication will be performed.
-
Assign the created role to the promo-user.
-
Create a new Spring configuration file with the name
rest-dispatcher-spring.xmlunder the root package (com.company.demo) of web module. The content of the file must be as follows:<beans xmlns="http://www.springframework.org/schema/beans" xmlns:xsi="http://www.w3.org/2001/XMLSchema-instance" xmlns:context="http://www.springframework.org/schema/context" xsi:schemaLocation="http://www.springframework.org/schema/beans http://www.springframework.org/schema/beans/spring-beans-4.3.xsd http://www.springframework.org/schema/context http://www.springframework.org/schema/context/spring-context-4.3.xsd"> <context:component-scan base-package="com.company.demo.web.rest"/> </beans> -
Include the file into the
cuba.restSpringContextConfigapplication property in themodules/web/src/web-app.propertiesfile:cuba.restSpringContextConfig = +com/company/demo/rest-dispatcher-spring.xml -
Create the
restpackage under the root package of web module and implement the custom Spring MVC controller in it. Use theOAuthTokenIssuerbean to generate and issue the REST API token for a user after the custom authentication:@RestController @RequestMapping("auth-code") public class AuthCodeController { @Inject private OAuthTokenIssuer oAuthTokenIssuer; @Inject private Configuration configuration; @Inject private DataManager dataManager; @Inject private MessageTools messageTools; @Inject private TrustedClientService trustedClientService; // here we check secret code and issue token using OAuthTokenIssuer @RequestMapping(method = RequestMethod.GET) public ResponseEntity get(@RequestParam("code") String authCode) { // obtain system session to be able to call middleware services WebAuthConfig webAuthConfig = configuration.getConfig(WebAuthConfig.class); UserSession systemSession; try { systemSession = trustedClientService.getSystemSession(webAuthConfig.getTrustedClientPassword()); } catch (LoginException e) { throw new RuntimeException("Error during system auth"); } // set security context AppContext.setSecurityContext(new SecurityContext(systemSession)); try { // find coupon with code LoadContext<Coupon> loadContext = LoadContext.create(Coupon.class) .setQuery(LoadContext.createQuery("select c from demo_Coupon c where c.code = :code") .setParameter("code", authCode)); if (dataManager.load(loadContext) == null) { // if coupon is not found - code is incorrect return new ResponseEntity<>(new ErrorInfo("invalid_grant", "Bad credentials"), HttpStatus.BAD_REQUEST); } // generate token for "promo-user" OAuthTokenIssuer.OAuth2AccessTokenResult tokenResult = oAuthTokenIssuer.issueToken("promo-user", messageTools.getDefaultLocale(), Collections.emptyMap()); OAuth2AccessToken accessToken = tokenResult.getAccessToken(); // set security HTTP headers to prevent browser caching of security token HttpHeaders headers = new HttpHeaders(); headers.set(HttpHeaders.CACHE_CONTROL, "no-store"); headers.set(HttpHeaders.PRAGMA, "no-cache"); return new ResponseEntity<>(accessToken, headers, HttpStatus.OK); } finally { // clean up security context AppContext.setSecurityContext(null); } } // POJO for JSON error messages public static class ErrorInfo implements Serializable { private String error; private String error_description; public ErrorInfo(String error, String error_description) { this.error = error; this.error_description = error_description; } public String getError() { return error; } public String getError_description() { return error_description; } } } -
Exclude the
restpackage from scanning in web/core modules: theOAuthTokenIssuerbean is available only in REST API context, and scanning for it in the application context will cause an error.<context:component-scan base-package="com.company.demo"> <context:exclude-filter type="regex" expression="com\.company\.demo\.web\.rest\..*"/> </context:component-scan> -
Now users will be able to obtain OAuth2 access code using GET HTTP request with the
codeparameter tohttp://localhost:8080/app/rest/auth-code?code=A325The result will be:
{"access_token":"74202587-6c2b-4d74-bcf2-0d687ea85dca","token_type":"bearer","expires_in":43199,"scope":"rest-api"}The obtained access token should then be passed to REST API, as described in the documentation.
5.3.1. Social Login in REST API
The mechanism of social login can be used in REST API too. The complete sample application is available on GitHub and described in the social login section, below are the key points of getting an access token with a Facebook account.
-
Create the
restapipackage under the root package of web module and implement the custom Spring MVC controller in it. This controller should contain two main methods:get()to get aResponseEntityinstance andlogin()to obtain an OAuth token.@RequestMapping(method = RequestMethod.GET) public ResponseEntity get() { String loginUrl = getAsPrivilegedUser(() -> facebookService.getLoginUrl(getAppUrl(), OAuth2ResponseType.CODE_TOKEN) ); HttpHeaders headers = new HttpHeaders(); headers.set(HttpHeaders.LOCATION, loginUrl); return new ResponseEntity<>(headers, HttpStatus.FOUND); }Here we check the Facebook code, obtain an access code and issue the access token using
OAuthTokenIssuer:@RequestMapping(method = RequestMethod.POST, value = "login") public ResponseEntity<OAuth2AccessToken> login(@RequestParam("code") String code) { User user = getAsPrivilegedUser(() -> { FacebookUserData userData = facebookService.getUserData(getAppUrl(), code); return socialRegistrationService.findOrRegisterUser( userData.getId(), userData.getEmail(), userData.getName()); }); OAuth2AccessTokenResult tokenResult = oAuthTokenIssuer.issueToken(user.getLogin(), messageTools.getDefaultLocale(), Collections.emptyMap()); HttpHeaders headers = new HttpHeaders(); headers.set(HttpHeaders.CACHE_CONTROL, "no-store"); headers.set(HttpHeaders.PRAGMA, "no-cache"); return new ResponseEntity<>(tokenResult.getAccessToken(), headers, HttpStatus.OK); } -
Exclude the
restapipackage from scanning in web/core modules: theOAuthTokenIssuerbean is available only in REST API context, and scanning for it in the application context will cause an error.<context:component-scan base-package="com.company.demo"> <context:exclude-filter type="regex" expression="com\.company\.demo\.restapi\..*"/> </context:component-scan> -
Create a new Spring configuration file with the name
rest-dispatcher-spring.xmlunder the root package (com.company.demo) of web module. The content of the file must be as follows:<beans xmlns="http://www.springframework.org/schema/beans" xmlns:xsi="http://www.w3.org/2001/XMLSchema-instance" xmlns:context="http://www.springframework.org/schema/context" xsi:schemaLocation=" http://www.springframework.org/schema/beans http://www.springframework.org/schema/beans/spring-beans-4.3.xsd http://www.springframework.org/schema/context http://www.springframework.org/schema/context/spring-context-4.3.xsd"> <context:component-scan base-package="com.company.demo.restapi"/> </beans> -
Include the file into the
cuba.restSpringContextConfigapplication property in themodules/web/src/web-app.propertiesfile:cuba.restSpringContextConfig = +com/company/demo/rest-dispatcher-spring.xml -
Create the
facebook-login-demo.htmlfile in themodules/web/web/VAADINfolder of your project. It will contain the JavaScript code running on HTML page:<html> <head> <title>Facebook login demo with REST-API</title> <script src="jquery-3.5.1.min.js"></script> <style type="text/css"> #users { display: none; } </style> </head> <body> <h1>Facebook login demo with REST-API</h1> <script type="application/javascript"...> </script> <a id="fbLink" href="/app/rest/facebook">Login with Facebook</a> <div id="users"> You are logged in! <h1>Users</h1> <div id="usersList"> </div> </div> </body> </html>The following script will try to login with Facebook. Firstly, it will remove code parameters from URL, then it will pass the code to REST API to get an OAuth access token, and in case of successful authentication we will be able to load and save data as usual.
var oauth2Token = null;

function tryToLoginWithFacebook() {
    var urlHash = window.location.hash;

    if (urlHash && urlHash.indexOf('&code=') >= 0) {
        console.log("Try to login to CUBA REST-API!");

        var urlCode = urlHash.substring(urlHash.indexOf('&code=') + '&code='.length);
        console.log("Facebook code: " + urlCode);

        history.pushState("", document.title, window.location.pathname);

        $.post({
            url: '/app/rest/facebook/login',
            headers: {
                'Content-Type': 'application/x-www-form-urlencoded'
            },
            dataType: 'json',
            data: {code: urlCode},
            success: function (data) {
                oauth2Token = data.access_token;

                loadUsers();
            }
        })
    }
}

function loadUsers() {
    $.get({
        url: '/app/rest/v2/entities/sec$User?view=_local',
        headers: {
            'Authorization': 'Bearer ' + oauth2Token,
            'Content-Type': 'application/x-www-form-urlencoded'
        },
        success: function (data) {
            $('#fbLink').hide();
            $('#users').show();

            $.each(data, function (i, user) {
                $('#usersList').append("<li>" + user.name + " (" + user.email + ")</li>");
            });
        }
    });
}

tryToLoginWithFacebook();
Another example or running a JavaScript code from CUBA applications you can find in the JavaScript Usage Example section.
5.4. Getting an Entity Instances List
Let’s suppose that the system has a sales_Order entity and we need to get a list of this entity instances. Besides, we need to get not all the records, but only 50 records, starting with the 100th one. A response must contain not only simple properties of the sales_Order entity but also an information about the order customer (a reference field named customer). Orders must be sorted by date.
A base URL for getting all instances of the sales_Order entity is as follows:
http://localhost:8080/app/rest/v2/entities/sales_Order
To implement all the conditions described above the following request parameters must be specified:
-
view - a view, that will be used for loading entities. In our case the
order-editcontains acustomerreference. -
limit - a number of instances to be returned.
-
offset - a position of the first extracted record.
-
sort - an entity attribute name that will be used for sorting.
An OAuth token must be put in the Authorization header with the Bearer type:
Authorization: Bearer 29bc6b45-83cd-4050-8c7a-2a8a60adf251
As a result, we get the following GET request URL:
http://localhost:8080/app/rest/v2/entities/sales_Order?view=order-edit&limit=50&offset=5&sort=date
Using cURL, the request will look like:
curl -H "Authorization: Bearer d335902c-9cb4-455e-bf92-24ca1d66d72f" http://localhost:8080/app/rest/v2/entities/sales_Order?view=order-edit&limit=50&offset=100&sort=dateThe response will be like this:
[
  {
      "_entityName": "sales_Order",
      "_instanceName": "13/12/2017 Sidney Chandler",
      "id": "87fe4332-87fe-4332-870c-5875870c5875",
      "date": "2017-12-13",
      "amount": 49.99,
      "lines": [
          {
              "_entityName": "sales_OrderLine",
              "_instanceName": "Outback Power Remote Power System",
              "id": "9a8064af-6bdd-58e9-6672-f4a1a7a79480",
              "product": {
                  "_entityName": "sales_Product",
                  "_instanceName": "Outback Power Remote Power System",
                  "id": "e8f27ecf-4024-aa12-9362-7a11f150e65a",
                  "price": 49.99,
                  "name": "Outback Power Remote Power System"
              },
              "quantity": 1.000
          }
      ],
      "customer": {
          "_entityName": "sales_Customer",
          "_instanceName": "Sidney Chandler",
          "id": "a09983f6-540c-5d49-a4cf-d2343b6ee44b",
          "name": "Sidney Chandler"
      }
  },
  {
      "_entityName": "sales_Order",
      "_instanceName": "22/12/2017 Shelby Robinson",
      "id": "f12a4193-f12a-4193-c83d-2a46c83d2a46",
      "date": "2017-12-22",
      "amount": 283.55,
      "lines": [
          {
              "_entityName": "sales_OrderLine",
              "_instanceName": "Cotek Battery Charger",
              "id": "4ec120de-1ced-ad44-5817-fec5e632e3cd",
              "product": {
                  "_entityName": "sales_Product",
                  "_instanceName": "Cotek Battery Charger",
                  "id": "008f9335-c3a4-8e3b-cb59-a2e6b1e6b283",
                  "price": 30.10,
                  "name": "Cotek Battery Charger"
              },
              "quantity": 1.000
          },
          {
              "_entityName": "sales_OrderLine",
              "_instanceName": "Solar-One HUP Flooded Battery 48V",
              "id": "4179ea59-a927-5754-c7b2-17a02f9f4df7",
              "product": {
                  "_entityName": "sales_Product",
                  "_instanceName": "Solar-One HUP Flooded Battery 48V",
                  "id": "1d2272b5-a702-e3d4-6d2c-7cd360f93182",
                  "price": 210.55,
                  "name": "Solar-One HUP Flooded Battery 48V"
              },
              "quantity": 1.000
          }
      ],
      "customer": {
          "_entityName": "sales_Customer",
          "_instanceName": "Shelby Robinson",
          "id": "7efdaa07-0844-749c-6b43-a1b3a8b2b803",
          "name": "Shelby Robinson"
      }
  }
]
Please note, that every entity in the response has a _entityName attribute with the entity name and an _instanceName attribute with the entity instance name.
5.5. New Entity Instance Creation
New sales_Order entity instance can be created with the POST request on the address:
http://localhost:8080/app/rest/v2/entities/sales_Order
An OAuth token must be put in the Authorization header with the Bearer type.
The request body must contain a JSON object that describes a new entity instance, e.g.:
{
  "date": "2020-01-12",
  "lines": [
    {
      "_entityName": "sales_OrderLine",
      "product": {
        "_entityName": "sales_Product",
        "id": "e62906e5-1f1a-1bf1-9a57-c798293e86d7"
          },
      "quantity": 20
    },
    {
      "_entityName": "sales_OrderLine",
      "product": {
        "_entityName": "sales_Product",
        "id": "345e429f-6d74-7d1a-d1ab-9f6c67c10fe5"
          },
      "quantity": 5
    }
  ],
  "customer": {
    "id": "a09983f6-540c-5d49-a4cf-d2343b6ee44b"
  }
}
Below is an example of cURL POST request that creates a new Order instance:
curl -H "Authorization: Bearer d335902c-9cb4-455e-bf92-24ca1d66d72f" -H "Content-Type: application/json" -X POST -d "{\"date\": \"2018-10-12 15:47:28\", \"amount\": 9.90, \"customer\": {\"id\": \"383ebce2-b295-7378-36a1-bcf93693821f\"}}" http://localhost:8080/app/rest/v2/entities/sales_OrderA collection of order items (lines) and a customer reference are passed in the request body. Let’s examine how these attributes will be processed.
First, let’s have a quick look to the Order class:
package com.company.sales.entity;

import com.haulmont.chile.core.annotations.Composition;
import com.haulmont.chile.core.annotations.NamePattern;
import com.haulmont.cuba.core.entity.StandardEntity;
import com.haulmont.cuba.core.entity.annotation.Lookup;
import com.haulmont.cuba.core.entity.annotation.LookupType;
import com.haulmont.cuba.core.entity.annotation.OnDelete;
import com.haulmont.cuba.core.global.DeletePolicy;

import javax.persistence.*;
import java.math.BigDecimal;
import java.util.Date;
import java.util.List;

@NamePattern("%s %s|date,customer")
@Table(name = "SALES_ORDER")
@Entity(name = "sales_Order")
public class Order extends StandardEntity {
    private static final long serialVersionUID = 5602880376063487368L;

    @Temporal(TemporalType.DATE)
    @Column(name = "DATE_", nullable = false)
    protected Date date;

    @Column(name = "NUMBER_")
    private String number;

    @Composition
    @OnDelete(DeletePolicy.CASCADE)
    @OneToMany(mappedBy = "order")
    protected List<OrderLine> lines;

    @Column(name = "AMOUNT")
    protected BigDecimal amount;

    @Lookup(type = LookupType.DROPDOWN, actions = {"lookup", "open"})
    @ManyToOne(fetch = FetchType.LAZY)
    @JoinColumn(name = "CUSTOMER_ID")
    protected Customer customer;

    @Column(name = "NUMBER_OF_SPECIAL_PRODUCTS")
    protected Integer numberOfSpecialProducts;

    //getters and setters omitted
}
The lines collection property is annotated with the @Composition. REST API methods for entity creation and update will create a new entity instances for all members of such collections. In our case, two instances of OrderLine entity will be created with the Order entity.
The customer reference doesn’t have a @Composition annotation, that’s why the REST API will try to find a client with the given id and set it to the customer field. If the client is not found then an order won’t be created and the method will return an error. Similarly, ids of the products will be set to the product field of the created OrderLine instances.
In case of successful method execution, the following JSON containing only three fields is returned:
{
  "_entityName": "sales_Order",
  "_instanceName": "12/01/2020 Sidney Chandler",
  "id": "b8e702a8-4ca7-47b6-5c76-3a35e33fe609"
}
If you need to get other entity fields in the response, then pass the responseView parameter to the request URL and specify one of the views. For example, for a query with the order-edit view
http://localhost:8080/app/rest/v2/entities/sales_Order?responseView=order-edit
the response will be like this:
{
    "_entityName": "sales_Order",
    "_instanceName": "12/01/2020 Sidney Chandler",
    "id": "b8e702a8-4ca7-47b6-5c76-3a35e33fe609",
    "date": "2020-01-12",
    "numberOfSpecialProducts": 0,
    "lines": [
        {
            "_entityName": "sales_OrderLine",
            "_instanceName": "Astronergy Solar Panel",
            "id": "c3c7bbe4-75c5-0223-df56-0f6c018dd1e2",
            "product": {
                "_entityName": "sales_Product",
                "_instanceName": "Astronergy Solar Panel",
                "id": "345e429f-6d74-7d1a-d1ab-9f6c67c10fe5",
                "price": 23.00,
                "name": "Astronergy Solar Panel"
            },
            "quantity": 5.000
        },
        {
            "_entityName": "sales_OrderLine",
            "_instanceName": "Fullriver Sealed Battery 6V",
            "id": "881c6ea7-e9f4-cb2f-b0e3-1aac85aed81f",
            "product": {
                "_entityName": "sales_Product",
                "_instanceName": "Fullriver Sealed Battery 6V",
                "id": "e62906e5-1f1a-1bf1-9a57-c798293e86d7",
                "price": 5.10,
                "name": "Fullriver Sealed Battery 6V"
            },
            "quantity": 20.000
        }
    ],
    "customer": {
        "_entityName": "sales_Customer",
        "_instanceName": "Sidney Chandler",
        "id": "a09983f6-540c-5d49-a4cf-d2343b6ee44b",
        "name": "Sidney Chandler"
    }
}
The ability to pass the responseView parameter is specified in the cuba.rest.responseViewEnabled application property. By default, it is set to true. If this property is disabled, a full object graph of the created entity is returned.
For example, in case cuba.rest.responseViewEnabled is set to false, the response will be like this:
{
    "_entityName": "sales_Order",
    "id": "b8e702a8-4ca7-47b6-5c76-3a35e33fe609",
    "date": "2020-01-12",
    "updatedBy": "admin",
    "version": 2,
    "numberOfSpecialProducts": 0,
    "createdBy": "admin",
    "createTs": "2020-11-24 14:57:02.139",
    "lines": [
        {
            "_entityName": "sales_OrderLine",
            "id": "fcf41257-890f-7d57-5a5c-b3c4d75df40c",
            "product": {
                "_entityName": "sales_Product",
                "id": "345e429f-6d74-7d1a-d1ab-9f6c67c10fe5",
                "createdBy": "admin",
                "price": 23.00,
                "name": "Astronergy Solar Panel",
                "createTs": "2017-12-19 11:43:20.000",
                "version": 1,
                "updateTs": "2017-12-19 11:43:20.000"
            },
            "quantity": 5.000,
            "createdBy": "admin",
            "createTs": "2020-11-24 14:57:02.142",
            "version": 1,
            "updateTs": "2020-11-24 14:57:02.142",
            "order": {
                "_entityName": "sales_Order",
                "id": "9edf23b1-1698-7e08-4037-03d822876f08"
            }
        },
        {
            "_entityName": "sales_OrderLine",
            "id": "91cf2899-6c1d-4ac9-192f-24e1b08c7ea6",
            "product": {
                "_entityName": "sales_Product",
                "id": "e62906e5-1f1a-1bf1-9a57-c798293e86d7",
                "createdBy": "admin",
                "price": 5.10,
                "name": "Fullriver Sealed Battery 6V",
                "createTs": "2017-12-19 11:39:22.000",
                "version": 1,
                "updateTs": "2017-12-19 11:39:22.000"
            },
            "quantity": 20.000,
            "createdBy": "admin",
            "createTs": "2020-11-24 14:57:02.142",
            "version": 1,
            "updateTs": "2020-11-24 14:57:02.142",
            "order": {
                "_entityName": "sales_Order",
                "id": "9edf23b1-1698-7e08-4037-03d822876f08"
            }
        }
    ],
    "updateTs": "2020-11-24 14:57:02.252",
    "customer": {
        "_entityName": "sales_Customer",
        "id": "a09983f6-540c-5d49-a4cf-d2343b6ee44b",
        "createdBy": "admin",
        "name": "Sidney Chandler",
        "createTs": "2017-12-19 11:32:24.000",
        "version": 1,
        "updateTs": "2017-12-19 11:32:24.000",
        "email": "chandler@mail.com"
    }
}
5.6. Existing Entity Instance Update
An existing sales_Order entity instance can be updated with the PUT request on the address:
http://localhost:8080/app/rest/v2/entities/sales_Order/050af491-16ad-7b4d-8499-4d0bace23bb1
The last part of the query here is the entity identifier.
An OAuth token must be put in the Authorization header with the Bearer type.
The request body must contain a JSON object containing only fields we want to update, e.g.:
{
  "date": "2020-11-01",
  "customer": {
    "id": "5effc3b8-9445-2b86-cc30-92aabc7c3a6a"
  }
}
The response body will contain three fields:
{
  "_entityName": "sales_Order",
  "_instanceName": "01/11/2020 Hildred Ellis",
  "id": "050af491-16ad-7b4d-8499-4d0bace23bb1"
}
If you need to get other entity fields in the response, then pass the responseView parameter to the request URL and specify one of the views. For example, for a query with the order-edit view
http://localhost:8080/app/rest/v2/entities/sales_Order/050af491-16ad-7b4d-8499-4d0bace23bb1?responseView=order-edit
the response will be like this:
{
    "_entityName": "sales_Order",
    "_instanceName": "01/11/2020 Hildred Ellis",
    "id": "050af491-16ad-7b4d-8499-4d0bace23bb1",
    "date": "2020-11-01",
    "numberOfSpecialProducts": 0,
    "lines": [
        {
            "_entityName": "sales_OrderLine",
            "_instanceName": "Fullriver Sealed Battery 6V",
            "id": "8b6a921e-b910-c766-7e40-eed95fa49238",
            "product": {
                "_entityName": "sales_Product",
                "_instanceName": "Fullriver Sealed Battery 6V",
                "id": "e62906e5-1f1a-1bf1-9a57-c798293e86d7",
                "price": 5.10,
                "name": "Fullriver Sealed Battery 6V"
            },
            "quantity": 20.000
        }
    ],
    "customer": {
        "_entityName": "sales_Customer",
        "_instanceName": "Hildred Ellis",
        "id": "5effc3b8-9445-2b86-cc30-92aabc7c3a6a",
        "name": "Hildred Ellis"
    }
}
The ability to pass the responseView parameter is specified in the cuba.rest.responseViewEnabled application property. By default, it is set to true. If this property is disabled, a full object graph of the updated entity is returned.
For example, in case cuba.rest.responseViewEnabled is set to false, the response will be like this:
{
    "_entityName": "sales_Order",
    "id": "050af491-16ad-7b4d-8499-4d0bace23bb1",
    "date": "2020-11-01",
    "updatedBy": "admin",
    "version": 6,
    "numberOfSpecialProducts": 0,
    "createdBy": "admin",
    "createTs": "2020-11-23 22:33:26.057",
    "updateTs": "2020-11-25 00:54:49.390",
    "customer": {
        "_entityName": "sales_Customer",
        "id": "5effc3b8-9445-2b86-cc30-92aabc7c3a6a",
        "createdBy": "admin",
        "name": "Hildred Ellis",
        "createTs": "2017-12-19 11:32:47.000",
        "version": 1,
        "updateTs": "2017-12-19 11:32:47.000",
        "email": "ellis@mail.com"
    }
}|
Tip
|
The JSON object above provides the |
5.7. Executing a JPQL Query (GET)
Before the execution with the REST API a query must be described in the configuration file. The rest-queries.xml file must be created in the main package of the web module (e.g. com.company.sales). Then the file must be defined in the application properties file of the web module (web-app.properties).
cuba.rest.queriesConfig = +com/company/sales/rest-queries.xmlrest-queries.xml contents:
<?xml version="1.0"?>
<queries xmlns="http://schemas.haulmont.com/cuba/rest-queries.xsd">
    <query name="ordersAfterDate" entity="sales_Order" view="order-edit">
        <jpql><![CDATA[select o from sales_Order o where o.date >= :startDate and o.date <= :endDate]]></jpql>
        <params>
            <param name="startDate" type="java.util.Date"/>
            <param name="endDate" type="java.util.Date"/>
        </params>
    </query>
</queries>
To execute a JPQL query the following GET request must be executed:
http://localhost:8080/app/rest/v2/queries/sales_Order/ordersAfterDate?startDate=2016-11-01&endDate=2017-11-01
The request URL parts:
-
sales_Order- extracted entity name. -
ordersAfterDate- a query name from the configuration file. -
startDateandendDate- request parameters with the values.
Parameter value must be passed in a format defined for the corresponding datatype. For example:
-
if the query parameter type is
java.util.Date, then the value pattern is taken from theDateTimeDatatype. By default it isyyyy-MM-dd HH:mm:ss.SSS -
for
java.sql.Datequery parameter type, the value pattern is taken from theDateDatatypeand it isyyyy-MM-ddby default -
for
java.sql.Timethe datatype isTimeDatatypeand the default format isHH:mm:ss
An OAuth token must be put in the Authorization header with the Bearer type.
The method returns a JSON array of extracted entity instances:
[
  {
    "_entityName": "sales_Order",
    "_instanceName": "00002",
    "id": "b2ad3059-384c-3e03-b62d-b8c76621b4a8",
    "date": "2016-12-31",
    "description": "New Year party set",
    "number": "00002",
    "lines": [
      {
        "_entityName": "sales_OrderLine",
        "_instanceName": "Jack Daniels",
        "id": "0c566c9d-7078-4567-a85b-c67a44f9d5fe",
        "price": 50.7,
        "name": "Jack Daniels"
      },
      {
        "_entityName": "sales_OrderLine",
        "_instanceName": "Hennessy X.O",
        "id": "c01be87b-3f91-7a86-50b5-30f2f0a49127",
        "price": 79.9,
        "name": "Hennessy X.O"
      }
    ],
    "customer": {
      "_entityName": "sales_Customer",
      "_instanceName": "Morgan Collins",
      "id": "5d111245-2ed0-abec-3bee-1a196da92e3e",
      "firstName": "Morgan",
      "lastName": "Collins"
    }
  }
]
A full list of possible request parameters is available in the Swagger documentation.
5.8. Executing a JPQL Query (POST)
It is also possible to execute a query with POST HTTP request. POST request can be used when you need to pass a collection as query parameter value. In this case, the type of the query parameter in REST queries configuration file must end with square brackets: java.lang.String[], java.util.UUID[], etc.
<?xml version="1.0"?>
<queries xmlns="http://schemas.haulmont.com/cuba/rest-queries.xsd">
    <query name="ordersByIds" entity="sales_Order" view="order-edit">
        <jpql><![CDATA[select o from sales_Order o where o.id in :ids and o.status = :status]]></jpql>
        <params>
            <param name="ids" type="java.util.UUID[]"/>
            <param name="status" type="java.lang.String"/>
        </params>
    </query>
</queries>
Query parameters values must be passed in the request body as JSON map:
{
  "ids": ["c273fca1-33c2-0229-2a0c-78bc6d09110a", "e6c04c18-c8a1-b741-7363-a2d58589d800", "d268a4e1-f316-a7c8-7a96-87ba06afbbbd"],
  "status": "ready"
}
The POST request URL:
http://localhost:8080/app/rest/v2/queries/sales_Order/ordersByIds?returnCount=true
5.9. Service Method Invocation (GET)
Suppose there is an OrderService service in the system. The implementation looks as follows:
package com.company.sales.service;

import com.haulmont.cuba.core.EntityManager;
import com.haulmont.cuba.core.Persistence;
import com.haulmont.cuba.core.Transaction;
import org.springframework.stereotype.Service;
import javax.inject.Inject;
import java.math.BigDecimal;

@Service(OrderService.NAME)
public class OrderServiceBean implements OrderService {

    @Inject
    private Persistence persistence;

    @Override
    public BigDecimal calculatePrice(String orderNumber) {
        BigDecimal orderPrice = null;
        try (Transaction tx = persistence.createTransaction()) {
            EntityManager em = persistence.getEntityManager();
            orderPrice = (BigDecimal) em.createQuery("select sum(oi.price) from sales_OrderLine oi where oi.order.number = :orderNumber")
                    .setParameter("orderNumber", orderNumber)
                    .getSingleResult();
            tx.commit();
        }

        return orderPrice;
    }
}
Before the execution with the REST API a service method invocation must be allowed in the configuration file. The rest-services.xml file must be created in the main package of the web module (e.g. com.company.sales). Then the file must be defined in the application properties file of the web module (web-app.properties).
cuba.rest.servicesConfig = +com/company/sales/rest-services.xmlrest-services.xml content:
<?xml version="1.0" encoding="UTF-8"?>
<services xmlns="http://schemas.haulmont.com/cuba/rest-services-v2.xsd">
    <service name="sales_OrderService">
        <method name="calculatePrice">
            <param name="orderNumber"/>
        </method>
    </service>
</services>
To invoke the service method the following GET request must be executed:
http://localhost:8080/app/rest/v2/services/sales_OrderService/calculatePrice?orderNumber=00001
The request URL parts:
-
sales_OrderService- a service name. -
calculatePrice- a method name. -
orderNumber- an argument name with the value.
An OAuth token must be put in the Authorization header with the Bearer type.
A service method may return a result of simple datatype, an entity, an entities collection or a serializable POJO. In our case a BigDecimal is returned, so the response body contains just a number:
39.2
5.10. Service Method Invocation (POST)
REST API allows execution not only of methods that have arguments of simple datatypes, but also of methods with the following arguments:
-
entities
-
entities collections
-
serializable POJOs
Suppose we added a new method to the OrderService created in the previous section:
@Override
public OrderValidationResult validateOrder(Order order, Date validationDate){
    OrderValidationResult result=new OrderValidationResult();
    result.setSuccess(false);
    result.setErrorMessage("Validation of order "+order.getNumber()+" failed. validationDate parameter is: "+validationDate);
    return result;
}
OrderValidationResult class looks as follows:
package com.company.sales.service;

import java.io.Serializable;

public class OrderValidationResult implements Serializable {

    private boolean success;

    private String errorMessage;

    public boolean isSuccess() {
        return success;
    }

    public void setSuccess(boolean success) {
        this.success = success;
    }

    public String getErrorMessage() {
        return errorMessage;
    }

    public void setErrorMessage(String errorMessage) {
        this.errorMessage = errorMessage;
    }
}
The new method has an Order entity in the arguments list and returns a POJO.
Before the invocation with the REST API the method must be allowed, so we add a record to the rest-services.xml configuration file (it was described in the Service Method Invocation (GET)).
<?xml version="1.0" encoding="UTF-8"?>
<services xmlns="http://schemas.haulmont.com/cuba/rest-services-v2.xsd">
    <service name="sales_OrderService">
        <method name="calculatePrice">
            <param name="orderNumber"/>
        </method>
        <method name="validateOrder">
            <param name="order"/>
            <param name="validationDate"/>
        </method>
    </service>
</services>
The validateOrder service method may be called with the POST request on the address:
http://localhost:8080/app/rest/v2/services/sales_OrderService/validateOrder
In case of the POST request parameters are passed in the request body. The request body must contain a JSON object, each field of this object corresponds to the service method argument.
{
  "order" : {
    "number": "00050",
    "date" : "2016-01-01"
  },
  "validationDate": "2016-10-01"
}
Parameter value must be passed in a format defined for the corresponding datatype. For example:
-
if the parameter type is
java.util.Date, then the value pattern is taken from theDateTimeDatatype. By default it isyyyy-MM-dd HH:mm:ss.SSS -
for
java.sql.Dateparameter type, the value pattern is taken from theDateDatatypeand it isyyyy-MM-ddby default -
for
java.sql.Timethe datatype isTimeDatatypeand the default format isHH:mm:ss
An OAuth token must be put in the Authorization header with the Bearer type.
The REST API method returns a serialized POJO:
{
  "success": false,
  "errorMessage": "Validation of order 00050 failed. validationDate parameter is: 2016-10-01"
}
5.11. Files Downloading
When downloading a file, passing a security token in the request header is often inconvenient. It is desirable to have a URL for downloading that may be put to the src attribute of the img tag.
As a solution, an OAuth token can also be passed in the request URL as a parameter with the access_token name.
For example, an image is uploaded to the application. Its FileDescriptor id is 44809679-e81c-e5ae-dd81-f56f223761d6.
In this case a URL for downloading the image will look like this:
http://localhost:8080/app/rest/v2/files/44809679-e81c-e5ae-dd81-f56f223761d6?access_token=a2f0bb4e-773f-6b59-3450-3934cbf0a2d6
5.12. Files Uploading
In order to upload a file, you should get an access token which will be used in the subsequent requests.
Suppose we have the following form for the file input:
<form id="fileForm">
    <h2>Select a file:</h2>
    <input type="file" name="file" id="fileUpload"/>
    <br/>
    <button type="submit">Upload</button>
</form>

<h2>Result:</h2>
<img id="uploadedFile" src="" style="display: none"/>
We will use jQuery for the upload and get a JSON with data which is the newly created FileDescriptor instance. We can access the uploaded file by its FileDescriptor id with the access token as a parameter:
$('#fileForm').submit(function (e) {
    e.preventDefault();

    var file = $('#fileUpload')[0].files[0];
    var url = 'http://localhost:8080/app/rest/v2/files?name=' + file.name; // send file name as parameter

    $.ajax({
        type: 'POST',
        url: url,
        headers: {
            'Authorization': 'Bearer ' + oauthToken // add header with access token
        },
        processData: false,
        contentType: false,
        dataType: 'json',
        data: file,
        success: function (data) {
            alert('Upload successful');

            $('#uploadedFile').attr('src',
                'http://localhost:8080/app/rest/v2/files/' + data.id + '?access_token=' + oauthToken); // update image url
            $('#uploadedFile').show();
        }
    });
});
5.13. JavaScript Usage Example
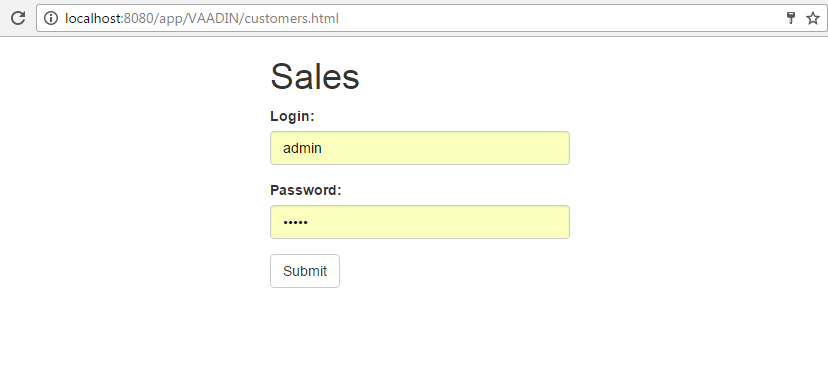
This section contains an example of using REST API v2 from JavaScript running on a HTML page. The page initially shows login form, and after successful login displays a message and a list of entities.
For simplicity, we will use modules/web/web/VAADIN folder for storing HTML/CSS/JavaScript files, as the corresponding folder in the deployed web application is used for serving static resources by default. So you will not need to make any configuration of your Tomcat application server. The resulting URL will start from http://localhost:8080/app/VAADIN, so do not use this approach in a real world application - create a separate web application with its own context instead.
Download jQuery and Bootstrap and copy to modules/web/web/VAADIN folder of your project. Create customers.html and customers.js files, so the content of the folder should look as follows:
bootstrap.min.css
customers.html
customers.js
jquery-3.1.1.min.js
customers.html file content:
<html>
<head>
<script type="text/javascript" src="jquery-3.1.1.min.js"></script>
<link rel="stylesheet" href="bootstrap.min.css"/>
</head>
<body>
<div style="width: 300px; margin: auto;">
<h1>Sales</h1>
<div id="loggedInStatus" style="display: none" class="alert alert-success">
Logged in successfully
</div>
<div id="loginForm">
<div class="form-group">
<label for="loginField">Login:</label>
<input type="text" class="form-control" id="loginField">
</div>
<div class="form-group">
<label for="passwordField">Password:</label>
<input type="password" class="form-control" id="passwordField">
</div>
<button type="submit" class="btn btn-default" onclick="login()">Submit</button>
</div>
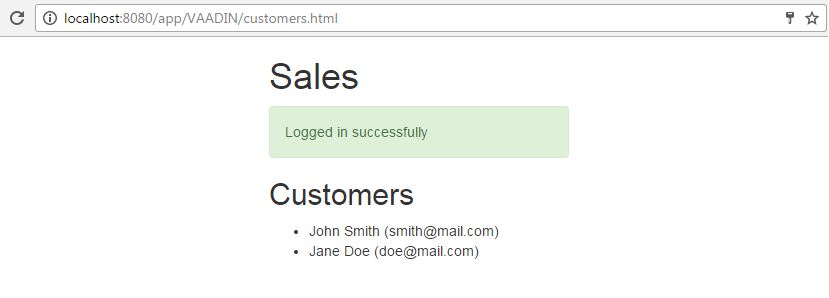
<div id="customers" style="display: none">
<h2>Customers</h2>
<ul id="customersList"></ul>
</div>
</div>
<script type="text/javascript" src="customers.js"></script>
</body>
</html>customers.js file content:
var oauthToken = null;
function login() {
    var userLogin = $('#loginField').val();
    var userPassword = $('#passwordField').val();
    $.post({
        url: 'http://localhost:8080/app/rest/v2/oauth/token',
        headers: {
            'Authorization': 'Basic Y2xpZW50OnNlY3JldA==',
            'Content-Type': 'application/x-www-form-urlencoded'
        },
        dataType: 'json',
        data: {grant_type: 'password', username: userLogin, password: userPassword},
        success: function (data) {
            oauthToken = data.access_token;
            $('#loggedInStatus').show();
            $('#loginForm').hide();
            loadCustomers();
        }
    })
}

function loadCustomers() {
    $.get({
        url: 'http://localhost:8080/app/rest/v2/entities/sales_Customer?view=_local',
        headers: {
            'Authorization': 'Bearer ' + oauthToken,
            'Content-Type': 'application/x-www-form-urlencoded'
        },
        success: function (data) {
            $('#customers').show();
            $.each(data, function (i, customer) {
                $('#customersList').append("<li>" + customer.name + " (" + customer.email + ")</li>");
            });
        }
    });
}
Login and password from the user input are sent to the server by the POST request with the Base64-encoded client credentials in the Authorization header as explained in Getting an OAuth Token section. If the authentication is successful, the web page receives an access token value from the server, the token is stored in the oauthToken variable, the loginForm div is hidden and the loggedInStatus div is shown.
To show the list of customers, the request is sent to the server to get the instances of the sales_Customer entity, passing the oauthToken value in the Authorization header.
In case the request is processed successfully, the customers div is shown, and the customersList element is filled with items containing customer names and emails.
5.14. Getting Localized Messages
There are methods in the REST API for getting localized messages for entities, their properties and enums.
For example, to get a list of localized messages for the sec$User entity you have to execute the following GET request:
http://localhost:8080/app/rest/v2/messages/entities/sec$User
An OAuth token must be put in the Authorization header with the Bearer type.
You can explicitly specify the desired locale using the Accept-Language http header.
The response will be like this:
{
  "sec$User": "User",
  "sec$User.active": "Active",
  "sec$User.changePasswordAtNextLogon": "Change Password at Next Logon",
  "sec$User.createTs": "Created At",
  "sec$User.createdBy": "Created By",
  "sec$User.deleteTs": "Deleted At",
  "sec$User.deletedBy": "Deleted By",
  "sec$User.email": "Email",
  "sec$User.firstName": "First Name",
  "sec$User.group": "Group",
  "sec$User.id": "ID",
  "sec$User.ipMask": "Permitted IP Mask",
  "sec$User.language": "Language",
  "sec$User.lastName": "Last Name",
  "sec$User.login": "Login",
  "sec$User.loginLowerCase": "Login",
  "sec$User.middleName": "Middle Name",
  "sec$User.name": "Name",
  "sec$User.password": "Password",
  "sec$User.position": "Position",
  "sec$User.substitutions": "Substitutions",
  "sec$User.timeZone": "Time Zone",
  "sec$User.timeZoneAuto": "Autodetect Time Zone",
  "sec$User.updateTs": "Updated At",
  "sec$User.updatedBy": "Updated By",
  "sec$User.userRoles": "User Roles",
  "sec$User.version": "Version"
}
To get the localization for enum, use the following URL:
http://localhost:8080/app/rest/v2/messages/enums/com.haulmont.cuba.security.entity.RoleType
If you omit the entity name or enum name part in the URL, you’ll get the localization for all entities or enums.
5.15. Data Model Versioning Example
- Entity attribute was renamed
-
Let’s suppose that the
oldNumberattribute of thesales_Orderentity was renamed tonewNumberanddatewas renamed todeliveryDate. In this case transformation config will be like this:<?xml version="1.0"?> <transformations xmlns="http://schemas.haulmont.com/cuba/rest-json-transformations.xsd"> <transformation modelVersion="1.0" currentEntityName="sales_Order"> <renameAttribute oldName="oldNumber" currentName="newNumber"/> <renameAttribute oldName="date" currentName="deliveryDate"/> </transformation> ... </transformations>If the client app needs to work with the old version of the
sales_Orderentity then it must pass themodelVersionvalue in the URL parameter:http://localhost:8080/app/rest/v2/entities/sales_Order/c838be0a-96d0-4ef4-a7c0-dff348347f93?modelVersion=1.0The following result will be returned:
{
  "_entityName": "sales_Order",
  "_instanceName": "00001",
  "id": "46322d73-2374-1d65-a5f2-160461da22bf",
  "date": "2016-10-31",
  "description": "Vacation order",
  "oldNumber": "00001"
}
The response JSON contains an
oldNumberanddateattributes although the entity in the CUBA application hasnewNumberanddeliveryDateattributes. - Entity name was changed
-
Next, let’s imagine, that in some next release of the application a name of the
sales_Orderentity was also changed. The new name issales_NewOrder.Transformation config for version
1.1will be like this:<?xml version="1.0"?> <transformations xmlns="http://schemas.haulmont.com/cuba/rest-json-transformations.xsd"> <transformation modelVersion="1.1" oldEntityName="sales_Order" currentEntityName="sales_NewOrder"> <renameAttribute oldName="oldNumber" currentName="newNumber"/> </transformation> ... </transformations>In addition to the config from the previous example an
oldEntityNameattribute is added here. It specifies the entity name that was valid for model version1.1. ThecurrentEntityNameattribute specifies the current entity name.Although an entity with a name
sales_Orderdoesn’t exist anymore, the following request will work:http://localhost:8080/app/rest/v2/entities/sales_Order/c838be0a-96d0-4ef4-a7c0-dff348347f93?modelVersion=1.1The REST API controller will understand that it must search among
sales_NewOrderentities and after the entity with given id is found names of the entity and of thenewNumberattribute will be replaced in the result JSON:{ "_entityName": "sales_Order", "_instanceName": "00001", "id": "46322d73-2374-1d65-a5f2-160461da22bf", "date": "2016-10-31", "description": "Vacation order", "oldNumber": "00001" }The client app can also use the old version of data model for entity update and creation.
This POST request that uses old entity name and has old JSON in the request body will work:
http://localhost:8080/app/rest/v2/entities/sales_Order{ "_entityName": "sales_Order", "_instanceName": "00001", "id": "46322d73-2374-1d65-a5f2-160461da22bf", "date": "2016-10-31", "description": "Vacation order", "oldNumber": "00001" } - Entity attribute must be removed from JSON
-
If some attribute was added to the entity, but the client that works with the old version of data model doesn’t expect this new attribute, then the new attribute can be removed from the result JSON.
Transformation configuration for this case will look like this:
<?xml version="1.0"?>
<transformations xmlns="http://schemas.haulmont.com/cuba/rest-json-transformations.xsd">
    <transformation modelVersion="1.5" currentEntityName="sales_Order">
        <toVersion>
            <removeAttribute name="discount"/>
        </toVersion>
    </transformation>
    ...
</transformations>
Transformation in this config file contains a
toVersiontag with a nestedremoveAttributecommand. This means that when the transformation from the current state to specific version is performed (i.e. when you request a list of entities) then adiscountattribute must be removed from the result JSON.In this case if you perform the request without the
modelVersionattribute, the discount attribute will be returned:http://localhost:8080/app/rest/v2/entities/sales_Order/c838be0a-96d0-4ef4-a7c0-dff348347f93{ "_entityName": "sales_Order", "_instanceName": "00001", "id": "46322d73-2374-1d65-a5f2-160461da22bf", "deliveryDate": "2016-10-31", "description": "Vacation order", "number": "00001", "discount": 50 }If you specify the
modelVersionthendiscountattribute will be removedhttp://localhost:8080/app/rest/v2/entities/sales_Order/c838be0a-96d0-4ef4-a7c0-dff348347f93?modelVersion=1.1{ "_entityName": "sales_Order", "_instanceName": "00001", "id": "46322d73-2374-1d65-a5f2-160461da22bf", "deliveryDate": "2016-10-31", "description": "Vacation order", "oldNumber": "00001" } - Using custom transformer
-
You can also create and register a custom JSON transformer. As an example let’s examine the following situation: there was an entity
sales_OldOrderthat was renamed tosales_NewOrder. This entity has anorderDatefield. In the previous version, this date field contained a time part, but in the latest version of the entity, the time part is removed. REST API client that request the entity with an old model version1.0expects the date field to have the time part, so the transformer must modify the value in the JSON.First, that’s how the transformer configuration must look like:
<?xml version="1.0"?>
<transformations xmlns="http://schemas.haulmont.com/cuba/rest-json-transformations.xsd">

    <transformation modelVersion="1.0" oldEntityName="sales_OldOrder" currentEntityName="sales_NewOrder">
        <custom>
            <fromVersion transformerBeanRef="sales_OrderJsonTransformerFromVersion"/>
            <toVersion transformerBeanRef="sales_OrderJsonTransformerToVersion"/>
        </custom>
    </transformation>

    ...
</transformations>
There are a
customelement and nestedtoVersionandfromVersionelements. These elements have a reference to the transformer bean. This means that custom transformer must be registered as a Spring bean. There is one important thing here: a custom transformer may use theRestTransformationsplatform bean (this bean gives an access to other entities transformers if it is required). But theRestTransformationsbean is registered in the Spring context of the REST API servlet, not in the main context of the web application. This means that custom transformer beans must be registered in the REST API Spring context as well.That’s how we can do that.
First, create a
rest-dispatcher-spring.xmlin the web or portal module (e.g. in packagecom.company.test).Next, register this file in the
app.propertiesof the web or portal module:cuba.restSpringContextConfig = +com/company/test/rest-dispatcher-spring.xmlThe
rest-dispatcher-spring.xmlmust contain custom transformer bean definitions:<?xml version="1.0" encoding="UTF-8"?> <beans xmlns="http://www.springframework.org/schema/beans" xmlns:xsi="http://www.w3.org/2001/XMLSchema-instance" xsi:schemaLocation="http://www.springframework.org/schema/beans http://www.springframework.org/schema/beans/spring-beans-4.3.xsd"> <bean name="sales_OrderJsonTransformerFromVersion" class="com.company.test.transformer.OrderJsonTransformerFromVersion"/> <bean name="sales_OrderJsonTransformerToVersion" class="com.company.test.transformer.OrderJsonTransformerToVersion"/> </beans>The content of the
sales_OrderJsonTransformerToVersiontransformer is as follows:package com.company.test.transformer; import com.fasterxml.jackson.databind.JsonNode; import com.fasterxml.jackson.databind.ObjectMapper; import com.fasterxml.jackson.databind.node.ObjectNode; import com.google.common.base.Strings; import com.haulmont.restapi.transform.AbstractEntityJsonTransformer; import com.haulmont.restapi.transform.JsonTransformationDirection; public class OrderJsonTransformerToVersion extends AbstractEntityJsonTransformer { public OrderJsonTransformerToVersion() { super("sales_NewOrder", "sales_OldOrder", "1.0", JsonTransformationDirection.TO_VERSION); } @Override protected void doCustomTransformations(ObjectNode rootObjectNode, ObjectMapper objectMapper) { JsonNode orderDateNode = rootObjectNode.get("orderDate"); if (orderDateNode != null) { String orderDateNodeValue = orderDateNode.asText(); if (!Strings.isNullOrEmpty(orderDateNodeValue)) rootObjectNode.put("orderDate", orderDateNodeValue + " 00:00:00.000"); } } }This transformer finds the
orderDatenode in the JSON object and modifies its value by adding the time part to the value.When the
sales_OldOrderentity with a data model version1.0is requested, the result JSON will contain entities withorderDatefields that contain time part, although it is not stored in the database anymore.A couple more words about custom transformers. They must implement the
EntityJsonTransformerinterface. You can also extend theAbstractEntityJsonTransformerclass and override itsdoCustomTransformationsmethod. TheAbstractEntityJsonTransformercontains all functionality of the standard transformer.
5.16. Using Entities Search Filter
REST API allows you to specify ad-hoc search criteria when getting a list of entities.
Let’s suppose that we have two entities:
-
Author that has two fields:
lastNameandfirstName -
Book with three fields:
title(String),author(Author) andpublicationYear(Integer)
To perform a search with conditions we must use the URL like this:
http://localhost:8080/app/rest/v2/entities/test_Book/search
The search conditions must be passed in the filter parameter. It is a JSON object that contains a set of conditions. If the search is performed with the GET request, then the filter parameter must be passed in the URL.
- Example 1
-
We need to find all books that were released in 2007 and have an author with the first name starting with "Alex". The filter JSON should look like this:
{
    "conditions": [
        {
            "property": "author.firstName",
            "operator": "startsWith",
            "value": "Alex"
        },
        {
            "property": "publicationDate",
            "operator": "=",
            "value": 2007
        }
    ]
}
By default, search criteria are applied with the AND operation.
This example also demonstrates that nested properties are supported (author.firstName).
|
Tip
|
For a full list of all supported operators used in search conditions, see the Swagger documentation. |
- Example 2
-
The next example demonstrates two things: how to execute a search with the POST request and how to use OR groups. In case of POST request all parameters must be passed in the JSON object that is passed in the request body. The search filter must be placed in the object field called
filter. All other parameters (view name, limit, etc.) must be placed in fields with corresponding names:
{
  "filter": {
    "conditions": [
      {
        "group": "OR",
        "conditions": [
          {
            "property": "author.lastName",
            "operator": "contains",
            "value": "Stev"
          },
          {
            "property": "author.lastName",
            "operator": "=",
            "value": "Dumas"
          }
        ]
      },
      {
        "property": "publicationDate",
        "operator": "=",
        "in": [2007, 2008]
      }
    ]
  },
  "view": "book-view"
}
In this example, conditions collection contains not only condition objects, but also an OR group. So the result search criterion will be:
((author.lastName contains Stev) OR (author.lastName = Duma) AND (publicationDate in [2007, 2008]))
Notice that the view parameter is also passed in the request body.
6. Security in REST API
REST API defines its own REST security scope. You should configure a separate set of roles that includes cuba.restApi.enabled specific permission for users logging in to the system through the REST API. If you don’t do it, the users will not be able to log in via REST.
6.1. Legacy Security Implications
If you use previous CUBA versions or migrate to CUBA 7.2, legacy roles and permissions are used. So, to enable the REST API in your application, you must configure security (Roles/Access Groups) and always keep it in the actual state on a production system in order to prevent access to some sensitive data.
Here are some rules you should follow when the REST API is turned on:
-
Always disable access to the REST API for roles/users which are not supposed to use it. See
CUBA > REST API > Use REST APIspecific permission in the role editor screen. -
Use deny-by-default strategy: always assign
DENYINGrole to users which have access to the REST API. Project model changes over time - it’s easy to miss adding granular restrictions. -
Always configure and assign access group constraints for non-common entities to the REST API users.
-
Remember that
EntityManagerdoes not impose access group constraints, so consider usingDataManagerin middleware services exposed to the REST API. -
Remember that entity attribute restrictions are not imposed by a
DENYINGrole. Setup permissions for each entity attribute individually. -
Specify a unique client secret in production environment.
If you have troubles configuring fine-grained security for your project, consider implementing custom endpoints instead of the universal REST API.
Appendix A: Application Properties
- cuba.rest.allowedOrigins
-
Defines a comma-separated list of origins that can access the REST API.
Default value:
*Used in the Web Client and Web Portal blocks.
- cuba.rest.anonymousEnabled
-
Enables an anonymous access to the REST API endpoints.
Default value:
falseUsed in the Web Client and Web Portal blocks.
- cuba.rest.client.id
-
Defines an identifier of the REST API client. In this case, the client is not a platform user, but an application (some web portal or mobile app) that uses REST API. Client credentials are used for basic authentication when accessing the REST API token endpoint.
The value is generated automatically when the add-on is added.
Used in the Web Client and Web Portal blocks.
- cuba.rest.client.secret
-
Defines a password for the REST API client. In this case, the client is not a platform user, but an application (some web portal or mobile app) that uses REST API. Client credentials are used for basic authentication when accessing the REST API token endpoint. The application property value in addition to the actual password value (e.g.,
secret), must contain an identifier of thePasswordEncoder(e.g.,{noop}).If the password is used for basic authentication, you don’t need to use the
PasswordEncoderidentifier.The value is generated automatically when the add-on is added.
Used in the Web Client and Web Portal blocks.
- cuba.rest.client.tokenExpirationTimeSec
-
Defines a REST API access token expiration timeout for the default client in seconds.
Default value:
43200(12 hours)Used in the Web Client and Web Portal blocks.
- cuba.rest.client.refreshTokenExpirationTimeSec
-
Defines a REST API refresh token expiration timeout for the default client in seconds.
Default value:
31536000(365 days)Used in the Web Client and Web Portal blocks.
- cuba.rest.deleteExpiredTokensCron
-
Specifies cron expression for scheduled removing of expired tokens from the database.
Default value:
0 0 3 * * ?Used in the Middleware block.
- cuba.rest.jsonTransformationConfig
-
Additive property defining a file that contains JSON transformation configurations used by the REST API when the client needs data in format of some particular data model version.
The file is loaded using the Resources interface, so it can be located in classpath or in the configuration directory.
The XSD of the file is available at http://schemas.haulmont.com/restapi/7.2/rest-json-transformations.xsd.
Default value: none
Example:
cuba.rest.jsonTransformationConfig = +com/company/sample/json-transformations.xmlUsed in the Web Client and Web Portal blocks.
- cuba.rest.maxUploadSize
-
Maximum file size (in bytes) that can be uploaded with the REST API.
Default value:
20971520(20 Mb)Used in the Web Client and Web Portal blocks.
- cuba.rest.optimisticLockingEnabled
-
Enables optimistic locking of
Versionedentities if theversionattribute is provided in JSON.Default value:
falseUsed in the Web Client and Web Portal blocks.
- cuba.rest.requiresSecurityToken
-
If true, a special system attribute is included in JSON for loaded entities, and the same attribute is expected to be passed back to REST when saving the entities. See details in Security Constraints for Collection Attributes.
Default value:
falseUsed in the Web Client and Web Portal blocks.
- cuba.rest.responseViewEnabled
-
If set to
true,responseViewparameter with the view name can be passed in the create and update requests. In this case the created/updated entity must be reloaded with the specified view and returned in the response JSON.If set to
false, the response contains JSON with a full graph of the created/updated entity.Default value:
trueUsed in the Web Client and Web Portal blocks.
- cuba.rest.reuseRefreshToken
-
Specifies whether a refresh token may be reused. If set to
falsethen when an access token is requested using the refresh token, a new refresh token will be issued, and the old refresh token will be revoked.Default value:
trueUsed in the Web Client and Web Portal blocks.
- cuba.rest.servicesConfig
-
Additive property defining a file that contains a list of services available for application REST API calls.
The file is loaded using the Resources interface, so it can be located in classpath or in the configuration directory.
The XSD of the file is available at http://schemas.haulmont.com/restapi/7.2/rest-services-v2.xsd.
Default value: none
Example:
cuba.rest.servicesConfig = +com/company/sample/app-rest-services.xmlUsed in the Web Client and Web Portal blocks.
- cuba.rest.storeTokensInDb
-
Enables storing of REST API security tokens in the database. By default, tokens are stored in memory only.
Stored in the database.
Interface:
RestConfigDefault value:
falseUsed in the Middleware block.
- cuba.rest.syncTokenReplication
-
Specifies whether newly created tokens should be sent to the cluster synchronously. By default, tokens are sent to the cluster asynchronously.
Stored in the application properties.
Interface:
RestConfigDefault value:
falseUsed in the Middleware block.
- cuba.rest.tokenMaskingEnabled
-
Specifies whether REST API token values should be masked in application logs.
Default value:
trueUsed in the Web Client and Web Portal blocks.
- cuba.rest.queriesConfig
-
Additive property defining a file that contains a list of JPQL queries available for application REST API calls.
The file is loaded using the Resources interface, so it can be located in classpath or in the configuration directory.
The XSD of the file is available at http://schemas.haulmont.com/restapi/7.2/rest-queries.xsd.
Default value: none
Example:
cuba.rest.queriesConfig = +com/company/sample/app-rest-queries.xmlUsed in the Web Client and Web Portal blocks.