5.3.8. Deployment to Jelastic Cloud
Below is an example of building and deployment application to the Jelastic cloud.
|
Please note that only projects using PostgreSQL or HSQL databases are currently supported. |
-
First, create a free test account in the Jelastic cloud using a web browser.
-
Create a new environment where the application WAR will be deployed:
-
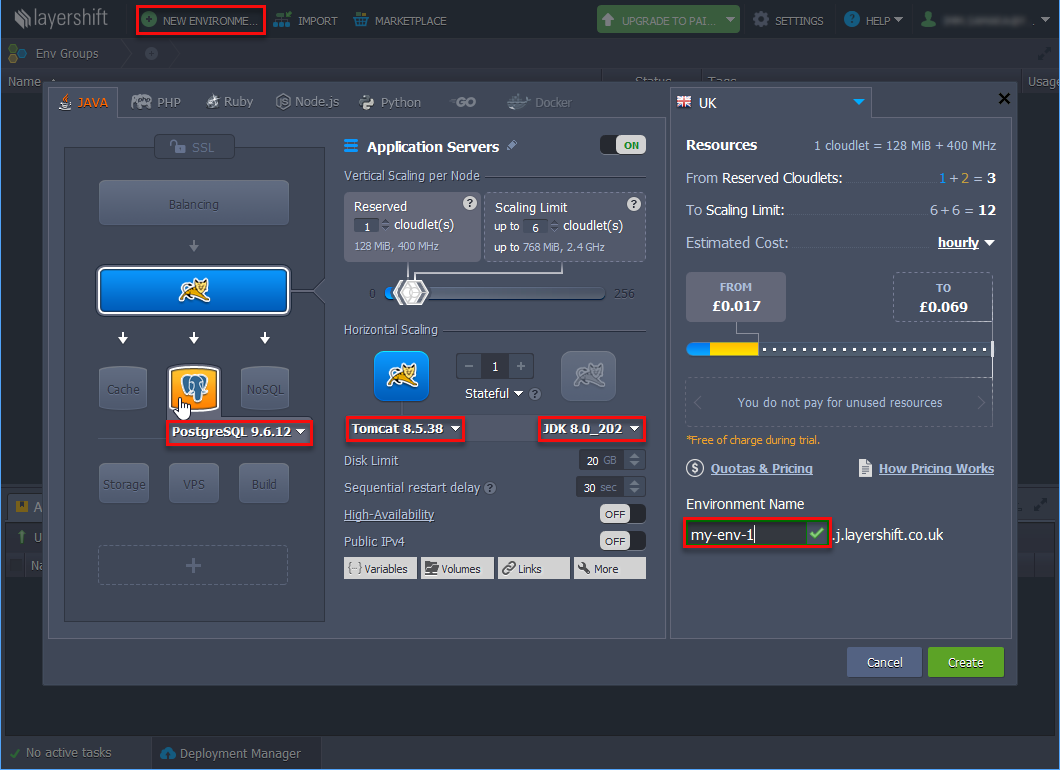
Click New Environment.
-
Specify the settings in the window that appears: a compatible environment should have Java 8, Tomcat 8 and PostgreSQL 9.1+ (if the project uses PostgreSQL database). In the Environment Name field, specify a unique environment name and click Create.
-
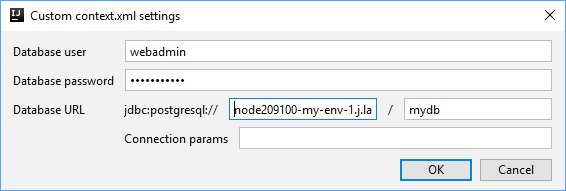
If the created environment uses PostgreSQL, you will receive an email with the database connection details. Go to the database administration web interface using the link in the email received after the creation of the environment and create an empty database. The database name should be specified later in the custom
context.xml.
-
-
Build Single WAR file using CUBA Studio:
-
Select CUBA > Deployment > WAR Settings in the main menu.
-
Select Build WAR checkbox.
-
Enter
..in the Application home directory field. -
Select Include JDBC driver and Include Tomcat’s context.xml checkboxes.
-
If your project uses PostgreSQL, press Generate button next to the Custom context.xml path field. Specify the database user, password, host, and name of the database that you created earlier in the Jelastic web interface.
-
Select Single WAR for Middleware and Web Client checkbox.
-
Press Generate button next to the Custom web.xml path field. Studio will generate a special
web.xmlof the single WAR comprising the Middleware and Web Client application blocks.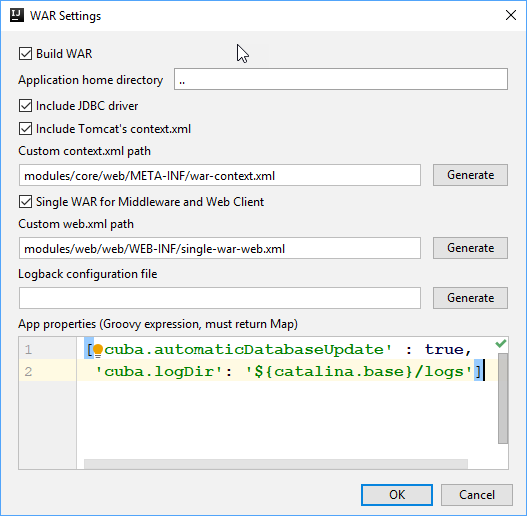
-
Add
cuba.logDirproperty in the App properties field:appProperties = ['cuba.automaticDatabaseUpdate': true, 'cuba.logDir': '${catalina.base}/logs'] -
Click the OK button. Studio adds the buildWar task to the
build.gradlefile.task buildWar(type: CubaWarBuilding) { includeJdbcDriver = true includeContextXml = true appProperties = ['cuba.automaticDatabaseUpdate': true, 'cuba.logDir' : '${catalina.base}/logs'] webXmlPath = 'modules/web/web/WEB-INF/single-war-web.xml' coreContextXmlPath = 'modules/core/web/META-INF/war-context.xml' } -
If your project uses HSQLDB, open the
buildWartask in thebuild.gradleand add thehsqlInProcess = trueproperty in order to run the embedded HSQL server while deploying the WAR file. Make sure that thecoreContextXmlPathproperty is not set.task buildWar(type: CubaWarBuilding) { appProperties = ['cuba.automaticDatabaseUpdate': true, 'cuba.logDir': '${catalina.base}/logs'] includeContextXml = true webXmlPath = 'modules/web/web/WEB-INF/single-war-web.xml' includeJdbcDriver = true hsqlInProcess = true } -
Start build process by running
buildWarfrom the command line:gradlew buildWarAs a result, the
app.warfile will be created in thebuild\distributions\warproject subdirectory.
-
-
Use deployWar Gradle task to deploy your WAR file to Jelastic.
task deployWar(type: CubaJelasticDeploy, dependsOn: buildWar){ email = **** password = **** hostUrl = 'app.j.layershift.co.uk' environment = 'my-env-1' } -
After the deployment process is completed, your application will be available in the Jelastic cloud. To open it, use a URL like
<environment>.<hostUrl>in the browser.For example:
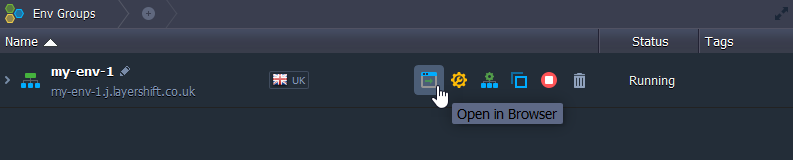
http://my-env-1.j.layershift.co.ukYou can also open the application using the Open in Browser button located on the environments panel in Jelastic.