4.5.3. Example of Application Component
In this section, we’ll consider a complete example of creating an application component and using it in a project. The component will provide a "Customer Management" functionality and include the Customer entity and corresponding UI screens. The application will use the Customer entity from the component as a reference in its Order entity.
- Creating the Customer Management component
-
-
Create a new project in Studio and specify the following properties on the New project screen:
-
Project name –
customers -
Project namespace –
cust -
Root package –
com.company.customers
-
-
Open the Project Properties window and set the Module prefix to
cust. -
Create the
Customerentity with at least thenameattribute.If your component contains
@MappedSuperclasspersistent classes, make sure they have descendants which are entities (i.e., annotated with@Entity) in the same project. Otherwise, such base classes will not be properly enhanced and you will not be able to use them in applications. -
Generate DB scripts and create standard screens for the
Customerentity:cust_Customer.browseandcust_Customer.edit. -
Go to the menu designer and rename the
application-custmenu item tocustomerManagement. Then, open themessages.propertiesfile in the Main Message Pack section and specify the new caption for thecustomerManagementmenu item. -
Generate app-component.xml descriptor by clicking the CUBA > Advanced > App Component Descriptor item in the main menu.
-
Test the Customer Management functionality:
-
Select CUBA > Create Database in the main menu.
-
Run the application: click the debug button next to the selected
CUBA Applicationconfiguration in the main toolbar. -
Open
http://localhost:8080/custin your web browser.
-
-
Install the application component into the local Maven repository by selecting the CUBA > Advanced > Install App Component menu item.
-
- Creating the Sales application
-
-
Create a new project in Studio and specify the following properties on the New project screen:
-
Project name –
sales -
Project namespace –
sales -
Root package –
com.company.sales
-
-
Open the Project Properties window and select Use local Maven repository checkbox.
-
Include application component in the project as described in the Installing add-on by coordinates section of the Studio User Guide. Use Maven coordinates of the Customer Management component, e.g.
com.company.customers:cust-global:0.1-SNAPSHOT. -
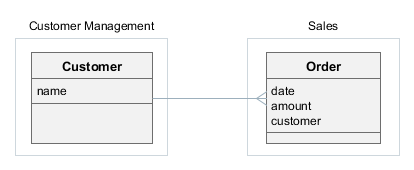
Create the
Orderentity and add thedateandamountattributes. Then add thecustomerattribute as a many-to-one association with theCustomerentity – it should be available in the Type drop-down list. -
Generate DB scripts and create standard screens for the
Orderentity. When creating standard screens, create anorder-with-customerview that includes thecustomerattribute and use it for the screens. -
Test the application functionality:
-
Select CUBA > Create Database in the main menu.
-
Run the application: click the debug button next to the selected
CUBA Applicationconfiguration in the main toolbar. -
Open
http://localhost:8080/appin your web browser. The application will contain two top-level menu items: Customer Management and Application with the corresponding functionality.
-
-
- Modifying the Customer Management component
-
Suppose we have to change the component functionality (add an attribute to
Customer) and then reassemble the application to incorporate the changes.-
Open the
customersproject in Studio. -
Edit the
Customerentity and add theaddressattribute. Include this attribute to both browser and editor screens. -
Generate DB scripts – a script for altering table will be created. Save the scripts.
-
Test the changes in the component:
-
Select CUBA > Update Database in the main menu.
-
Run the application: click the debug button next to the selected
CUBA Applicationconfiguration in the main toolbar. -
Open
http://localhost:8080/custin your web browser.
-
-
Re-install the application component into the local Maven repository by selecting the CUBA > Advanced > Install App Component menu item.
-
Switch to the
salesproject in Studio. -
Select CUBA > Build Tasks > Clean.
-
Select CUBA > Update Database in the main menu – the update script from the Customer Management component will be executed.
-
Run the application: click the debug button next to the selected
CUBA Applicationconfiguration in the main toolbar. -
Open
http://localhost:8080/appin your web browser – the application will contain theCustomerentity and screens with the newaddressattribute.
-