7.3.10.4. Container Deployment to Heroku
Set up the single Uber JAR as it is described in the Single Uber JAR Deployment section. Create a Heroku account and install Heroku CLI. For this purpose, please refer to the WAR Deployment to Heroku section.
Create the app and connect it to the database with the following command
heroku create cuba-sales-docker --addons heroku-postgresql:hobby-devAfter the task is completed you have to configure the database credentials in the jetty-env.xml file for the connection to the database created by Heroku.
-
Go to the https://dashboard.heroku.com.
-
Select your project, open the Resources tab and select the database.
-
In the newly opened window open the Settings tab and click the View Credentials button.
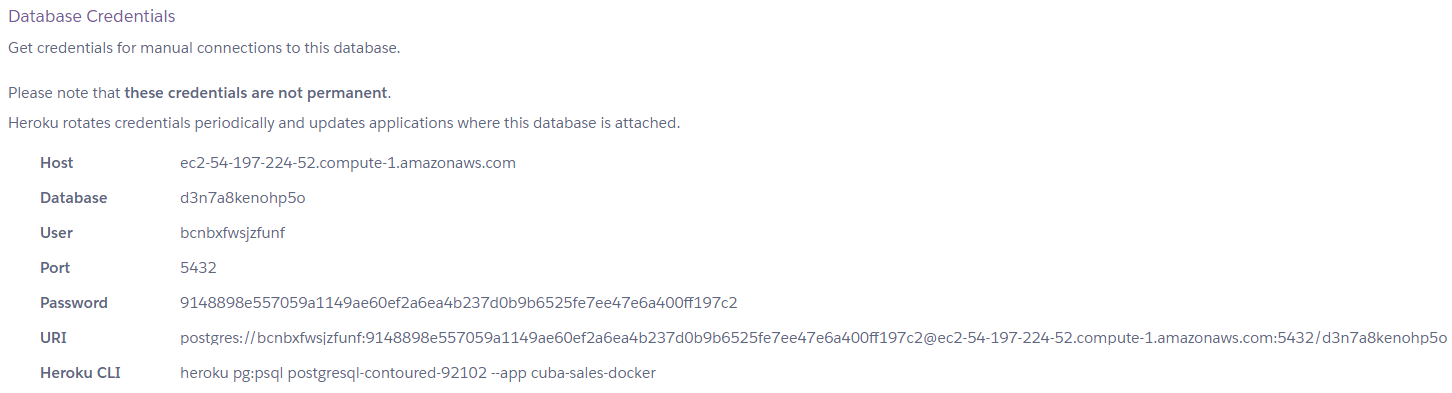
Switch to the IDE and open the jetty-env.xml file. You have to change the URL (host and database name), user name and password. Copy credentials from the site and paste them into the file.
<?xml version="1.0"?>
<!DOCTYPE Configure PUBLIC "-" "http://www.eclipse.org/jetty/configure_9_0.dtd">
<Configure id='wac' class="org.eclipse.jetty.webapp.WebAppContext">
    <New id="CubaDS" class="org.eclipse.jetty.plus.jndi.Resource">
        <Arg/>
        <Arg>jdbc/CubaDS</Arg>
        <Arg>
            <New class="org.apache.commons.dbcp2.BasicDataSource">
                <Set name="driverClassName">org.postgresql.Driver</Set>
                <Set name="url">jdbc:postgresql://<Host>/<Database></Set>
                <Set name="username"><User></Set>
                <Set name="password"><Password></Set>
                <Set name="maxIdle">2</Set>
                <Set name="maxTotal">20</Set>
                <Set name="maxWaitMillis">5000</Set>
            </New>
        </Arg>
    </New>
</Configure>
Build the single Uber JAR file using the Gradle task:
gradle buldUberJarAlso, you have to add some changes to the Dockerfile. First of all, if you use the free account, you have to restrict the amount of memory consumed by the application. Then you need to obtain the port of the app from the Heroku and add it to the image.
The Dockerfile should look like the following:
### Dockerfile

FROM openjdk:8

COPY . /usr/src/cuba-sales

CMD java -Xmx512m -Dapp.home=/usr/src/cuba-sales/home -jar /usr/src/cuba-sales/app.jar -port $PORT
Set up Git with the following commands:
git init
heroku git:remote -a cuba-sales-docker
git add .
git commit -am "Initial commit"
Then log in to the container registry. It’s the Heroku location for storing images.
heroku container:loginNext, build the image and push it to Container Registry
heroku container:push webHere web is the process type of the application. When you run this command, by default Heroku is going to build the image using the Dockerfile in the current directory, and then push it to Heroku.
After the deployment process is completed, your application will be accessible in web browser by an URL like https://cuba-sales-docker.herokuapp.com/app
You can also open the application from the Heroku dashboard using the Open app button.
The third way to open a running application is to use the following command (remember to add the app context to the link, e.g. https://cuba-sales-docker.herokuapp.com/app):
heroku open