5.8.8.1. Using a Third-party Vaadin Component
This is an example of using the Stepper component available at http://vaadin.com/addon/stepper, in an application project. The component enables changing text field value in steps using the keyboard, mouse scroll or built-in up/down buttons.
Create a new project in CUBA Studio and name it addon-demo.
A Vaadin add-on may be integrated if the application project has a web-toolkit module. Create the module by clicking the Create web toolkit module link of the Project properties navigator section.
Then click the Create new UI component link. The New UI component page will open. Select the Vaadin add-on value in the Component type section.
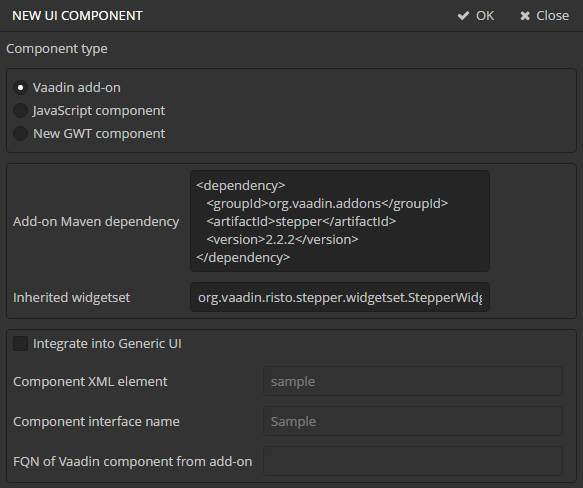
Fill in the following fields:
-
The Add-on Maven dependency field contains Maven coordinates of the Vaadin add-on. The add-on will be included as a dependency to the project. You can define coordinates in two formats:
-
As an XML copied from the add-on web site (http://vaadin.com/addon/stepper):
<dependency> <groupId>org.vaadin.addons</groupId> <artifactId>stepper</artifactId> <version>2.2.2</version> </dependency> -
In one line as you add dependencies in build.gradle:
org.vaadin.addons:stepper:2.2.2
-
-
The Inherited widgetset field contains a widgetset name of the add-on. In our case it is
org.vaadin.risto.stepper.widgetset.StepperWidgetset. -
Integrate into generic UI - deselect this checkbox as we do not integrate the component into the Generic UI in this example.
Press the OK button.
If you open the project in the IDE, you can see that Studio has changed two files:
-
In
build.gradle, the web module now contains a dependency on the add-on that contains the component.configure(webModule) { ... dependencies { ... compile("org.vaadin.addons:stepper:2.2.2") } -
The
AppWidgetSet.gwt.xmlfile of the web-toolkit module now inherits the add-on widgetset:<module> <inherits name="com.haulmont.cuba.web.toolkit.ui.WidgetSet" /> <inherits name="org.vaadin.risto.stepper.widgetset.StepperWidgetset" /> <set-property name="user.agent" value="safari" />TipYou can speed up the widgetset compilation by defining the user.agentproperty. In this example, widgetset will be compiled only for browsers based on WebKit: Chrome, Safari, etc.
Now the component from the Vaadin add-on is included to the project. Let’s see how to use it in the project screens.
-
Create a new entity
Customerwith two fields:-
nameof type String -
scoreof type Integer
-
-
Generate standard screens for the new entity. Ensure that the In module field is set to
Web Module. Screens that use Vaadin components directly must be placed in the web module.TipActually, screens can be placed in the gui module as well, but then the code that uses the Vaadin component should be moved to a separate companion. -
Next, we will add the
steppercomponent to the screen. You can place it in a FieldGroup or in a separate container. Let’s examine both methods.-
Add the
custom = "true"attribute to thescorefield of thefieldGroupcomponent of thecustomer-edit.xmlscreen.<?xml version="1.0" encoding="UTF-8" standalone="no"?> <window xmlns="http://schemas.haulmont.com/cuba/window.xsd" caption="msg://editCaption" class="com.company.addondemo.web.customer.CustomerEdit" datasource="customerDs" focusComponent="fieldGroup" messagesPack="com.company.addondemo.web.customer"> <dsContext> <datasource id="customerDs" class="com.company.addondemo.entity.Customer" view="_local"/> </dsContext> <layout expand="windowActions" spacing="true"> <fieldGroup id="fieldGroup" datasource="customerDs"> <column width="250px"> <field id="name"/> <field id="score" custom="true"/> </column> </fieldGroup> <frame id="windowActions" screen="editWindowActions"/> </layout> </window>Add the following code to the
CustomerEdit.javacontroller:package com.company.addondemo.web.customer; import com.company.addondemo.entity.Customer; import com.haulmont.cuba.gui.components.AbstractEditor; import com.haulmont.cuba.gui.components.Component; import com.haulmont.cuba.gui.components.FieldGroup; import com.haulmont.cuba.gui.components.VBoxLayout; import com.haulmont.cuba.gui.xml.layout.ComponentsFactory; import com.haulmont.cuba.web.gui.components.WebComponentsHelper; import com.vaadin.ui.Layout; import org.vaadin.risto.stepper.IntStepper; import javax.inject.Inject; import java.util.Map; public class CustomerEdit extends AbstractEditor<Customer> { @Inject private ComponentsFactory componentsFactory; @Inject private FieldGroup fieldGroup; private IntStepper stepper = new IntStepper(); @Override public void init(Map<String, Object> params) { fieldGroup.addCustomField("score", (datasource, propertyId) -> { Component box = componentsFactory.createComponent(VBoxLayout.class); Layout layout = (Layout) WebComponentsHelper.unwrap(box); layout.addComponent(stepper); stepper.setSizeFull(); stepper.addValueChangeListener(event -> datasource.getItem().setValue(propertyId, event.getProperty().getValue())); return box; }); } @Override protected void initNewItem(Customer item) { item.setScore(0); } @Override protected void postInit() { stepper.setValue(getItem().getScore()); } }The
init()method initializes the customscorefield. TheComponentsFactorycreates an instance of BoxLayout, retrieves a link to the Vaadin container via WebComponentsHelper, and adds the new component to it. TheBoxLayoutis then returned to be used in the custom field.Data binding is implemented programmatically by setting a current value to the
steppercomponent from the editedCustomerinstance in thepostInit()method. Additionally, the corresponding entity attribute is updated through the value change listener, when the user changes the value. -
The new component can be used in any part of the screen outside of the
FieldGroup. In order to do this, declare thescoreBoxcontainer in the XML-descriptor:<?xml version="1.0" encoding="UTF-8" standalone="no"?> <window xmlns="http://schemas.haulmont.com/cuba/window.xsd" caption="msg://editCaption" class="com.company.addondemo.web.customer.CustomerEdit" datasource="customerDs" focusComponent="fieldGroup" messagesPack="com.company.addondemo.web.customer"> <dsContext> <datasource id="customerDs" class="com.company.addondemo.entity.Customer" view="_local"/> </dsContext> <layout expand="windowActions" spacing="true"> <fieldGroup id="fieldGroup" datasource="customerDs"> <column width="250px"> <field id="name"/> </column> </fieldGroup> <hbox id="scoreBox" spacing="true"> <label value="Score" align="MIDDLE_LEFT"/> </hbox> <frame id="windowActions" screen="editWindowActions"/> </layout> </window>Inject the container to the screen controller, retrieve a link to the underlying Vaadin container and add the component to it:
package com.company.addondemo.web.customer;

import com.company.addondemo.entity.Customer;
import com.haulmont.cuba.gui.components.AbstractEditor;
import com.haulmont.cuba.gui.components.BoxLayout;
import com.haulmont.cuba.web.gui.components.WebComponentsHelper;
import com.vaadin.ui.Layout;
import org.vaadin.risto.stepper.IntStepper;

import javax.inject.Inject;
import java.util.Map;

public class CustomerEdit extends AbstractEditor<Customer> {

    @Inject
    private BoxLayout scoreBox;

    private IntStepper stepper = new IntStepper();

    @Override
    public void init(Map<String, Object> params) {
        com.vaadin.ui.Layout box = (Layout) WebComponentsHelper.unwrap(scoreBox);
        box.addComponent(stepper);

        stepper.addValueChangeListener(event ->
                getItem().setValue("score", event.getProperty().getValue()));
    }

    @Override
    protected void postInit() {
        stepper.setValue(getItem().getScore());
    }
}
Data binding is implemented in the same way as described above.
-
-
To adapt the component style, create a theme extension in the project. Click the Create theme extension link in the Project properties navigator section. Select the
halotheme. After that, open thethemes/halo/halo-ext.scssfile located in the web module and add the following code:@import "../halo/halo"; /* Define your theme modifications inside next mixin */ @mixin halo-ext { @include halo; /* Basic styles for stepper inner text box */ .stepper input[type="text"] { @include box-defaults; @include valo-textfield-style; &:focus { @include valo-textfield-focus-style; } } } -
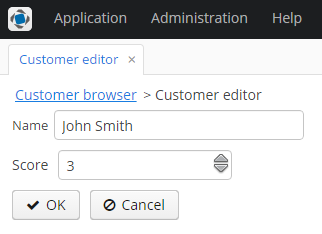
Start the application server. The resulting editor screen will look as follows: