2.1. CUBA Studio Installation
- Prerequisites
-
-
Make sure that Java SE Development Kit (JDK) 8 is installed by running the following command in the console:
java -versionThe command should return the Java version, e.g.
1.8.0_60. -
If you are using OpenJDK on Linux, install OpenJFX, for example:
sudo apt-get install openjfx -
If you connect to the internet via a proxy server, some Java system properties must be passed to the JVM running Studio and Gradle. These properties are explained here: http://docs.oracle.com/javase/8/docs/technotes/guides/net/proxies.html (see properties for HTTP and HTTPS protocols).
It is recommended to set these properties system-wide in the
JAVA_OPTSenvironment variable. The Studio launch script passesJAVA_OPTSto the Java executable.
-
- Fresh installation of CUBA Studio
-
-
Download an appropriate installer or ZIP archive from https://www.cuba-platform.com/download.
-
Run the installer or unzip the archive to a local directory, e.g.
c:/work/studio -
Launch the installed application or open the command line, go to
bindirectory and runstudio -
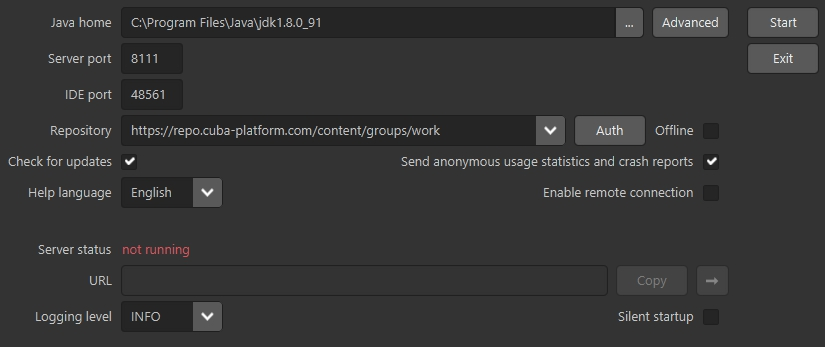
In the CUBA Studio Server window, enter the following parameters:
-
Java home − JDK installation to be used for building and running projects. If you have set the
JAVA_HOMEenvironment variable as described in the beginning of this chapter, it will appear in this field. Otherwise, Studio will try to find your Java installation itself. -
Advanced button opens a dialog that allows you to enter a path to Gradle home directory. Leave it empty; in this case, the required Gradle distribution will be downloaded automatically.
If you want to use a local Gradle distribution, enter the path to the respective directory. For project build system to work correctly, Gradle 3.4 is required.
-
Server port − CUBA Studio server port (the default port is 8111).
-
IDE port − IDE plugin listening port (the default port is 48561).
-
Repository − binary artifacts repository URL and authentication parameters.
The following options are also available:
-
Check for updates - check for new versions on every start.
-
Help language - built-in help language.
-
Offline - enable working with projects without an Internet connection, provided that all the required libraries have been previously downloaded from the repository.
-
Send anonymous statistics and crash reports - enable Studio to send error statistics to developers.
-
Enable remote connection - by default, it is assumed that Studio runs on localhost. Select this checkbox if you need to connect to this Studio instance from a remote host.
-
Silent startup - if selected, the Studio server starts in tray and opens UI in default browser automatically. This option is available only for Windows and macOS.
-
-
Click Start to run the Studio server.
The server will download, run, and connect to the Gradle daemon. This may take a significant amount of time on first startup; on subsequent launches, this will take just a few seconds.
After that, the web server will be started, and the URL of the Studio interface will appear in the URL field. By clicking →, you can open the address in your default web browser; by clicking Copy you can copy the address to the clipboard.
-
Open the specified address in the web browser.
-
In the Studio web interface, click Create new to create a new project, or Import to add an existing one to the Recent list.
-
Once the project is opened, the Studio will download the source code of the platform components and save it to the local folder. Before building the project, it is recommended to wait until the download is finished and make sure that the background task indicator in the bottom left corner has faded out.
-
- Updating CUBA Studio
-
If you are updating Studio to a newer bug-fix version (e.g. from 6.5.0 to 6.5.1), install it to the existing folder, e.g. on Windows it would be
C:\Program Files (x86)\CUBA Studio 6.5. When installing a new minor or major version, use a separate folder, e.g.CUBA Studio 6.6.If installed from Windows EXE installer or ZIP archive, Studio supports auto-update on newer bug-fix releases. Update files are saved in the
~/.haulmont/studio/updatefolder. In case of any problems with the new version, you can remove the update files and Studio will revert to the version installed manually.Auto-update does not work for minor and major releases and if Studio was installed from macOS DMG. In this case, you should download new installer and run it manually.