4.5.4. Using Application Components
Any CUBA application can be used as a component of another application. An application component is a full-stack library providing functionality on all layers - from database schema to business logic and UI.
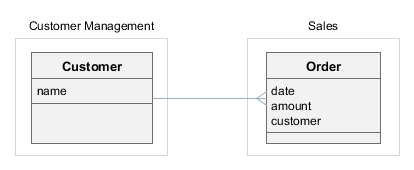
In this section, we’ll consider an example of creating an application component and using it in a project. The component will provide a "Customer Management" functionality and include the Customer entity and corresponding UI screens. The application will use the Customer entity from the component as a reference in its Order entity.
- Creating the Customer Management component
-
-
Create a new project in Studio and specify the following properties on the New project screen:
-
Project name -
customers -
Project namespace -
cust -
Root package -
com.company.customers
-
-
Edit Project properties and on the Advanced tab, set the Module prefix to
cust. This is necessary to assemble component artifacts with names different from the defaultapp. -
Create the
Customerentity with at least thenameattribute. Switch to the Instance name tab and specify addnameto the name pattern attributes.WarningIf your component contains
@MappedSuperclasspersistent classes, make sure they have descendants which are entities (i.e. annotated with@Entity) in the same project. Otherwise such base classes will not be properly enhanced and you will not be able to use them in applications. -
Generate DB scripts and create standard screens for the
Customerentity:cust$Customer.browseandcust$Customer.edit. After that, go to main menu designer and rename theapplicationmenu item tocustomerManagement. -
Click to the App component descriptor link on the Project properties panel. Save the generated descriptor by clicking OK.
-
Test the Customer Management functionality: Run > Create database, Run > Start application server, then open
http://localhost:8080/custin your web browser. -
Install the application component into the local Maven repository by executing the Run > Install app component menu command. This command just runs the
installGradle task after stopping Gradle daemons.
-
- Creating the Sales application
-
-
Create a new project in Studio and specify the following properties on the New project screen:
-
Project name -
sales -
Project namespace -
sales -
Root package -
com.company.sales
-
-
Edit Project properties and on the App components panel click the plus button next to Custom components. In the Custom application component dialog, select the
customersproject in the Registered project drop-down list. The list contains all project registered in Studio that have anapp-component.xmldescriptor. Click OK in the dialog. The Maven coordinates of the Customer Management component will appear in the list of custom components. Save the project properties by clicking OK. -
Create the
Orderentity and add thedateandamountattributes. Then add thecustomerattribute as a many-to-one association with theCustomerentity - it should be available in the Type drop-down list. -
Generate DB scripts and create standard screens for the
Orderentity. When creating standard screens, create aorder-with-customer-viewview that includes thecustomerattribute and use it for the screens. -
Test the application functionality: Run > Create database, Run > Start application server, then open
http://localhost:8080/appin your web browser. The application will contain two top level menu items: Customer Management and Application with the corresponding functionality.
-
- Modifying the Customer Management component
-
Suppose we have to change the component functionality (add an attribute to
Customer) and then reassemble the application to incorporate the changes.-
Open the
customersproject in Studio. -
Edit the
Customerentity and add theaddressattribute. When saving the entity, select both browser and editor screens to include the new attribute. -
Generate DB scripts - a script for altering table will be created. Save the scripts.
-
Test the changes in the component: Run > Update database, Run > Start application server, then open
http://localhost:8080/custin your web browser. -
Re-install the application component into the local Maven repository by executing the Run > Install app component menu command.
-
Close the
customersproject and opensales. -
Execute Build > Clean, then Build > Assemble project menu commands.
-
Execute Run > Update database - the update script from the Customer Management component will be executed.
-
Execute Run > Start application server and open
http://localhost:8080/appin your web browser - the application will contain theCustomerentity and screens with the newaddressattribute.
-
- Sharing the Customer Management component
-
You can share the application component by uploading it to a remote Maven repository.
-
Stop the Studio server.
-
Set up a repository as explained in Setting Up a Private Artifact Repository.
-
Open
build.gradleof thecustomersproject in a text editor. Replace the repository and its credentials inbuildscript/repositoriessection and add theuploadRepositoryto thecubasection:buildscript { ... repositories { maven { url 'http://repo.company.com/nexus/content/groups/work' // repository containing CUBA and your own artifacts credentials { username(rootProject.hasProperty('repoUser') ? rootProject['repoUser'] : 'admin') password(rootProject.hasProperty('repoPass') ? rootProject['repoPass'] : 'admin123') } } ... cuba { ... uploadRepository { url = 'http://repo.company.com/nexus/content/repositories/snapshots' // repository for uploading your artifacts user = 'admin' password = 'admin123' } } -
Open the command line and run
gradle assemblein thecustomersproject root directory. This ensures your new repository caches CUBA artifacts required for working in Studio. -
In the Studio server window, specify your repository and credentials instead of the standard CUBA repository. Start the Studio server.
-
Open the
customersproject in Studio. -
In the Studio Search dialog (Alt-/), find the
uploadArchivesGradle task and run it. You can also run this task from the command line. The Customer Management component artifacts will be uploaded to your repository. -
Remove the component artifacts from your local Maven repository to ensure that they will be downloaded from the remote repository when the
salesapplication is assembled the next time: just delete the.m2/repository/com/companyfolder located in your user home directory. -
Open the
customersproject in Studio. The repository URL in itsbuild.gradlewill be automatically changed to the one specified in the Studio server window. -
Now you can assemble and run the application - the Customer Management component will be downloaded from the remote repository.
-