5.8.8.2. Integrating a Vaadin Component into the Generic UI
In the previous section, we have included the third-party Stepper component in the project. In this section, we will integrate it into CUBA Generic UI. This will allow developers to use the component declaratively in the screen XML and bind it to the data model entities through datasources.
Create a new project in CUBA Studio and name it addon-gui-demo. Type agd in the Project namespace field.
Create the web-toolkit module by clicking the Create web toolkit module link of the Project properties navigator section.
Then click the Create new UI component link. The New UI component page will open. Select the Vaadin add-on value in the Component type section.
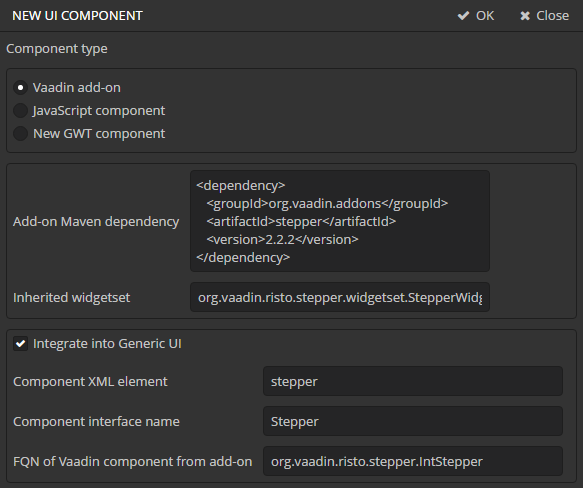
Fill in the Add-on Maven dependency and Inherited widgetset as described in the previous section.
Then fill in the fields of the bottom section:
-
Integrate into Generic UI - defines that a component should be integrated into the Generic UI.
-
Component XML element - an element to be used in screen XML descriptors. Enter
stepper. -
Component interface name - a name of the component Generic UI interface. Enter
Stepper. -
FQN of the Vaadin component from add-on - fully qualified class name of the Vaadin component from the add-on. In our case it is
org.vaadin.risto.stepper.IntStepper.
When you click OK, Studio will do the following:
-
Add the Vaadin add-on as a web module dependency in
build.gradle. -
Include add-on widgetset in
AppWidgetSet.gwt.xmlof web-toolkit module. -
Generate stubs for the following files:
-
Stepper- an interface of the component in the gui module. -
WebStepper- a component implementation in the web module. -
StepperLoader- a component XML-loader in the gui module. -
ui-component.xsd- a new component XML schema definition. If the file already exists, the information about the new component will be added to the existing file. -
cuba-ui-component.xml- the file that registers a new component loader in web module. If the file already exists, the information about the new component will be added to the existing file.
-
Open the project in the IDE.
Let’s walk through generated files add make necessary changes.
-
Open the
Stepperinterface in the gui module. Replace its content with the following code:package com.company.addonguidemo.gui.components; import com.haulmont.cuba.gui.components.Field; public interface Stepper extends Field { String NAME = "stepper"; boolean isManualInputAllowed(); void setManualInputAllowed(boolean value); boolean isMouseWheelEnabled(); void setMouseWheelEnabled(boolean value); int getStepAmount(); void setStepAmount(int amount); int getMaxValue(); void setMaxValue(int maxValue); int getMinValue(); void setMinValue(int minValue); }The base interface for the component is
Field, which is designed to display and edit an entity attribute. -
Open the
WebStepperclass - a component implementation in the web module. Replace its content with the following code:package com.company.addonguidemo.web.gui.components; import com.company.addonguidemo.gui.components.Stepper; import com.haulmont.cuba.web.gui.components.WebAbstractField; import org.vaadin.risto.stepper.IntStepper; public class WebStepper extends WebAbstractField<IntStepper> implements Stepper { public WebStepper() { this.component = new org.vaadin.risto.stepper.IntStepper(); } @Override public boolean isManualInputAllowed() { return component.isManualInputAllowed(); } @Override public void setManualInputAllowed(boolean value) { component.setManualInputAllowed(value); } @Override public boolean isMouseWheelEnabled() { return component.isMouseWheelEnabled(); } @Override public void setMouseWheelEnabled(boolean value) { component.setMouseWheelEnabled(value); } @Override public int getStepAmount() { return component.getStepAmount(); } @Override public void setStepAmount(int amount) { component.setStepAmount(amount); } @Override public int getMaxValue() { return component.getMaxValue(); } @Override public void setMaxValue(int maxValue) { component.setMaxValue(maxValue); } @Override public int getMinValue() { return component.getMinValue(); } @Override public void setMinValue(int minValue) { component.setMinValue(minValue); } }The chosen base class is
WebAbstractField, which implements the methods of theFieldinterface. -
The
StepperLoaderclass in gui module loads the component from its representation in XML.package com.company.addonguidemo.gui.xml.layout.loaders; import com.company.addonguidemo.gui.components.Stepper; import com.haulmont.cuba.gui.xml.layout.loaders.AbstractFieldLoader; public class StepperLoader extends AbstractFieldLoader<Stepper> { @Override public void createComponent() { resultComponent = factory.createComponent(Stepper.class); loadId(resultComponent, element); } @Override public void loadComponent() { super.loadComponent(); String manualInput = element.attributeValue("manualInput"); if (manualInput != null) { resultComponent.setManualInputAllowed(Boolean.valueOf(manualInput)); } String mouseWheel = element.attributeValue("mouseWheel"); if (mouseWheel != null) { resultComponent.setMouseWheelEnabled(Boolean.valueOf(mouseWheel)); } String stepAmount = element.attributeValue("stepAmount"); if (stepAmount != null) { resultComponent.setStepAmount(Integer.valueOf(stepAmount)); } String maxValue = element.attributeValue("maxValue"); if (maxValue != null) { resultComponent.setMaxValue(Integer.valueOf(maxValue)); } String minValue = element.attributeValue("minValue"); if (minValue != null) { resultComponent.setMinValue(Integer.valueOf(minValue)); } } }The
AbstractFieldLoaderclass contains code for loading basic properties of theFieldcomponent. SoStepperLoaderloads only the specific properties of theSteppercomponent. -
The
cuba-ui-component.xmlfile in the web module registers the new component and its loader. Leave the file unchanged.<?xml version="1.0" encoding="UTF-8" standalone="no"?> <components> <component> <name>stepper</name> <componentLoader>com.company.addonguidemo.gui.xml.layout.loaders.StepperLoader</componentLoader> <class>com.company.addonguidemo.web.gui.components.WebStepper</class> </component> </components> -
The
ui-component.xsdfile in gui module contains XML schema definitions of custom visual components. Add thestepperattributes definition.<?xml version="1.0" encoding="UTF-8" standalone="no"?> <xs:schema xmlns="http://schemas.company.com/agd/0.1/ui-component.xsd" attributeFormDefault="unqualified" elementFormDefault="qualified" targetNamespace="http://schemas.company.com/agd/0.1/ui-component.xsd" xmlns:xs="http://www.w3.org/2001/XMLSchema"> <xs:element name="stepper"> <xs:complexType> <xs:attribute name="id" type="xs:string"/> <xs:attribute name="caption" type="xs:string"/> <xs:attribute name="width" type="xs:string"/> <xs:attribute name="height" type="xs:string"/> <xs:attribute name="datasource" type="xs:string"/> <xs:attribute name="property" type="xs:string"/> <xs:attribute name="manualInput" type="xs:boolean"/> <xs:attribute name="mouseWheel" type="xs:boolean"/> <xs:attribute name="stepAmount" type="xs:int"/> <xs:attribute name="maxValue" type="xs:int"/> <xs:attribute name="minValue" type="xs:int"/> </xs:complexType> </xs:element> </xs:schema>
Let’s see how to add the new component to a screen.
-
Create a new entity
Customer. The entity have two fields:-
nameof type String -
scoreof type Integer
-
-
Generate standard screens for the new entity.
-
Add the
steppercomponent to the editor screen. You can place it in a FieldGroup or in a separate container. We’ll examine both methods.-
Using the component inside a container.
-
Open the
customer-edit.xmlfile. -
Define the new namespace
xmlns:app="http://schemas.company.com/agd/0.1/ui-component.xsd". -
Remove the
scorefield fromfieldGroup. -
Add
steppercomponent to the screen.
As a result, the XML descriptor should look like this:
<?xml version="1.0" encoding="UTF-8" standalone="no"?>
<window xmlns="http://schemas.haulmont.com/cuba/window.xsd"
        xmlns:app="http://schemas.company.com/agd/0.1/ui-component.xsd"
        caption="msg://editCaption"
        class="com.company.addonguidemo.gui.customer.CustomerEdit"
        datasource="customerDs"
        focusComponent="fieldGroup"
        messagesPack="com.company.addonguidemo.gui.customer">
    <dsContext>
        <datasource id="customerDs"
                    class="com.company.addonguidemo.entity.Customer"
                    view="_local"/>
    </dsContext>
    <layout expand="windowActions" spacing="true">
        <fieldGroup id="fieldGroup" datasource="customerDs">
            <column width="250px">
                <field id="name"/>
            </column>
        </fieldGroup>
        <app:stepper id="stepper" datasource="customerDs" property="score" caption="Score"
                     minValue="1" maxValue="20"/>
        <frame id="windowActions" screen="editWindowActions"/>
    </layout>
</window>
In the example above, the
steppercomponent is associated with thescoreattribute of theCustomerentity. An instance of this entity is managed by thecustomerDsdatasource. -
-
Using the new component inside a FieldGroup:
<?xml version="1.0" encoding="UTF-8" standalone="no"?>
<window xmlns="http://schemas.haulmont.com/cuba/window.xsd"
        caption="msg://editCaption"
        class="com.company.addonguidemo.gui.customer.CustomerEdit"
        datasource="customerDs"
        focusComponent="fieldGroup"
        messagesPack="com.company.addonguidemo.gui.customer">
    <dsContext>
        <datasource id="customerDs"
                    class="com.company.addonguidemo.entity.Customer"
                    view="_local"/>
    </dsContext>
    <layout expand="windowActions" spacing="true">
        <fieldGroup id="fieldGroup" datasource="customerDs">
            <column width="250px">
                <field id="name"/>
                <field id="score" custom="true"/>
            </column>
        </fieldGroup>
        <frame id="windowActions" screen="editWindowActions"/>
    </layout>
</window>
package com.company.addonguidemo.gui.customer; import com.company.addonguidemo.entity.Customer; import com.company.addonguidemo.gui.components.Stepper; import com.haulmont.cuba.gui.components.AbstractEditor; import com.haulmont.cuba.gui.components.FieldGroup; import com.haulmont.cuba.gui.xml.layout.ComponentsFactory; import javax.inject.Inject; import java.util.Map; public class CustomerEdit extends AbstractEditor<Customer> { @Inject private ComponentsFactory componentsFactory; @Inject private FieldGroup fieldGroup; @Override public void init(Map<String, Object> params) { fieldGroup.addCustomField("score", (datasource, propertyId) -> { Stepper stepper = componentsFactory.createComponent(Stepper.class); stepper.setDatasource(datasource, propertyId); stepper.setWidth("100%"); return stepper; }); } }
-
-
To adapt the component style, create a theme extension in the project. Click the Create theme extension link in the Project properties navigator section. Select the
halotheme. After that, open thethemes/halo/halo-ext.scssfile located in the web module and add the following code:@import "../halo/halo"; /* Define your theme modifications inside next mixin */ @mixin halo-ext { @include halo; /* Basic styles for stepper inner text box */ .stepper input[type="text"] { @include box-defaults; @include valo-textfield-style; &:focus { @include valo-textfield-focus-style; } } } -
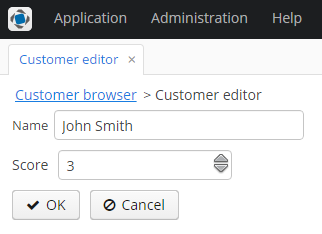
Start the application server. The resulting editor screen will look as follows: