1. Overview
CUBA WebDAV Add-on provides the following functionalities:
-
Editing and viewing documents using desktop versions of external applications (MS Word, MS Excel, etc.).
-
Document version control. After updating a document, a new version of it is created on the server side. At the same time, the component supports work with documents having versioning both enabled and disabled.
-
Granting and restricting access to certain documents.
2. Getting Started
2.1. Minimal Requirements
The minimum version of Microsoft Office required for opening documents via the WebDav protocol is MS Office 2010 SP2, or higher.
To check which versions of Microsoft Office and Service Pack (SP) are installed on your computer, launch MS Word and open the Product Information section from File → Help.
Service Pack 2 for MS Office 2010 (and later versions) should have the following number: 14.0.7015.1000 (or greater). To update your Service Pack, follow this link.
2.2. Installation via CUBA Studio
2.2.1. Adding Repository
-
Open your project in CUBA Studio.
-
Edit Properties.

-
Click the Plus button in the Repositories section.
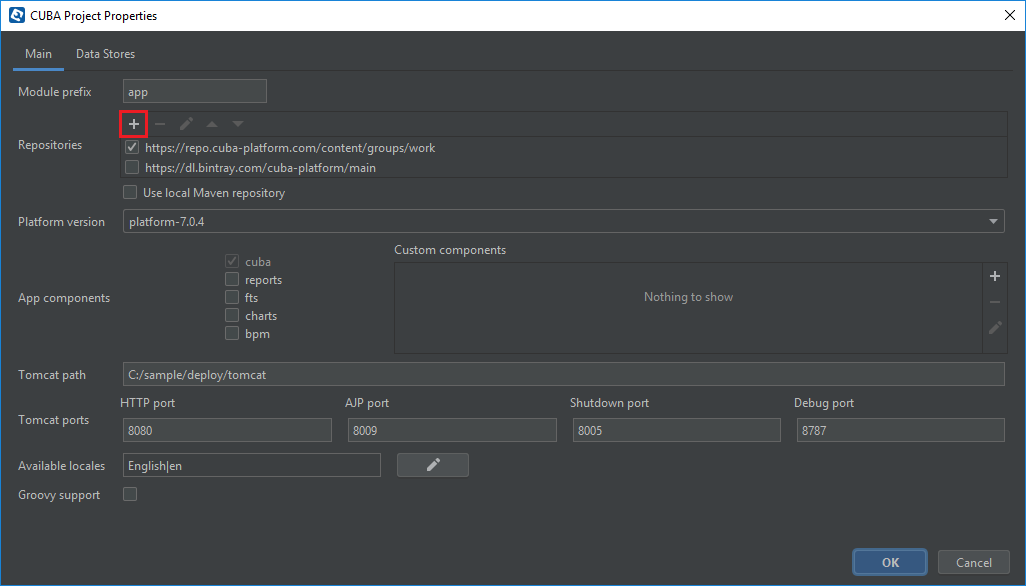
-
Specify the repository URL:
https://repo.cuba-platform.com/content/groups/premiumand your credentials in the corresponding fields. The first part of your license key before dash is the repository user name, the part after dash is the password. For example, if your key is111111222222-abcdefabcdef, then the user name is111111222222and the password isabcdefabcdef. Click OK to save the changes.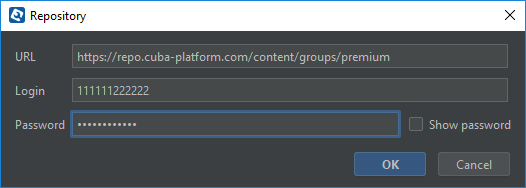
-
Select the added repository in the list of repositories to use it in your project.
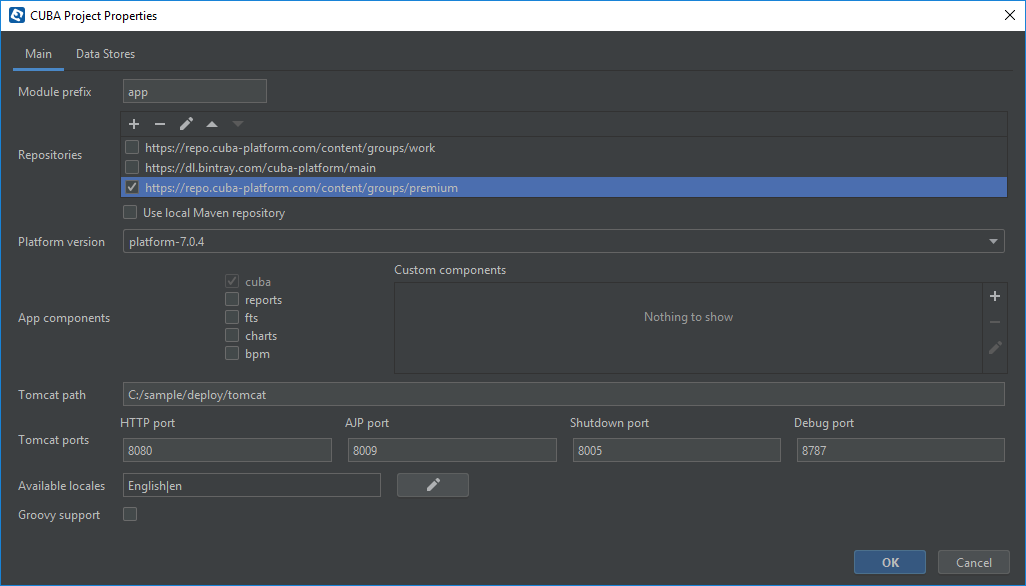
-
Click OK to save the project properties.
2.2.2. Adding Component
-
Edit Properties.
-
Click the Plus button in the App components section.
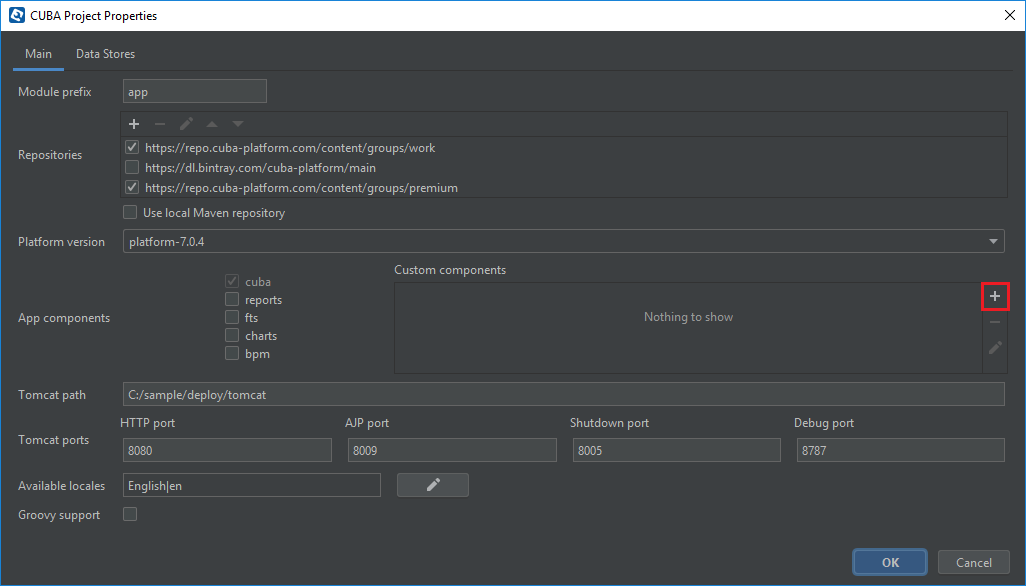
-
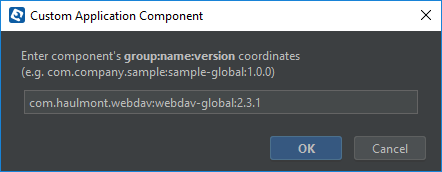
Specify the coordinates of the component in the corresponding field as follows: group:name:version (see the Compatible Versions). Click OK to confirm the operation.
-
Click OK to save the project properties.
2.3. User Access
If there are some application users created in the system before activating the WebDav component (e.g. admin), the component functionalities are not available to them. To grant those users access, it is mandatory to change their passwords.
Please check this documentation for more details.
2.4. Enabling Component
Installing the Webdav component to the system, which is already in production use, does not entail any visible changes in the application behavior.
The component functionalities are available only for fields of the FileDescriptor and WebdavDocument types. To enable them, use one (or several if required) of the options provided below:
-
Enabling the functionalities for all fields of the FileDescriptor type.
-
Set the value of the
webdav.enabledproperty totrue. After this, WebDAV will be enabled for all fields of the FileDescriptor type (for more information, refer to Application Properties.
-
-
Enabling the functionalities for particular fields using the
@WebdavSupportannotation.
Note: Using this option allows enabling Webdav only for fields of the FileDescriptor type. However, versioning can be enabled for fields of both FileDescriptor and WebdavDocument types.
    @Table(name = "CONTRACTSYSTEM_CONTRACT")
    @Entity(name = "contractsystem$Contract")
    public class Contract extends StandardEntity {
       // ...

       @WebdavSupport
       @ManyToOne(fetch = FetchType.LAZY)
       @JoinColumn(name = "DOCUMENT_ID")
       protected FileDescriptor document;

       // ...
}-
Enabling the functionalities for fields of the WebdavDocument type. To learn how to create attributes of the WebdavDocument type, please refer to Creating Attributes of the WebdavDocument Type.
    @Table(name = "CONTRACTSYSTEM_CONTRACT")
    @Entity(name = "contractsystem$Contract")
    public class Contract extends StandardEntity {
       // ...

       @ManyToOne(fetch = FetchType.LAZY)
       @JoinColumn(name = "DOCUMENT_ID")
       protected WebdavDocument document;

       // ...
    }
The figure below shows how the Document field is displayed when the component functionalities are enabled.
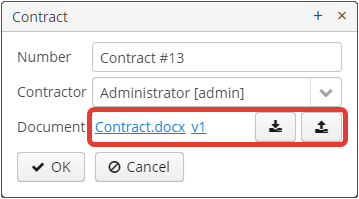
Note: After enabling the WebDav component, its functionalities are available only when working with freshly-created objects. To apply the changes to previously created objects, it is required to migrate the data (for more details, see Data Migration).
Before using the component, check that all application properties are configured properly. For more information, get acquainted with Application Properties.
If you want to use WebDAV fields in the CUBA <form> element then you need to add WebDAV component scheme to your screen XML file
xmlns:wd="http://schemas.haulmont.com/webdav/ui-component.xsd"Following fields can be used to manage WebDAV documents:
-
webdav-document-upload- field for WebDAV document -
webdav-document-upload- field for FileDescriptor
2.5. Links
The component enables to receive a link to a document, which can be published on a web-portal or passed to third parties. When opening the link, your browser requests credentials for accessing the document / document version. After successful authorization, the document/version is opened in a desktop version of an external application.
3. Component Features
3.1. Data Model
3.1.1. WebdavSupport Annotation
The @WebdavSupport annotation defines whether the component functionality is enabled for a particular field. The
annotation can be specified for fields of the FileDescriptor and WebdavDocument types.
Parameters:
-
versioning - enables versioning support for a particular field.
-
enabled - disables/enables the component functionalities for a field. Note that this parameter is notapplicable to fields of the WebdavDocument type.
3.1.2. Examples
Example 1. Setting up @WebdavSupport for a field of the FileDescriptor type.
@Table(name = "CONTRACTSYSTEM_CONTRACT")
@Entity(name = "contractsystem$Contract")
public class Contract extends StandardEntity {
   // ...

   @WebdavSupport
   @ManyToOne(fetch = FetchType.LAZY)
   @JoinColumn(name = "DOCUMENT_ID")
   protected FileDescriptor document;

   // ...
}
Example 2. Setting up @WebdavSupport for a field of the WebdavDocument type.
@Table(name = "CONTRACTSYSTEM_CONTRACT")
@Entity(name = "contractsystem$Contract")
public class Contract extends StandardEntity {
   // ...

   @OneToOne(fetch = FetchType.LAZY)
   @JoinColumn(name = "DOCUMENT_ID")
   protected WebdavDocument document;

   // ...
}
3.2. Version Control
3.2.1. Document Version Manager
Document Version Manager provides a number of functionalities for maintaining document versions. This functionality is supported only if versioning is enabled for a document.
There are two possible modes of working with the screen: editing and read only.
When editing is available, the screen is opened via the WebdavDocumentUploadField component by clicking a link with a document version number.
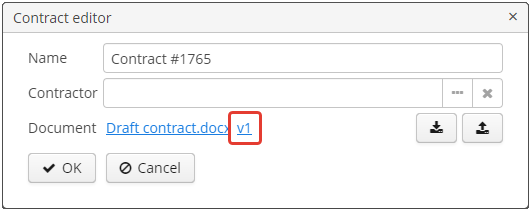
After that, the Document versions manager dialog window is opened.
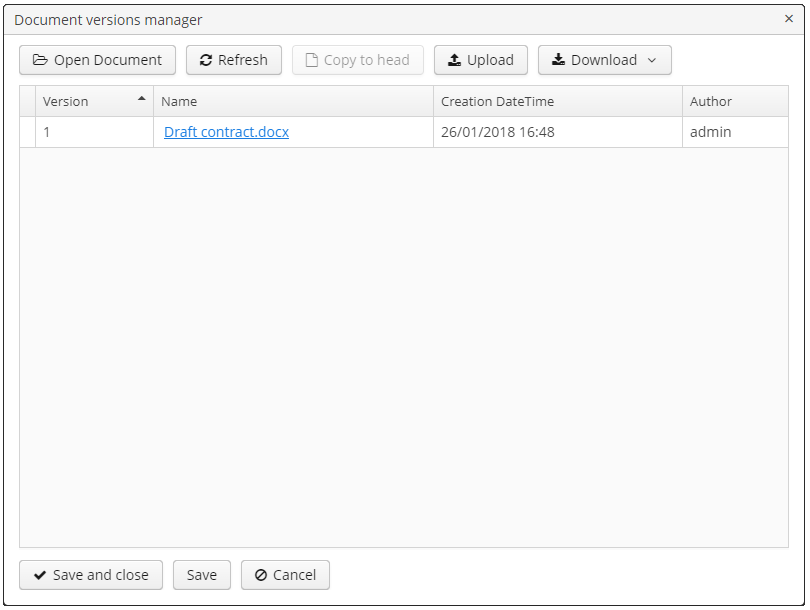
When editing is enabled, Document Version Manager supports the following operations:
-
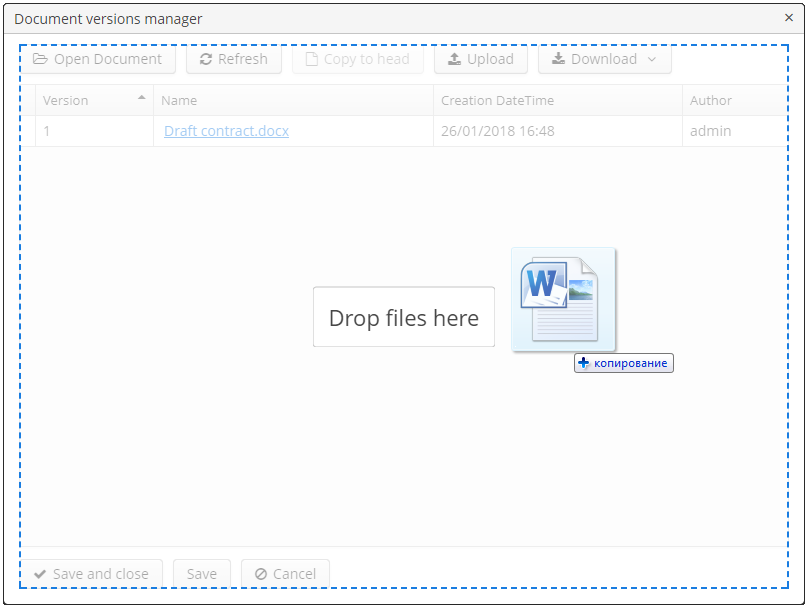
Creating a new document version. Clicking Upload allows selecting files to upload to the system. This can also be done by dragging and dropping a required file to the DropZone. After that, uploaded files are numerated in accordance with the number of the latest document version. Numbers of new versions are tagged with the * symbol. This means that they have been uploaded but are not linked to a document yet. Thus, version numbers can be updated after saving the changes. If the dialog window is closed without saving, then all versions tagged with * will be removed after launching the WebdavDocumentVersionsCleaner.
-
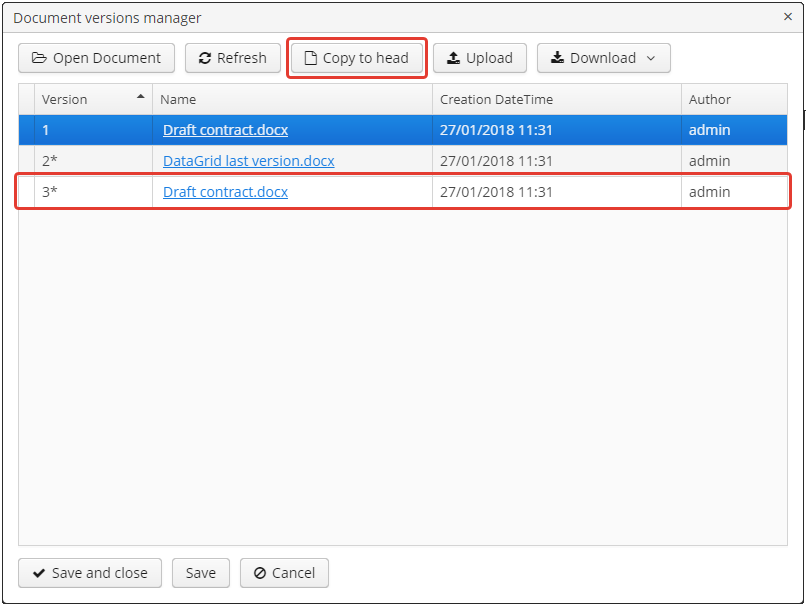
Creating a new document version based on another one. Selecting a document version and clicking the Copy to head button enables to copy and numerate it in accordance with the number of the latest document version. Numbers of new versions are tagged with the * symbol. This means that they have been uploaded but are not linked to a document yet. Thus, version numbers can be updated after saving the changes. If the dialog window is closed without saving, then all versions tagged with * will be removed after launching the WebdavDocumentVersionsCleaner.
-
Opening a document for editing. Every time a document is saved in an external application, its new version is sent to the database. Use the Refresh button to update the list of document versions shown in Document Version Manager.
Note: Clicking Refresh deletes all unsaved document versions. Thus, if some document version was copied and not saved, then the changes are discarded.
-
Opening a document for reading (read only). To open a document for reading, it is required to click a link with a file name.
-
Downloading a ZIP-archive with one or several document versions. The Download button contains two options for downloading selected documents/versions. The first option allows downloading documents as separate files. The Download as ZIP option enables to send all selected documents to a ZIP-archive and download it. For the sake of convenience, file names contain -v suffixes with corresponding version numbers, e.g. example-v3.docx, document-v1.docx.
3.2.2. Conflict Resolution Policies
There are several policies intended to resolve conflicts, which may occur when collaborate editing a document. By default, RejectMergePolicy is applied.
Let us consider an example of how these policies can be helpful. For instance, two users simultaneously opened the same document in Document Version Manager and added a bunch of new versions. The first user finished working with his/her versions and saved the changes. After that, the second user did the same and, at that moment, the database contained versions created by both the first and the second user. However, each user can see only his/her versions in Document Version Manager.
This situation may cause issues with ordering and saving these conflicting document versions. In order to resolve the conflicts, the policies mentioned below can be used.
RebaseMergePolicy
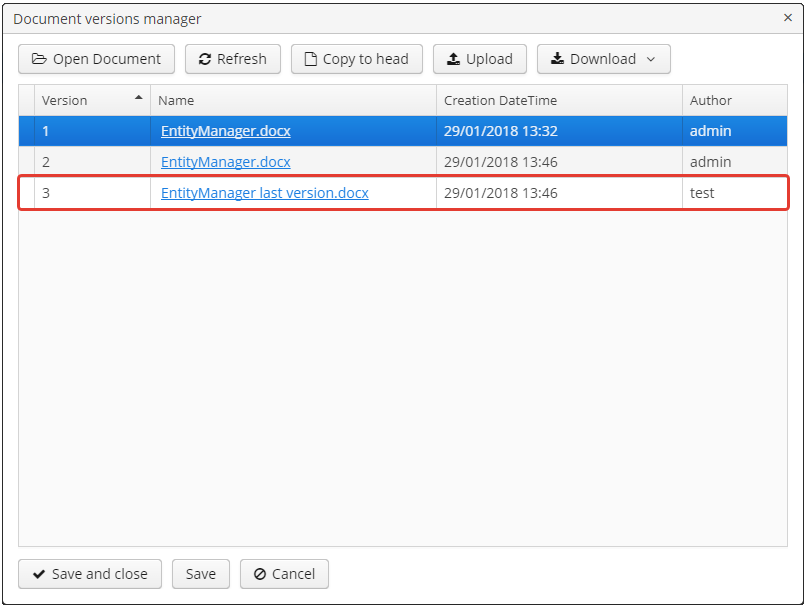
RebaseMergePolicy allows putting new versions of a document after the ones, which already exist in the database. New versions are numbered in accordance with the number of the latest document version existing in the database.
Let us return to our example: two users opened the same document in Document Version Manager.
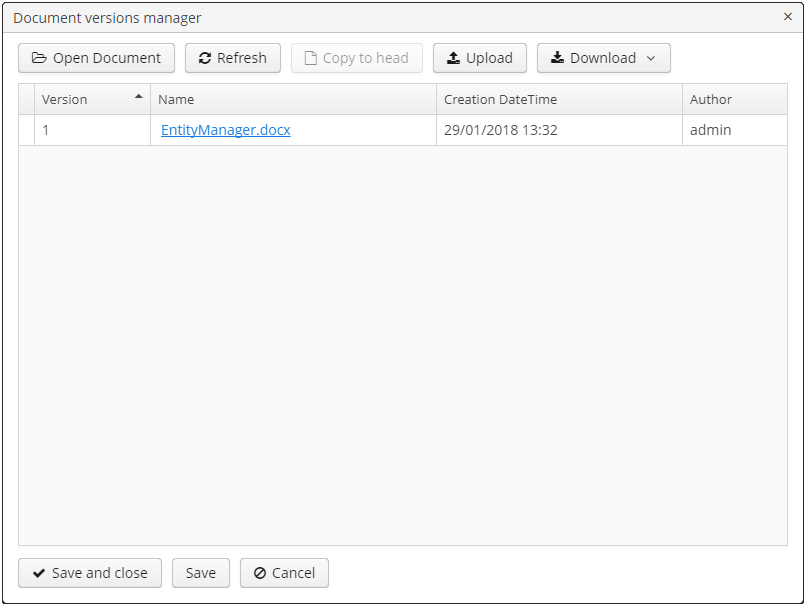
The first user added a new document version.
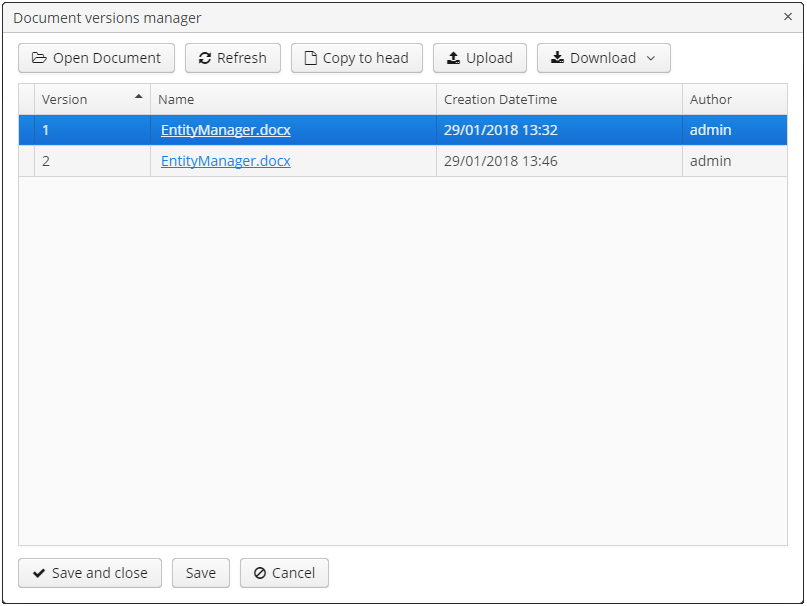
After that, the second user also added a new version and saved the changes. After saving, this version is shown as the third one and we can see the version created by the first user as well.
CancelMyMergePolicy
If document versions have changed when working in Document Version Manager, then all versions marked with * are deleted.
CancelTheirMergePolicy
If document versions have changed when working in Document Version Manager, then all versions marked with * are saved instead of the ones added in Document Version Manager.
RejectMergePolicy
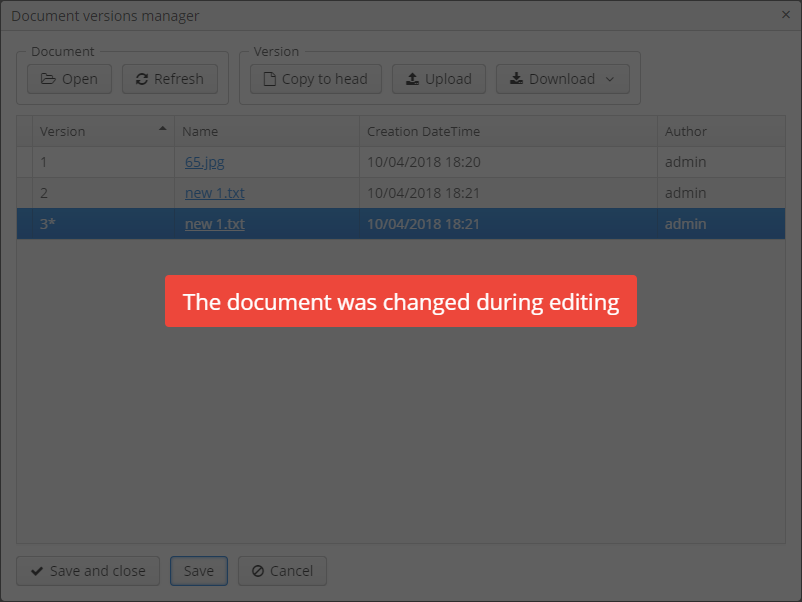
If a conflict occurs, the corresponding warning is displayed and all new versions are not saved.
3.2.3. Overriding Default Conflict Resolution Policy
If it is required to change the system behavior regarding conflicts, the following steps should be taken. Each step is illustrated with code samples describing how to change the default policy to RejectPolicyMergePolicy.
-
Create a custom
DataSupplierclass inherited fromWebdavDataSupplierand override thegetDefaultMergePolicymethod so that it returned an instance of a policy class.public class RejectDataSupplier extends WebdavDataSupplier { @Override protected MergePolicy<WebdavDocumentVersion> getDefaultMergePolicy() { return new RejectMergePolicy<>(); } } -
Create a screen inherited from
webdav-show-document-version-edit.xmland override it. Specify the previously createdDataSupplierclass in the descriptor.<?xml version="1.0" encoding="UTF-8" standalone="no"?> <window xmlns="http://schemas.haulmont.com/cuba/window.xsd" dataSupplier="com.haulmont.contractsystem.data.RejectDataSupplier" extends="com/haulmont/webdav/web/screens/documentversion/webdav-show-document-version-edit.xml"> <layout/> </window> -
Add the screen with the
webdav$WebdavShowDocumentVersion.editidentifier to the menu.<screen id="webdav$WebdavShowDocumentVersion.edit" template="com/haulmont/contractsystem/web/screens/ext-webdav-document-version-edit.xml"/>As a result, when a conflict occurs, the
WebdavRejectMergePolicyExceptionis thrown and the corresponding message is shown.
3.3. Data Migration
3.3.1. Data Migration Overview
WebDav functionalities are unavailable for already existing data until it is migrated.
For example, let us enable WebDav for the document attribute of the Contract entity using the @WebdavSupport annotation
(see WebdavSupport Annotation).
@Table(name = "CONTRACTSYSTEM_CONTRACT")
@Entity(name = "contractsystem$Contract")
public class Contract extends StandardEntity {

   ...

   @NotNull
   @WebdavSupport //Enable WebDav
   @OnDelete(DeletePolicy.CASCADE)
   @ManyToOne(fetch = FetchType.LAZY, optional = false)
   @JoinColumn(name = "DOCUMENT_ID")
   protected FileDescriptor document;

   ...
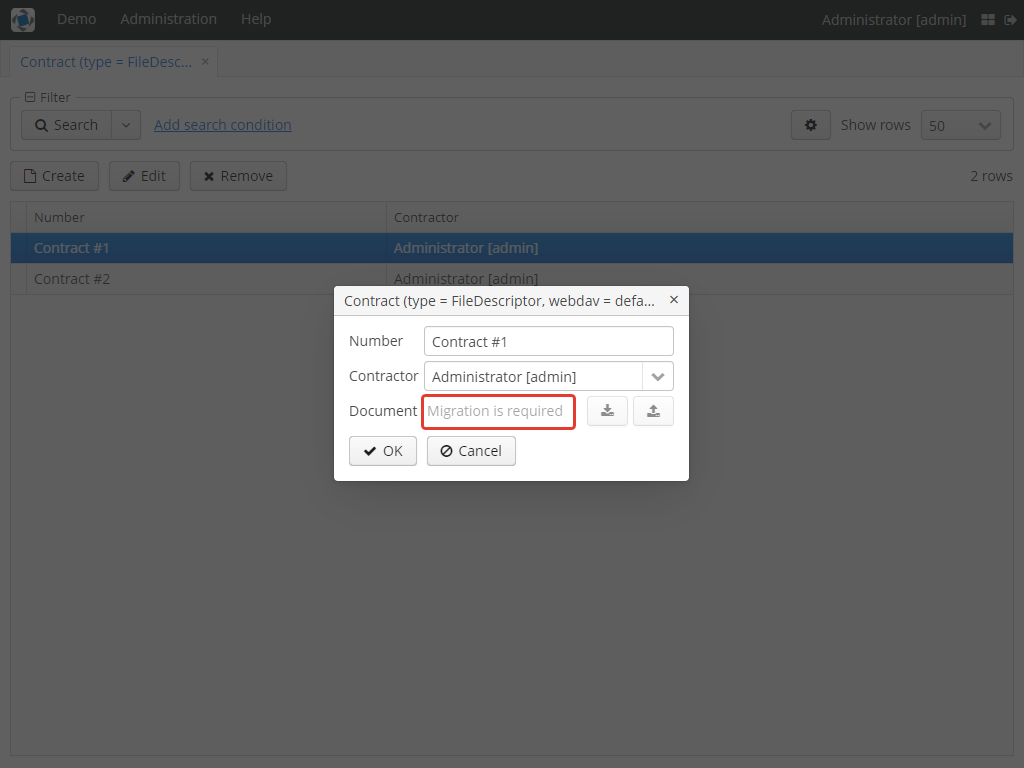
As it can be seen from the figure below, the Migration is required notification is displayed instead of links. This happens because after enabling or disabling the component, all previously created entities require migration. During the migration process, new instances of WebdavDocumentVersion and WebdavDocument are created for each document. And if it is skipped, then it is impossible to edit the 'document' attribute because it is considered related to the entity, which is not migrated yet.
Note: There is no need to migrate freshly-created entities.
The data migration process can be executed from Migration Screen (Menu: Administration → WebDAV → Migration Screen). On the screen, there is a list of entity attributes, which support WebDav (attributes of the FileDescriptor and WebdavDocument types). All listed attributes are grouped into entity packages.
Attention: It is highly recommended to back up the existing database before launching the migration process.
Warning: Entities, which belong to the basic com.haulmont.cuba package, are included in the list on Migration Screen
so that their further extension and use of @WebDavSupport was possible. If you do not extend these entities and/or
screens related to them, please do not select them for migration.
To start migration, it is necessary to select the required fields/entities, for which WebDav or versioning was enabled/disabled and click the Do migration button. Once the migration process is finished, a system message containing a list of entities that were created / updated / deleted appears. If some entities were not found, the 'No data for migration' notification is shown. If some fields require removal of WebdavDocument entities, then a corresponding message is displayed.
Data migration is required in the following cases:
-
Enabling/disabling WebDav. If WebDav is enabled for attributes of one or several entities, then during migration, new instances of
WebdavDocumentVersionandWebdavDocumentare created for attributes of the FileDescriptor type. Created entities may have versioning enabled or disabled. It depends on the annotation value and a global parameter. If some field has WebDav disabled, then instances ofWebdavDocumentVersionandWebdavDocumentare deleted. -
Enabling/disabling versioning. Launching the migration after enabling/disabling versioning updates the existing instances of
WebdavDocumentfor fields of one or several entities.
Note: Attributes of the FileDescriptor type store the first versions of documents. After disabling WebDav and launching migration, values of these fields are changed to the latest document versions. Another important moment is that it is impossible to disable WebDav for attributes of the WebdavDocument type (only versioning can be disabled).
In the sections below, you can find two examples of data migration: after enabling and disabling WebDav.
Data Migration After Enabling WebDav
The first example describes the process of migrating data after enabling WebDav for the 'document' attribute of the Contract entity.
@Table(name = "CONTRACTSYSTEM_CONTRACT")
@Entity(name = "contractsystem$Contract")
public class Contract extends StandardEntity {

   ...

   @NotNull
   @WebdavSupport //Enable WebDav
   @OnDelete(DeletePolicy.CASCADE)
   @ManyToOne(fetch = FetchType.LAZY, optional = false)
   @JoinColumn(name = "DOCUMENT_ID")
   protected FileDescriptor document;

   ...
Let’s imagine that there are several instances of the Contract entity, which were created before enabling WebDav.
For the sake of convenience, we add WebdavDocumentLink for each instance of 'document' in Contract Browser.
For example, this can be done by using generated columns.
@Inject
protected ComponentsFactory componentsFactory;

public Component generateLinkCell(Contract entity) {
   return componentsFactory.createComponent(WebdavDocumentLink.class)
           .withFileDescriptor(entity.getDocument());
}
After adding a column, the Migration is required caption is shown instead of links related to unmigrated entities.
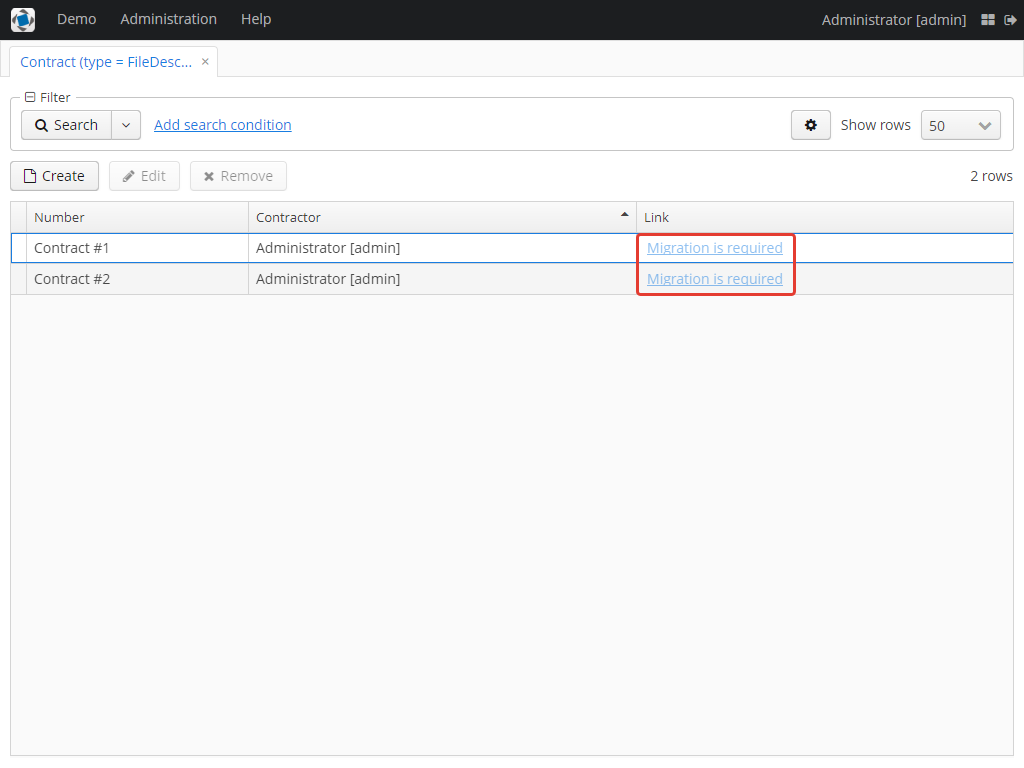
As it can be seen from the figure below, there are no restrictions applied to new entities.
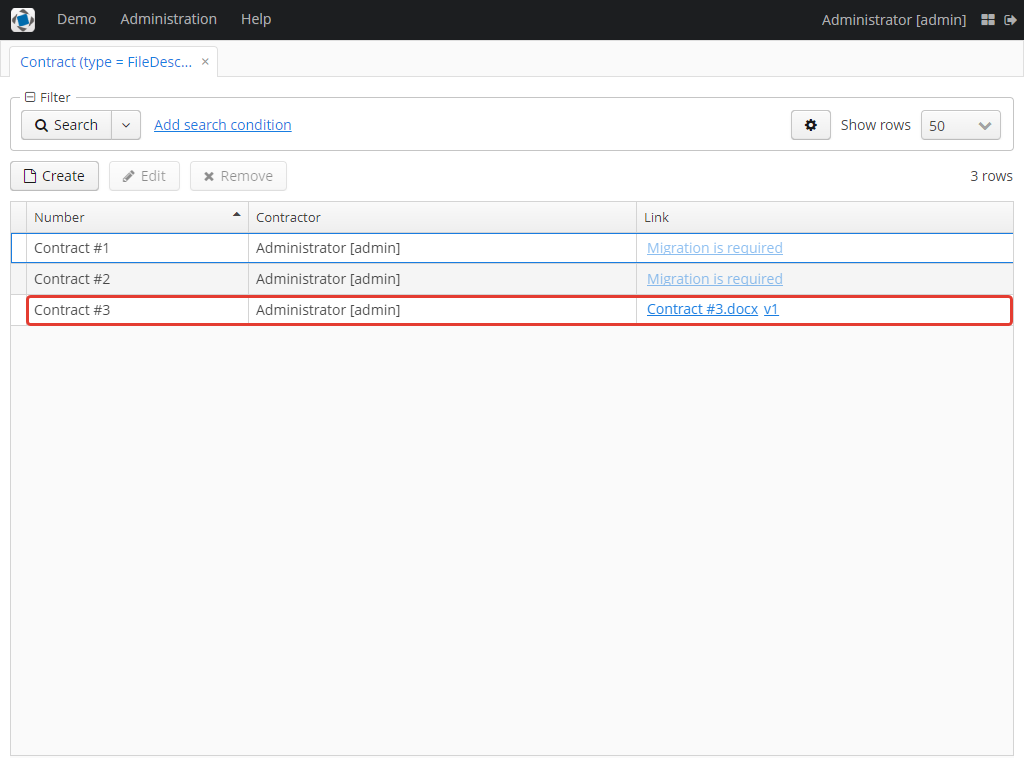
Now, let’s open Migration Screen (Menu: Administration → Webdav → Migration screen) and select the document field related to the Contract entity for migration.
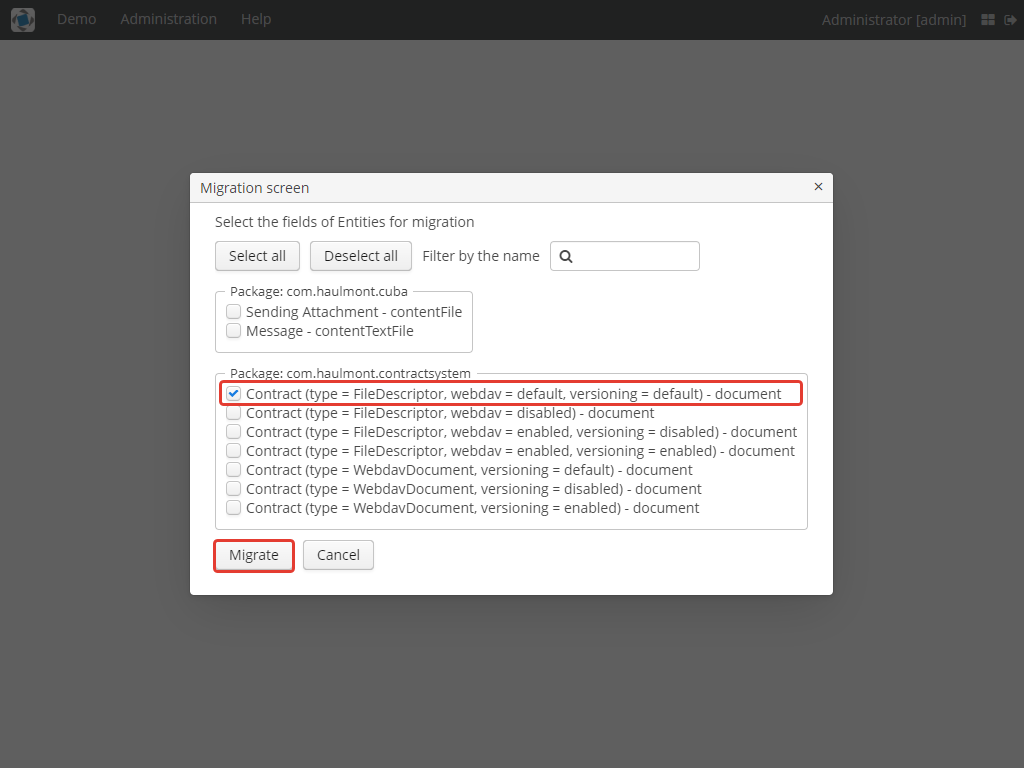
Launching migration is available by clicking the Migrate button. Once the process is completed, the system displays its results.
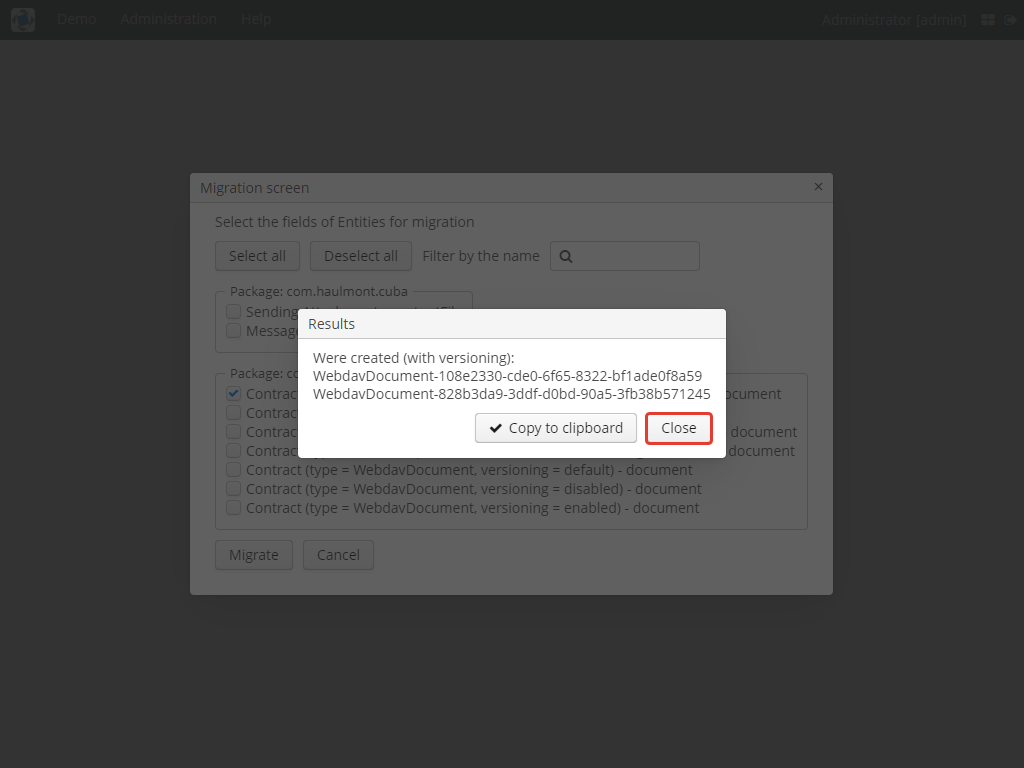
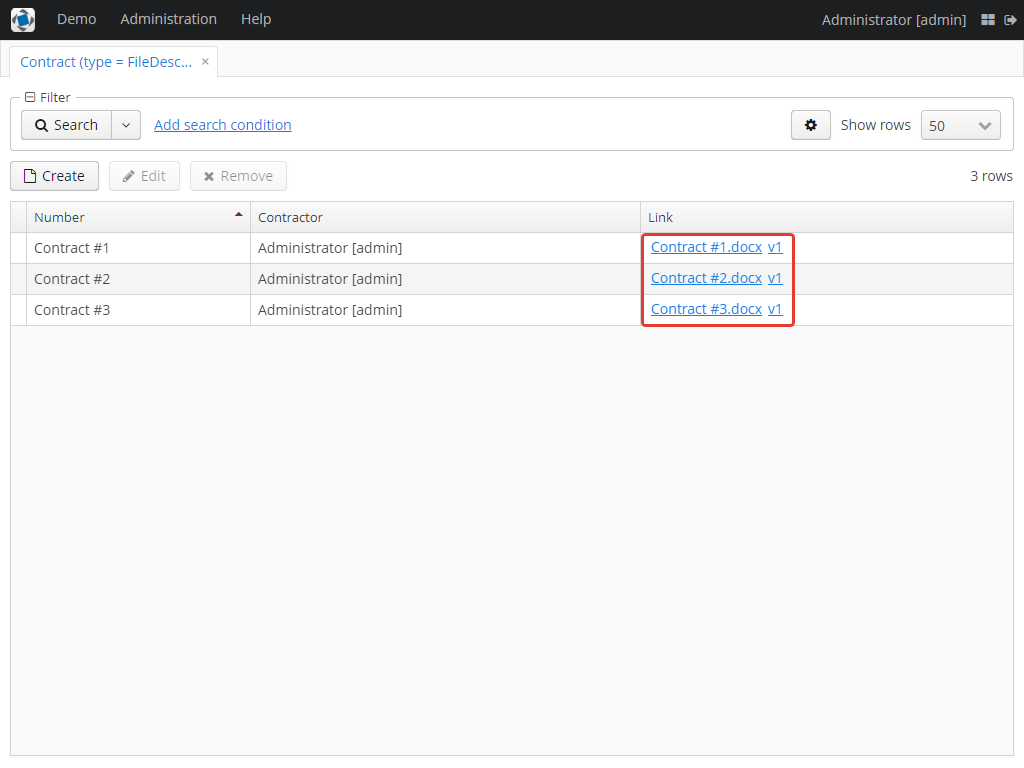
As we can see, three instances of WebdavDocument which have versioning enabled were created. If we open Contract Browser again, we can see that after migration, all required links are present.
3.3.2. Data Migration After Disabling WebDav
Having the previous example in consideration, let’s check how migration affects fields, for which WebDav has been disabled.
We will use the same Contract entity. Let’s assume that there are several WebDav entities linked to the 'document' field,
which were created before. To get a full picture of how the migration process works in this case,
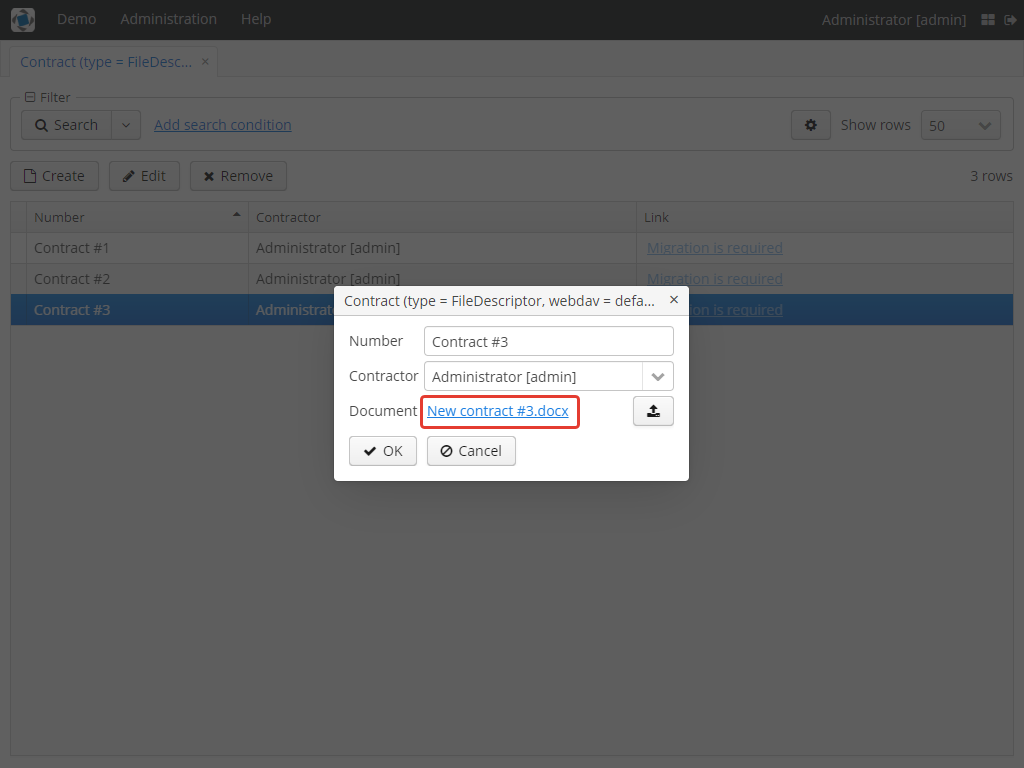
let’s upload a new document version for the Contract #3 entity — New contract #3.docx.
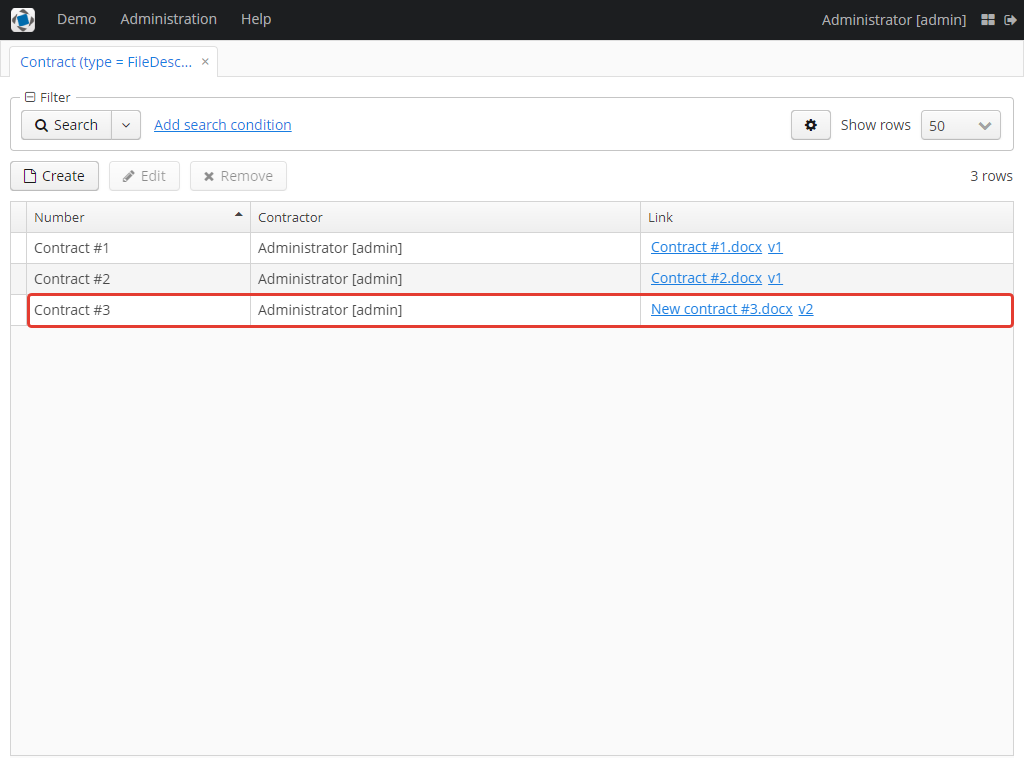
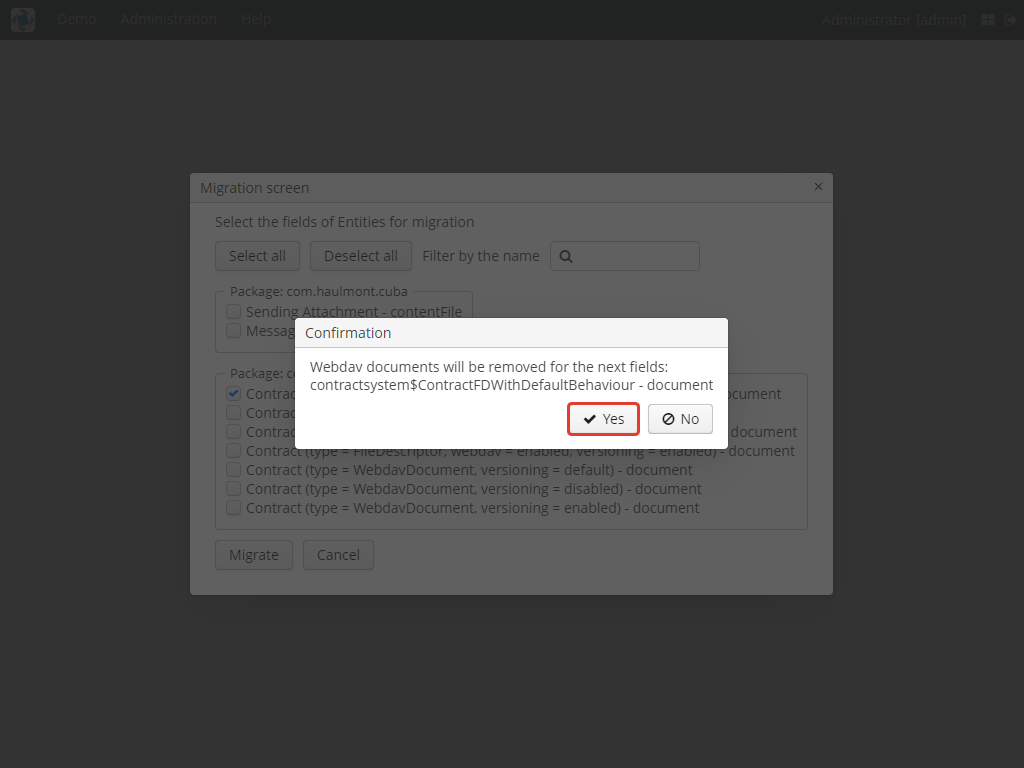
The next step is to remove the @WebdavSupport annotation for the 'document' field of the Contract entity by selecting
the field on Migration Screen and launching migration. The system shows the Confirmation dialog
window saying that all WebdavDocument entities corresponding to the selected field will be removed.
After confirming the operation, the migration process results are displayed.
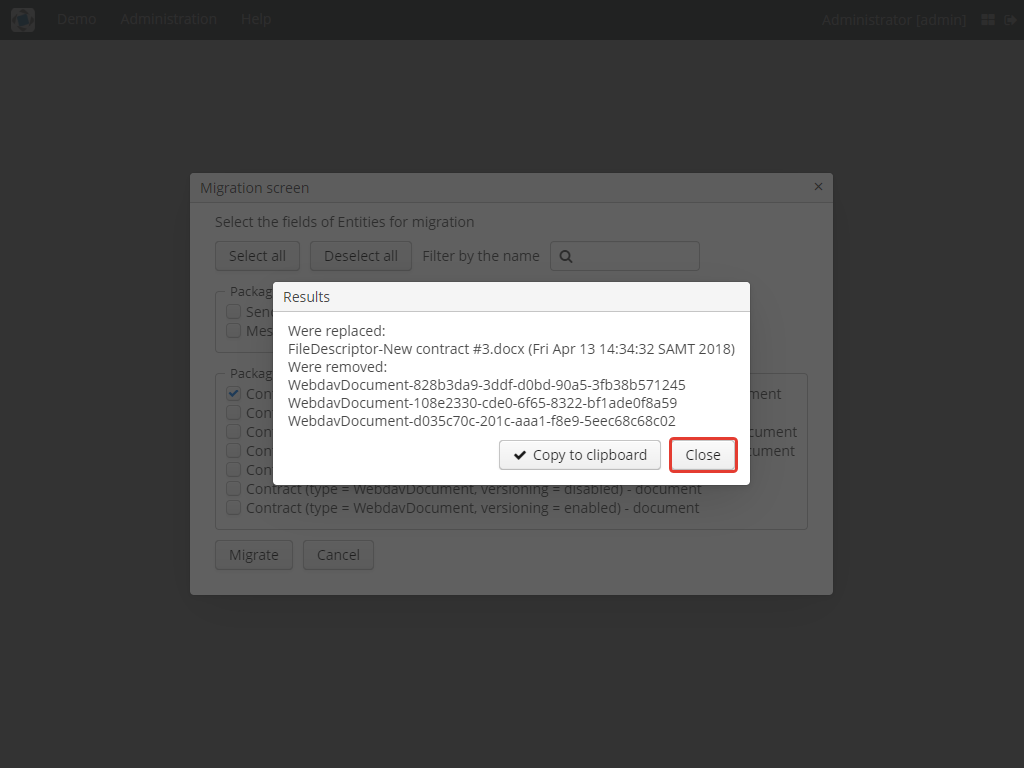
During the migration process, WebDav documents were deleted and FileDescriptor was updated to the latest version for one entity . If we open Contract Browser again, we can see that all links are disabled.
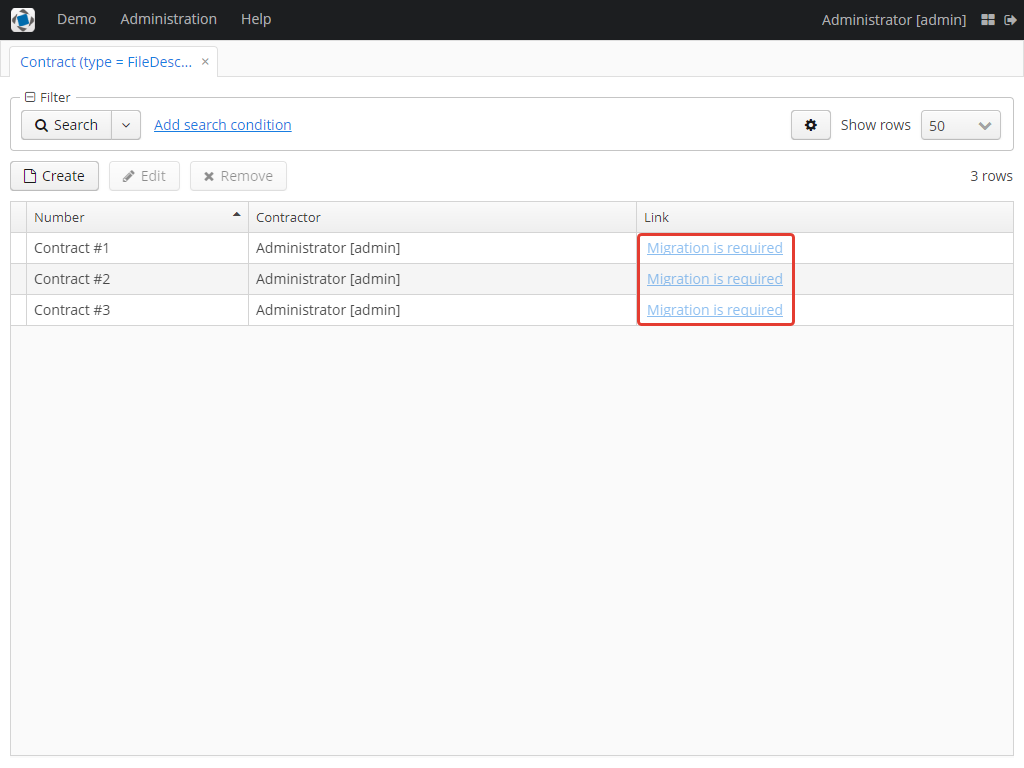
If we open the New Contract entity in Contract Editor, we can see the latest document version.
3.4. Scheduled Tasks
WebdavLockExpiredCleaner
-
Method: removeUnreferencedVersions
-
Interval: 2 hours
-
Description: Removes expired lock-objects
WebdavDocumentVersionsCleaner
-
Method: removeUnreferencedVersions
-
Interval: 1 month
-
Description: Removes WebdavDocumentVersion instances, which do not have links to documents
Note: In order to not remove versions, which are currently being edited, the versions created less than a day ago (from the current time) are excluded from the task. For instance, if today is 10.02.18, then versions created on 09.02.18 00:00 are ignored.
3.5. Security
When enabling the WebDav component, 4 restrictions for creating, reading, updating and removing WebdavDocumentVersion
entities are created. The same set of access rights is available to a user for working with a document and corresponding document versions.
If it is required to restrict a particular user to edit or read document versions, this can be done by changing permissions applicable to a user role. Find out more here.
3.5.1. WebdavDocument Access Restrictions
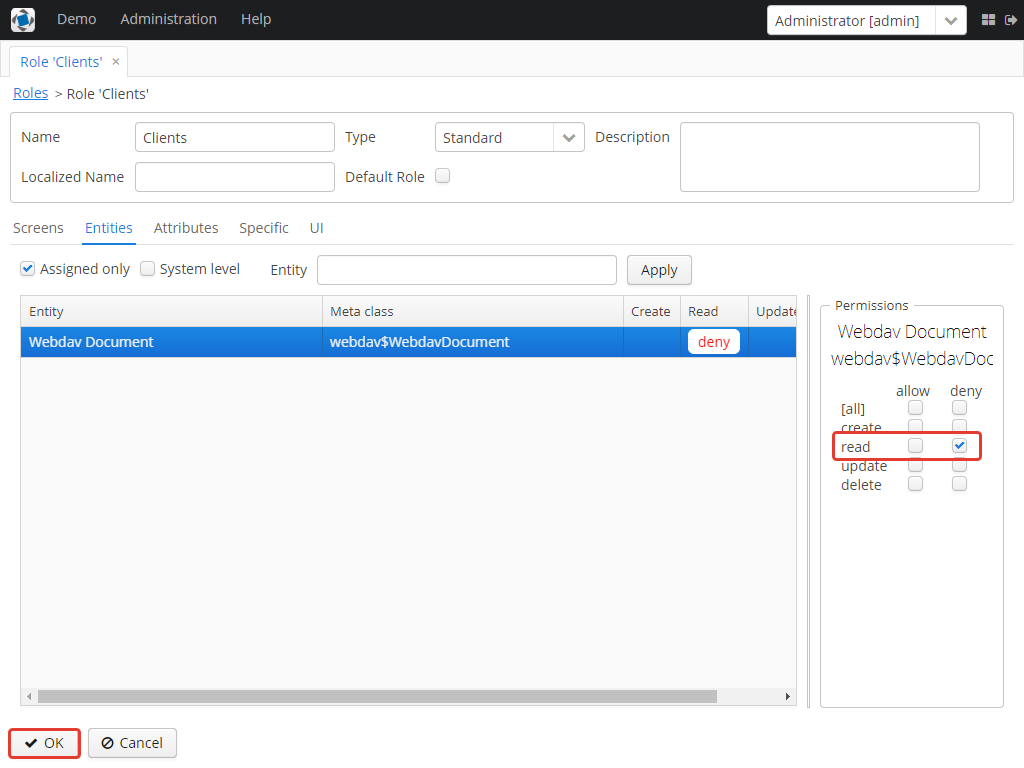
Let us consider the following example. There is the 'Clients' role created in the system and it is necessary to restrict users with this role to read Webdav documents. For this purpose, configure the 'Clients' role as it is shown in the figure below (for more details, refer to this documentation).
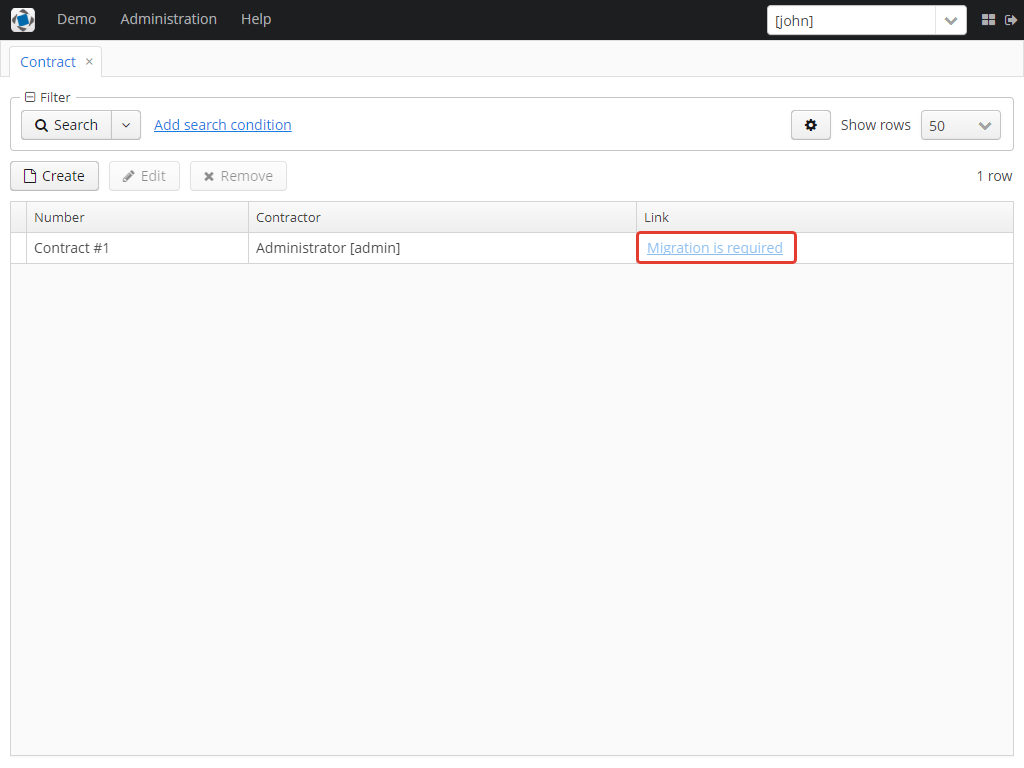
After this, all users with the 'Clients' role will not be able to use links to Webdav documents — the Migration is required notification will be displayed.
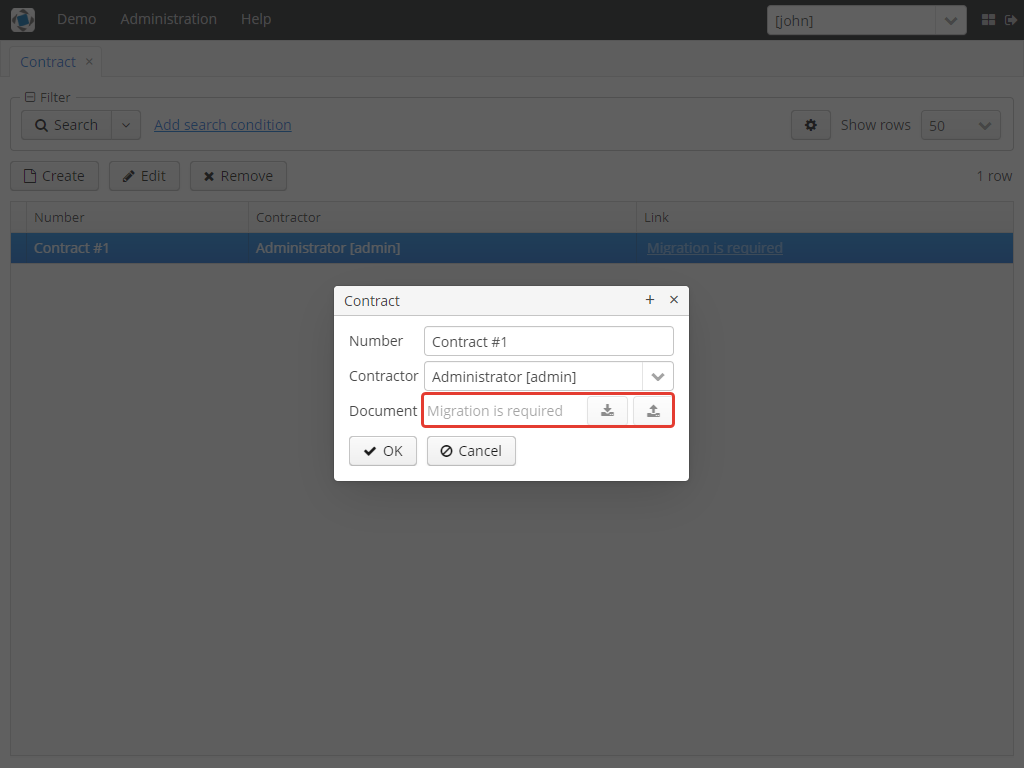
The same notification will be shown in WebdavDocumentUploadField.
3.5.2. Usage of Constraints to Restrict Access to WebdavDocument
Another example shows how to restrict access to a particular group of users. Let us consider that there is an access group called 'Users'. It is required to configure an access group in such a way that only document authors can edit documents / document versions. This can be done by creating a new constraint in Menu: Administration → Access → Constraints.
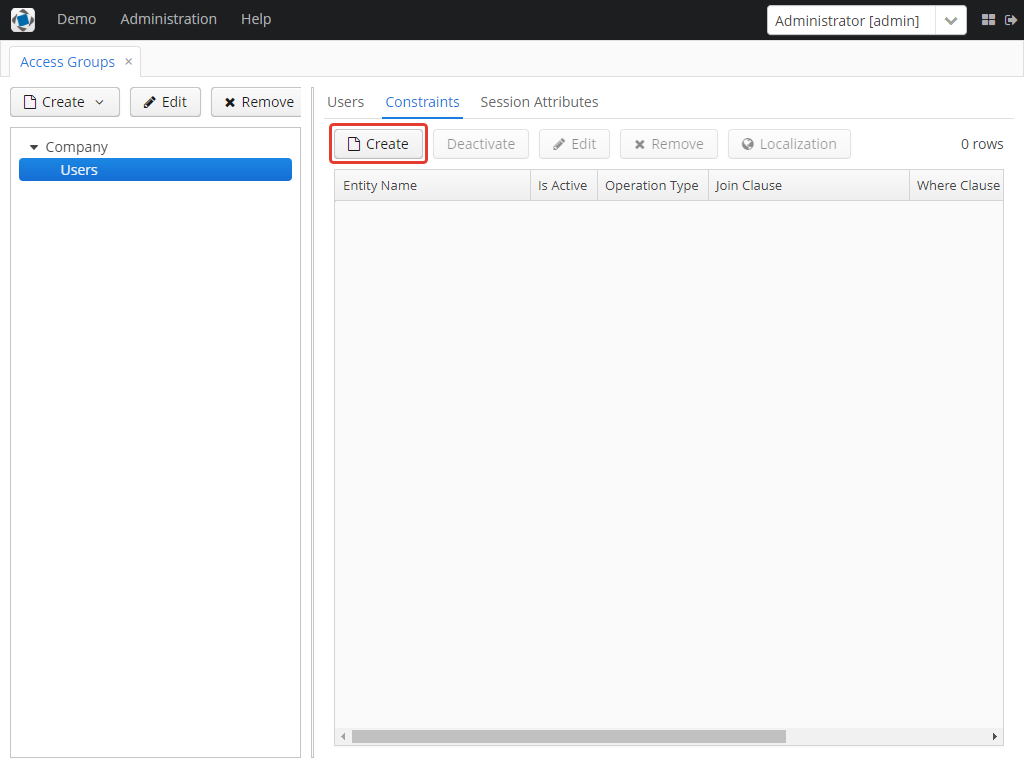
Create a new restriction with the Update type for the webdav$WebdavDocument entity:
import com.haulmont.cuba.core.global.*

if (PersistenceHelper.isNew({E})) {
    return true
}

def dm = AppBeans.get(DataManager)
def document = dm.reload({E}, "webdavDocument-with-versions-view")

return document.createdBy == userSession.user.login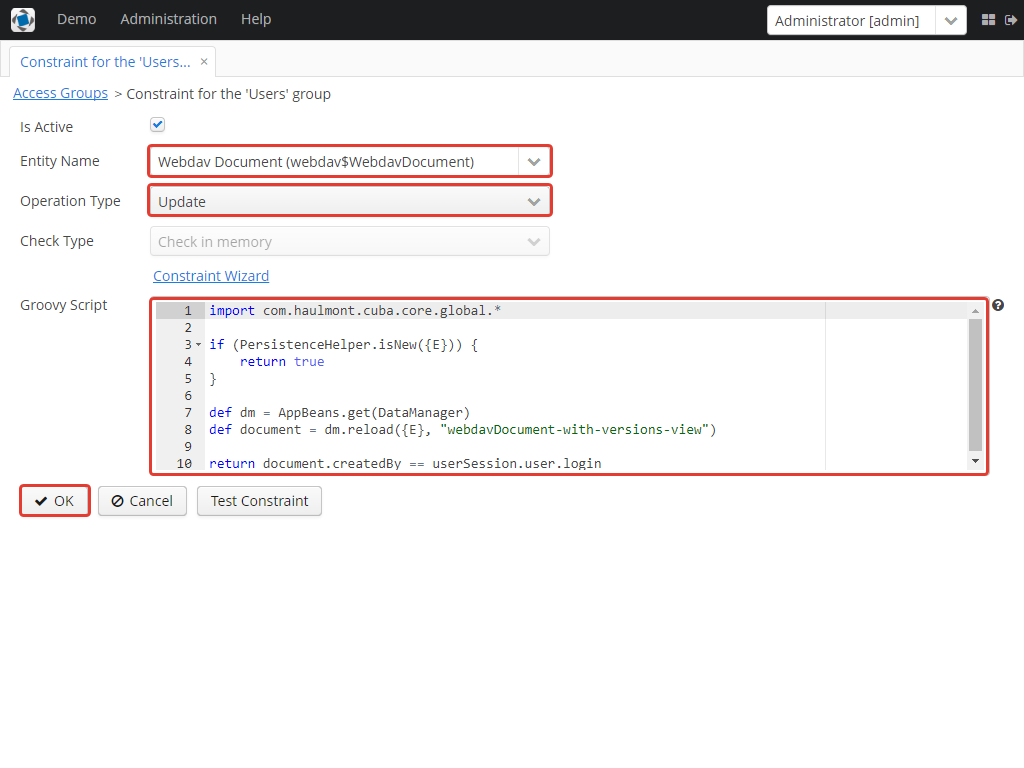
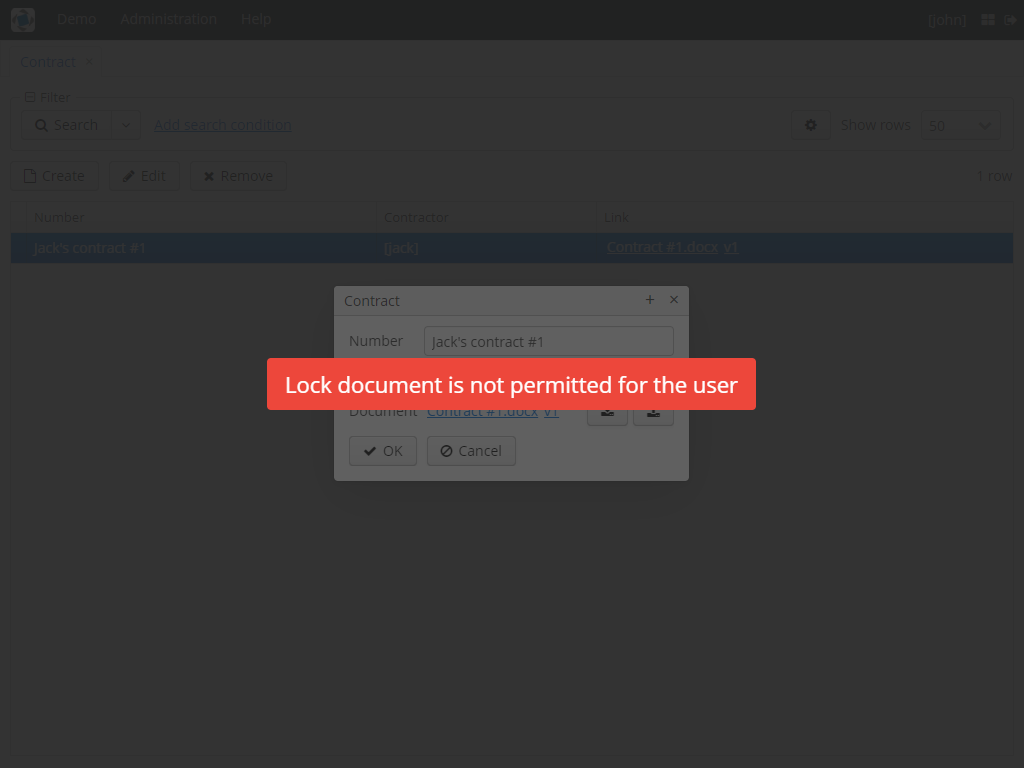
The system checks whether the current user is a document author. If it is not the case, then the user will not be allowed to edit a document and the following notification message will be displayed:
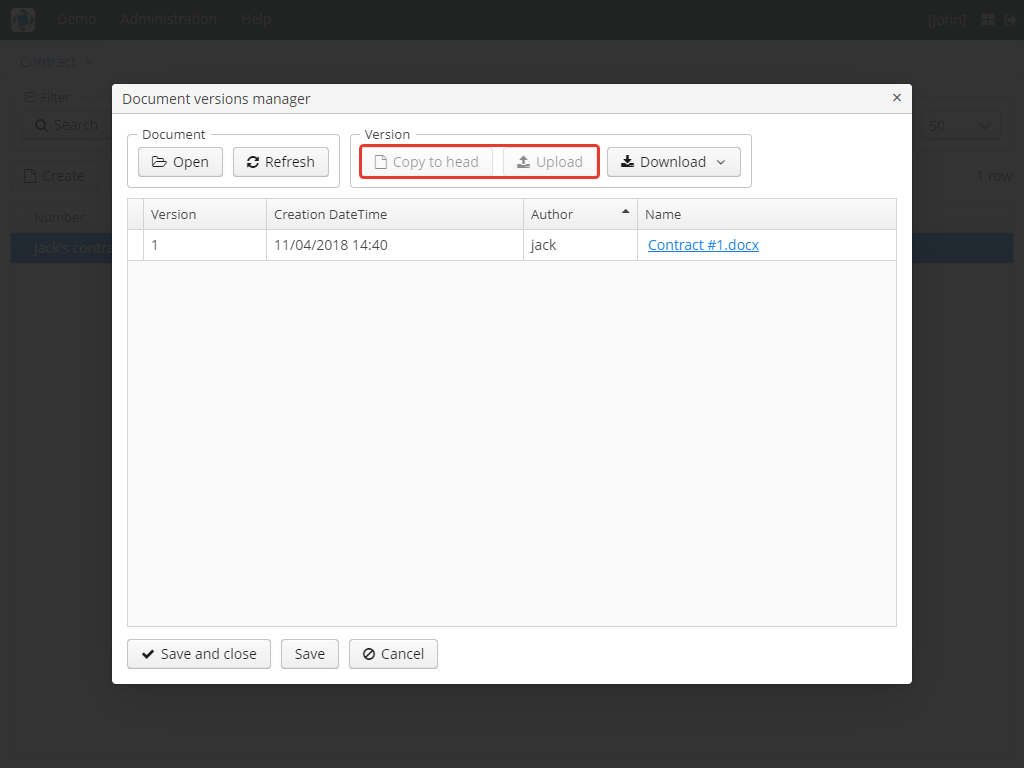
All buttons intended to manage document versions will be inactive and the document itself will not be saved on the server side after opening it in an external application.
4. Main Services
4.1. WebdavCredentialsManagementService
It is designed to work with WebdavCredentials. The service is used to get credentials of a user with a local
or {@code viewName} view by a user id / login / user.
4.2. WebdavDocumentsManagementService
It is designed to work with WebdavDocument. The service methods allow you to:
-
receive a document by a document / file/ document version id / FileDescriptor id / document id / document version;
-
restrict/grant access to a document for a certain period;
-
create / update / delete a document;
-
create / update / delete versions of a particular document.
4.3. WebdavDocumentVersionsManagementService
The service is used to work with document versions. It enables to:
-
get the first version of a document;
-
receive the latest version of a document;
-
get a particular version of a document;
-
get all existing versions of a document;
-
create / update / delete a document versions.
4.4. WebdavMigrationService
The service methods provide allow executing the following operations: * executing the migration process; * getting the information about classes and properties to be migrated; * receiving the information about migration types (can be used only on the middleware level); * getting results of the migration process, e.g. defines whether some files are expected to be removed after migration.
4.5. WebdavRawLinksManagementService
It is designed to work with persistent links. Persistent links are stored in the database as instances of the WebdavLink entity and they are related to instances of either the WebdavDocument or WebdavDocumentVersion entities. For more details, please refer to the Links section.
The service methods allow you to create persistent links to a document with a default / read-only / specific context.
4.6. WebdavUrlManagementService
The service is used for getting impersistent links to documents. These links are not stored in the database and generated on the go. For more details, please refer to the Links section.
The service enables to execute the following operations:
-
getting a link to a latest document version in full access/read-only mode;
-
getting a link to a particular document version in full access/read-only mode;
-
receiving information about an external application used for opening a document version.
4.7. WebdavUserDetailsService
WebdavUserDetailsService enables to search for a user by his/her username. In the actual implementation, the search may possibly be case sensitive, or case insensitive, depending on how the implementation instance is configured. In this case, the returned UserDetails object may have different a username.
4.8. WebdavUserManagementService
The service is used for changing a user password.
5. UI Components
5.1. WebdavDocumentLink
WebdavDocumentLink is a CUBA Platform UI component that provides the functionality of reading
and editing documents using Microsoft Office Apps. Also, if versioning is supported for a document, the user
can see all versions of a document.
Component XML-name: document-link.
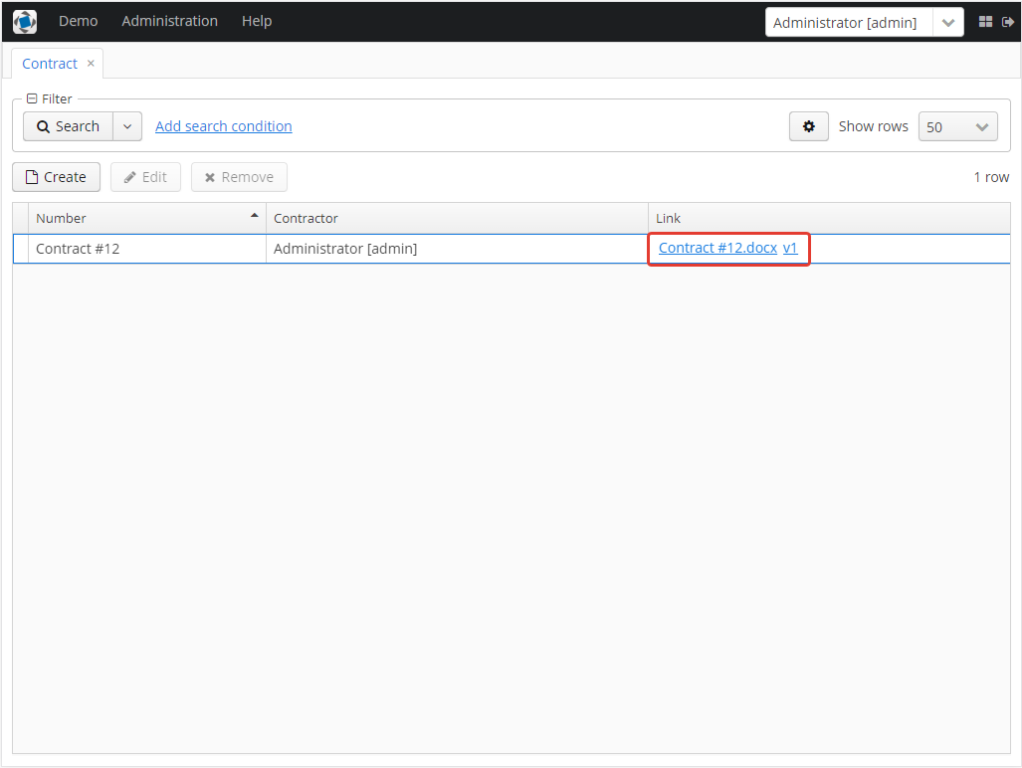
The component features the following functionalities:
-
Opening the latest version of a document for reading/editing.
-
Opening preceding document versions in read-only mode (for more details, see Document Version Manager).
5.1.1. Work Modes
The component works in the following three modes:
-
Webdav is disabled.
-
Webdav is enabled, Versioning is disabled.
-
Webdav is enabled, Versioning is enabled.
Webdav is enabled |
Webdav is disabled |
|
Versioning is enabled |
|
In this mode |
Versioning is disabled |
|
In this mode |
5.1.2. Declarative Creation
To use the Webdav components in XML, it is required to specify the http://schemas.haulmont.com/webdav/ui-component.xsd
scheme file in a required screen descriptor. During this step, it is important to specify the name of a name space where
component tags are stored, e.g. xmlns:webdav="http://schemas.haulmont.com/webdav/ui-component.xsd. In the
example above, the name space is determined by the word 'webdav'.
<?xml version="1.0" encoding="UTF-8" standalone="no"?>
<window xmlns="http://schemas.haulmont.com/cuba/window.xsd"
       caption="msg://screenCaption"
       class="com.haulmont.contractsystem.web.demo.Demo"
       messagesPack="com.haulmont.contractsystem.web.demo"
       xmlns:webdav="http://schemas.haulmont.com/webdav/ui-component.xsd">
   <dsContext>
       <collectionDatasource id="contractsDs"
                             class="com.haulmont.contractsystem.entity.Contract"
                             view="contract-view">
           <query>
               <![CDATA[select e from contractsystem$Contract e]]>
           </query>
       </collectionDatasource>
   </dsContext>

   <layout …>
   ...

       <webdav:document-link id="webdavLink"
                             datasource="contractsDs"
                             property="fileDescriptor"/>

   ...
   </layout>

</window>
Attributes
-
webdavDocumentId— a unique identifier of WebdavDocument to be displayed. -
fileDescriptorId— an id of FileDescriptor to be displayed. The latest version of a document is shown. -
showVersion— indicates whether a link is shown on the version control screen. The default value of this parameter depends on versioning: if it is enabled for a document, then a link is shown. -
datasource— a datasource name to be shown. A link leads to an entity from a datasource. -
property— a name of a property from a datasource. Possible values: WebdavDocument or FileDescriptor.
Note: document-link are inherited from linkButton and contain all parent properties.
5.1.3. Manual Creation
Use ComponentsFactory to create WebdavDocumentLink:
WebdavDocumentLink documentLink = componentsFactory.createComponent(WebdavDocumentLink.class);After obtaining a WebdavDocumentLink instance, it requires configuring. For this purpose, you can use one of the methods
described below:
-
withFileDescriptor(FileDescriptor fileDescriptor)— requires specifying a FileDescriptor instance related to a document version. -
withFileDescriptorId(UUID fileDescriptorId)— requires specifying an identifier of FileDescriptor related to a document version. -
withWebdavDocumentVersion(WebdavDocumentVersion webdavDocumentVersion)— requires specifying a version of WebdavDocumentVersion. -
withWebdavDocumentVersionId(UUID webdavDocumentVersionId)— requires specifying webdavDocumentVersionId. -
withWebdavDocument(WebdavDocument webdavDocument)— requires specifying a document. -
withWebdavDocumentId(UUID webdavDocumentId)— requires specifying a document identifier.
Configuration Examples
Creating a link to a document version using a FileDescriptor object:
WebdavDocumentLink documentLink = componentsFactory.createComponent(WebdavDocumentLink.class)
                                                   .withFileDescriptor(...);
The example below describes how to create a link to a document using the WebdavDocument object:
WebdavDocumentLink documentLink = componentsFactory.createComponent(WebdavDocumentLink.class)
                                                   .withWebdavDocument(...);
5.2. WebdavDocumentVersionLink
WebdavDocumentVersionLink is a CUBA Platform UI component that enables to open a particular document version
using Microsoft Office Apps in read only mode. The component displays a file name of a certain document version.
Component XML-name: document-version-link.
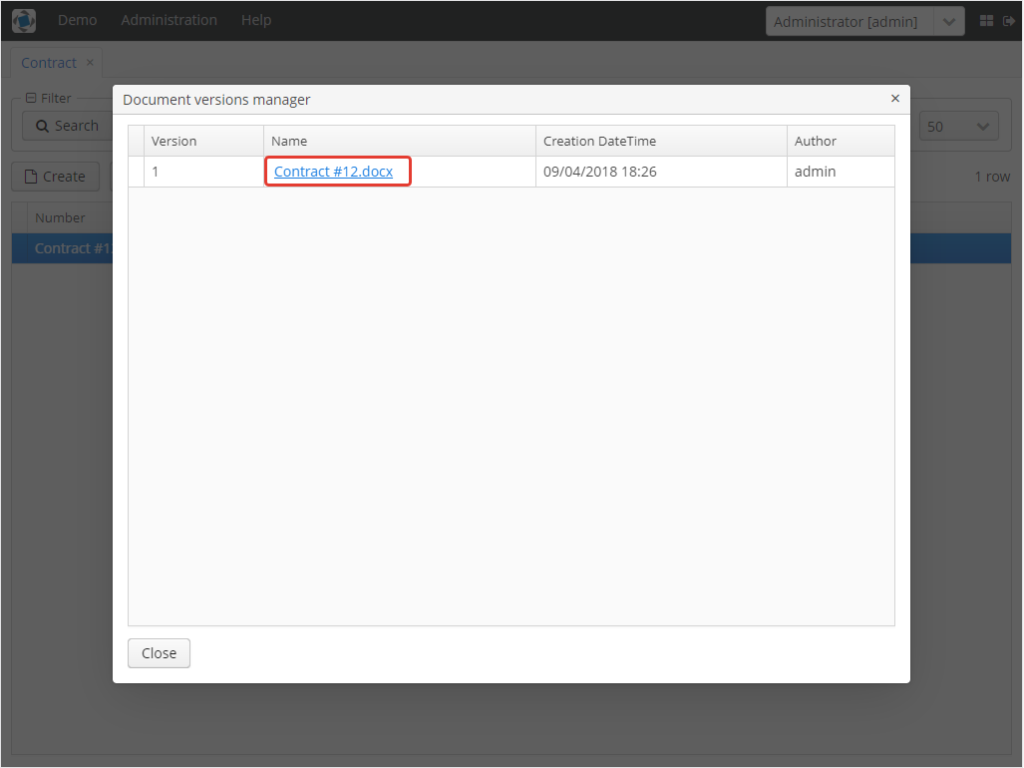
5.2.1. Work Modes
The component works in the following three modes:
-
Webdav is disabled.
-
Webdav is enabled, Versioning is disabled.
-
Webdav is enabled, Versioning is enabled.
Webdav is enabled |
Webdav is disabled |
|
Versioning is enabled |
|
In this mode |
Versioning is disabled |
|
In this mode |
5.2.2. Declarative Creation
To use the Webdav components in XML, it is required to specify the http://schemas.haulmont.com/webdav/ui-component.xsd
scheme file in a required screen descriptor. During this step, it is important to specify the name of a name space where
component tags are stored, e.g. xmlns:webdav="http://schemas.haulmont.com/webdav/ui-component.xsd. In the
example above, the name space is determined by the word 'webdav'.
<?xml version="1.0" encoding="UTF-8" standalone="no"?>
<window xmlns="http://schemas.haulmont.com/cuba/window.xsd"
       caption="msg://screenCaption"
       class="com.haulmont.contractsystem.web.demo.Demo"
       messagesPack="com.haulmont.contractsystem.web.demo"
       xmlns:webdav="http://schemas.haulmont.com/webdav/ui-component.xsd">
   <dsContext>
       <collectionDatasource id="contractsDs"
                             class="com.haulmont.contractsystem.entity.Contract"
                             view="contract-view">
           <query>
               <![CDATA[select e from contractsystem$Contract e]]>
           </query>
       </collectionDatasource>
   </dsContext>

   <layout …>
   ...

       <webdav:document-version-link id="webdavVersionLink"
                                     datasource="contractsDs"
                                     property="fileDescriptor"/>

   ...
   </layout>

</window>
Attributes
-
webdavDocumentVersionId— an id of WebdavDocumentVersion for displaying. -
webdavDocumentId— an id of WebdavDocumentVersion for displaying. A value can be used only in combination with naturalVersionId. -
naturalVersionId— a natural version number. A value can be used only in combination with a document version identifier. -
fileDescriptorId— an id of FileDescriptor to be displayed. The latest version of a document is shown. -
datasource— a datasource name that is used for displaying an entity from a datasource. -
property— a property from a datasource. Possible values: WebdavDocumentVersionLink or FileDescriptor.
Note: document-version-link are inherited from linkButton and contain all parent properties.
5.2.3. Manual Creation
Use ComponentsFactory to create WebdavDocumentVersionLink:
WebdavDocumentVersionLink documentVersionLink = componentsFactory.createComponent(WebdavDocumentVersionLink.class);After obtaining a WebdavDocumentVersionLink instance, it requires configuring. For this purpose, you can use one of
the methods described below:
-
withWebdavDocumentVersion(WebdavDocumentVersion webdav
DocumentVersion)
- requires specifying a current version ofWebdavDocumentVersion. -
withWebdavDocumentVersionId(UUID webdavDocumentVersionId)— requires specifying a document identifier. -
withFileDescriptor(FileDescriptor fileDescriptor)— requires specifying a FileDescriptor instance related to a document version. -
withFileDescriptorId(UUID fileDescriptorId)— requires specifying an identifier ofFileDescriptorrelated to a document version. -
withWebdavDocument(WebdavDocument webdavDocument)— this method has to be combined withwithNaturalVersionId(Long naturalVersionId). The combination of these two methods allows identifying a document and natural id of a document version. -
withWebdavDocumentId(UUID webdavDocumentId)— this method has to be combined withwithNaturalVersionId(Long naturalVersionId). The combination of these two methods allows identifying a document and natural id of a document version.
Configuration Examples
Creating a link to a document version using the WebdavDocumentVersion object:
WebdavDocumentVersionLink documentVersionLink = componentsFactory.createComponent(WebdavDocumentVersionLink.class)
                                                                 .withDocumentVersion(...);
Creating a link to a document version using the WebdavDocument object and a document version natural id:
WebdavDocumentVersionLink documentVersionLink = componentsFactory.createComponent(WebdavDocumentVersionLink.class)
                                                                 .withDocument(...)
                                                                 .withNaturalVersionId(...);
5.3. WebdavDocumentUploadField
WebdavDocumentUploadField is a CUBA Platform UI component which is designed to work with documents.
Component XML-name: upload.
The component features the following functionalities:
-
Uploading a file to create a new document or a document version.
-
Opening a document for reading/editing.
-
Downloading the latest or preceding document versions.
-
Creating new document versions based on previous ones.
5.4. Work Modes
The component works in the following three modes:
-
Webdav is disabled.
-
Webdav is enabled, Versioning is disabled.
-
Webdav is enabled, Versioning is enabled.
Webdav is enabled |
Webdav is disabled |
|
Versioning is enabled |
|
|
Versioning is disabled |
|
|
5.4.1. Declarative Creation
To use the Webdav components in XML, it is required to specify the http://schemas.haulmont.com/webdav/ui-component.xsd
scheme file in a required screen descriptor. During this step, it is important to specify the name of a name space where
component tags are stored, e.g. xmlns:webdav="http://schemas.haulmont.com/webdav/ui-component.xsd. In the
example above, the name space is determined by the word 'webdav'.
<?xml version="1.0" encoding="UTF-8" standalone="no"?>
<window xmlns="http://schemas.haulmont.com/cuba/window.xsd"
       caption="msg://screenCaption"
       class="com.haulmont.contractsystem.web.demo.Demo"
       messagesPack="com.haulmont.contractsystem.web.demo"
       xmlns:webdav="http://schemas.haulmont.com/webdav/ui-component.xsd">
   <dsContext>
       <collectionDatasource id="contractsDs"
                             class="com.haulmont.contractsystem.entity.Contract"
                             view="contract-view">
           <query>
               <![CDATA[select e from contractsystem$Contract e]]>
           </query>
       </collectionDatasource>
   </dsContext>

   <layout …>
   ...

       <webdav:w-upload id="webdavUpload"
                        datasource="contractsDs"
                        property="fileDescriptor"/>

   ...
   </layout>

</window>
Attributes
-
showDownloadButton— indicates if the Download button is shown or not. By default, the button is shown only for FieldGroup. -
downloadButtonCaption— a caption of the Download button. -
downloadButtonIcon— a custom icon for the Download button. If it is set, then the button caption is not shown. -
downloadButtonDescription— a mouse over tooltip for the Download button.
Note: w-upload is inherited from CUBA upload and contains all parent properties.
5.4.2. Manual Creation
API for WebdavDocumentUploadField is similar to API for FileUploadField.
To learn more, please refer to the FileUploadField section of CUBA documentation.
Configuration Examples
Creating a field to a document using the WebdavDocumentUploadField object:
WebdavDocumentUploadField uploadField = componentsFactory.createComponent(WebdavDocumentUploadField.class);
uploadField.setDatasource(...);
5.5. Using WebDav in FileMultiUploadField
The AppComponent does not contain a UI component similar to FileMultiUploadField. However, it is possible to support
this functionality by configuring the following example from the CUBA documentation.
@Inject
private FileMultiUploadField multiUploadField;
@Inject
private FileUploadingAPI fileUploadingAPI;
@Inject
private DataSupplier dataSupplier;

// webdav: begin
@Inject
protected WebdavDocumentsManagementService documentsService;
// webdav: end

@Override
public void init(Map<String, Object> params) {
   multiUploadField.addQueueUploadCompleteListener(() -> {
       for (Map.Entry<UUID, String> entry : multiUploadField.getUploadsMap().entrySet()) {
           UUID fileId = entry.getKey();
           String fileName = entry.getValue();
           FileDescriptor fd = fileUploadingAPI.getFileDescriptor(fileId, fileName);
           // save file to FileStorage
           try {
               fileUploadingAPI.putFileIntoStorage(fileId, fd);
           } catch (FileStorageException e) {
               new RuntimeException("Error saving file to FileStorage", e);
           }
           // save file descriptor to database
           FileDescriptor committed = dataSupplier.commit(fd);

           // webdav: begin
           // create and save WebdavDocument
           documentsService.createNonVersioningDocumentByFileDescriptor(committed);
           // webdav: end
       }
       showNotification("Uploaded files: " + multiUploadField.getUploadsMap().values(), NotificationType.HUMANIZED);
       multiUploadField.clearUploads();
   });

   multiUploadField.addFileUploadErrorListener(event ->
           showNotification("File upload error", NotificationType.HUMANIZED));
}
Appendix A: Application Properties
General Properties
webdav.enabled
-
Description: enables the component functionalities for all fields (those that do not have the @WebdavSupport annotation) related to a document. If a value of this property is changed, a system administrator should migrate the data.
-
Default value:
false -
Type: stored in the database
-
Interface:
WebdavConfig
webdav.versioningEnabled
-
Description: enables the versioning functionality for all fields (those that do not have the @WebdavSupport annotation) related to a document. If a value of this property is changed, a system administrator should migrate the data.
-
Default value:
true -
Type: stored in the database
-
Interface:
WebdavConfig
webdav.applications
-
Description: allows matching which document formats can be opened via various external applications. For each application you can configure a set of file extensions in the
"extensions"block. For example:
"ms-powerpoint":{"name":"Microsoft PowerPoint","protocols":{"writable":"ms-powerpoint:ofe%7Cu%7C","read_only":"ms-powerpoint:ofv%7Cu%7C"},"extensions":["ppt","pptx"]
Considering the example given above, we can conclude that if the user tries opening a document with the *.ppt extension, it will be opened in Microsoft PowerPoint.
-
Default value:`{"ms-word":{"name":"Microsoft Word","protocols":{"writable":"ms-word:ofe%7Cu%7C","read_only":"ms-word:ofv%7Cu%7C"},"extensions":["docx","doc","rtf"]},"ms-excel":{"name":"Microsoft Excel","protocols":{"writable":"ms-excel:ofe%7Cu%7C","read_only":"ms-excel:ofv%7Cu%7C"},"extensions":["xls","xlsx"]},"ms-powerpoint":{"name":"Microsoft PowerPoint","protocols":{"writable":"ms-powerpoint:ofe%7Cu%7C","read_only":"ms-powerpoint:ofv%7Cu%7C"},"extensions":["ppt","pptx"]}}`
-
Type: stored in the database
-
Interface:
WebdavConfig
Link Generator
Use the application properties described below to configure document downloading/opening:
webdav.server.protocol
-
Description: a server connection protocol
-
Default value:
http -
Type: stored in the database
-
Interface:
WebdavServerConfig -
Available values:
http,https
webdav.server.hostname
-
Description: a host name and address
-
Default value:
localhost -
Type: stored in the database
-
Interface:
WebdavServerConfig
webdav.server.port
-
Description: a port, on which the server is running
-
Default value:
8080 -
Type: stored in the database
-
Interface:
WebdavServerConfig
webdav.server.modulePrefix
-
Description: an application address
-
Default value:
app -
Type: stored in the database
-
Interface:
WebdavServerConfig
webdav.server.dispatcherPath
-
Description: a dispatcher servlet address
-
Default value:
webdav -
Type: stored in the database
-
Interface:
WebdavServerConfig
As a result, values of all aforementioned properties form the following address: http://localhost:8080/app/dispatch/webdav/
Appendix B: Manual Installation
Adding Repository
Open the build.gradle file and specify the repository URL: https://repo.cuba-platform.com/content/groups/premium
and your credentials in the repositories section.
buildscript {
   ext.cubaVersion = '7.0.4'
   repositories {
       maven {
           url 'https://repo.cuba-platform.com/content/groups/work'
           credentials {
               username(rootProject.hasProperty('repoUser') ? rootProject['repoUser'] : 'cuba')
               password(rootProject.hasProperty('repoPass') ? rootProject['repoPass'] : 'cuba123')
           }
       }

       //The repository, which contains the Webdav component
       maven {
           url 'https://repo.cuba-platform.com/content/groups/premium'
           credentials {
               username('111111222222')
               password('xxxxxxxxxxxx')
           }
       }
   }

   ...
}
Adding Component
Open the build.gradle file and specify the component artifacts in the dependencies section Compatible Versions.
dependencies {
   ...
   appComponent("com.haulmont.webdav:webdav-global:2.3.3")
}
The following steps you can find in the Getting Started and User Access sections.
Adding Component to web.xml
After adding the repository and component to the build.gradle file, it is necessary to specify the component in the
web.xml files of each module.
<context-param>
       <param-name>appComponents</param-name>
       <param-value>com.haulmont.cuba com.haulmont.webdav</param-value>
   </context-param>
Appendix C: Compatible Versions
The table below provides the information about component versions compatible with the platform version used in your project:
Platform Version |
Add-on Version |
7.0.x |
2.3.3 |
6.10.x |
2.2.1 |
6.9.x |
2.1.0 |
6.8.x |
2.0.0 |
Example: com.haulmont.webdav:webdav-global:2.3.3
-
Artifact group: com.haulmont.webdav
-
Artifact name: webdav-global
-
Version: 2.3.3
Appendix D: Creating Attributes of the WebdavDocument Type
In order to add an attribute of the WebdavDocument type the following steps should be made:
-
Open your project in CUBA Studio.
-
Double-click the required entity in the CUBA project tree and go to the Design tab.
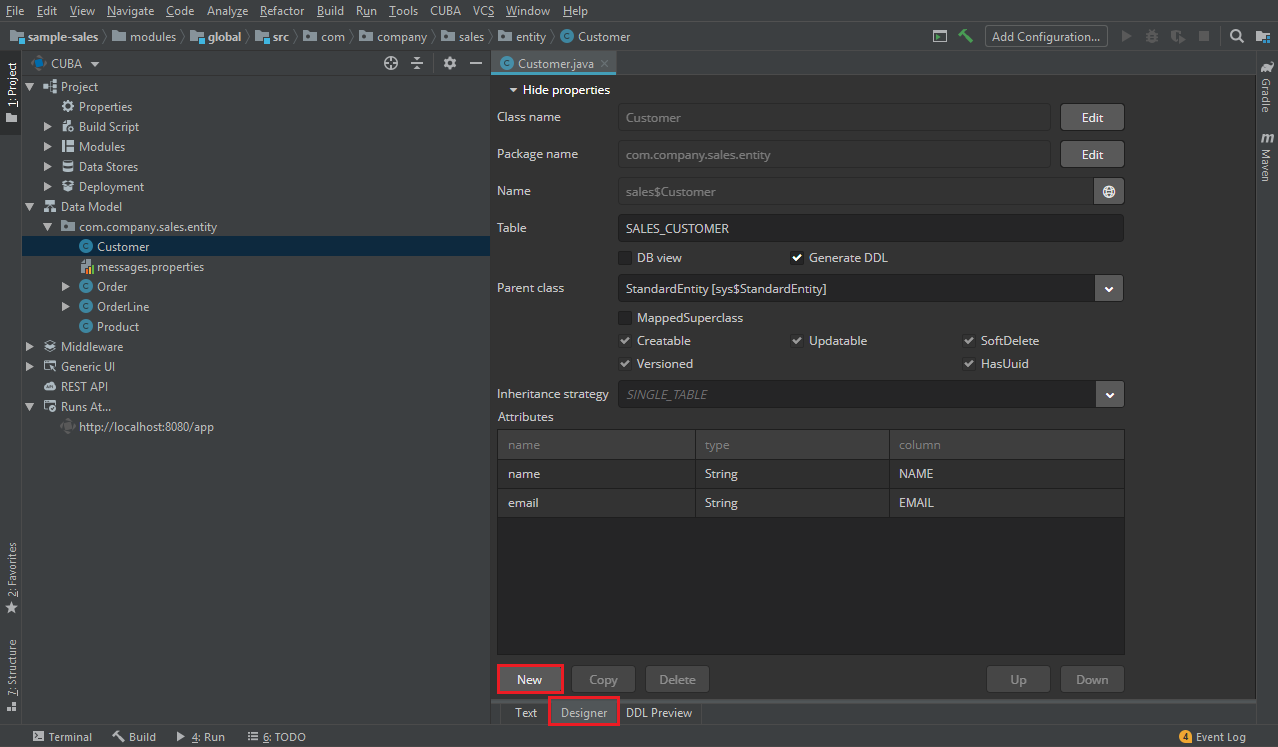
-
Click New in the Attributes section. After this, the New Attribute dialog window is opened.
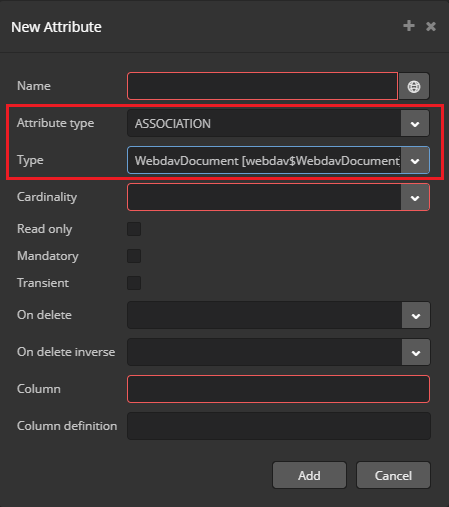
-
Select the
ASSOCIATIONvalue in the Attribute type field. SpecifyWebdavDocumentas a value of the Type field. Fill in the required fields and click Add to confirm the creation of a new attribute.