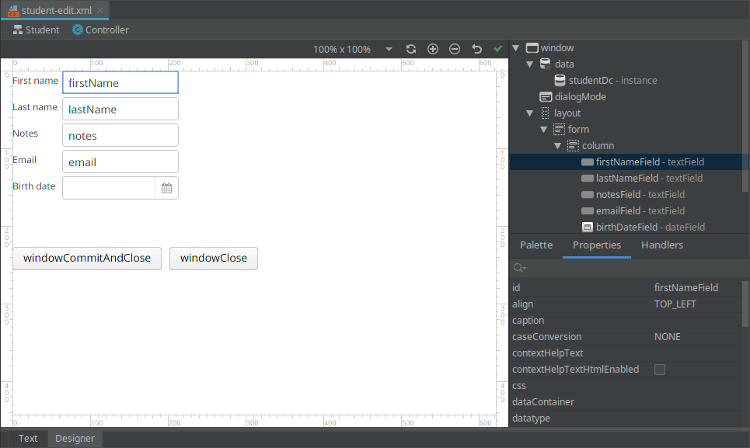
Preface
This manual provides the reference information for CUBA Studio IDE and the features it offers to enhance your productivity when developing applications based on CUBA Platform.
CUBA Studio is based on open-source IntelliJ Platform and extends its functionality with the following CUBA-specific features:
-
Scaffolding of Gradle build scripts.
-
Scaffolding of data model, database schema and CRUD UI.
-
WYSIWYG designer of screen layout.
-
Developer-friendly features that boost the coding process: actions, intentions, inspections, references.
-
Support for easy internationalization.
-
Creating data model and UI screens for an existing (legacy) database.
-
Hot (re)deploy.
-
Easy migration to new versions of CUBA Platform and Add-ons.
IntelliJ Platform provides a strong foundation for the CUBA Studio. It contains many features that boost CUBA developer productivity, such as ergonomic user interface, smart completion, safe code refactorings, background inspections, built-in version control and integration with Gradle. If you have not used IntelliJ IDEA before, we highly recommend you to visit Learn & Support section of the IntelliJ IDEA web site to get a quick tour of its basic features.
Release Notes
- Version 15
-
-
An ability to use environment variables for sensitive database connection parameters has been added (supported for CUBA
7.2.7or later). It helps to avoid storing such parameters in the version control. Read more in the Environment variables as connection parameters section. -
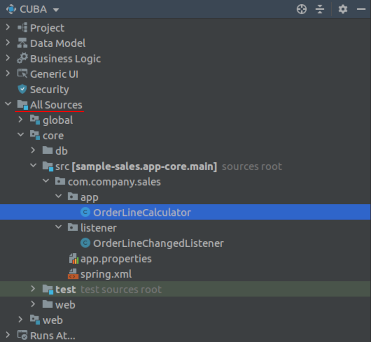
The new All Sources section has been added to the CUBA project tree. It displays all source files located in the modules of the project without filtering them by file type. This section allows developer to locate files or classes that aren’t included into one of specialized project tree sections (services, screen controllers, entities etc).
-
Ability to organize database update scripts by per-month folders has been added. For large project teams the current behavior of grouping database update scripts into per-year folders may be inconvenient. So the new setting was introduced: CUBA → Settings → Group update scripts by. After it is changed to MONTH, new update scripts are grouped to per-month folders (e.g.
/2020/10/,/2020/11/etc). Note that already existing update script files will not be (and cannot be) re-organized.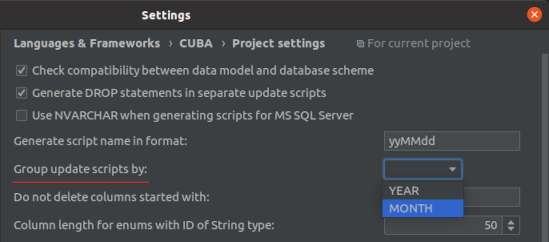
-
The user interface for the
zipProjectGradle task has been added, available in the main menu (CUBA → Advanced → Zip Project). It can be used for code sharing purposes.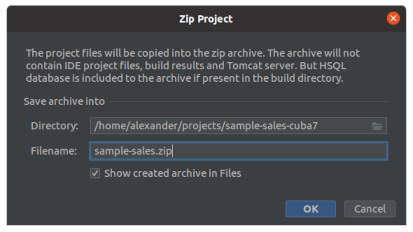
-
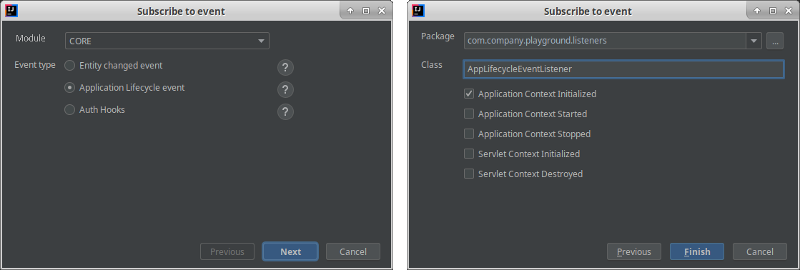
Existing Subscribe to Event and Install Delegate dialogs have been unified into one dialog for convenience.
-
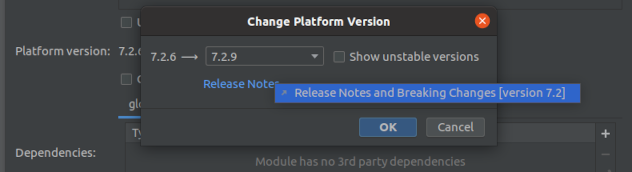
The ability to change Platform Version has been extracted as a separate dialog from the Project Properties dialog. It now also shows links to release notes for related platform versions.
-
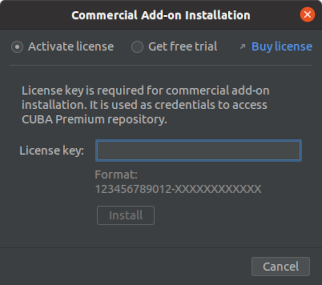
UI to install trial and full version of commercial add-ons has been improved. Additional cases are now processed automatically (such as commercial add-on arfifacts uploaded to a custom project-specified repository).
-
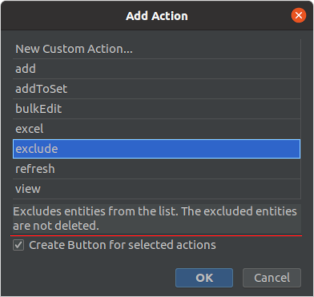
Studio now displays description for standard actions. Description is displayed in the action creation dialog and in the table creation wizard dialog (as mouseover tooltip).
-
A new inspection has been added to detect the popular problem: when users manually add
appComponentdependency to thebuild.gradlefile but forget to register this add-on in theweb.xmlfile(s) of the project.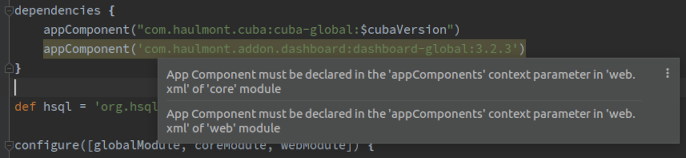
-
Ability to edit
~/.gradle/gradle.propertiesfile in the IDE has been added. Use CUBA → Advanced → Edit Gradle properties action in the main menu to edit global Gradle settings file. -
Standalone IDE version of the Studio has been upgraded to the IntelliJ Community platform 2020.2. Previously downloaded standalone Studio IDE will not be upgraded - you should download the new version from the CUBA Platform web site.
-
Numerous small improvements and bug fixes:
-
- Version 14
-
-
An ability to track database schema changes for additional data stores has been added (platform
7.2.0or later). To enable generating database migration scripts for the data store - use the new added radio button group in the Data Store Properties dialog: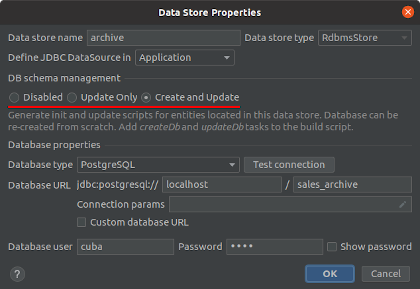
The following database schema management modes are available:
-
Disabled - Studio doesn’t track database schema changes for this data store. This is the default mode, and this is how previous Studio versions used to behave.
-
Update Only - Studio generates update database migration scripts and provides ability to update database schema to match updated data model. However, Studio does not provide a way to re-create the database from scratch. This mode should be used for databases that are not fully managed by the CUBA application, e.g. databases shared with other applications.
-
Create and Update - Studio generates full set of init and update database migration scripts and provides ability to re-create the database from scratch or update it to match updated data model. Use this mode for a database meant to be fully managed by the CUBA application.
-
-
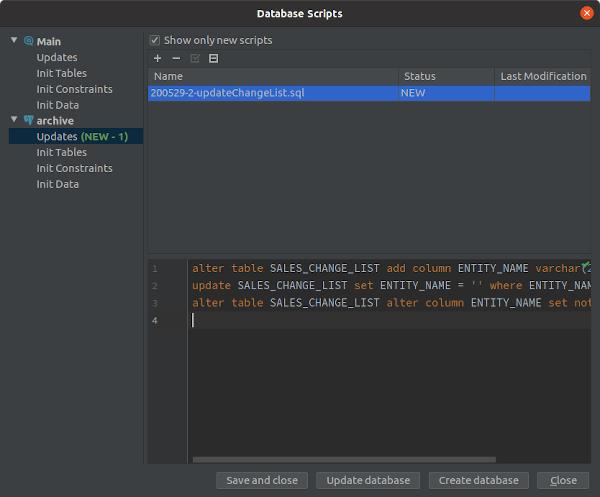
If your project has additional data stores with database schema management enabled, then the Database Scripts dialog will show database scripts for all managed data stores:
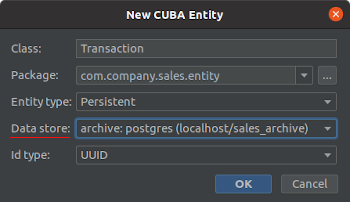
Additionally, the New CUBA Entity dialog now allows you to specify data store to register the new entity in:
-
A visual designer for the roles defined at design time has been added (platform
7.2.0or later). It allows you to conveniently construct role definitions, specifying role settings, available screens and menu items, entity CRUD permissions, available attributes and specific permissions.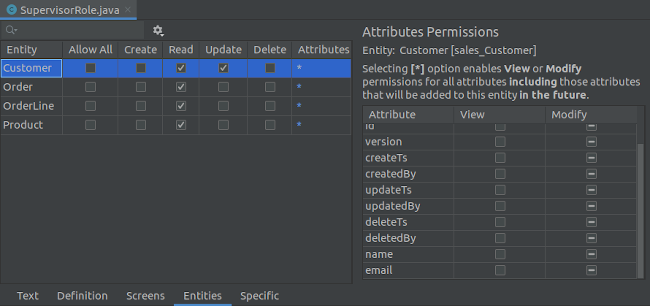
-
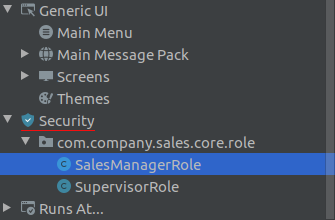
Design-time role definitions are now displayed in the CUBA project tree under Security section.
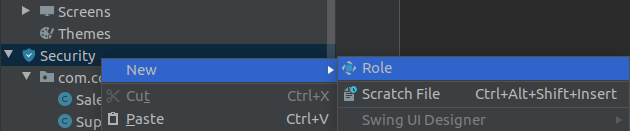
To create new role definition, use context menu → New → Role action in the Security section:
-
Visual editing of the specific permissions and categories project configuration is now available. This functionality is built into the design-time role visual designer, located in the Specific tab:

-
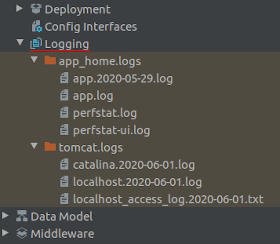
Log files of the local debug Tomcat server are now displayed in the Logging section of the CUBA project tree:
-
Added ability to customize logging configuration file used by the application (platform
7.2.0or later). To create customlogback.xmlconfiguration file, use the CUBA project tree → Logging section → Generate Logback Configuration File action: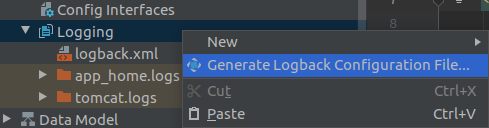
The generated file can be modified as necessary. It will be used by the local Tomcat debug server. It will be also used as a default logging configuration file in the WAR Settings and UberJAR Settings dialogs.
-
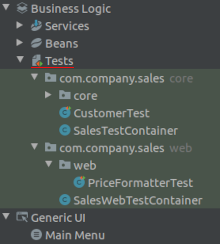
Middleware and Web integration tests are now displayed in the CUBA project tree, grouped under Business Logic → Tests section:
-
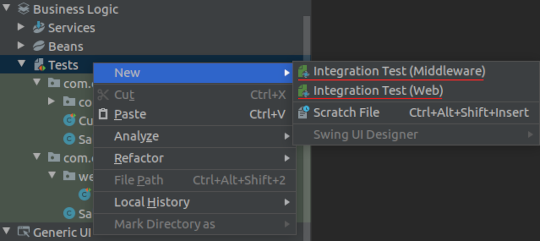
Ability to create new integration test classes has been added. To create new test class, use context menu in the CUBA project tree → Tests section → New → Integration Test (Middleware) or Integration Test (Web):
-
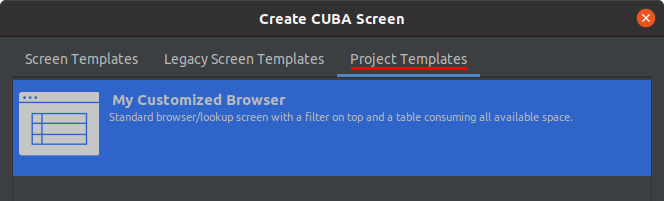
Ability to customize screen templates has been added. Press Copy template button in the first step of the Create CUBA Screen wizard to create own screen template. Template files will be copied to the project and become available for modification. Custom screen templates are displayed in the Generic UI → Screens → Custom Templates section of the CUBA project tree:
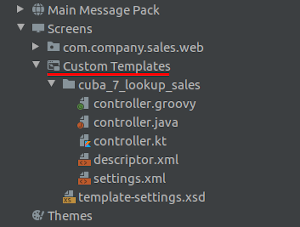
You can modify template files for the screen controller and descriptor, or even add new parameters to the wizard by extending the settings.xml file. Customized screen templates are available for selection on the Project Templates tab of the first step of the New → Screen wizard:
-
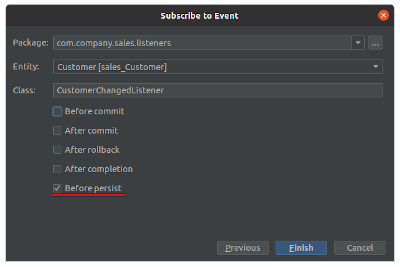
Ability to scaffold EntityPersistingEvent event listeners has been added to the Subscribe to Event wizard dialog:
-
The New CUBA Bean dialog now allows developers to specify target module and create Spring beans in
global,webandportalmodules in addition to thecoremodule: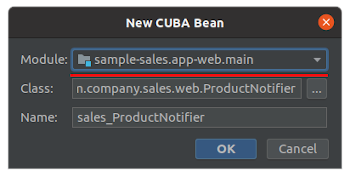
-
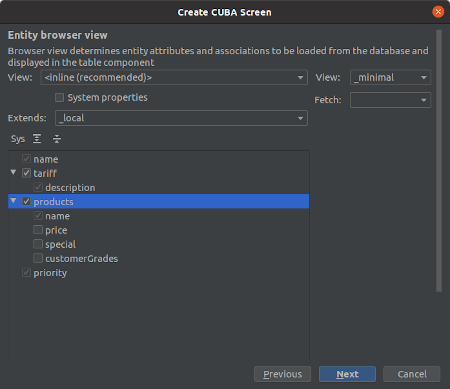
The Create CUBA Screen wizard has been extended with steps to configure entity browser and editor views. Developer is now able to select necessary properties right in the wizard without opening modal dialogs. Selected properties also determine which fields will be displayed in the browser table or edited in the editor form:
-
Formcreation wizard dialogs has been added to the Screen Designer. It activates when user places newFormto the screen layout. This dialog provides ability to choose existing or configure new data container and set up other requiredFormattributes: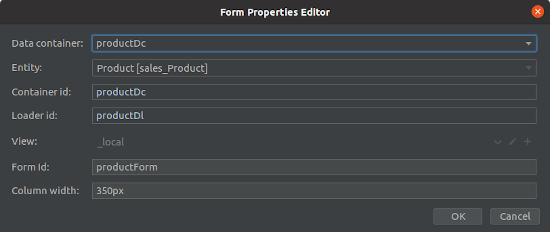
-
Component Palette panel of the Screen Designer now allows developer to drag-and-drop components from the palette to the source code. Selected component will be added as a child component in the containing tag.
-
Switching main menu from Composite to Single mode for menu customization has been simplified. Menu designer now suggests developer to copy menus and items inherited from the platform and add-ons to the project’s configuration.
-
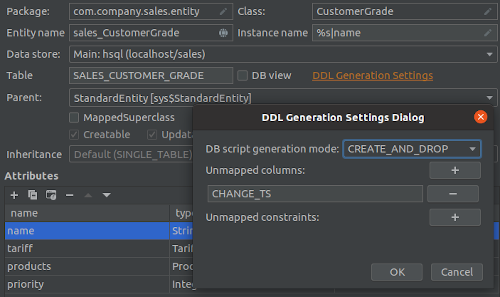
Additional DDL generation settings have been added to the Entity Designer. Developer now can choose one of three database script generation modes for the particular entity: Create and drop, Create only, Disabled. Also it is now possible to specify unmapped columns or constraints (ones that are not mapped to the JPA entity model but exist in the database, and Studio should not suggest dropping them).
-
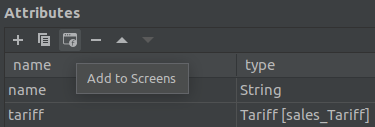
The Add new attributes to existing screens feature (previously available only as intention action) has been improved and became easier to access. Now it is available in the entity source code as the Add attributes to screens top actions panel’s button:

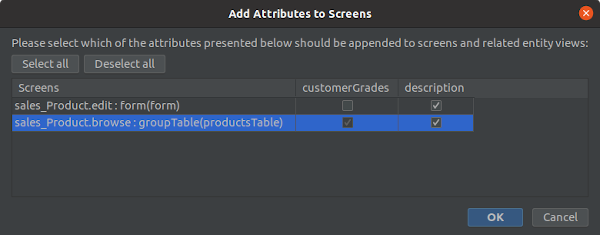
Similar action has been added to the Entity Designer as the Add to Screens button above the attributes table:
-
Inspection has been added that detects usages of the
System.out.printlnorSystem.err.printlnstatements in the code. It provides quick fixes to the developer (available by pressing Alt+Enter / Option+Enter) to transform the statement to use injected or static SLF4J Logger: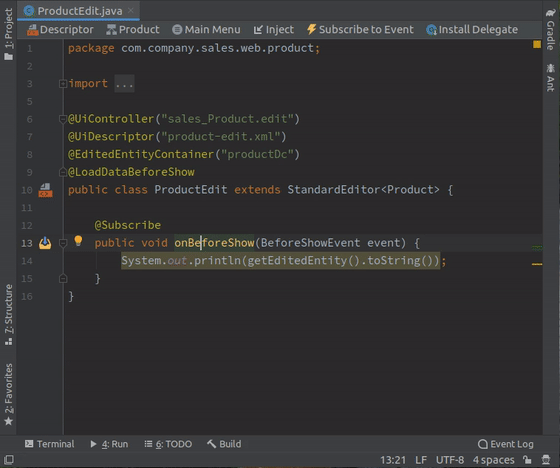
-
The "Entity is created by calling constructor" inspection has been extended with a quick fix. By pressing Alt+Enter (Option+Enter) you can transform the statement to use the recommended
DataManager#create(Entity.class)factory method:
-
The "GUI component is created by calling constructor" inspection has been extended with a quick fix. By pressing Alt+Enter (Option+Enter) you can transform the statement to use the recommended
UiComponents#create(Component.class)factory method:
-
Support for the custom components UI metadata has been added to the Screen Designer. It allows to integrate a custom UI component implemented in an add-on or project into UI of the Screen Designer by adding special annotations to component’s definition. Read more about UI metadata in the Developer’s Manual.
-
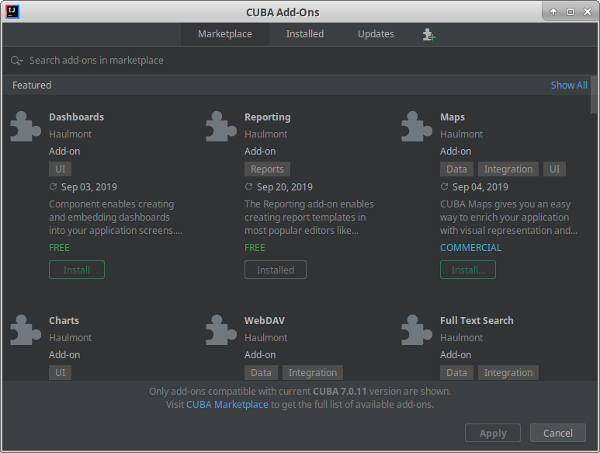
Integration with the CUBA Store has been added. Now you can log in to your CUBA profile by pressing the CUBA User Profile button on the toolbar:
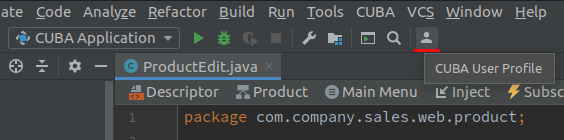
After logging in you will be able to download and install trial versions of the commercial add-ons in the Marketplace window.
-
Processing time of the Generate Database Scripts operation has been significantly optimized (reduced). The same done to the database schema check happening before the CUBA Application run configuration is started.
-
Studio now uses MariaDB connector when connecting to both MySQL and MariaDB databases. It is no longer required to download MySQL proprietary driver in order to use MySQL with the Studio. In case if using MySQL driver is essential for some reason, it can be enabled by adding the
disableMariaDbDriverparameter to the connection string. -
Default memory settings for the standalone IDE version of the Studio have been increased. Now it is configured to use up to
-Xmx1200m, up from previously used-Xmx768mvalue. -
Standalone IDE version of the Studio has been upgraded to the IntelliJ Community platform 2019.3. Previously downloaded standalone Studio IDE will not be upgraded - you should download the new version from the CUBA Platform web site.
-
The following infrastructure improvements have been implemented for developers located in China:
-
Added new built-in CUBA artifact repository
https://nexus.cuba-platform.cn/repository/cuba/, located in China. -
Add-ons information in the marketplace has been translated into Chinese.
-
Optimized location of the external resources used by the Studio for better network accessibility.
-
-
The JxBrowser browser implementation has been removed. Now Studio uses JavaFX to show embedded web pages. It helped to significantly reduce size of the plugin bundle.
-
Numerous small improvements and bug fixes:
-
- Version 13
-
Layout of the Screen Designer has been rearranged, targeting the following goals:
-
Efficient usage of the IDE window space.
-
Convenient switching between XML descriptor source code and layout preview.
-
Allow experienced developers to use Designer capabilities when viewing and editing the XML code.
The following changes and improvements have been implemented for the Screen Designer:
-
Screen Designer panels became independent IDE tool windows. Component Hierarchy is displayed in the up-right corner of the IDE, as it was before. Component Palette is displayed in the bottom-right corner. Component Inspector is displayed in the bottom-left corner and contains Properties and Handlers tabs.
These tool windows appear automatically when you open screen descriptor in the editor. When you switch active screen descriptor file in the editor, the content of the tool windows is updated. Sometimes when you open other IDE tool windows (such as Gradle, Persistence etc.), Designer’s panels become hidden, and you can re-open them by clicking the corresponding buttons in the left and right sides of the IDE window.
The ability to display Component Inspector in the bottom-right corner was kept for those users who prefer the old layout. In order to move this panel to the right side, click the Move to Right Bottom button located in the panel’s title.
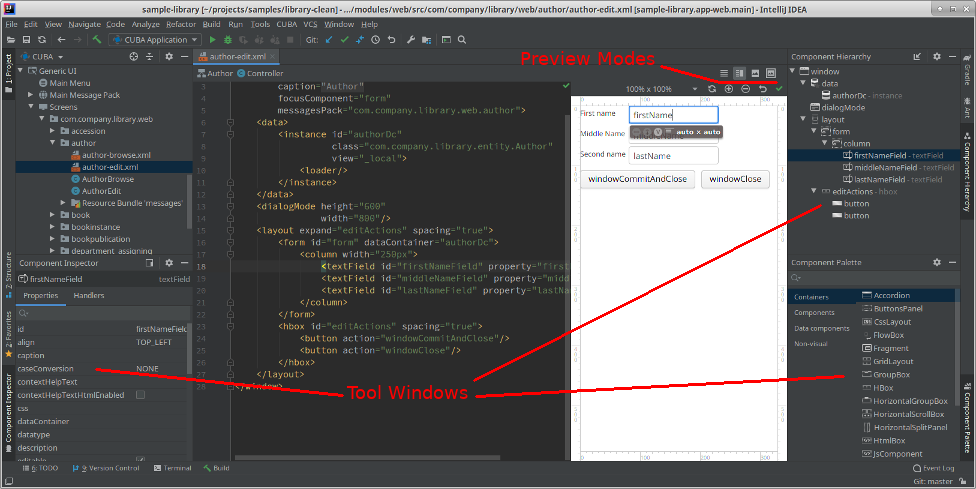
-
Layout preview panel now shares editor space with the source code of the screen descriptor. The tabsheet with Text and Designer tabs has gone. On the right side of the top panel of the screen descriptor there are four buttons that switch preview display mode:
-
Editor only - only source code is displayed in the editor.
-
Editor and Preview - editor space is split to contain both source code and preview.
-
Preview only - only preview is displayed in the editor (similar to the old Screen Designer layout).
-
Preview in Window - source code is displayed in the editor, while preview is displayed in the separate window which can be moved to another display.
-
-
Designer panels are active when editing XML code and interact with the editor. Experienced developers who navigate and modify screen descriptors by editing the XML source code can now benefit from the editing capabilities of the screen designer:
-
When the editor caret is moved from one XML tag to another, the corresponding component is selected in the Component Hierarchy and Component Inspector panels.
-
Clicking element in the Hierarchy panel moves the caret to the corresponding XML tag in the source code.
-
You can drag new components from the Palette to the Hierarchy, reorder components and edit component properties in the Inspector panel when only source code is displayed in the editor. The source code immediately reflects all changes.
-
-
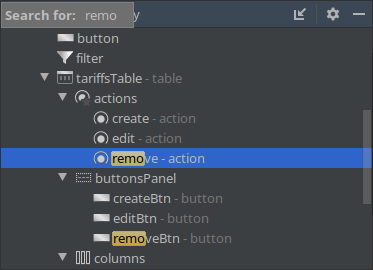
Screen Designer now displays Table (and DataGrid) columns and actions in the Component Hierarchy tree. As a part of this change, several modal dialogs were removed that were used previously to edit columns and actions. Now you can view and edit column and action properties and event handlers right in the Component Inspector panel. Adding a new table column or action also became easier. When a table, one of table columns or actions is selected, the Component Inspector displays the + Add button. By pressing it you can add one or more columns or actions to the table.
-
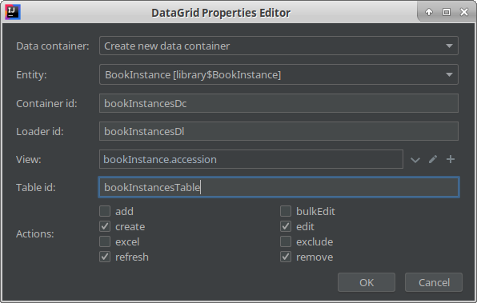
Component creation wizard dialogs have been added to the Screen Designer. Adding data containers, tables and grids, table column, table action and form field components to the screen has become easier.
When you add one of mentioned components to the screen, a dialog appears that allows you to specify the most important component properties. For example, when adding a DataGrid to the screen, you are able to choose existing or create new data container, specify component id and select a set of standard actions and buttons to be added to the table.
-
Ability to search component by typing text from keyboard has been added to the Screen Designer’s Component Hierarchy panel:
-
Additional conversions have been added to the context menu of the Component Hierarchy panel. Now you can quickly convert
TextFieldcomponent toTextAreaand other components: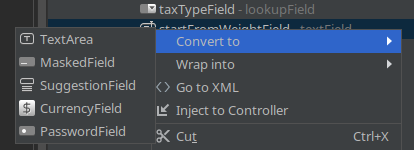
-
The Inject to Controller context menu action available in the Component Hierarchy panel now supports injecting more then one selected components at once.
Other features and improvements:
-
Support for Kotlin as a programming language has been added. You can select Kotlin as a project’s programming language in the project creation wizard, if selected platform version is
7.2.0or later. All elements of the CUBA project: entities, screens, services can be generated using Kotlin. Studio visual designers, smart auto completions, inspections and hot deploy support Kotlin language as well. -
The Hot Deploy mechanism for projects using platform
7.2.0or later has been reworked (for all languages) in order to support Kotlin language. If you encounter any problems with Java / Groovy projects, you can switch back to the old mechanism by turning off the following setting: Main Menu → CUBA → Settings → Project Settings → Hot deploy compiled classes. -
The CUBA project creation wizard has been extended. Fields were rearranged between steps and more fields were added to the wizard: Module Prefix, supported programming languages, Locales, Main Data Store properties.
-
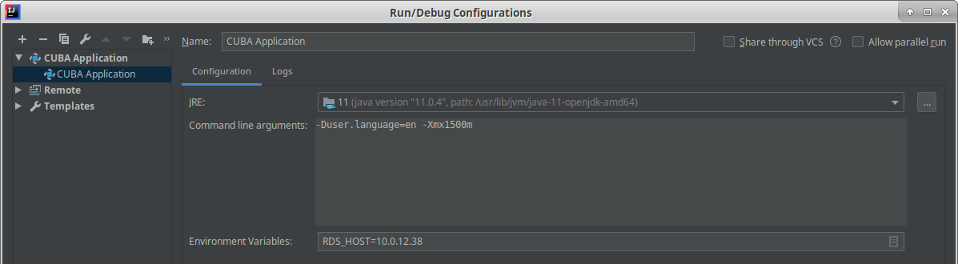
Two additional settings were added to the CUBA Application run configuration: Command line arguments and Environment Variables. These settings are applied to the tomcat process running the CUBA application in debug mode. For example, by specifying command line arguments you can set non-default timezone:
-Duser.timezone=Europe/Londonor increase memory settings:-Xmx1500mfor the application server.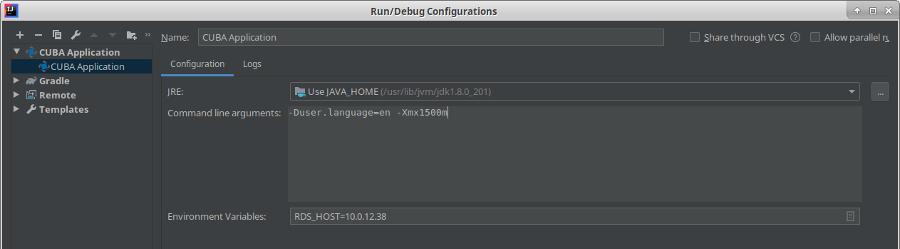
-
New template for the login screen with updated layout and design is now available for projects based on CUBA platform
7.2.0or later. Examples of how the new login screen looks like can be found in the GitHub ticket. In order to add new login screen to your project, choose the Login screen with branding image template in the New → Screen wizard. -
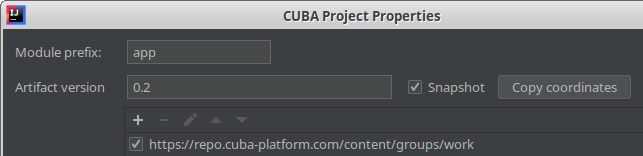
Ability to edit project artifact version has been added to the Project Properties dialog:
-
The Inject action has been added to the top actions panel of Middleware services and Spring Beans source code. Previously it was available only through Generate (Alt+Insert) menu.
-
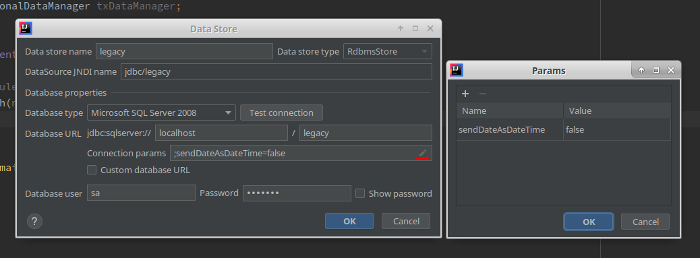
Added convenient dialog to specify connection parameters in the Data Store Properties window. A "pencil" button has been added to the Connection params field, and pressing this button opens a dialog that helps to specify connection parameters. Studio converts parameters to connection string taking into account DBMS-specific separators:
-
The Locales dialog now suggests available languages and countries and automatically fills locale code according to selected language:

-
The Attribute is not included into the view code inspection has been extended. Now it also checks usages of non-persistent attributes that have associated persistent attributes specified by the
@MetaProperty#relatedannotation parameter. -
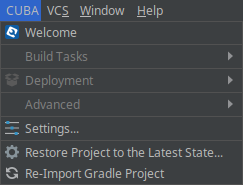
Improved Studio behavior for problematic cases when Gradle project synchronization fails for some reason. The CUBA main menu stays visible and contains additional menu items:
-
The Re-Import Gradle Project item helps to deal with one-time network inaccessibility problem.
-
The Restore Project to the Latest State item reverts Gradle build script to the state after last successful import, which helps with unintended or erroneous build script changes.
-
-
Standalone IDE version of the Studio has been upgraded to the IntelliJ Community platform 2019.2. Previously downloaded standalone Studio IDE will not be upgraded - you should download new version from the CUBA Platform web site.
-
Numerous small improvements and bug fixes:
-
- Version 12
-
-
The Screen Designer has been re-implemented using native IntelliJ UI components. New designer has better responsiveness and faster opening time. Many improvements were made to the designer, some of them are mentioned below.
-
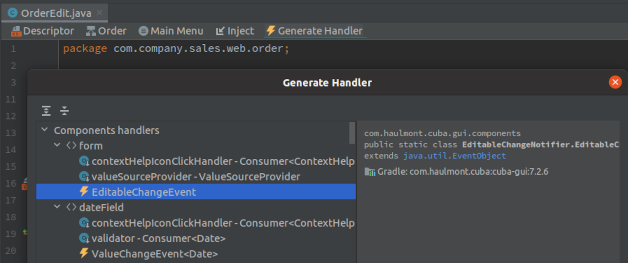
A new Handlers tab has been added to the Screen Designer, next to Palette and Properties. It displays existing methods along with all possible options for event listeners and component delegates associated with the selected component. In order to generate necessary handler method - just double-click the corresponding row.
-
Preview action has been added to the top actions panel of the screen descriptor. It opens a window with the preview of the edited screen. Canvas of the preview window interacts with the XML editor and automatically updates its content according to the layout changes.
-
Added Inject to controller and Go to XML actions to the context menu in the Screen Designer hierarchy tree.
-
Added CUBA Documentation actions to the context menu of the hierarchy tree and components palette. These actions open the corresponding component’s section in the CUBA Developer’s Manual.
-
Add Column button has been added to the Properties tab of the Form component.
-
Added class name auto completion for the class field in the Validator and Formatter Screen Designer dialogs.
-
Added scaffolding for various application event listeners. It is accessible in two ways:
-
Open existing Spring Bean and press Subscribe to event in the top actions panel of the source code editor.
-
In the Middleware section of the CUBA project tree invoke a right click → New → Event Listener context menu item.
-
-
Added project-wide options affecting screen generation. These settings are used by the New → Screen… wizard. To change the settings, open Main Menu → CUBA → Settings → Screen Generation Settings. The following screen settings are available:
-
Form field width (450px by default) - used by entity editors
-
Keep editor actions at the bottom - used by entity editors that are opened as a "full screen" (not as dialog)
-
Force modal open type for editors - used by entity editors opened as a dialog
-
-
Added ability to specify menu item caption in the screen creation wizard.
-
Added ability to scaffold handlers for components which don’t have id yet. Studio asks user to enter component id when required.
-
Main Menu action has been added to the actions panel of the screen controller. It allows developer to include current screen to the main menu or to navigate to the main menu configuration.
-
Build WAR and UberJAR UI in the Deployment section of the CUBA project tree has been improved. From now you can build WAR or UberJar just by double-clicking the corresponding element Build WAR or Build UberJAR, if building the corresponding artifact is turned on. Configuration files related to these artifacts (
single-war-web.xml,logback.xml,jetty-env.xmletc) are now shown near to the WAR/UberJAR Settings project tree elements for convenient access.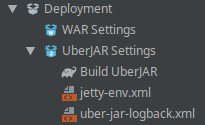
-
Added new actions that allow developer to create new database init/update scripts. These actions are available from the CUBA project tree, under the Data Stores → Main Data Store section:
-
init → context menu → New → Database init script
-
update → context menu → New → Database update script
-
-
The Install Delegate dialog that is invoked from the screen controller now allows developer to generate a formatter, custom column generator or value provider for any table column.
-
Added suggestions for the icon attribute of the screen XML descriptor, also added icon preview as a gutter icon.

-
Added suggestions for the optionsEnum XML descriptor attribute of the
LookupFieldcomponent. -
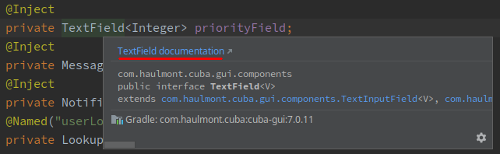
Quick Documentation popup invoked for UI components now provides a link to the CUBA documentation:
-
Localized Message dialog in the Entity Designer now automatically constructs message keys for Bean Validation messages, e.g. "playground_Rank.queueSize.validation.Digits" or "playground_Tariff.taxType.validation.NotNull".
-
Added support for the Integrated Security option of the Microsoft SQL Server (2012+) database type. Please note that it’s available only for projects based on CUBA 7.1.0 and later.
-
Performance for large projects has been improved (data model designer, views.xml static analysis, CUBA project tree).
-
Oldest compatible IntelliJ IDEA version has been increased to 2019.1. This means that if you are using an older IDEA (or CUBA Studio) version, you will not be able to update your CUBA plugin to newer releases; you would need to upgrade your IDEA or CUBA Studio installation.
-
Numerous small improvements and bug fixes:
-
- Version 11
-
-
The "CUBA Add-ons" screen has been added which allows you to manage add-ons included in your project. The screen can be opened by double-clicking Project → Add-ons in the CUBA project tree, or from the main menu: CUBA → Marketplace. Detailed description of the screen is available in the corresponding section.
-
The Welcome screen has been added. It simplifies access to common project settings and actions, holds links to documentation and community web pages.
-
Implemented UI to manage 3rd-party libraries used by the project. It is available in the Project Properties Editor.
-
The Entity Designer has been re-implemented using native IntelliJ UI components. New designer has the following benefits:
-
Better responsiveness, faster opening time
-
Changes to the entity and its attributes are instantly committed into the source code
-
Integration with IntelliJ smart refactorings such as Safe Delete of entity attributes
-
-
Implemented Safe Delete refactoring of entity attributes. To start this refactoring, remove the attribute in the entity designer or right-click the attribute declaration and choose from the context menu: Refactor → Safe Delete…. This refactoring searches for attribute usages in views, screens and other configuration files. It automatically removes attribute usages that are safe to delete and warns about usages in the code that would need manual repair.
-
Data Store settings have been moved out from the Project Properties screen. From now Data Store settings are available for viewing and editing in the CUBA project tree → Data Stores section. Main Data Store settings also can be opened from main menu: CUBA → Main Data Store Settings. Please refer to the Managing Data Stores section for more details.
-
An ability to use HSQLDB InMemory as an additional data store has been added.
-
Added support for MariaDB as a main or additional data store.
-
Added support for Amazon Redshift as an additional data store.
-
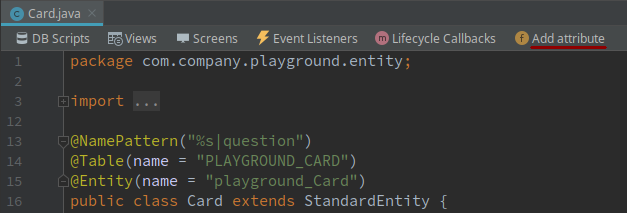
Add attribute action has been added to the actions panel of the entity source code editor.
-
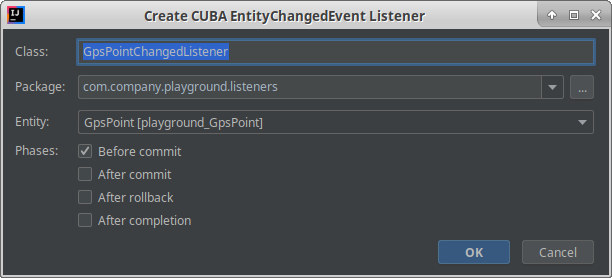
Actions supporting
EntityChangedEventlisteners have been added to the actions panel of the entity source code editor. They allow you to create new listener or to navigate to already existing listener methods.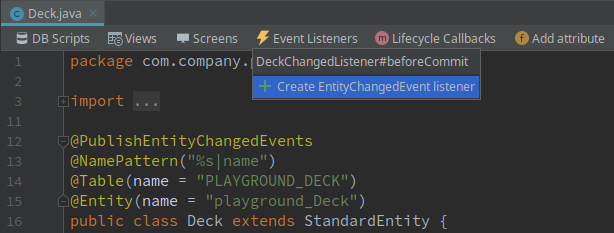
-
The Create CUBA EntityChangedEvent Listener scaffolding dialog has been improved. Now it allows you to create several listener methods in one class and to choose two additional event phases.
-
Added support for more BeanValidation 2.0 annotations in the Entity designer:
@NotEmpty,@Positive,@PastOrPresentand others. -
When adding attributes to an entity, the entity designer automatically recognizes attribute name that can be displayed as instance caption (
name,caption,titleetc) and generates @NamePattern annotation if it hasn’t been defined yet. -
View designer is now able to rename an already existing view, migrating its usages in the code.
-
The Inject 'xxx' quick fix which allows you to inject bean based on variable name has been extended to work in the context of both screen controllers and Spring beans. The example how one can utilize this quick fix is presented below:

To utilize this feature, type variable name of the desired bean in the code of a Spring bean or a CUBA screen controller. Then press Alt+Enter and choose Inject 'beanName' suggestion in the popup list. Class name of the bean is determined automatically based on variable name which must exactly match bean interface name. For example:
dataManager,fileStorageService,messageBundleandclusterManagerAPIvariable names will be recognized and successfully injected as corresponding CUBA beans. -
Added a Java code inspection checking that localization messages targeted by
getMessageandformatMessagemethod calls exist.
Checks are performed for
getMessageandformatMessagemethods ofMessageBundle,MessagesandAbstractWindow(legacy screens) classes. If the message with given key in a given message pack does not exist, message key is highlighted in red.If you press Alt+Enter and choose Create message in the message bundle quick fix item, Studio will open Localization Message dialog to input localized message for all configured project locales.
-
Standalone IDE version of the Studio has been upgraded to IntelliJ Community platform 2019.1. Previously downloaded standalone Studio IDE will not be upgraded - you should download new version from the CUBA Platform web site.
-
CUBA plugin for IntelliJ IDEA containing this release of the Studio has been uploaded to the main (Stable) plugins channel. So it’s not necessary to set up additional plugins repository anymore. If you have used previous versions of CUBA Studio plugin, you can now remove https://plugins.jetbrains.com/plugins/haulmont/list from the list of Custom Plugin Repositories. Custom repositories list is located here: File → Settings → Plugins → "gear" icon → Manage Plugin Repositories.
-
Numerous small improvements and bug fixes:
-
- Version 10
-
-
Code editors of entities, screen controllers and screen descriptors now have a panel on top which provides quick access to CUBA-related actions and navigation between related files. For example, below is the panel in an entity class editor:
Using the panel buttons you can quickly navigate to the related DDL scripts, views and screens. Also, you can create new views, screens and JPA lifecycle callback methods.
The actions are also duplicated in the "intentions" context menu which is invoked by pressing Alt+Enter (Option+Enter):
-
Implemented scaffolding of
EntityChangedEventlisteners. In order to run it, select an entity class, package, or the top-level Middleware node in the CUBA project tree and click the New > EntityChangedEvent Listener context menu item. Studio will create a Spring bean in thecoremodule with two listener methods: one notified before and another after transaction commit. -
Implemented scaffolding of JMX beans. In order to run it, select the Middleware node or one of the packages under the Beans node in the CUBA project tree and click the New > JMX Bean item of the context menu.
-
Implemented scaffolding of configuration interfaces. In order to run it, select the Project > Config Interfaces node in the CUBA project tree and click the New > Configuration Interface item of the context menu.
-
The Inject dialog now contains the Project Beans section which allows you to inject any Spring bean available in the project.
-
The Inject dialog now works for screen controllers written in Groovy too.
-
Improved injection experience: now if you put the cursor inside a method and invoke the Inject dialog, the resulting field will be generated on top of the class definition and the field name will be automatically copied to the cursor.
-
Inject component into controller intention is available on the XML element of the component. Try to position cursor on a component XML element and press Alt+Enter (Option+Enter).
-
Implemented visual designer for entity indexes and unique constraints. See the Indexes tab at the bottom of the entity editor.
-
Implemented inspections about duplicated entity name and table name. They are shown on the entity class if the same entity name or table name is defined for more than one entity class.
-
Implemented intentions for adding correct JPA annotations to entity fields. It simplifies manual coding of entity attributes: you can just add a field to the entity class, generate getters/setters, and then press Alt+Enter (Option+Enter) on the field to generate annotations.
-
In the screen controller code, you will get a warning if you inject a screen component not present in the screen’s XML:

-
In the entity class code, you will get a warning if the class has no
@NamePatternannotation: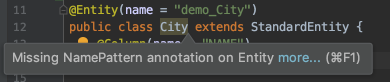
You can fix the problem or suppress the warning by pressing Alt+Enter (Option+Enter) on the class name.
-
View designer now has a master-detail layout with the list of views on the left and the selected view editor on the right.
-
For projects based on CUBA 7.1 and above, the following features have been added:
-
Main screen templates with side menu and responsive side menu.
-
Support for passing properties to screens and fragments opened declaratively.
-
Support for REST API add-on.
-
-
All Resolved Issues:
-
- Version 9
-
-
BREAKING CHANGE: Studio now uses HSQL version 2.4.1. When you open a project using HSQL database, Studio prompts you to update the version of HSQL in the project’s
build.gradle. If you accept, the project will correctly work with the Studio v.9+. However, be aware of the following issues:-
The application will not start if the project with the new HSQL driver is opened in a previous Studio version containing the older HSQL server;
-
In the projects with HSQL based on CUBA version before 7.1, Scheduled Tasks do not work because their table has a column named
PERIODwhich is a reserved word in HSQL 2.4.1. The column is renamed in CUBA 7.1.TipIf you are on CUBA 7.0 or below and need to work with HSQL and Scheduled Tasks at development time, you can make Studio to use HSQL 2.2.9 by following these steps:
-
Exit Studio.
-
Copy
cuba-studiofolder:-
on Windows from
C:\Program Files\Haulmont\CUBA Studio 2018.3\plugins\to%userprofile%\.CubaStudio2018.3\config\plugins\ -
on macOS from
/Applications/CUBA Studio.app/Contents/plugins/to~/Library/Application Support/CubaStudio2018.3/
-
-
Replace
hsqldb-2.4.1.jarfile withhsqldb-2.2.9.jarin the copiedcuba-studio/libfolder. You can download the file here. -
Start Studio and open your project.
-
Replace
def hsql = 'org.hsqldb:hsqldb:2.4.1'withdef hsql = 'org.hsqldb:hsqldb:2.2.9'in thebuild.gradle.
Now both Studio and your project will use HSQL 2.2.9 and the application based on CUBA 7.0 and below can work with Scheduled Tasks on HSQL.
-
-
-
Hot deploy mechanism now deploys all dependent classes together with the changed one, which eliminates
ClassCastExceptionon opening modified screens. -
When selecting MySQL or Oracle database, Studio shows a dialog where you can click a link for downloading the JDBC driver from the vendor website and then upload it from the local file system to the correct locations in the project and Studio itself. After uploading a driver, restart Studio.
The drivers can be removed from Studio using the CUBA > Database Proprietary Drivers settings page.
-
DataGridandTreeDataGridare available for browser and master-detail screen templates in the Table type field of the Create CUBA Screen wizard. -
Extend an existing screen and Entity fragment templates have been added to the Create CUBA Screen wizard.
-
Undo/Redo actions now work correctly in the screen visual designer.
-
Implemented auto-complete for data loader query in the screen designer.
-
Screen designer now has a button in the canvas top right corner to switch to the screen controller.
-
Warnings in screen XML when
invokeanddatasourceattributes are used in screens based on new API. -
If you have added Groovy support in the Project Properties window, you can select Groovy in the Advanced > Controller language field of the Create CUBA Screen wizard.
-
Services written in Groovy are shown in CUBA project tree.
-
Notification about new platform versions on project opening.
-
Refined gutter icons in source code editor.
-
Entity attribute type can now be freely changed in the entity designer with or without refactoring.
-
Enumeration designer has been implemented.
-
View designer has been rewritten with native IntelliJ UI.
-
Data model generator now contains screen templates based on the new API.
-
All Resolved Issues:
-
- Version 8
-
-
Opening of a project for the first time is now performed through the import wizard. See Opening an Existing Project for details.
-
The project model is now stored in a file inside the
.ideafolder, so the Gradle synchronization is not started each time the project is opened. -
The Run/Debug Configuration editor now allows you to select a JDK to be used for running the application server. See JVM field on the Configuration tab. The value of
JAVA_HOMEenvironment variable is used by default. -
Views can be renamed by the standard Refactor > Rename action. This action can be invoked on the view element in the CUBA project tree, on the
nameattribute of the view XML definition in theviews.xmlfile, and on any reference to this view in the screen XML descriptors. -
A view editor can be invoked from the view field of a data container in the screen designer.
-
Implemented auto-complete and usage reference for
screenattribute of the<fragment>XML element in screen descriptors. -
Implemented localized message editor for menu captions. Click Generic UI > Web Menu in the CUBA project tree, switch to the Structure tab, select a menu item and click edit in the Caption field.
-
Implemented warning for enum values without localized captions. If you see the warning, use the Create message in the message bundle quick fix to create a default caption.
-
Implemented auto-complete for the names of the application properties declared in configuration interfaces. Press Ctrl+Space when defining a property in
app.propertiesorweb-app.propertiesfiles. -
All Resolved Issues:
-
- Version 7
-
-
If your project is based on CUBA 6.10 and uses BPM, Charts, Full-Text Search or Reports premium add-ons, you should set the premium repository access credentials in
~/.gradle/gradle.propertiesas described in the Developer’s Manual. Studio does not pass the credentials to Gradle. -
All Resolved Issues:
-
1. Installation
Before installing CUBA Studio, make sure your system meets the requirements explained in the Setup section of the CUBA Developer’s Manual.
You can install CUBA Studio in two different forms: as a standalone IDE for your operating system or as a plugin for existing IntelliJ IDEA. The Studio standalone IDE is a special build of IntelliJ IDEA Community Edition which includes the CUBA plugin. If you haven’t used IntelliJ IDEA before, we recommend using the standalone IDE.
The IDE has a version corresponding to the IntelliJ IDEA in use, for example 2020.2. The CUBA plugin has its own version starting from 15.
Installers of the standalone IDE for Windows, macOS and Linux can be downloaded from https://www.cuba-platform.com/tools/. The plugin is available in the IntelliJ plugins repository (see below).
- Installation on Windows
-
-
Download the
cuba-studio-VERSION.exeinstaller. -
Run the installer and follow its instructions: choose the install location, launcher type, folder name, and complete the installation.
-
Launch the installed application and see below for further instructions.
-
- Installation on macOS
-
-
Download the
cuba-studio-VERSION.dmginstaller. -
Double-click the installer, then drag and drop
CUBA Studio.appto theApplicationsfolder. If you have a previous version of Studio and you want to keep it, select Keep Both in the appeared dialog. -
Launch the CUBA Studio application and see below for further instructions.
-
- Installation on Linux
-
-
Install the required dependency:
$ sudo apt-get install libgconf-2-4
-
Download the
cuba-studio-VERSION.tar.gzarchive. -
Move the archive to an appropriate folder, e.g.
~/liband unpack it:$ tar -xvf cuba-studio-VERSION.tar.gz
-
Go to the
bindirectory and launch the application:$ cd ~/lib/cuba-studio-VERSION/bin $ ./cuba-studio.sh
-
- First launch of the IDE
-
When you launch the standalone CUBA Studio IDE for the first time, you are asked a number of questions:
-
In the first dialog Complete Installation, select Do not import settings and click OK.
-
In the next dialog Customize CUBA Studio you can click Skip Remaining and Set Defaults to accept default settings. You will be able to customize the environment at any time later.
-
See the Getting Started section for how to start a new project or to open an existing one.
-
- IntelliJ IDEA plugin installation
-
-
Start IntelliJ IDEA 2020.2 or newer.
-
Open the Plugins dialog.
-
Switch to the Marketplace tab.
-
Enter "CUBA" into the search field. You will see the CUBA plugin in search results.
-
Click Install and follow further instructions of the IDE.
-
1.1. Working Behind a Proxy
In order to configure CUBA Studio to access the internet via a proxy server, you need to perform the following steps:
-
Configure IntelliJ IDEA (or CUBA Studio)
-
Configure Gradle
-
Configure Git (optional)
- Configure IDEA (CUBA Studio) proxy settings
-
-
Open the Settings dialog: Main Menu → File → Settings.
-
Choose Appearance & Behavior → System Settings → HTTP Proxy settings section.
-
Set necessary setting values and press Check connection to test them:
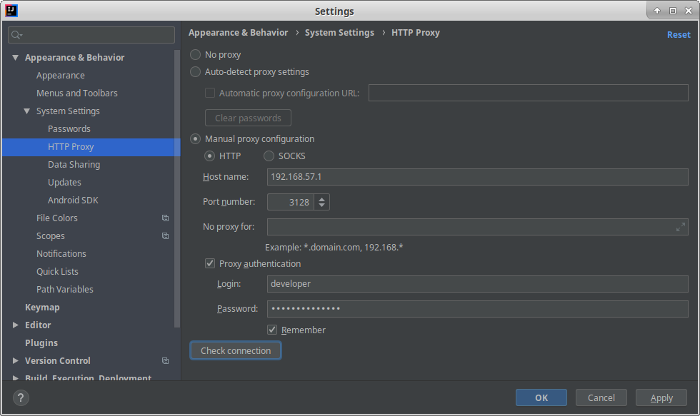
Please refer to this page for more information.
-
- Configure Gradle proxy settings
-
-
Find the ~/.gradle/gradle.properties file in the user home directory
-
Edit this file and add required proxy parameters as described in the Gradle documentation:
systemProp.http.proxyHost=192.168.57.1 systemProp.http.proxyPort=3128 systemProp.http.proxyUser=developer systemProp.http.proxyPassword=Df887..33 systemProp.http.nonProxyHosts=*.nonproxyrepos.com|localhost -
- Configure Git proxy settings (optional)
-
You might want to configure proxy settings for the Git version control tool as well, e.g. to download sample projects from one of the CUBA GitHub repositories:
Consider to run this command:
git config --global http.proxy http://proxyUsername:proxyPassword@proxy.server.com:portOr refer to the Git documentation for more details.
1.2. Working Offline
It is possible to develop projects using Studio without internet connection, provided that all project dependencies have been already downloaded, i.e. the project was already opened and assembled by this Studio installation. Part of Studio functionality will not be available in offline mode, e.g. it will not be possible to change the platform version or browse CUBA Add-Ons Marketplace.
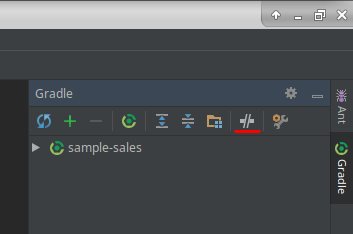
To start working offline, open the Gradle tool window in the right part of the IDE and click the Toggle Offline Mode button:
In offline mode, Gradle uses dependencies from the cache when executing all project build tasks. Gradle will not attempt to access the network to perform dependency resolution. If the required dependencies are not present in the cache, build execution will fail.
1.3. Non-Standard Studio Builds
Sometimes you might need to use one of non-standard Studio builds in your IDE. It may be necessary to get the early access for the newest Studio features or to participate in the Beta testing. Using non-standard Studio build requires to install the specific plugin version into the IntelliJ IDEA.
|
Tip
|
Non-standard Studio builds have the same subscription requirements as stable releases. |
- Beta releases
-
Beta Studio releases are published a few weeks before next major Studio release becomes available. These releases are tested but still can contain some unresolved problems. Beta releases are intended for the following purposes:
-
Provide early access for the new Studio features to interested users.
-
Help CUBA team by trying upcoming Studio versions on a wide range of workspaces and projects and providing user feedback.
In order to try the beta version, you need to do the following:
-
Open the Main Menu → File → Settings → Plugins dialog.
-
Click the
 icon and select Manage Plugin Repositories.
 -
Click + (Add) and enter the following in the Repository URL field: https://plugins.jetbrains.com/plugins/beta/list
-
Switch to the Marketplace tab. You should immediately see that CUBA plugin requests for update to the
BETAversion. -
Click Update.
-
Restart IDE if prompted to do so.
If (when) you need to return back to stable plugin version, do the following:
-
Open the Main Menu → File → Settings → Plugins dialog.
-
Uninstall CUBA plugin
-
Click the
icon and select Manage Plugin Repositories. -
Remove "beta" repository from the list.
-
Install CUBA plugin again, it will come from the stable plugins channel.
-
- Nightly builds
-
Nightly Studio builds are published every night as a part of continuous integration process. These builds contain the latest changes implemented by the CUBA Studio team. You can switch to nightly builds if you want to be the first person who gets newest features, improvements and support for upcoming CUBA platform versions.
WarningNightly builds contain changes that have not passed through the quality assurance process. Therefore they can contain severe functionality defects.
In order to try the nightly build, you need to do the following:
-
Open the Main Menu → File → Settings → Plugins dialog.
-
Click the
icon and select Manage Plugin Repositories. -
Click + (Add) and enter the following in the Repository URL field: https://plugins.jetbrains.com/plugins/haulmont_nightly/list
-
Switch to the Marketplace tab. You should immediately see that CUBA plugin requests for update to the
NIGHTLYversion. -
Click Update.
-
Restart IDE if prompted to do so.
As new nightly builds are published every night, you will start receiving a "plugin can be updated" notification from the IDE on a daily basis.
If (when) you need to return back to stable plugin version, do the following:
-
Open the Main Menu → File → Settings → Plugins dialog.
-
Uninstall CUBA plugin
-
Click the
icon and select Manage Plugin Repositories. -
Remove "nightly" repository from the list.
-
Install CUBA plugin again, it will come from the stable plugins channel.
-
- Installing plugin from disk
-
Any release of the Studio plugin, including previous releases, can also be manually downloaded from the plugin repository site and installed into the IntelliJ IDEA. Follow these steps:
-
Open the CUBA Plugin page in the JetBrains Plugin Repository.
-
Select the channel you need to download release from (Stable, Beta or Nightly).
-
Find required build in the Version History list.
-
Press Download to download the build.
-
Open the Main Menu → File → Settings → Plugins dialog.
-
Click the
icon and select Install Plugin from Disk…. -
Select just downloaded zip file in the file tree and press OK.
-
Restart IDE if prompted to do so.
-
2. Update
- Updating the standalone IDE
-
You can just download the newer version of the standalone Studio IDE from the website and install it on top of the existing version. All your settings will be preserved.
Instead of downloading and installing the entire IDE application, you can set up automatic update of the CUBA plugin from the plugins repository:
-
Open the Plugins dialog.
-
Switch to the Updates tab.
-
If there are updates available, you will see them in the list. Click Update for the CUBA plugin, and the IDE will download the plugin.
-
After the download process completes, you will have to restart the IDE to apply the new version of the plugin.
-
- Updating IntelliJ IDEA plugin
-
-
Click Help > Check for Update on Windows and Linux or IntelliJ IDEA > Check for Updates on macOS.
-
If there are updates available, you will see them in the list. Select the CUBA plugin and click Update. The IDE will download the plugin.
-
After the download process completes, you will have to restart the IDE to apply the new version of the plugin.
-
3. Getting Started
This section describes how to create new or open an existing project in Studio and start the application.
3.1. Creating a New Project
CUBA Studio provides an easy way to create new CUBA projects from scratch. Just use the New Project wizard and follow the steps below:
-
In the Welcome to CUBA Studio window click Create New Project, or use Main Menu → File → New → Project.
-
Select CUBA Project.
-
Specify Project namespace – the namespace which will be used as a prefix for entity names and database tables. The namespace can consist of Latin letters only and should be as short as possible. Think carefully on the name at this stage, as changing it later on will require complex manual intervention.
-
Change Root package if necessary. It is the root (or base) package for Java classes. It can be adjusted later, but the classes generated at project creation will not be moved.
-
Change Module prefix if required. Module names of the CUBA project are prepended with this prefix. Module prefix can be adjusted later.
-
In the Project SDK field, select a JDK corresponding to
JAVA_HOMEwhich is set in your environment. If you see the<No SDK>value, click New and select the folder where the JDK is installed, for exampleC:\Java\jdk8u202-b08on Windows or/Library/Java/JavaVirtualMachines/jdk8u202-b08/Contents/Homeon macOS. -
Accept the default repositories configuration, or customize it for the project.
-
Select the Platform version to be used in the project. If you don’t have any specific requirements, use the latest released version.
-
For the purpose of beta-testing or early accessing new CUBA platform features you might want to use one of unstable CUBA platform versions, ones that end with
BETAorSNAPSHOTsuffixes. To see them in the Platform version drop-down list, you need to select the Show unstable versions checkbox. Also note thatSNAPSHOTreleases are published only to therepo.cuba-platform.comartifact repository. -
Select value in the Languages support drop down field to change set of programming languages used in the project, or leave recommended Java value.
-
Use the Available locales field to open the Locales editor dialog and add more supported locales to the project. You will be able to change them later if required.
-
Click Next.
-
On the second wizard step you can set up main data store properties, e.g. select local PostgreSQL database for the new project. These properties can be changed later.
-
Click Next.
-
Change value of the Project name field, if required. The name should contain only Latin letters, numbers and underscores.
-
Project location is the path to the new project directory. You can select another directory by typing it in the field or clicking the ellipsis button next to the field.
-
Click Finish. The empty project will be created in the specified directory, and Studio will start building the project information from Gradle files and indexing the project.
-
When the project synchronization and indexing process is completed, you will see the CUBA project tree in the Project tool window.
-
Open the Gradle tool window which is docked on the right side by default. Click the "wrench" icon (Gradle Settings) and select
Project SDKin the Gradle JVM field. Click OK. -
Now you can start working with the project.
3.2. Opening an Existing Project
- Opening an imported project
-
If the project has already been opened by CUBA Studio on this computer, do the following:
-
Use recent projects list; or click Open, select the project’s folder in the file system dialog and click Open button.
-
Wait for Gradle synchronization and project indexing process to complete. As soon as the CUBA project tree appears in the Project tool window, you can start working with the project.
-
- Opening a project for the first time
-
If the project has not been opened by CUBA Studio on this computer, for example, just checked out from VCS, do the following:
-
In the welcome window, click Import Project. If another project is already opened, click File > New > Project from Existing Sources in the main menu.
-
In the file system dialog, select the project’s root folder containing the
build.gradlefile, then click Open button. -
In the Import Project window, select Import project from external model radio-button and choose CUBA in the list below. Then click Next.
-
Click Finish on the next page of the import wizard.
-
Wait for Gradle synchronization and project indexing process to complete. The CUBA project tree should appear in the Project tool window.
-
Click File > Project Structure in the main menu.
-
Make sure that the Project SDK field has a value corresponding to
JAVA_HOMEwhich is set in your environment. If you see the<No SDK>value, click New and select the folder where the JDK is installed, for exampleC:\Java\jdk8u202-b08on Windows or/Library/Java/JavaVirtualMachines/jdk8u202-b08/Contents/Homeon macOS. -
Make sure that the Project language level field has a value corresponding to the JDK version. For example, if the JDK is
1.8, the language level must be8 - Lambdas, type annotations, etc.
-
-
- Opening a project based on CUBA 6.10 for the first time
-
CUBA Studio supports projects based on CUBA 6.10+ and 7.0. You can open your existing projects created in a previous version of Studio and import them into the new Studio.
Keep in mind that CUBA 6.10 supports only Java 8, so your
JAVA_HOMEenvironment variable must point to the JDK 8 installation. Later after migrating to CUBA 7, you will be able to use a newer JDK if needed.Follow the steps below to open an existing project based on CUBA 6.10 for the first time:
-
If your project uses premium add-ons (Reports, BPM, etc.) and you have a subscription, you should set the premium repository access credentials in
~/.gradle/gradle.propertiesas described in the documentation. -
Remove old IntelliJ project files using the
gradlew cleanIdeatask in the command line. -
If the project is under Git version control, add
.idealine to the.gitignorefile located in the project root. It will ensure your local IDE settings will not be shared between all developers of the project. -
Import the project as described in the Opening a project for the first time section above.
-
3.3. Upgrading a Project
This section covers the process of upgrading a project to a newer CUBA version.
|
Tip
|
It is recommended to put the project under version control and commit all pending changes before upgrade. It will allow you to see what changes are performed and quickly roll back to a previous version if the upgrade fails for some reason. |
-
Open the project as described in the previous section.
-
Click CUBA > Project Properties in the main menu or double-click Project > Properties in the CUBA project tree.
-
In the CUBA Project Properties dialog, click the Change… link located near the Platform version label.
-
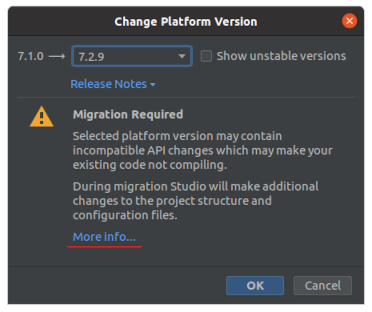
The Change Platform Version dialog appears. Select the desired CUBA version in the drop-down field.
-
For the purpose of beta-testing or early accessing new CUBA platform features you might want to use one of unstable CUBA platform versions, ones that end with
BETAorSNAPSHOTsuffixes. To see them in the platform version drop-down list, you need to select the Show unstable versions checkbox.TipSNAPSHOT versions are available only if you use the
repo.cuba-platform.comrepository.WarningBoth
BETAandSNAPSHOTversions are strongly not recommended for use in production. -
You can press the Release Notes link and navigate to the documentation page that describes new features, improvements and breaking changes in the API of the new platform version.
-
If you are upgrading to a newer feature release (for example, from 6.10.X to 7.0.X or from 7.0.Y to 7.1.Y), the Migration Required section appears in the Change Platform Version dialog.
-
By pressing the More info… link, you can open another dialog containing information about changes that will be automatically performed by the Studio to the project structure, build scripts or individual project files. Review the information.
-
-
Click OK to confirm platform version upgrade, and click OK in the Project Properties dialog.
-
Studio performs automatic migration (if needed) and runs Gradle
cleanandundeploytasks. -
If you are upgrading to a feature release, review Breaking Changes section in Release Notes and make changes in your project accordingly.
-
If your project includes CUBA Add-ons, you may need to update them to the appropriate version compatible with the new CUBA platform version:
-
Open CUBA project tree → Project → Add-ons.
-
Select Updates tab.
-
Select all ready for update add-ons.
-
Click Apply & Close.
-
Wait until updated dependencies are downloaded and indexed.
-
-
Try to assemble your project by executing CUBA > Build Tasks > Assemble. Watch the output and fix your code if it doesn’t compile.
-
Execute CUBA > Update Database to incorporate possible framework schema changes into your project’s database.
3.4. Starting the Application
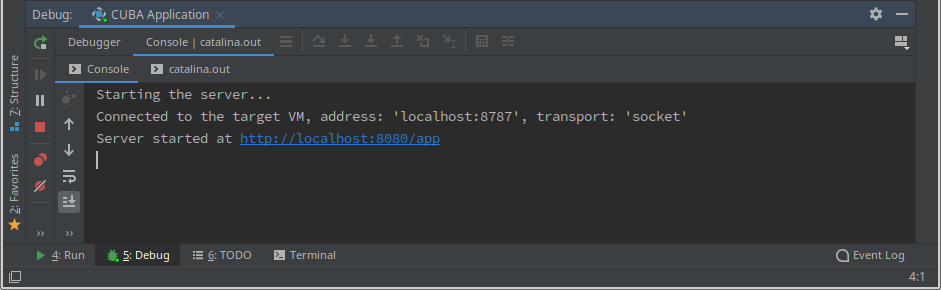
When Studio imports a CUBA project, it creates a Run/Debug Configuration specifically tailored to run local Tomcat server with the deployed application. So in order to run the application and connect to it with the debugger, just click the debug button next to the selected CUBA Application configuration in the main toolbar:

See the status in the Console tab of the Debug tool window. You can click to the link printed after the Server started at message to open the application UI in the default web browser.
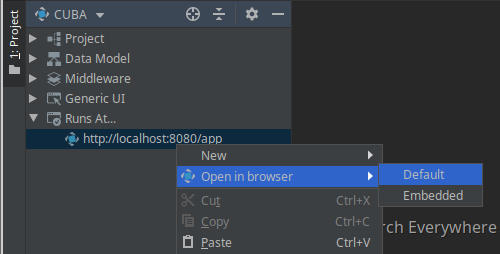
You can also open the running application in the web browser using the Runs At… CUBA tree section:
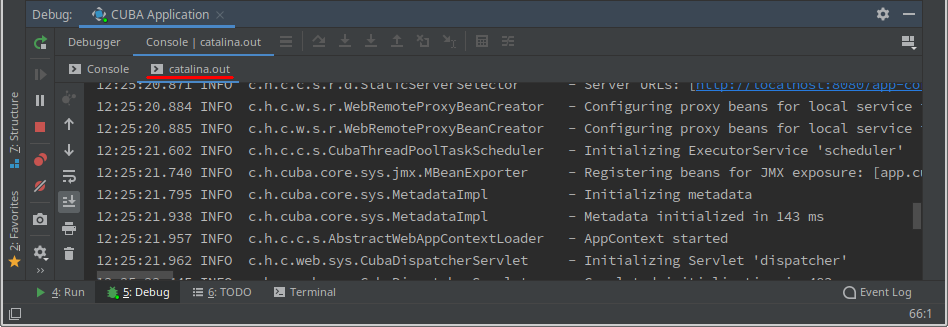
In order to view the application server output, switch to the catalina.out tab:
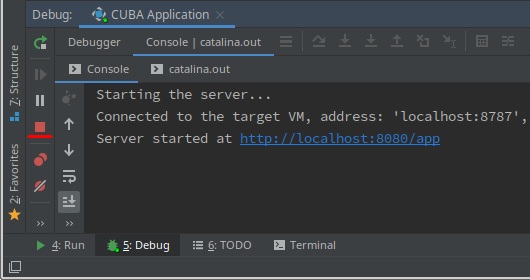
You can stop the application server by selecting Run > Stop 'CUBA Application' in the main menu or by clicking the button in the Debug tool window:
Use of Run/Debug Configuration is the preferred way to start the application in development, but Studio also allows you to control the local Tomcat application server through the CUBA main menu items:
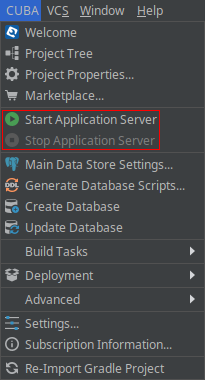
When starting the server by the Start Application Server main menu command, on Windows you will see a console window with the server output. On Linux and macOS, the console is not shown, but you can see the server log by executing tail -f deploy/tomcat/logs/app.log in the Terminal tool window. The Stop Application Server command stops Tomcat by sending the SHUTDOWN signal to the shutdown port specified in the project properties (8005 by default).
- Run/Debug Configuration Settings
-
It is possible to adjust settings of the debug Tomcat server which is used by the CUBA Application Run/Debug configuration. You can open the settings dialog the following way:
-
Click the CUBA Application element in the tool bar and choose Edit Configurations… in the context menu.
-
Or use the Main Menu → Run → Edit Configurations…

The Run/Debug Configuration dialog appears. You might be interested in editing the following settings:
-
JRE - Java Runtime Environment used to launch the debug Tomcat server. You can choose JRE that is different from the project JDK, while considering binary compatibility requirements (application compiled with Java 11 will not run under Java 8).
-
Command line arguments - JVM options to be passed to the debug server. For example, specify
-Xmx1500mto increase maximum allowed memory usage for the server. -
Environment Variables - environment variables that should be available to the debug server process.
-
3.5. Using Non-Default JDK
Both IntelliJ IDEA and Gradle by default use Java Development Kit (JDK) defined by the JAVA_HOME environment variable to assemble and run Java projects. In order to use the non-default JDK in your project without touching global system settings, you need to perform several steps.
Let’s consider this environment configuration:
-
JAVA_HOMEenvironment variable on the development machine points to the JDK 8, and for some reason you don’t have the ability to change it. -
You’ve chosen to use JDK 11 in the project.
-
You are going to use new Java 11 APIs, so your project needs to be compiled and run with JDK 11.
You need to perform the following steps:
-
Add JDK 11 to the global list of IDEA SDKs if it hasn’t been added yet. Go to the Main menu → File → Project Structure. Select SDKs in the left menu. Press + button → choose JDK → select JDK 11 installation folder. Press OK to save changes.
-
When creating a new CUBA project, select "11" for the Project SDK field.
-
For existing projects - open the Main Menu → File → Project Structure dialog and change the Project → Project SDK value.
-
Navigate to the project root folder and create
gradle.propertiesfile with the following text:
# Path to JDK 11
org.gradle.java.home = C:/Java/jdk-11.0.5.10-hotspot
-
Modify the
build.gradlefile located in the project root folder. Add the following statements to the end ofconfigure([globalModule, coreModule, webModule])block:
configure([globalModule, coreModule, webModule]) {
    ...
    sourceCompatibility = '11'
    targetCompatibility = '11'
}
-
Refresh the Gradle project configuration: Gradle tool window → Reimport All Gradle Projects;
-
Change JRE used by the CUBA Application run configuration. Open Main Menu → Run → Edit configurations… → CUBA Application → Change the JVM field value.
When these changes are performed, the project is going to be compiled and run with JDK 11, without needing to change global system settings.
4. Studio User Interface
This section describes the user interface of the IDE elements specific to CUBA. For all features of the IntelliJ IDEA, refer to its documentation.
4.1. CUBA Project Tree
The CUBA Project Tree is designed to represent the project structure and its significant elements. It normally opens in the Project tool window on the left side of the IDE. You can always switch to the project tree using the CUBA > Project Tree main menu command or by selecting CUBA in the top drop-down list of the Project tool window.
The project tree contains the following elements:
-
Project
-
Properties - lets you configure the basic settings of your project.
-
Add-ons - opens the screen to configure CUBA add-ons used in your project
-
Build Script - contains two main project scripts: build.gradle (defines the build configuration) and
settings.gradle(defines the project name and the set of modules). -
Config Files - displays project’s important configuration files grouped by their module.
-
Data Stores - displays and manages the list of data stores the project is connected to. By default there is only one
Maindata store. -
Deployment - enables defining the project deployment options.
-
Config Interfaces - displays and manages project’s configuration interfaces.
-
Logging - displays logging configuration file along with local debug server log files.
-
-
Data model - displays and manages the data model of the project.
-
Business Logic - displays and manages middleware services, Spring beans and integration tests.
-
Generic UI - contains everything related to the project user interface, such as screens, themes, and so on.
-
Frontend UI - contains files related to the frontend user interface of the application.
-
Security - displays and allows you visually construct design-time role definitions.
-
All Sources - displays all source files located in the modules of the project without filtering them by file type. This section allows you to locate files or classes that aren’t included into one of specialized project tree sections.
-
Runs At… - allows you to open the running application in the external or embedded web browser.
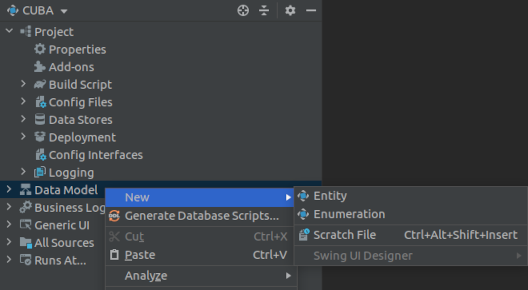
Use the context menu opened by right-clicking on the tree elements to execute actions specific for this project element. For example, using the context menu of the Data Model item, you can generate database scripts, generate model from the database, and create new entity or enumeration:
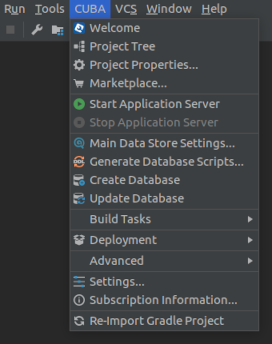
4.2. CUBA Menu
The CUBA main menu provides quick access to the CUBA-specific features of the IDE. Some of the menu items duplicate the functionality available through the CUBA Project Tree and its context menus.
You can add frequently used menu items to the main toolbar by right-clicking on the toolbar and selecting Customize Menus and Toolbars. In the Menus and Toolbars dialog, expand the Main Toolbar item and use Add Action command to add items from the Main Menu > CUBA tree.
4.3. Welcome Screen
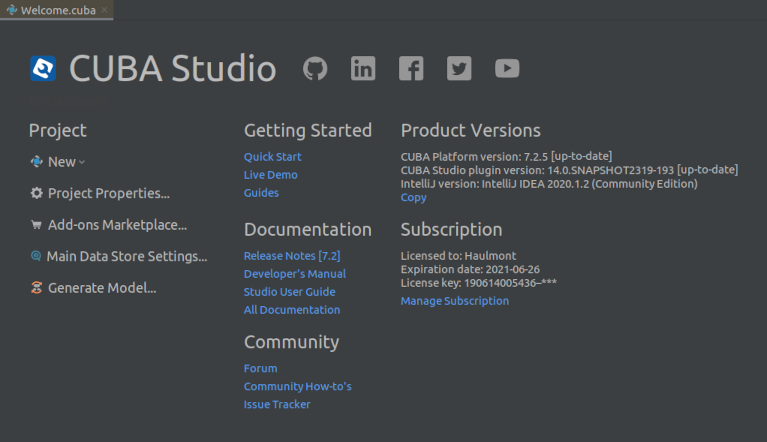
Welcome screen is always opened in the workspace after new project is created. It also can be opened from the main menu: CUBA → Welcome.
This screen provides quick access to main project settings, commonly used actions, documentation and community web pages. It also shows CUBA version used in your project, Studio version and subscription information.
4.4. CUBA Settings
If you click the CUBA > Settings main menu item, you will see the IDE settings window with the CUBA section selected.
The CUBA section itself contains the settings common to all projects opened in this Studio instance.
-
Ask before saving DB scripts with DROP statements - suggest to exclude update scripts containing DROP statements from automatic execution.
-
Show warning if application server port is in use - show a warning when you open a project and its Tomcat port is currently busy.
-
Use embedded browser to open application - if selected, the embedded web browser will be used when you double-click to the application URL in the Runs At project tree section.
-
Visual designer and embedded browser zoom percentage - default zoom for screen designer’s layout preview. You can adjust it later using one of actions located on the top of the preview panel.
-
Enable integration - select this checkbox if you want to integrate this IDE instance with the old Studio SE or Studio Browser Edition. You will be able to open projects from the old Studio in this IDE. This checkbox also enables communicating with the Frontend Generator command line tool.
-
Listening port - a port for the Studio integration with the old Studio and Frontend Generator. Make sure it is the same as specified in the old Studio IDE Port field.
- Project settings
-
The nested Project settings section contains the settings of the currently opened project. All non-default values are stored in the
studio-intellij.xmlfile in the project root directory, which can be added to the version control system to share project settings between all developers in your team.-
Check compatibility between data model and database scheme - show a warning whenever you start the application server and the current state of the data model differs from the database schema.
-
Generate DROP statements in separate update scripts - generate more safe update scripts when you remove an entity, an attribute, or change an attribute’s datatype. Such scripts are split into two parts: in the first part, the column or table is renamed to
*__UNUSED, and in the second part these objects are actually dropped. -
Use NVARCHAR when generating scripts for MS SQL Server - if this option is on, NVARCHAR column type will be used for all String attributes if the database type is Microsoft SQL Server.
-
Generate script name in format - specify
yyMMddHHmmto add current time to the names of generated database update scripts, which may help to ensure correct sequence of scripts when working in a team. -
Group update scripts by - determines how automatically generated database update scripts are grouped by folders. If YEAR is selected, scripts are put to per-year folders (
2020,2021etc). If MONTH is selected, scripts are put to nested per-month folders (2020/10,2020/11etc). The latter setting value is more convenient for large development teams. -
Do not delete columns started with - this field allows you to specify a prefix for table columns, that should not be tracked by Studio. If you add a column to a table mapped to an entity, and not map the column to an entity attribute, Studio will generate an update script dropping this column. To avoid dropping, you can exclude this script in the Database Scripts dialog, and it will not be generated again. Alternatively, you can set a common prefix for such columns in the Do not delete columns started with field and name the column accordingly. For example, enter
NOT_MAPPED_in the field and name the columnNOT_MAPPED_CODE. -
Column length for enums with ID of String type - this field allows you to set a length of the database column which is mapped to an attribute of enum type with the identifier of String type. For example, if you use short identifiers always consisting of one character, you can set 1 in this field to save database space.
-
Make plural forms - make plural forms of nouns according to English grammar.
-
Repeat entity parent package for screens - if the entity is located in an additional package inside entity, Studio will add this package for Generic UI screens generated by templates. For example, if the
Customerentity is insidecom.company.sample.entity.crm, the default package for its screens will becom.company.sample.web.crm.customer. -
Use underscores in generated package names - if selected, package names will include underscores separating words according to camel case in a corresponding entity name. For example, when generating screens for the
com.company.sample.CustomerGradeentity, the package of the screens will becom.company.sample.customer_grade. If the option is off, the package name will becom.company.sample.customergrade. -
Default parent package name for screens - this field allows you to specify a default package to be used instead of screens when generating a Generic UI screen from template not associated with an entity. It is also added before the package with entity name for templates associated with an entity. For example, if you set ui in this field and create a blank screen, the default value for the package will be
com.company.sample.web.ui. -
Default entity attribute access modifier - sets the modifier which Studio uses when generates entity fields.
-
Generate entity name with underscore symbol - if selected, entity names will have
namespace_ClassNameformat, for examplesales_Customer. Otherwise it will benamespace$ClassName. -
Show module prefix migration dialog - on project opening, suggest migrating build scripts to the new format with module prefix defined in a variable.
-
Instant hot deploy - this checkbox allows you to turn off hot deploy. If hot deployment is enabled, Studio dynamically updates the UI of your deployed web application as you apply or save changes to views, screens, messages or the main menu.
-
Hot deploy compiled classes - enables new hot deploy mechanism for projects based on CUBA 7.2 or later. The old mechanism used to copy Java sources to Tomcat configuration folders and compile them with a custom classloader. The new mechanism compiles source code on the side of the IDE and thus enables hot deploying Kotlin code. If you encounter problems with the new hot deploy mechanism, you can try to switch off this setting.
-
Scaffolding language - chooses which programming language is used to generate code in projects with Kotlin support. Available options are: Kotlin, Java and Always Ask. If your project has mixed Java / Kotlin content and you want to have control over scaffolding language for every new entity, service or screen - choose the Always Ask value in the drop-down. This setting is displayed only for projects with Kotlin support enabled.
-
Hot Deploy Settings - opens a dialog to customize hot deployment directories. For example, you might want to add folders where your web portal HTML and JavaScript files are located. When you change these files, Studio will copy them to respective destinations inside Tomcat. So you can just reload your web portal page to view the changes.
-
Screen Generation Settings - options affecting screen generation. These settings are used by the New → Screen… wizard. The following screen settings are available:
-
Default form field width - used by entity editors
-
Keep editor actions at the bottom - used by entity editors that are opened as a "full screen" (not as dialog)
-
Force modal open type for editors - used by entity editors opened as a dialog
-
-
Fold messages in - allows you to control message folding in screen descriptors and controllers. If selected, the message keys will be replaced with actual values from the appropriate message pack.
-
Message folding locale - what message file to use when folding messages.
-
4.5. Subscription Information
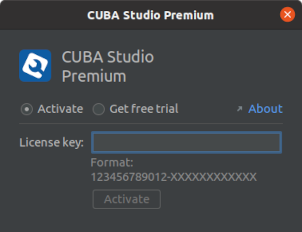
The Subscription Information dialog can be opened from the Main Menu: CUBA → Subscription Information.
The dialog provides the following functionality to the user:
-
Request CUBA Studio subscription trial.
-
Enter commercial Studio subscription key.
-
View current subscription details.
CUBA Studio subscription unlocks the following premium functionality:
-
Entity designer.
-
Enumeration designer.
-
Screen designer.
-
View designer.
-
Role designer.
-
Visual editor for the theme variables.
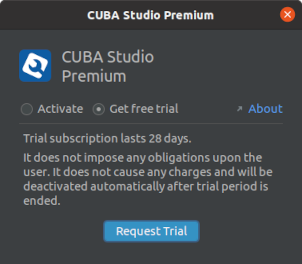
- Trial Subscription
Trial subscription can be requested once by every new user. It allows developer to evaluate full capabilities of the Studio for 28 days. Click Request Trial in the Subscription Information dialog to check if you are eligible for the trial:
5. Studio Features
This section of the documentation describes all Studio features that can help you in the developing CUBA applications. The information is mostly structured by the project elements which you see in the project tree.
5.1. Project
This section describes available editors and commands for managing the project infrastructure.
5.1.1. Project Properties Editor
The Project Properties editor allows you to configure your project. You can open it from the CUBA main menu or by double-clicking the Project > Properties item of the project tree.
- Basic settings
-
-
The Module prefix field displays name prefix of the project modules. Module name in its turn determines the name of the project artifacts, e.g.
sales-globalmodule assembles thesales-global-0.1.jarartifact. You can change module prefix in order to rename the modules. E.g. basic CUBA project withwagesmodule prefix has modules with nameswages-global,wages-coreandwages-web. -
The Artifact version field allows you to change version for the project artifacts. Disable the Snapshot checkbox if the version is a final build, not a snapshot (snapshot a is build which can be replaced by another build which has the same name).
-
The Repositories table displays the repositories currently used in the project. Studio scans these repositories to discover what platform versions are available. Use the buttons next to the field to configure the access to repository. For more details see documentation. You can also manually register any number of additional repositories containing application components in the
build.gradlescript. -
The Platform version field displays version of the CUBA platform used in the project. The Change… link located nearby allows you to upgrade platform version, an automatic migration will be performed if required. Read more here: Upgrading a Project.
-
The Show unstable versions checkbox enables displaying of unstable CUBA releases whose versions end with
BETAorSNAPSHOTsuffixes. -
Groovy support checkbox enables Groovy code within the application: for example, in screen controller classes.
-
If you need to change the path to the application server, specify the new path in the Tomcat path field. The next execution of
gradlew deployorgradlew startwill install Tomcat into that location. -
The Tomcat ports group allows you to assign non-standard ports for the Tomcat application server installed in the
deploy/tomcatfolder as a result of fast deployment. -
In particular, the HTTP port field affects the port Tomcat is listening on for HTTP connection, as well as
cuba.webPort,cuba.webAppUrl,cuba.restApiUrlandcuba.connectionUrlListapplication properties. -
In the AJP port field, you can set the port for AJP Connector.
-
In the Shutdown port field, you can set the port Tomcat is listening on for SHUTDOWN command.
-
In the Debug port field, you can set the port Tomcat is listening on for Java debugger connection. If you change this port, you should also change it in the debug configuration of your IDE.
-
Available locales field allows you to set locales used in your application. Open the locales editor by clicking the button next to the field. The Locale select visible checkbox located in the editor window controls the value of the cuba.localeSelectVisible application property. The editor also enables defining or overriding format strings for parsing and formatting data.
-
5.1.2. Project Dependencies
The Dependencies section of the Project Properties dialog displays and allows you to manage 3rd-party dependencies (libraries) connected to your project.
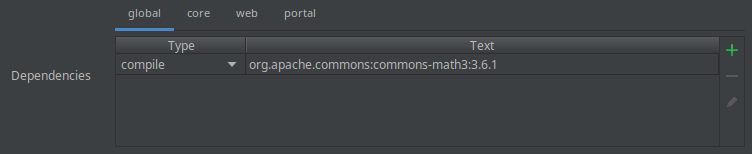
Project dependencies are displayed in a table grouped by module into three or more sections, depending on how many modules your project consists of. If library is added to global module - it effectively becomes globally accessible in the project, because all other CUBA project’s modules depend on the global module.
The Type column in the table shows dependency type:
-
compile - library is used for compilation and runtime
-
provided - for dependencies that are necessary to compile your production code but shouldn’t be part of the runtime classpath (JDBC drivers, Servlet API implementation etc.)
-
runtime - library is only used in runtime
-
testCompile - library is used to compile and run tests
-
testRuntime - library is used by tests, only in runtime
The Text column displays library coordinates in the format of Gradle dependency string: "group:name:version".
Dependency management actions are located right of the dependencies table:
-
Add dependency - add new dependency to your project. Specify Maven dependency declaration or Gradle dependency string. The dialog automatically validates that dependency declaration is correct.
-
Remove dependency - remove dependency from your project.
-
Edit dependency - change dependency declaration text.
Read more about 3rd-party dependencies in the Gradle documentation.
- Adding new 3rd-party dependency
-
Adding a 3rd-party dependency to your project requires the following steps:
-
Find out Maven dependency declaration or Gradle dependency string for the required library.

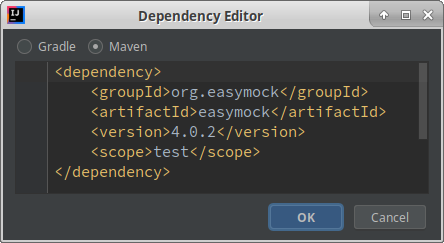
-
Copy dependency declaration into the clipboard
-
Open Project Properties dialog
-
Choose the module to attach the dependency to, or use global module to make the library globally available in the project.
-
Press + button right of the Dependencies table. The Dependency Editor dialog opens. Dependency declaration from the clipboard is automatically pasted into the text area.
-
Click OK in the Dependency Editor dialog. Fix the declaration if validation errors are prompted.
-
Click OK in the CUBA Project Properties dialog to apply the changes. Studio will add necessary declarations to the project build script and refresh project configuration.
-
Now you can use library’s classes in your code.
TipGradle implementation 'a.b.c' dependency type is not supported yet, please use compile 'a.b.c' instead of it.
-
- Adding a JAR file dependency
-
Sometimes you have a JAR file that isn’t present in any of public or internal Maven repositories and you need to add this file as a dependency to your project. In this case you need to modify the build.gradle script manually.
-
Create the
libdirectory in the project root folder; -
Copy the JAR file to this folder, e.g. as
<my-project>/lib/custom-lib.jar -
Open the Gradle build script: CUBA project tree → Build Script → build.gradle;
-
Modify the build.gradle by adding a
flatDirclause to therepositoriessection:
repositories { maven { ... } flatDir { dirs "${project.rootDir}/lib" } }-
Modify the build.gradle
configure(globalModule)section by adding a dependency specifying JAR file name:
configure(globalModule) { ... dependencies { compile(name: 'custom-lib') } }-
Refresh the Gradle project configuration: Gradle tool window → Reimport All Gradle Projects;
-
Now you can use library’s classes in your code.
-
5.1.3. Managing Add-ons
Add-ons are publicly distributed full-stack libraries extending your project with additional functionality. More information about add-ons and application components can be found in the CUBA Developer’s Manual.
The CUBA Add-ons dialog allows you to manage add-ons included in your project. It can be opened:
-
by double-clicking Project → Add-ons in the CUBA project tree,
-
from the Main Menu: CUBA → Marketplace…
The dialog has three tabs: Marketplace, Installed and Updates.
5.1.3.1. Marketplace
The Marketplace tab displays published add-ons that are compatible with your project.
Add-ons are grouped into categories. Searching by filter is available, e.g. "email" or "category:Translation".
Clicking on add-on title leads to the page with detailed overview, compatibility, licensing information:
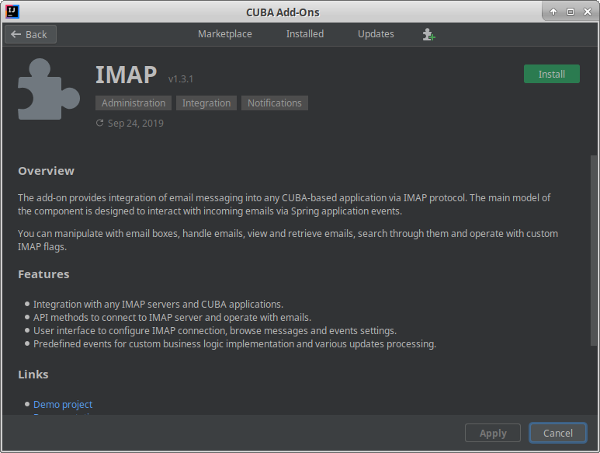
In order to install one or more add-ons, press Install for the ones you’re interested and then click Apply or Apply & Close button. After the confirmation Studio will make necessary changes to your project’s build scripts and configuration files, download new libraries and refresh Gradle project configuration.
Installation of commercial add-ons is described in separate section: Commercial Add-on Installation.
5.1.3.2. Installing Add-on by Coordinates
Add-on coordinates is simply a Gradle dependency string, e.g. "com.mycompany.cuba-addons:myaddon:0.1.5". This string can be published on CUBA platform web site or by author of the add-on. In order to install necessary add-on by coordinates (or by Gradle dependency string), click the "Install Add-on Manually" icon located right to Updates tab header:
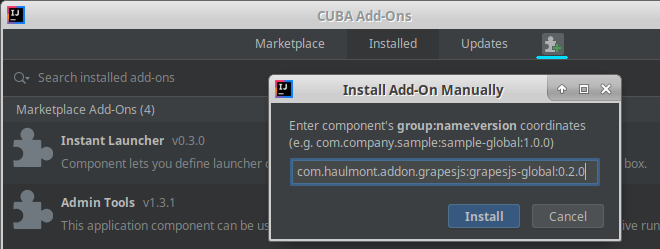
5.1.3.3. Installed Add-ons
The Installed tab displays add-ons that are already connected to the current project.
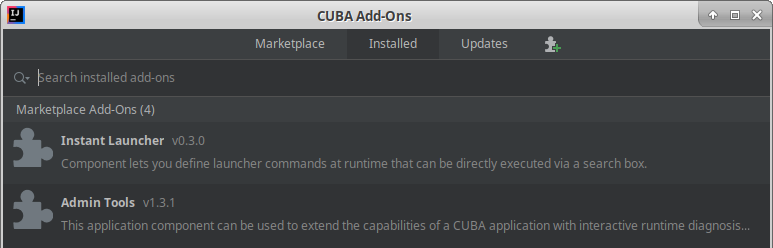
Installed add-ons are grouped into two categories. Marketplace Add-Ons are those which are installed from CUBA Marketplace. Custom Add-Ons are those which are developed by 3rd parties and hosted in 3rd-party repositories, including local Maven.
In order to detach add-on from your project, select corresponding item in the list and press Delete, or right-click → Uninstall. Then click Apply in the dialog. Studio will remove the add-on from the list of project dependencies and update project configuration.
5.1.3.4. Add-ons Updates
Studio automatically checks whether there are any updates available for add-ons included in your project. The Updates tab displays information about add-ons that can be updated.
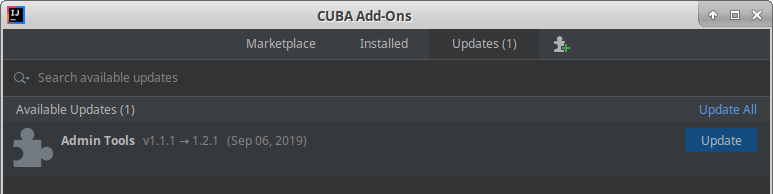
In order to update the add-on, click Update button, then Apply or Apply & Close button. Studio will upgrade the dependency, download required libraries and refresh project configuration.
Additionally, after the project is opened, notification about available updates is displayed in the down-right corner of the screen:
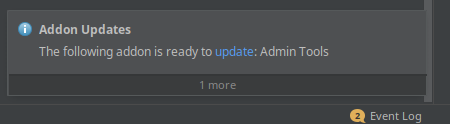
5.1.4. Commercial Add-on Installation
Using commercial CUBA add-ons requires you to have an add-on subscription. You can purchase the subscription on the CUBA Store web site. Also, for the purpose of evaluation you can install a trial version of the particular add-on (available for 30 days).
Below are described the following installation scenarios:
-
Automated installation of the purchased add-on.
-
Manual installation of the purchased add-on.
5.1.4.1. Installing Add-on Trial
-
Open the Marketplace window, e.g. from the main menu: CUBA → Marketplace.
-
Find the required add-on and click Install next to it.
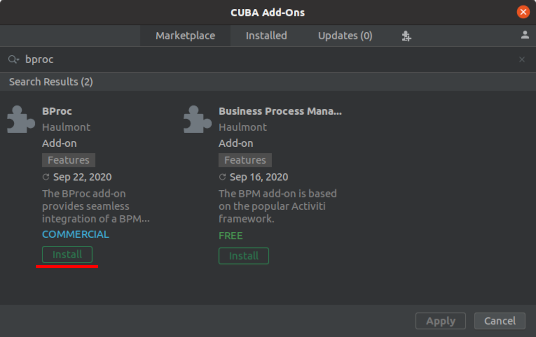
-
Click Get free trial in the appearing dialog window.
-
If you are not signed in to the CUBA user profile yet, click the Sign In… link in the dialog.
-
Register or log in on the CUBA website.
-
Read the instructions and click Install Trial.
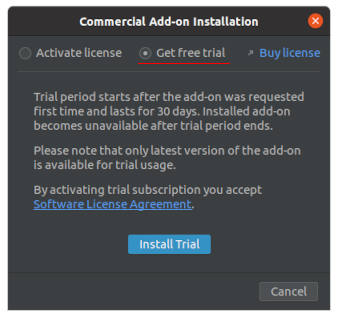
-
Click Apply. A trial version of the add-on will be installed into your project.
When the trial period expires, CUBA Studio will inform you. Keep being signed in to your CUBA user profile to not miss the end of the trial period.
|
Warning
|
Please pay attention that you won’t be able to run your application with the expired trial version of the add-on. |
- CUBA User Profile
After signing in to your cuba-platform.com user profile you will be able to view the list of remaining trial add-on versions available to you.
If you haven’t signed in to your user profile yet, use the Sign In to CUBA button located in the top right corner of the CUBA Add-Ons window:

You will be redirected to your browser. After logging in, you will get a notification in the IDE. Clicking the same button again will open a dialog with your profile details and the list of available trial add-on versions:
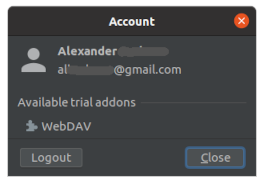
5.1.4.2. Installing Purchased Add-on
After having purchased the add-on you will receive the license key. It may be the same license key as for Studio Premium, or a separate license key if the Studio is not included into your subscription or if the add-on was purchased separately.
-
Open the Marketplace window, e.g. from the main menu: CUBA → Marketplace.
-
Find the required add-on and click Install next to it.

-
Enter the license key for the add-on in the appearing dialog.
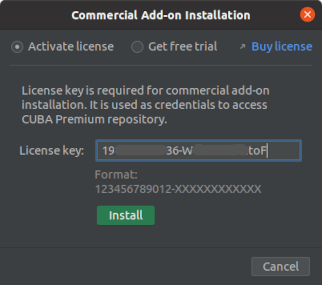
-
Click Install in the Commercial Add-On Installation dialog.
-
Click Apply or Apply & Close button, and then Continue in the confirmation dialog.
After the confirmation Studio will make necessary changes to your project’s build scripts and configuration files, download new libraries and refresh Gradle project configuration.
5.1.4.3. Manual Add-on Installation
Use this way of commercial add-on installation if you have any problems with automatic installation, or if you need to setup environment for building your project from command line (e.g. in continuous integration server).
You need a license key which is received after add-on purchase. This key will be used to set up premium repository credentials.
- Adding Premium Repository
Open build.gradle file and add one more repository as the last repository in the list:
-
If the main repository is
repo.cuba-platform.com, addhttps://repo.cuba-platform.com/content/groups/premiumbuildscript { // ... repositories { // ... maven { url 'https://repo.cuba-platform.com/content/groups/premium' credentials { username(rootProject.hasProperty('premiumRepoUser') ? rootProject['premiumRepoUser'] : System.getenv('CUBA_PREMIUM_USER')) password(rootProject.hasProperty('premiumRepoPass') ? rootProject['premiumRepoPass'] : System.getenv('CUBA_PREMIUM_PASSWORD')) } } } } -
If the main repository is Bintray, add
https://cuba-platform.bintray.com/premiumbuildscript { // ... repositories { // ... maven { url 'https://cuba-platform.bintray.com/premium' credentials { username(rootProject.hasProperty('bintrayPremiumRepoUser') ? rootProject['bintrayPremiumRepoUser'] : System.getenv('CUBA_PREMIUM_USER')) password(rootProject.hasProperty('premiumRepoPass') ? rootProject['premiumRepoPass'] : System.getenv('CUBA_PREMIUM_PASSWORD')) } } } }
- Providing Repository Credentials
Your license key consists of two parts: the first part before the dash is a repository user name, the part after the dash is a password. For example, if your key is 111111222222-abcdefabcdef, then the user name is 111111222222 and the password is abcdefabcdef. In case of Bintray, the user name must be followed by @cuba-platform.
You can provide the credentials in one of the following ways:
-
The recommended way is to create a
~/.gradle/gradle.propertiesfile in your user home directory (e.g.C:\users\john\.gradle\gradle.propertieson Windows or/Users/helen/.gradle/gradle.propertieson Mac). Then open this file and set properties in it:premiumRepoUser=111111222222 bintrayPremiumRepoUser=111111222222@cuba-platform premiumRepoPass=abcdefabcdef -
Alternatively, you can specify the credentials in the
CUBA_PREMIUM_USERandCUBA_PREMIUM_PASSWORDenvironment variables. -
When you run Gradle tasks from the command line (e.g. during Continious Integration), you can also pass the properties as command-line arguments with the
-Pprefix, for example:gradlew assemble -PpremiumRepoUser=111111222222 -PpremiumRepoPass=abcdefabcdef
|
Tip
|
The |
- Adding Component
-
In the
build.gradlefile specify the component artifact coordinates in the dependencies section as follows:com.haulmont.addon.<addon-name>:<addon-name>-global:<addon-version>For example:
dependencies { //... appComponent('com.haulmont.addon.maps:maps-global:1.3.0') } -
Specify the add-on identifier (e.g.
com.haulmont.addon.maps) in theweb.xmlfiles of thecore,web(andportalif it exists) modules in theappComponentscontext parameter. For example:<context-param> <param-name>appComponents</param-name> <param-value>com.haulmont.cuba com.haulmont.addon.maps</param-value> </context-param> -
If you run Gradle tasks from the command line run
gradlew assemble.
The add-on will be included in your project.
5.1.5. Managing Modules
Studio lets you create, edit and remove optional modules of your project: core, gui, web, web-toolkit, portal and front. You can do it using CUBA > Advanced > Manage Modules main menu or from the context menu of the Project item of the project tree.
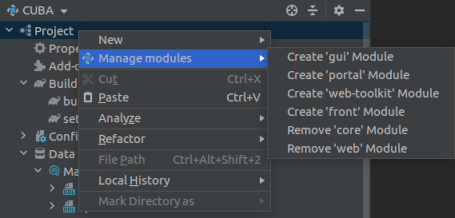
When you create a new project, it contains global, core and web modules.
- Automatic module management
Note that in some cases Studio may automatically add modules to your project.
For example, Studio automatically adds the web-toolkit module to the project when it detects that the project contains one or more add-ons that define widgetsets (components with client-side Vaadin code). In such cases having the web-toolkit module in your project is necessary to build a complete widgetset that contains client-side code of UI components from CUBA and all attached add-ons compiled with the correct Vaadin version.

5.1.6. Managing Data Stores
5.1.6.1. Main Data Store
The main data store specifies connection to the main database used by the CUBA application. This data store contains system entities, and it’s mandatory for any CUBA project.
The Main Data Store Properties dialog displays settings of the main data store. It can be opened:
-
by double-clicking Project → Data Stores → Main Data Store in the CUBA project tree
-
from the main menu: CUBA → Main Data Store Settings…
5.1.6.2. Data Store Properties
The following properties are available both for Main and Additional data stores:
-
Define JDBC DataSource in - determines which component is responsible to create connection pool to the database (available for projects based on CUBA 7.2 or later). Available values are Application and JNDI.
-
Application - connection pool is created and managed by the CUBA platform using the HikariCP library. This is the recommended DataSource mode.
-
JNDI - connection pool is created by the application server and put into JNDI. CUBA application obtains the data source from the JNDI registry by its JNDI name.
-
-
Database type - type of the database server. Studio supports PostgreSQL, Microsoft SQL Server, Oracle, MySQL, MariaDB, Amazon RedShift and HSQLDB out of the box. It is also possible to integrate with other databases if necessary, refer to this section for details.
-
Database URL - specify host, port and database name.
-
Connection params - specify other connection parameters. Format of connection parameters depends on the selected DBMS. The string should include a separator between the database name and parameters. For example, to specify a Microsoft SQL Server 2008+ instance name, use the following string in the field:
;instanceName=myinstanceYou can use "pencil" button in the right part of the Connection params field to enter connection parameters conveniently. In this case Studio automatically forms connection string by adding DBMS-specific separator characters.
-
Custom database URL - specify a custom database connection URL. Host and Database name should be provided in this case, as they are used separately for database creation.
-
Database user and Password - database connection credentials.
-
Integrated Security - enable the corresponding authentication option when connecting to the Microsoft SQL Server 2012+ database.
In case of HSQLDB the Studio itself serves the database and stores its files in the build/hsqldb directory.
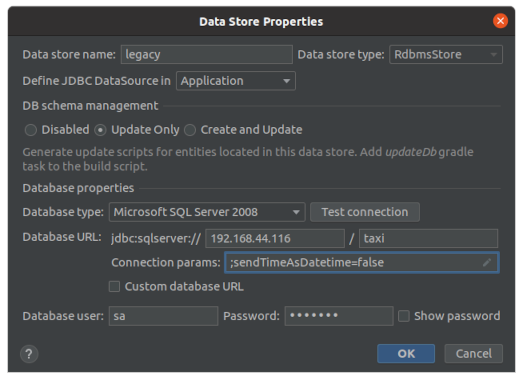
5.1.6.3. Environment variables as connection parameters
Some database connection parameters can be specified as environment variables. It allows development team to avoid storing these parameters in the version control system. The following parameters are supported:
-
database host,
-
database port,
-
database name,
-
user,
-
password.
The data store should have Define JDBC DataSource In setting set to Application.
For example, define environment variables:
PG_DB_HOST=127.0.0.1
PG_DB_NAME=salespg
PG_DB_USER=admin
PG_DB_PASSWORD=admin
Restart IDE to receive updated environment variables. Then change database connection settings in the app.properties file of the core module:
cuba.dataSourceProvider=application
cuba.dataSource.username=${PG_DB_USER}
cuba.dataSource.password=${PG_DB_PASSWORD}
cuba.dataSource.dbName=${PG_DB_NAME}
cuba.dataSource.host=${PG_DB_HOST}
cuba.dataSource.port=
Studio support includes the following:
-
The Data Store Properties dialog correctly detects and shows setting values.
-
Create database, Update database, Generate database scripts and Generate Model actions take values from the environment.
-
Debug Tomcat server also takes values from environment.
Detected setting values are displayed read-only in the Data Store Settings dialog, you need to modify them manually in the app.properties file when necessary.
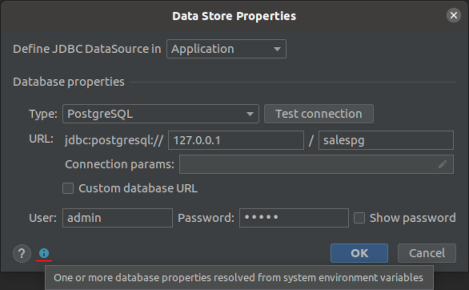
5.1.6.4. Additional Data Stores
You can add additional data stores to the project in order to store data in separate database, or to allow CUBA application reading data produced by another system.
In order to create the additional data store in the project, right-click Data Stores item in the CUBA project tree and choose New → Additional Data Store context menu item. Additional data stores registered in the project are displayed as sub-items under the Data Stores section:
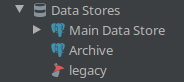
The Data Store dialog appears when you create or edit an additional data store. It has the following fields:
-
Data store name - the name of the data store. It may contain only alphanumeric characters and underscores and should be different from the project name.
-
Data store type - the type of the data store: either
RdbmsStoreorCustom, see the documentation for details. -
DataSource JNDI name - automatically set by Studio on the basis of the data store name.
-
In case of
RdbmsStoreyou need to specify additional properties which are described in a section above. -
DB schema management - choose the mode defining how Studio should manage the database and track changes to entities located in the data store.
- DB Schema management modes
Unlike with main data store, there can be several usage patterns of how CUBA application and Studio should treat additional data store.
-
3rd-party database. In this scenario an existing database produced by another computer system is attached to the CUBA application for the purpose of system integration on data storage level. In this case data schema and data formats are fully determined by another system, and CUBA application should not attempt to modify or drop existing tables. Entities are not created from scratch but mostly imported with the Generate Model Studio feature.
-
Shared database. In this scenario an existing database is also attached to the CUBA application for the purpose of system integration. However in this case the database is meant to be shared by several applications, and CUBA application is allowed to create its own tables as well as modify existing ones. Boundaries between applications can be defined on the database level with role restrictions. Entities are created with Entity Designer, as well as imported with the Generate Model Studio feature. Studio is allowed to update database schema, but not allowed to create the database from scratch.
-
Owned database. In this scenario the database is planned to be fully managed by the CUBA application. Studio is allowed to re-create database from scratch as the project’s data model has all necessary information on how to initialize database schema. Entities are created with Entity Designer.
Based on that, decide what database schema management mode is suitable for your purposes:
-
Disabled - Studio doesn’t track database schema changes for this data store. This is the default mode, and this is how previous Studio versions used to behave. Use this mode for attaching 3rd-party databases.
-
Update Only - Studio generates update database migration scripts and provides ability to update database schema to match updated data model. However, Studio does not provide a way to re-create the database from scratch. Use this mode for shared databases.
-
Create and Update - Studio generates full set of init and update database migration scripts and provides ability (Gradle tasks and actions in UI) to re-create the database from scratch or update it to match updated data model. Use this mode for owned databases.
5.1.6.5. Data Store Actions
By right-clicking the data store item in the CUBA project tree you can open its context menu:

Number of actions shown in the menu depends on the data store type and DB schema management mode.
-
Delete Data Store - remove the data store along with all associated configuration files and database migration scripts from the project.
-
Edit Data Store - open the dialog to edit data store settings.
-
Create Database - re-create database belonging to the selected data store. Applicable for Main data store and additional datastores with Create and Update schema management type.
-
Update Database - update database schema for the selected data store by running not yet applied update scripts. Applicable for Main data store and additional datastores with Update only and Create and Update schema management types.
-
Generate Database Scripts… - generate DDL scripts for the selected data store by comparing data model with the database schema. Applicable for Main data store and additional datastores with Update only and Create and Update schema management types.
-
Generate Model… - generate data model from the selected data store.
5.1.6.6. Database init and update scripts
Database init and update scripts are available for Main Data Store and additional data stores with Create and Update or Update Only schema management modes. Init and update scripts are displayed under the data store element:
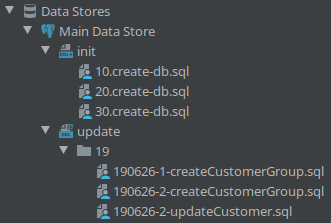
-
Init scripts contain DDL and DML statements creating the database from scratch, bringing the database structure to the state consistent with the current state of the data model.
-
Update scripts contain statements that update already existing database structure to the current state of the data model from any of the previous states.
Studio automatically maintains init and update scripts according to the data model changes, read more about it in the Database Migration section.
You can also create additional database scripts if necessary. Use the following actions in the CUBA project tree under the Data Stores → Main Data Store or Data Stores → (Name of the additional data store) sections:
-
init → context menu → New → Database init script
-
update → context menu → New → Database update script
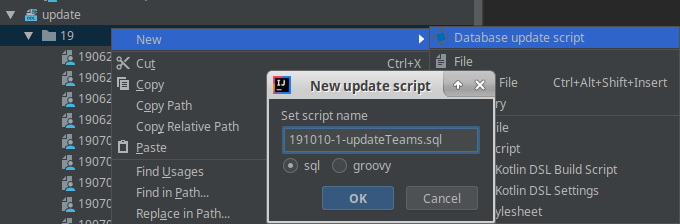
5.1.6.7. Additional JDBC drivers
When generating database migration scripts, Studio connects to the database and therefore needs JDBC driver for the used DBMS. Studio contains built-in JDBC drivers for the following DBMS types:
-
PostgreSQL
-
HSQLDB
-
Microsoft SQL Server
-
MariaDB
-
MySQL (with MariaDB driver)
Using the following DBMS types requires you to download JDBC drivers manually and add them to the Studio:
-
Oracle
-
Amazon RedShift
-
MySQL (with proprietary driver)
Adding driver files is performed in the settings screen: main menu → CUBA → Settings → Database Proprietary Drivers.
When integrating with a custom database, you need to copy driver files manually to the {USER_HOME}/.haulmont/studio/lib folder (e.g. C:\Users\{username}\.haulmont\studio\lib for Windows). The same folder should be used to put additional JDBC driver files for supported databases.
After manual adding JDBC driver files don’t forget to:
-
restart IDE.
-
shutdown Gradle daemon (run
gradlew --stopin terminal).
5.1.7. Deployment Settings
Studio contains editors for setting up Gradle tasks that build deployment artifacts. These editors can be opened through the CUBA > Deployment main menu or by double-clicking the items in Project > Deployment project tree section.
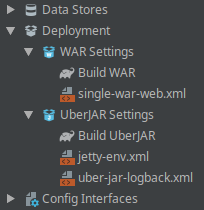
- WAR Settings
The WAR Settings editor allows you to set up building of WAR files. After completing the setup, the buildWar task will be created in your build.gradle.
-
Build WAR - if checked, the
buildWartask is configured inbuild.gradle. -
Include JDBC driver - whether JDBC driver should be included in WAR file.
-
Single WAR for Middleware and Web Client - whether to build a single WAR comprising the Middleware and Web Client application blocks.
-
Custom web.xml path is the file to be used as a special
web.xmlof the single WAR. Click Generate to create this file automatically. -
Logback configuration file - a path relative to the project root to the
logback.xmlconfiguration file. Click Generate to create this file automatically. -
For projects based on CUBA versions
7.2and later:-
Custom data store configuration - allows you to specify custom data store settings to be used by the WAR artifact.
-
-
For projects based on CUBA versions up to
7.1:-
Include Tomcat’s context.xml - whether
context.xml(Tomcat deployment descriptor) should be included in WAR file. -
Custom context.xml path - a path relative to the project root to the
context.xmlTomcat deployment descriptor. Enabled if Include Tomcat’s context.xml is checked. Click Generate to create this file automatically.
-
-
App properties - a set of application properties to define for this deployment. The properties will be added to the
/WEB-INF/local.app.propertiesfile inside the WAR.
The Build WAR sub-element is shown if the corresponding option is enabled in the settings. Clicking it executes the gradlew buildWar task.
- Uber JAR Settings
The UberJAR Settings editor allows you to set up building of an Uber JAR. After completing the setup, the buildUberJar task will be created in your build.gradle.
-
Build Uber JAR - if checked, the
buildUberJartask is configured inbuild.gradle. -
Single Uber JAR - if checked, the
buildUberJartask creates a single Uber JAR from all application modules. -
Logback configuration file - a path relative to the project root to the
logback.xmlconfiguration file. Click Generate to create this file automatically. -
For projects based on CUBA versions
7.2and later:-
Custom data store configuration - allows you to specify custom data store settings to be used by the UberJAR artifact.
-
-
For projects based on CUBA versions up to
7.1:-
Custom Jetty environment file - a path relative to the project root to the
jetty-env.xmlconfiguration file to be used by the embedded Jetty server. Click Generate to create this file automatically.
-
-
App properties - a set of application properties to define for this deployment. The properties will be added to the
/WEB-INF/local.app.propertiesfile inside the Uber JARs. -
Core port, Web port, Portal port fields allow you to set ports for the embedded servers of the corresponding application blocks. Not available if Single Uber JAR checked. Default port values are described in the documentation. You can also set ports when running the JARs using the
-portcommand line argument.
The Build UberJAR sub-element is shown if the corresponding option is enabled in the settings. Clicking it executes the gradlew buildUberJar task.
5.1.8. Configuration Interfaces
The configuration interfaces mechanism enables convenient working with application configuration parameters using Java interface methods, providing type-safe access to the properties.
Studio displays all configuration interfaces defined in the project in the Project → Config Interfaces section of the CUBA project tree:
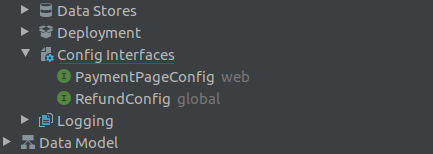
To create new configuration interface, right-click the Config Interfaces section and use the New → Configuration Interface context menu item. The New CUBA Config dialog will appear:
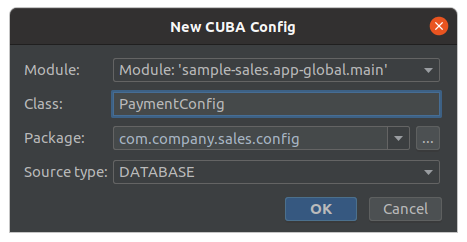
-
Module - choose the module to place configuration interface into.
-
Class - enter the name of the interface class.
-
Package - choose the package where configuration interface should be created.
-
Source type - choose where property values should be stored:
-
DATABASE - values will be taken from the database.
-
APP - values will be taken from
app.propertiesfiles. -
SYSTEM - values will be taken from the system properties of the JVM.
-
You can learn more about configuration interfaces in the corresponding section of the developer’s manual.
5.1.9. Logging
The Logging section of the CUBA project tree serves the following purposes:
-
Display log files of the local Tomcat debug server.
-
Allow developers to create and edit project-specific logging configuration.
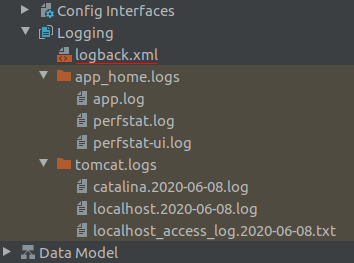
Log files are displayed in two folders reflecting their location in the file system. The same layout can be observed when the application is deployed to the production environment:
-
app_home.logs - CUBA log files. These logs are configured in the
logback.xmlconfiguration file. -
tomcat.logs - Tomcat log files. These logs are configured in the Tomcat.
The logback.xml file displayed in this section is a customized logging configuration file located at the etc/logback.xml location relative to the project root directory. This file is used as a CUBA logging configuration file for the local debug Tomcat server. The same file will be suggested to be used by default in the WAR Settings and UberJar Settings dialogs. You can create customized logging configuration file by right-clicking the Logging CUBA project tree section and choosing the Generate Logback Configuration File… item in the context menu:
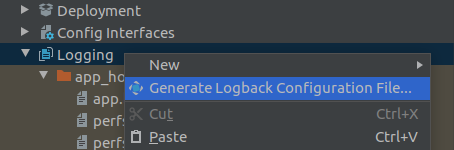
The generated logback.xml file can be customized, e.g. you can add your own appenders and limit logging messages by category. Read more about configuring logback on its manual page.
5.2. Data Model
In this section, we explain how to work with the data model of your application.
5.2.1. Working with Entities
- Creating new entity
-
-
Select Data Model section or a package below it in the project tree and choose New > Entity from the context menu.
-
The New CUBA Entity dialog appears. Enter the name of the entity class in the Entity name field, select the type of the entity and its id.
-
Studio will create the entity class and register it in
persistence.xmlormetadata.xml, depending on the entity type. The created class will be opened in the source code editor.
Studio displays four tabs at the bottom of the entities source code editor. Together they form the visual Entity Designer:
-
Text contains the source code.
-
Designer shows the entity structure where you can configure the entity and its attributes using graphical interface instead of writing Java code.
-
Indexes displays and allows you to create new indexes for the selected entity.
-
DDL Preview displays the read-only DDL code of the corresponding table and its referential constraints.
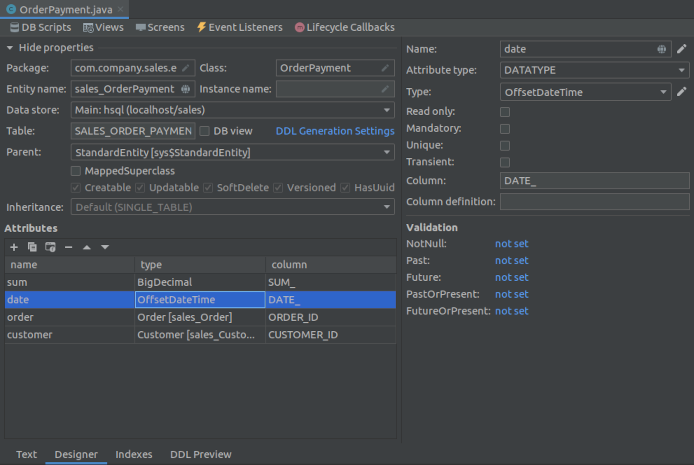 Tip
TipEntity designer is available only for users with active CUBA Studio subscription.
-
- Creating entity attributes
-
There are multiple ways of adding an attribute to an entity.
-
Using graphical interface of entity designer: switch to the Designer tab, click New below the Attributes table and fill the required fields in the New Attribute window.
The globe button in the right part of the Name field lets you immediately set a user-friendly name of the attribute. It is stored in the
messages.propertiesfile and used by default in UI components. If you have defined multiple languages for your application, you can specify the localized name for all languages.
-
Using a separate window opened from the source code, using the button Position the cursor below the last existing field and press Alt+Insert (Cmd+N). In the Generate menu, select Add Attribute…. Studio will show the New Attribute window as it would be opened from the graphical designer. The same window can be opened by clicking the Add attribute button located in the code editor actions panel.
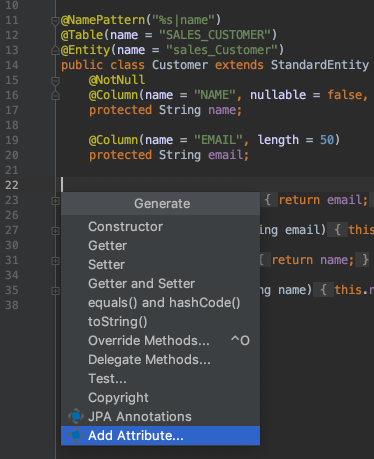
-
You can also write attribute fields by hand, generate getters and setters, and then select JPA Annotations in the Generate menu to add JPA annotations with default parameters.
Studio can help you to add the new attribute to existing UI screens containing this entity. Open the Text tab and click the Add attributes to screens action located at the top actions panel of the source code editor. Studio will search all screens working with the current entity and analyze which attributes can be added to their UI components. You will be able to select desired attributes and components in the dialog:
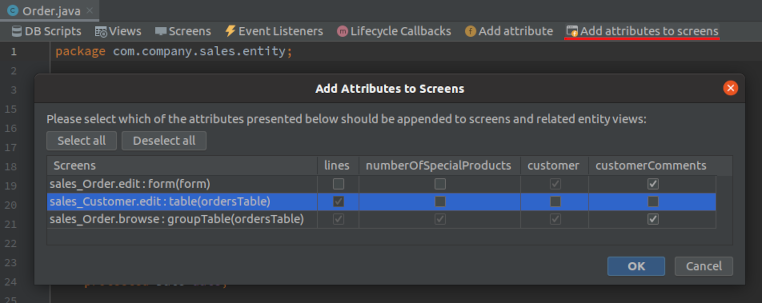
Another Add to Screens button with similar functionality is located in the Designer entity tab above the Attributes table.
-
- Creating the instance name
-
An entity that can be used as a reference attribute of another entity (for example
Customercan be an attribute ofOrder) requires a pattern to generate the meaningful name of an instance. This pattern is defined by the @NamePattern annotation on the entity class.If you are using the Entity Designer to edit the entity, the instance name can be set up using two different ways:
-
Using the visual constructor. It can be opened by pressing the pencil button in the Instance name field:
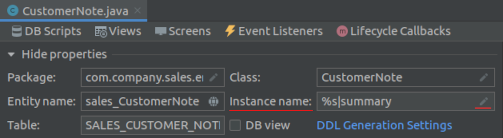
-
Automatically. The Entity Designer automatically assigns instance name when attribute with one of the following names is added to the entity:
name,title,caption,label,summary,description,firstName,lastName,middleName.
Instance name can also be created from the source code of the entity if you position the cursor on the class name, click
Alt+Enter(Option+Enter) and select Add name pattern (this item is shown only if the entity has no@NamePatternannotation):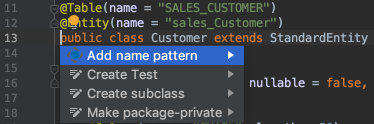
Press Enter, and Studio will show the list of all entity attributes. Select one or several attributes and press Enter. Studio will generate the
@NamePatternon the entity class. -
- Creating messages for new attributes
-
When you create a new entity attribute manually, its name will be highlighted to remind you of creating a user-friendly attribute name in the corresponding message pack:

Click Alt+Enter (Option+Enter) on the highlighted attribute and select Create message in the message bundle:
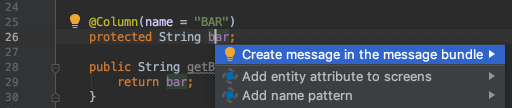
- DDL Generation Settings
The Designer entity editor tab allows you to set up DDL generation settings which alter the way how Studio generates database migration scripts for the edited entity.
- Removing entities
-
When you remove an entity class, use the Safe delete option to find and clean up references to this entity:

Some references like usages in
persistence.xmlandmetadata.xmlfiles will be deleted automatically. If there are other references, you will see a dialog that shows these references. Click View Usages in the dialog, review the references in the Find tool window and click Cancel or Do Refactor.
5.2.2. Working with Enumerations
Studio helps to work with enumerations by providing a set of actions and the visual designer.
Enumerations are displayed along with entities in the Data Model section of the CUBA project tree.
- Creating new enumeration
-
-
Select Data Model section or a package below it in the project tree and choose New > Enumeration from the context menu.
-
The New CUBA Enumeration dialog appears. Enter the name of the enumeration class in the Class field, select the package to put class to and the Id type (String is recommended).
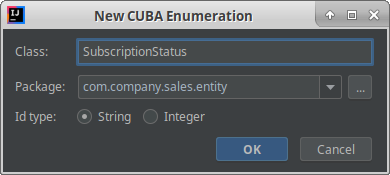
-
Studio will create the enumeration class. The created class will be opened in the source code editor. Two tabs will be displayed at the bottom of the editor:
-
Text contains the source code.
-
Designer shows the enumeration designer where you can configure the enum and its values (constants) using graphical interface instead of writing Java code.
-
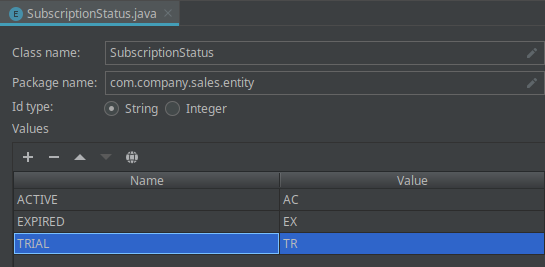
Use the Values table and its associated buttons to set up enumeration constants.
-
Name column allows you to enter enumeration constant name to be used in the code. It can be renamed later without affecting existing data in the database.
-
Value column allows entering the id of the enumeration constant. This is the actual value stored in the database.
-
The globe button allows you to set localized captions (user-friendly names) for the selected enum constant.
Designer also provides the ability to change the Id type used by the enumeration from String to Integer and visa versa. To perform this migration, open the enumeration designer and switch the Id type value. Studio will migrate usages of the enumeration in the code. After that you should change values of the existing enumeration constants. Note that such migration does not migrate enumeration values already stored in the database tables, you would need to implement such migration yourself, e.g. with a help of a database update script.
-
5.2.3. Working with Views
View is a descriptor of object graph defining which attributes, collections and sub-entities should be loaded from the database when particular entity is loaded. Views can be defined right in the screen descriptors, or they can be defined separately in a shared views.xml file and re-used by the application code.
To create a new shared view for an entity, select the entity in the project tree and click New > View in the context menu.
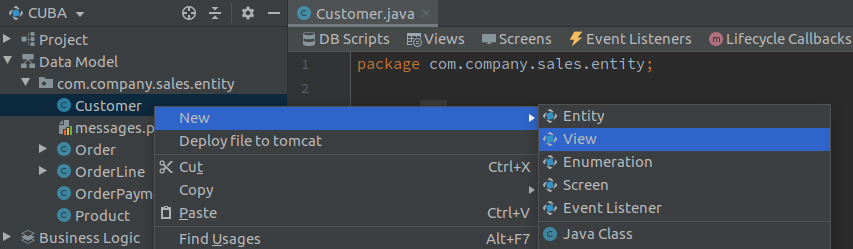
The view creation dialog will be opened. It contains the following fields:
-
Entity name - the name of the entity the view is created for.
-
Name - the name of the new view.
-
Extends - a built-in or custom view which attributes are extended by the new view. There are three built-in views available for any entity:
-
_localcontains all local attributes of an entity (the attributes which are not references to other entities), -
_minimalcontains the attributes listed in the name pattern, -
_baseincludes all local non-system attributes and attributes defined by@NamePattern(effectively_minimal+_local).
-
-
Configuration file - a views configuration file to store this view. By default, Studio generates a single
views.xmlfile in theglobalmodule.
The full list of attributes of the current entity is displayed in the tree below the fields. You can select which attributes will be included in the view by setting the checkboxes accordingly.
If your view extends another view, all inherited attributes are selected with the checkboxes disabled.
If you select a reference attribute, the following properties will appear in the right panel:
-
Entity - the referenced entity name.
-
View - an optional view to load the referenced entity. It is recommended to use references to named views instead of ad-hoc graph of view attributes, as it makes it easier to maintain complex views. Also, even if you define a view name, you can still add attributes not included in this view by setting the checkboxes in the tree.
-
Fetch - an optional property of reference attributes, specifies how to fetch the related entity from the database. See documentation for details.
When you click OK and close the designer, you can find the new view in the project tree under the entity:
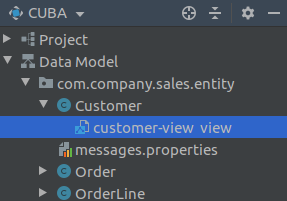
- View Designer
If you double-click the view item in the project tree, Studio will open views.xml in the code editor and focus requested view item in the view list. The code editor has two tabs at the bottom: Text and Structure. The Structure tab displays the list of views defined in this configuration file and allows to visually construct view definitions:
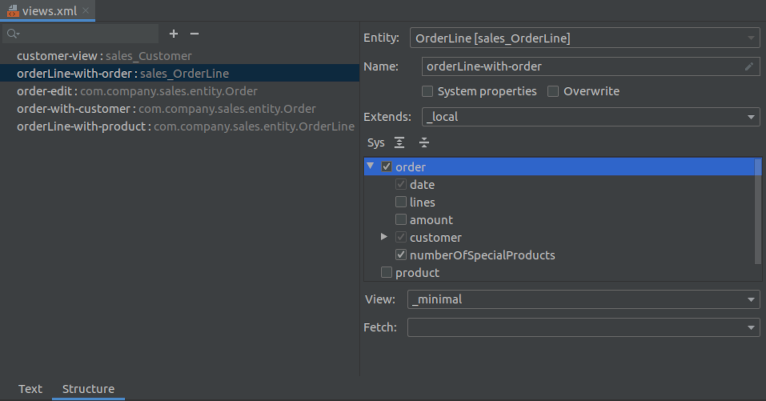
You can open the graphical designer for a view in a number of ways:
-
Select the view in the project tree and click the Edit View context menu item.
-
Position the cursor on the view element in the configuration file code, press Alt+Enter (Option+Enter), select Edit view in the popup menu and press enter.
-
Switch to the Structure tab of the configuration file code editor, select the view and click Edit button.
View designer allows you to safely rename view definition, automatically changing all references in the code to the previous view name that can be type-safely detected. To rename a view, press the "pencil" button located inside of the Name field on the right side of the designer.
|
Tip
|
View designer is available only for users with active CUBA Studio subscription. |
- Editing Views Manually
It is possible to edit view definitions manually by modifying source code of the views.xml. Studio provides comprehensive coding assistance for the XML structure of view configuration files.
When editing a view definition in XML, use Ctrl+Space for auto-completion of attribute names:
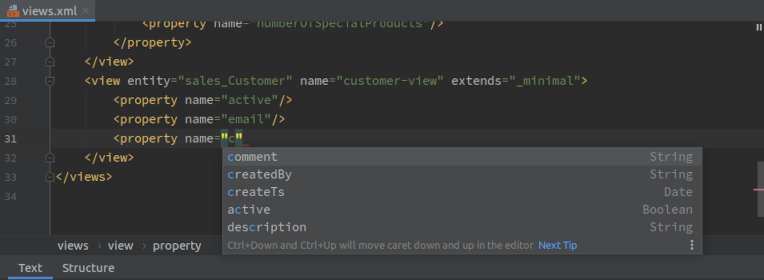
and pay attention to highlighted attributes, most probably they do not exist:

5.2.4. Database Migration
Studio is capable of creating DDL scripts for keeping your database schema up-to-date with the project’s data model. The generated scripts can be executed either from Studio, directly by Gradle tasks or by the application itself on startup.
Creating DDL scripts is performed for:
-
Main data store.
-
Additional data stores with Create and Update and Update Only schema management modes.
Generation of the DDL scripts can be started by the following actions:
-
From the main menu: CUBA > Generate Database Scripts - for all data stores.
-
Select Data Model in the project tree and click Generate Database Scripts in the context menu - for all data stores.
-
Select node in the CUBA project tree corresponding to the particular data store, right-click to open context menu and choose Generate Database Scripts item - to generate database scripts for one data store only.
Studio will open the Database Scripts window:
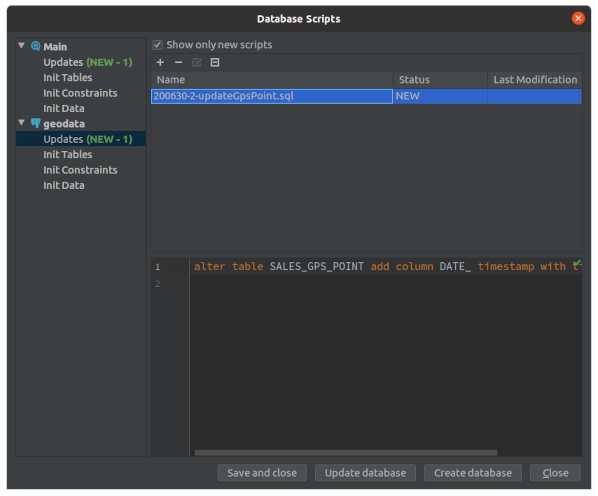
The panel on the left displays database script sections grouped by data stores which they belong to. Only data stores supporting DDL scripts are shown.
Database scripts are divided into the following sections:
- Updates
-
The Updates section displays scripts for updating the database to the current state of the data model. The table on the right displays the list of scripts with script text located in the bottom. If your project contains not yet applied update scripts, the corresponding section in the left tree is highlighted. Saved scripts are located in the
modules/core/db/updateormodules/core/db/update_{additional_data_store_name}directory. The scripts have autogenerated names with prefixes that ensure the order of execution. Scripts containing DROP statements are highlighted in red.You can add an arbitrary script by clicking the
 button, it will be saved and executed later together with auto-generated scripts.
The newly generated scripts can be edited or completely deleted by clicking the
 button.
If you click
 (exclude), you will have two options:
-
Move the script to the directory of manually executed scripts:
modules/core/db/update-manuallyormodules/core/db/update-manually_{additional_data_store_name}. Then the script will not be executed automatically when you run Update database, but you will be able to run it manually when needed. This option is useful for scripts that drop columns or tables renamed earlier to*__UNUSED. -
Exclude the script: it will not be saved to the
modules/core/db/updatedirectory, but remembered in thestudio-intellij.xmlfile in your project folder. When you generate scripts next time, Studio will ignore changes, corresponding to the excluded scripts. This allows you to maintain difference between the database and the model entities.For example, you may want to add a database field to a table, corresponding to a project entity, but do not map it to an entity attribute. When Studio generates a script to delete the field from the database, just exclude it, and Studio will never generate it again.
-
- Init Tables
-
The Init Tables script creates all tables when you execute Create Database. It is executed before the Init constraints and Init data scripts. You can edit the script, but keep the comments dividing tables. The script is saved into the
10.create-db.sqlfile. - Init Constraints
-
The Init Constraints script creates referential integrity constraints. It is executed immediately after the Init tables script. You can edit the script, but keep the comments dividing tables. The script is saved into the
20.create-db.sqlfile. - Init Data
-
The Init Data script allows you to insert additional data or schema information not present in the data model. It is executed at the end of initialization. The script is saved into the
30.create-db.sqlfile.
If the project contains an application component (add-on) that does not provide DDL scripts for the current database, Studio generates scripts for this component and shows them in the Init {component} tables and Init {component} constraints sections. The scripts are saved in 01.{component}-create-db.sql and 02.{component}-create-db.sql files respectively.
Click Save and close to save all generated scripts. You can find the scripts in the Project > Data Stores > Main Data Store project tree section.
In order to run the update scripts, stop the application server if it is running and execute Update Database or Update All Databases from the CUBA main menu. If you want to update only one data store, select corresponding node in the CUBA project tree, right-click to open context menu and choose Update Database item.
If you want to re-create the database from scratch with the init scripts, execute Create Database or Create All Databases. To re-create only one database, select the corresponding data store node in the CUBA project tree, right-click to open context menu and choose Create Database item.
- Entity DDL Generation Settings
You can customize Studio database migration scripts generation behavior on the entity level. The Designer tab of the Entity Designer allows you to configure DDL generation settings for the edited entity:
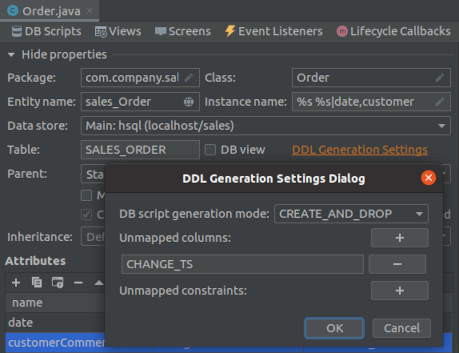
-
DB script generation mode - select suitable mode:
-
CREATE_AND_DROP - when generating DDL scripts, Studio can create table, columns and constraints in the database as well as drop any of its columns or constraints if corresponding attributes are missing in the data model. Both init and update scripts are generated according to the data model. Default mode.
-
CREATE_ONLY - Studio will not attempt to drop table columns or constraints when generating database update scripts. Init scripts are generated according to the data model.
-
DISABLED - Studio will not generate database init and update scripts at all for this entity.
-
-
Unmapped columns - list of columns that exist in the database table but are not mapped to entity attributes. Studio will not attempt to drop columns mentioned in this list.
-
Unmapped constraints - list of constraints that exist in the database table but are not mapped to entity attributes. Studio will not attempt to drop them in the database update scripts.
These settings can also be specified manually in the source code, see the com.haulmont.cuba.core.global.DdlGeneration annotation (available since platform version 7.1.6 and 7.2.2).
5.2.5. Generating Data Model
Studio allows you to create the data model and standard UI screens for an existing database. Click CUBA > Advanced > Generate Model main menu item or select Project > Data Stores in the project tree and click Generate Model in the context menu. If you have several data stores, Studio shows a dialog where you should select one.
Then Studio opens the Generate Model from Database wizard.
- Step 1
-
This is the first step of the model generation wizard.
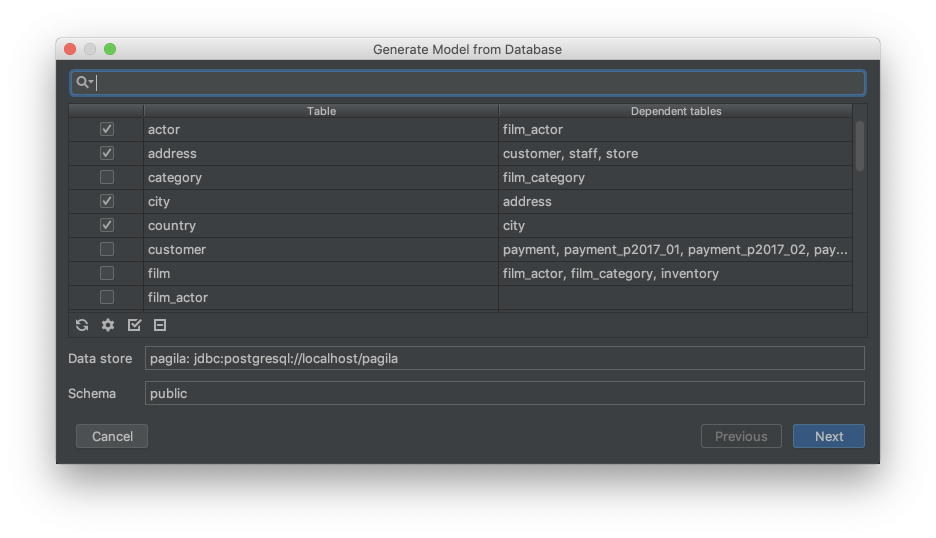
Optional step: click
to set up a Java package where to create new entities, and default mappings for system attributes.For example, if all or most of the tables in your database contain
ModifiedandModifiedBycolumns, you can map them toUpdatable.updateTsandUpdatable.updatedByattributes of created entities. In this case, you don’t need to map them individually for each table. Use Exclude columns from mapping list to not map certain columns automatically for all tables.The wizard displays the list of tables that have no corresponding entities in the project’s data model. You can use the filter field above to find a table by its name.
Select tables that you want to map to the data model. Some tables depend on others through foreign keys, so when you select a table, all tables that it depends on are also become selected. If you deselect a table, all dependent tables become deselected too.
You can click on the checkbox on the right to select or deselect all available tables.
Click Next.
- Step 2
-
At this step, you can review and edit automatically generated mappings for the selected tables.
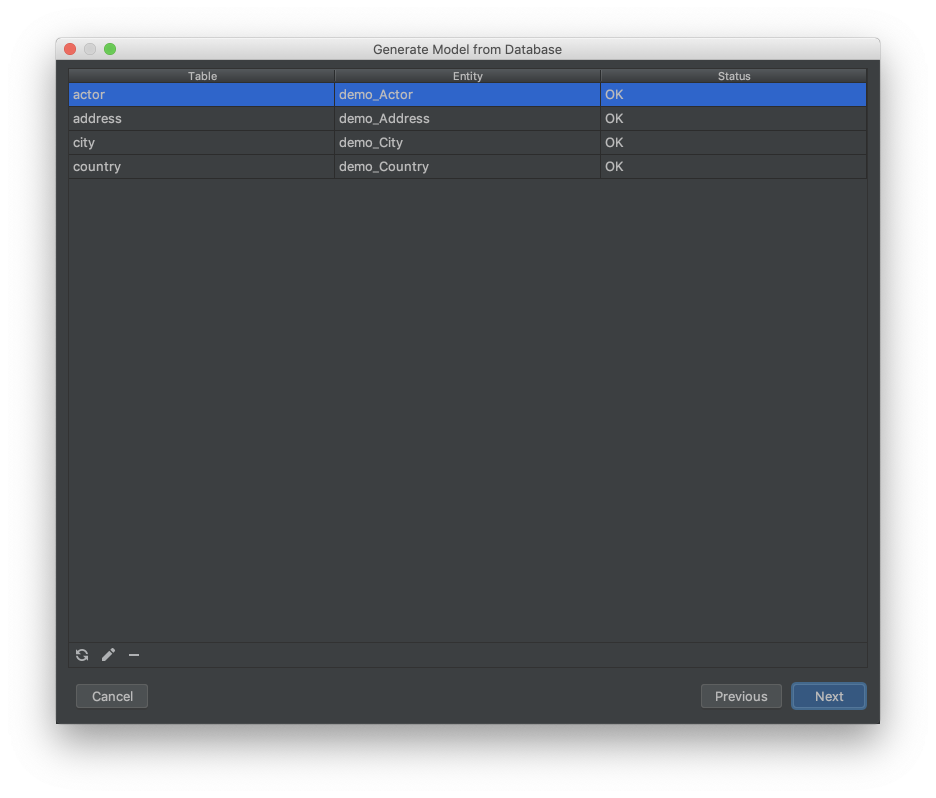
The Status column describes the result of the automatic mapping:
-
OK - the automatic mapping was successful, and all columns are mapped to a new entity.
-
Join table - a link between entities is recognized and mapped as a many-to-many join table.
-
There are unmapped columns - some columns cannot be mapped to a new entity.
-
New PK will be created - the table has no primary key. A new PK of UUID type will be created.
-
Composite PK will be replaced - the table has a composite primary key, but no other tables reference it. The composite PK will be replaced by the primary key of UUID type.
-
Composite PK referenced by other tables - the table has a composite primary key and some tables reference it. Studio cannot map such table.
-
Unsupported PK type - the table has a primary key of an unsupported type. Studio cannot map such table.
-
Choose primary key for DB view - it’s a database view and you should select a column or a set of columns suitable for the entity identifier. In this case, click the Choose PK button and select columns for the primary key.
The
 button allows you to re-launch automatic mapping for the selected table. For example, you can go to a database SQL tool, make some changes in the database schema, then return to the wizard and launch the mapping procedure again.
The
 button opens a dialog window with the mapping details. There you can change the entity name and the list of system interfaces implemented by the entity class. It will affect the number of system columns being created for compatibility with CUBA entities.
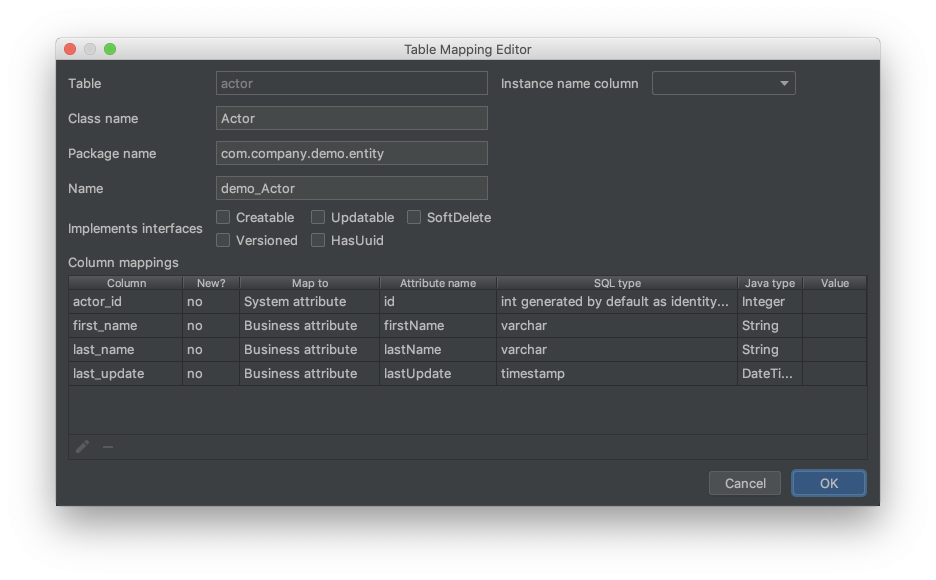
The Choose PK button appears instead of Edit mapping when a database view is selected and you need to select columns for the entity identifier.
By clicking Back, you can go to the previous step to select or deselect tables.
Click Next to go to the next step.
-
- Step 3
-
At this step, you can specify what UI screens should be created for new entities.
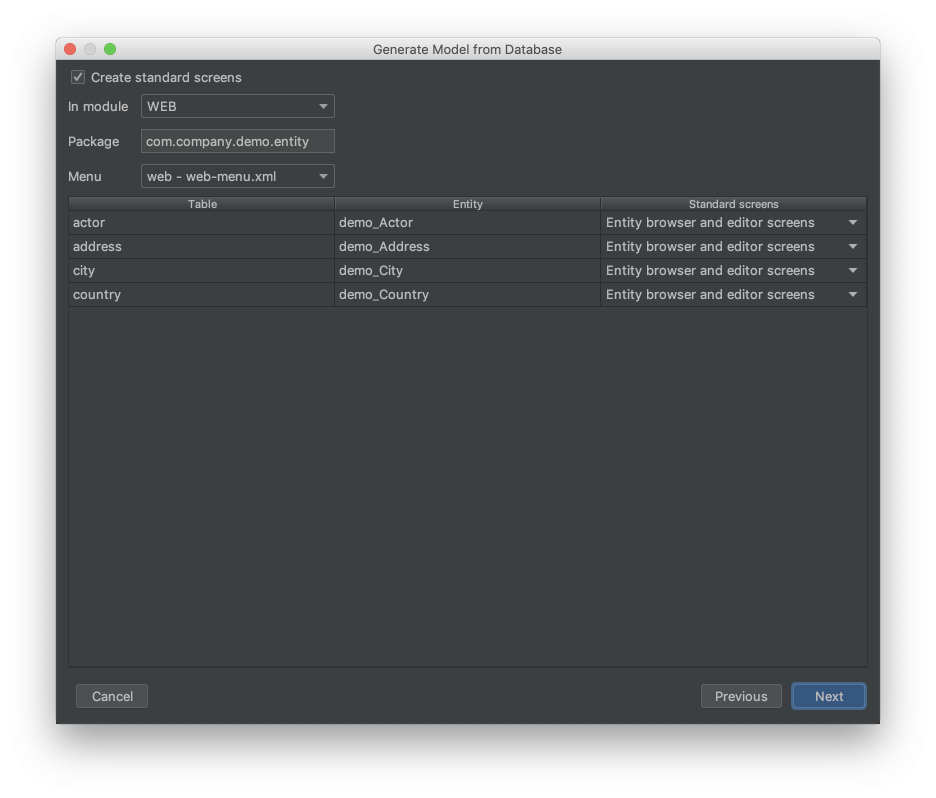
If you deselect the Create standard screen checkbox, Studio will not generate UI for the new entities.
Use the In module, Package and Menu fields to specify where to place the screens source code and where to display them in the main menu.
Use the drop-down list in the Standard screens column to select what types of screens to generate.
You can safely skip this step and generate UI screens for your entities later after finishing the model generation process.
Click Next to go to the next step.
- Step 4
-
This is the last step of the model generation wizard.
The Import scripts table contains the list of scripts that should be executed on the database to make it compliant with the entities being created.
Until this point, nothing is created in the project nor even saved to disk. Studio actually generates entities and screens and saves the scripts only when you press Run all scripts or Run script.
You can review and edit the scripts on this page, then run them or just save and run later by a database management tool. The import scripts are saved in the
modules/core/db/importdirectory.
5.2.6. Integrating with Custom Database
As described in the documentation, the framework allows you to use any DBMS supported by EclipseLink ORM as your project database. And Studio can help you to create files required for such integration.
Select CUBA > Advanced > Define Custom Database in the menu.
The opened window allows you to set properties for a new custom database that you want to work with. Based on these properties, Studio will generate code to support the database both at design and run time.
-
DB type id - the identifier of the database type to use in the
cuba.dbmsTypeapplication property. -
DB type name - a user-friendly name of the database type to show in Studio.
After you click OK, Studio will generate Java classes in com.haulmont.cuba.core.sys.persistence and Groovy classes in com.haulmont.studio.db.{db_id} packages of your project. The sample auto-generated implementation is suitable for Microsoft SQLServer database. You should change it appropriately.
First, fix the com.haulmont.studio.db.{db_id}.{db_id}DbProperties class. When it is ready to fit your database, you will be able to switch your project to this database in Studio. Reopen the project to see your database in the Database type drop-down list.
In order to connect to your database at runtime, fix {db_id}DbmsFeatures and {db_id}DbTypeConverter classes of the com.haulmont.cuba.core.sys.persistence package. The {db_id}SequenceSupport class is used only for generating integer identifiers and unique numbers.
Finally, fix the com.haulmont.studio.db.{db_id}.{db_id}DdlGenerator class for correct generation of init and update database scripts by Studio, if needed. Skip this step if you don’t need to generate DDL scripts for this database.
- Init data scripts for main data store
If you use the custom database as a main data store, when you generate database scripts, Studio will create init scripts for all application components, including CUBA. These scripts won’t include some required initialization data, so you have to add the following to the Init data script of your project (30.create-db.sql), actual for the platform version 7.2:
insert into SEC_GROUP (ID, CREATE_TS, VERSION, NAME, PARENT_ID)
values ('0fa2b1a5-1d68-4d69-9fbd-dff348347f93', now(), 0, 'Company', null)^

insert into SEC_USER (ID, CREATE_TS, VERSION, LOGIN, LOGIN_LC, PASSWORD, PASSWORD_ENCRYPTION, NAME, GROUP_ID, ACTIVE)
values ('60885987-1b61-4247-94c7-dff348347f93', now(), 0, 'admin', 'admin',
'$2a$10$vQx8b8B7jzZ0rQmtuK4YDOKp7nkmUCFjPx6DMT.voPtetNHFOsaOu', 'bcrypt',
'Administrator', '0fa2b1a5-1d68-4d69-9fbd-dff348347f93', true)^

insert into SEC_USER (ID, CREATE_TS, VERSION, LOGIN, LOGIN_LC, PASSWORD, NAME, GROUP_ID, ACTIVE)
values ('a405db59-e674-4f63-8afe-269dda788fe8', now(), 0, 'anonymous', 'anonymous', null,
'Anonymous', '0fa2b1a5-1d68-4d69-9fbd-dff348347f93', true)^

insert into SEC_USER_ROLE (ID, CREATE_TS, VERSION, USER_ID, ROLE_NAME)
values ('6736effb-9dfc-4430-973a-69868606b09c', current_timestamp, 0, '60885987-1b61-4247-94c7-dff348347f93', 'system-full-access')^- Adding JDBC driver
When generating database migration scripts, Studio needs JDBC driver for the used DBMS. For a custom database you need to download required JDBC driver files manually and put them to the {USER_HOME}/.haulmont/studio/lib folder (e.g. C:\Users\{username}\.haulmont\studio\lib for Windows).
After adding driver files to the appropriate folder don’t forget to:
-
restart IDE.
-
shutdown Gradle daemon (run
gradlew --stopin terminal).
- Firebird database integration example
An example of integrating a custom database (Firebird) into the CUBA and Studio can be found here: https://github.com/cuba-labs/firebird-sample. This sample can also be used as an add-on to add support for the Firebird database to your project.
5.3. Business Logic
The project tree displays all your middleware services, Spring beans and integration tests in one place. In the sections below we explain how to create new services, beans and tests.
5.3.1. Creating Services
Services are container-managed components that form the middle tier boundary and provide the interface to the client tier. Services may contain the business logic themselves or delegate the execution to Spring beans.
In order to create a new service, select the Business Logic project tree section and click New → Service in the context menu:
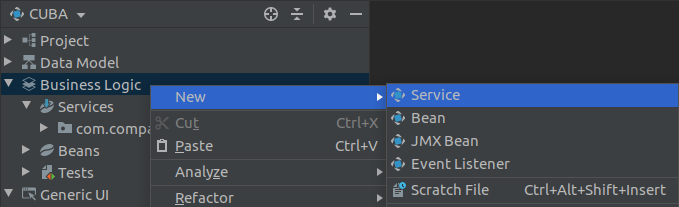
When you enter the name of the service interface, the corresponding bean name and the service name constant are generated automatically:
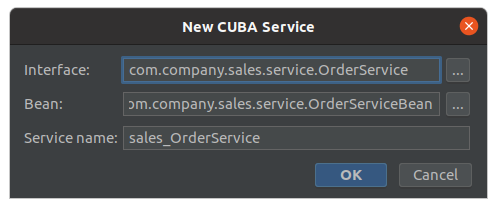
After that, the service interface will be created in the global module, and its implementation - in the core module. Also, the new service will be automatically registered in the web-spring.xml configuration file.
You can easily switch from the interface to service bean and back using the marker on the gutter:
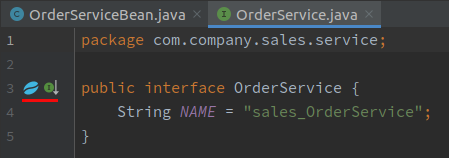
As soon as you create a method in the service interface, Studio inspection will suggest you implementing it in the bean class:
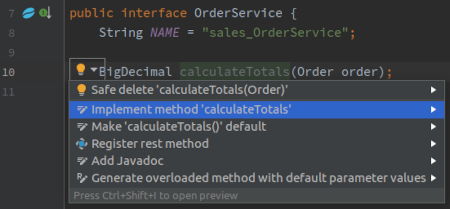
5.3.2. Creating Managed Beans
Studio shows all managed beans (Spring beans) of the middle tier (including entity and transaction listeners) in the Business Logic → Beans section of the project tree. Beans are displayed grouped by their module: core, global, web or portal.

In order to create a new managed bean, select the Business Logic → Beans project tree section and click New → Bean in the context menu:
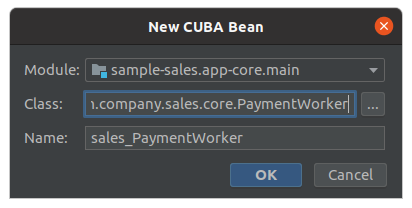
-
Module - select the module to place the new bean into.
-
Class - enter the name of the bean class.
-
Name - enter the unique name of the bean. When class name is entered, it is generated automatically.
5.3.3. Creating JMX Beans
JMX Beans are a special kind of Spring beans. JMX beans allow system administrator to view and change the state of the program in runtime. They are usually used to provide statistics, monitoring information, access to the configuration or other internal operations.
Studio shows JMX beans together with other Spring beans in the Business Logic → Beans section of the project tree. JMX beans can be created in core, global and web modules of the project.
In order to create a new JMX bean, select the Business Logic → Beans project tree section and click New → JMX Bean in the context menu. The Create JMX Bean dialog will appear:

-
Module - select the module to place the new bean into.
-
Interface Class - enter the name of the bean interface. This interface contains methods that will be exposed to JMX. This name should end with the
MBeanpostfix. -
Bean Class - enter the name of the bean class.
-
Bean Name - enter the unique name of the bean. When interface class is entered, it is generated automatically.
-
Package - enter the package to place bean into.
-
Description - description of the bean, it will be shown to the user in the JMX clients (such as CUBA built-in JMX Console).
5.3.4. Creating Event Listeners
Event listener is a Spring bean having one or more listener methods that accept an Event object and contain reaction on that event. You can read more about events and event listeners in the Developer’s Manual.
Studio allows you to scaffold listeners for various application events:
You can generate new listener class or add listeners to existing bean classes.
- New listener class
-
In order to generate new listener class, go to the Business Logic section of the CUBA project tree and then invoke a right click → New → Event Listener context menu item.
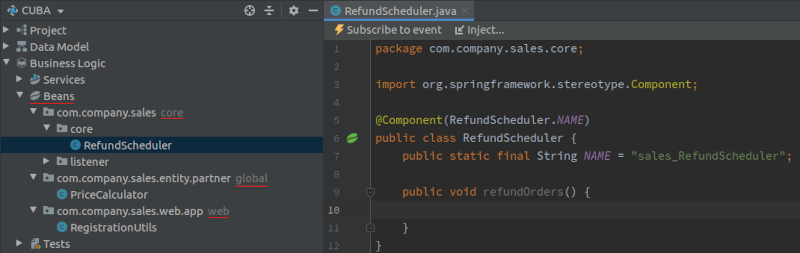
In the dialog you will be able to change the module where event listener class will be located. An event listener can be located in the web module, in this case limited number of events is available. Choose the event type, follow the wizard specifying required parameters and press Finish to invoke class generation.
- Add listener method to existing class
-
In order to add listener method to an existing class, open an existing Spring Bean and press Subscribe to event in the top actions panel of the source code editor:
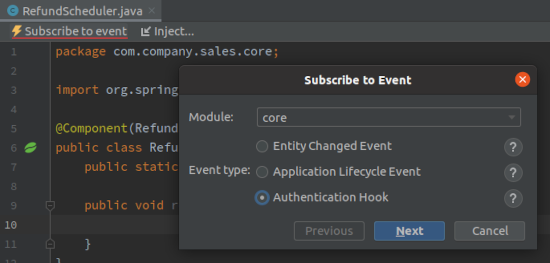
5.3.5. Creating Integration Tests
CUBA applications can be tested using well-known approaches: unit, integration and UI testing. Studio provides developer with support for the following categories of tests:
-
Middleware integration tests. This category of tests is used to test middleware functionality: services, beans, event listeners, logic of the ORM and communicating with the database. Middleware tests run in a fully functional Spring container connected to the database.
-
Web integration tests. Those run in the Spring container of the Web Client block. Web test container works independently from the middleware, and the framework creates stubs for all middleware services.
Both groups of tests are displayed in the Business Logic → Tests section of the CUBA project tree, grouped by module:
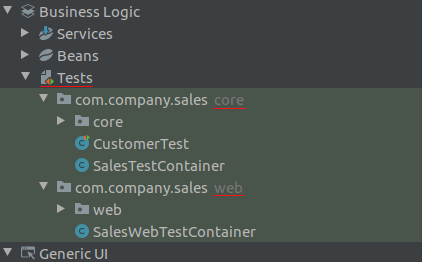
In order to create a new integration test, select the Business Logic → Tests project tree section and click New → Integration Test (Middleware) or Integration Test (Web) in the context menu:
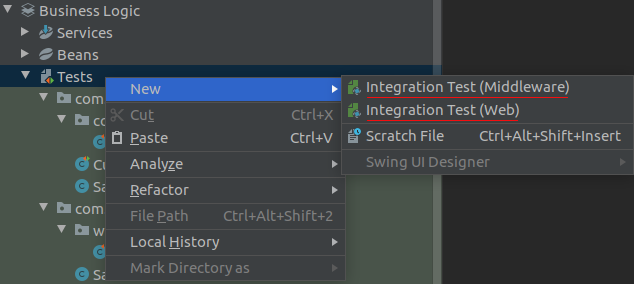
If your project doesn’t yet contain test source root or test container, Studio will show an additional confirmation dialog before creating necessary files and classes.
In the appearing dialog you need to enter the following parameters:
-
Class Name - name of the test class.
-
Package - package to place test class into.
-
Test container class - name of the test container class. Default
Commoncontainer is created automatically for you, but you can also create other container classes, e.g. to test your application using another DBMS type. -
Testing library - choose between JUnit5 or JUnit4. Note that CUBA projects which were created using previous platform versions up to 7.1 support only JUnit4, even if they were migrated to CUBA 7.2.

5.4. Generic UI
Studio provides a lot of features that facilitate working with Generic UI of your application.
In the project tree, you can find the following elements of Generic UI:
-
Web Menu opens the graphical editor of the main menu.
-
Main Message Pack section contains messages for main menu entries and common UI elements.
-
Screens section displays existing application screens.
-
Themes are used to manage the visual presentation of the application.
5.4.1. Creating and Removing Screens
To create a new Generic UI screen, select Generic UI in the project tree and click New > Screen in the context menu. If you want to create a CRUD screen for an entity, select this entity in the project tree and click New > Screen in the context menu:

Studio will show a list of available templates. The list is divided into two sections: Screen Templates and Legacy Screen Templates. The former contains the templates for the new screen API available since framework version 7, while the latter contains templates for screens that can be used in projects based on version 6 too.
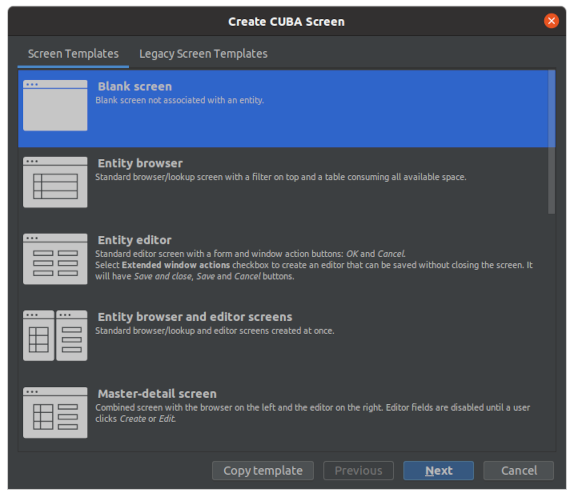
If you are creating the screen for an entity selected in the project tree, the Entity field will be filled automatically:
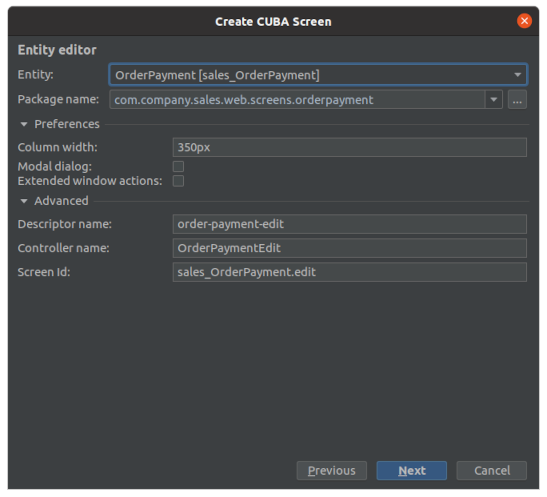
The Advanced section lets you modify the automatically generated descriptor and controller names and the screen id. It is useful when you have more than one screen for some entity.
The Entity browser view and Entity editor view wizard steps allow you to select amount of data that will be displayed in the browser table or edited in the entity editor form. Selected properties also determine the entity view used to load entities to the screen:
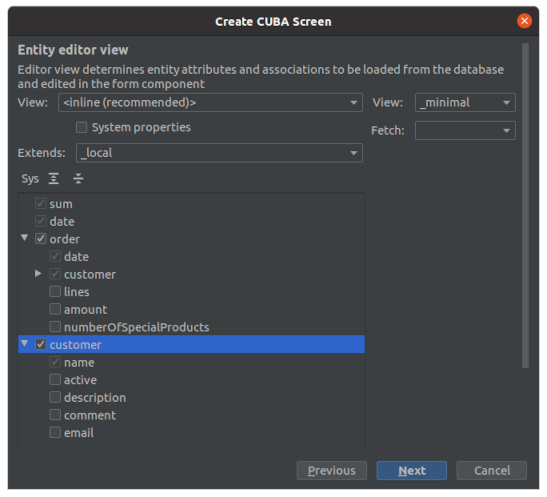
When you click Finish, the screen XML descriptor, Java controller and message bundle files are created and opened in the source code editor. For a legacy screen not annotated with UiDescriptor and/or @UiController annotation, its descriptor is registered in the web-screens.xml file.
- Removing screens
When you remove screen files, use the Safe delete option to find and clean up references to this screen:
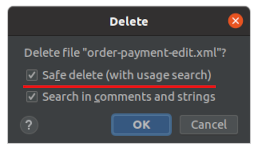
Some references to the screen being removed like usages in web-menu.xml and web-screens.xml files will be deleted automatically. If there are other references, you will see a dialog that warns about such usages. Click View Usages in the dialog, review the references in the Find tool window and click Cancel or Do Refactor:
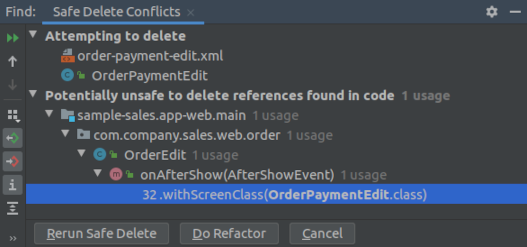
5.4.1.1. Custom Screen Templates
Studio provides you with the ability to copy standard screen templates to your project and customize them, changing template file for the screen descriptor, screen controller or even adding new parameters to the wizard.
Select template you want to customize and press Copy template button in the first step of the Create CUBA Screen wizard to create own screen template. Enter code name of the custom template. Template files will be copied to the project and become available for modification. Custom screen templates are displayed in the Generic UI → Screens → Custom Templates section of the CUBA project tree:
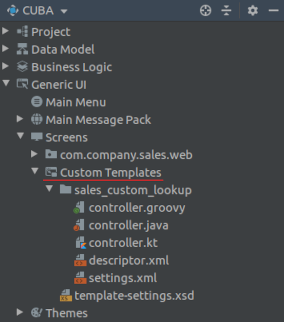
You can modify template files for the screen controller and descriptor, or even add new parameters to the wizard by extending the settings.xml file.
Customized screen templates are available for selection on the Project Templates tab of the first step of the New → Screen wizard:
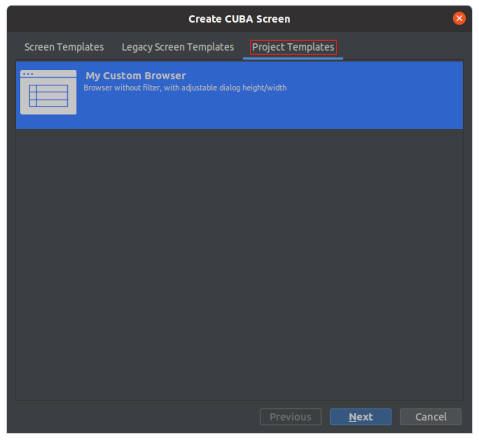
- Customization Example
To make entity browser’s dialog width and height to be adjustable wizard parameters, do the following:
-
Edit
settings.xmland add the following tags there:<property caption="Dialog Width" code="dialogWidth" propertyType="INTEGER" defaultValue="800" preferences="true"/> <property caption="Dialog Height" code="dialogHeight" propertyType="INTEGER" defaultValue="600" preferences="true"/> -
Edit
descriptor.xmland changedialogModetag declaration to the following:<dialogMode height="${dialogHeight}" width="${dialogWidth}"/> -
Try to use modified template in the screen wizard. New parameters have been added to the wizard:
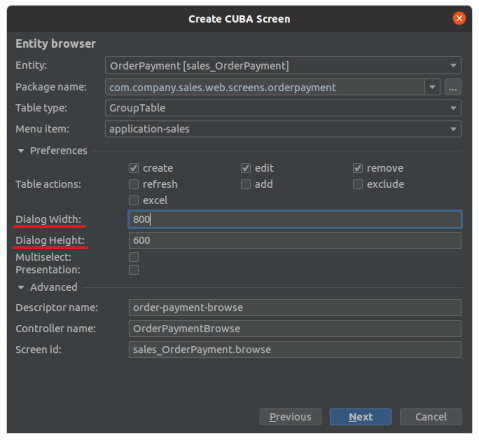
5.4.2. Working with Screen Descriptors
The screen XML descriptor editor is integrated with the Screen Designer. Screen Designer represents a number of panels and tool windows that allow you to develop layout of the screen and set UI components properties in WYSIWYG style. You can edit the XML directly or use Designer’s panels to generate the code for you.
The Screen Designer consists of the following elements:
-
Source code editor - displays and provides editing of the XML source code.
-
Top actions panel - provides several easily accessible actions.
-
Layout preview panel - displays interactive schematic presentation of the screen layout.
-
Component Hierarchy - displays elements of the screen as a hierarchy tree.
-
Component Palette - displays available components that can be added to the current screen.
-
Component Inspector - displays and provides editing of the component properties and event handlers.
|
Tip
|
Screen Designer panels and tool windows are available only for users with active CUBA Studio subscription. |

- Top actions panel
-
Actions panel is located on top of the source code editor. It provides access to the following actions:
-
Controller - navigates to the screen controller.
-
<entity class name> - displayed if this screen represents an entity browser or editor. Allows you to navigate to the entity associated with the current screen.
You can also switch from the screen descriptor to its controller and back using the marker on the gutter.
-
- Tool windows
-
The Component Hierarchy, Component Palette and Component Inspector panels are implemented as independent IDE tool windows. These tool windows appear automatically when you open screen descriptor in the editor. When you switch active screen descriptor file in the editor, the content of the tool windows is updated. Sometimes when you open other IDE tool windows (such as Gradle, Persistence etc.), Designer’s panels become hidden, and you can re-open them by clicking the corresponding buttons in the left and right sides of the IDE window.
The ability to display Component Inspector in the bottom-right corner was kept for those users who prefer the old layout used by previous versions of the CUBA Studio. In order to move this panel to the right side, click the Move to Right Bottom button located in the panel’s title.
Designer panels are also active when editing XML code and interact with the editor. Experienced developers who navigate and modify screen descriptors by editing the XML source code can also benefit from the editing capabilities of the screen designer tool windows. You can drag new components from the Palette to the Hierarchy, reorder components and edit component properties in the Inspector panel when only source code is displayed in the editor. The source code immediately reflects all changes.
- Layout Preview panel
-
The Layout Preview panel is used to display interactive schematic presentation of the screen layout. It shares editor space with the source code of the screen descriptor. On the right side of the top panel of the screen descriptor there are four buttons that switch preview display mode:
-
Editor only - only source code is displayed in the editor.
-
Editor and Preview - editor space is split to contain both source code and preview.
-
Preview only - only preview is displayed in the editor.
-
Preview in Window - source code is displayed in the editor, while preview is displayed in the separate window which can be moved to another display.

The panel has several controls located in the top-right corner:
-
The 100% x 100% drop-down allows you to select fixed canvas size. The canvas size can be larger than the size of the preview panel, in this case additional scroll bars are added. For example, if you are developing a complex screen containing many controls and want to see the preview, you can choose 1920 x 1080 canvas size and observe how layout looks like on a big screen.
-
The Refresh button reloads contents of the preview page.
-
The Zoom In, Zoom Out and Zoom Reset buttons change zoom of the preview page.
-
The right-most icon displays results of the automatic screen layout problems inspection. Move the cursor over the icon to see the list of discovered problems.
In the Layout Preview panel you can also arrange the components in the desired layout. Components can be resized and aligned using the controls:
-
expand horizontally,
-
expand vertically,
-
align the component vertically/horizontally.
-
- Component Palette
-
The Component Palette tool window is displayed in the down-right corner of the IDE. It displays the set of available screen components:
-
Containers;
-
Components;
-
Data components: containers and loaders;
-
Non-visual: actions, dialog mode settings, timers and other auxiliary screen elements;
-
Main window: components specific to the main screen.
You can search components in the palette by typing name in the search box.
In order to add a component to the layout, drag it from the palette:
-
Onto the Component Hierarchy panel.
-
Or to the appropriate place in the source XML code.
By right-clicking the component in the palette, you can open context menu with the following actions:
-
Add to Design - adds selected component to the screen, placing it to the place determined by the selected element in the hierarchy.
-
CUBA Documentation - opens component’s documentation page in the Developer’s Manual.
-
- Component Hierarchy
-
The Component Hierarchy tool window is displayed in the up-right corner of the IDE. It displays the tree of components added to the layout.
Elements of the tree can be rearranged using drag-and-drop.
Right-click the element in the hierarchy to open its context menu:
-
Convert the component to the one of similar alternative components.
-
Wrap the component into one of the suggested containers.
-
Go to XML - navigate to the XML tag in the source code.
-
Inject the element to the screen controller or navigate to the existing injection declaration.
-
Delete, Copy, Cut or Paste the element.
-
Open the CUBA Documentation page for the selected component.
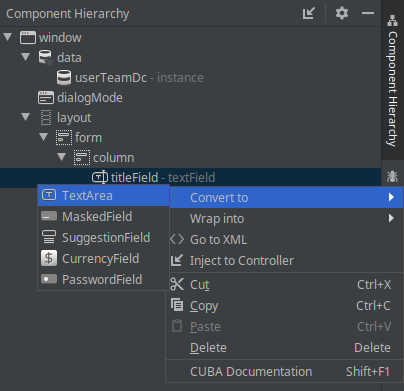
-
- Component Inspector
-
The Component Inspector tool window is displayed in the bottom-left corner of the IDE window. It displays and allows you to edit properties of the selected screen element:
-
The Properties panel displays visual component properties.
-
The Handlers panel displays event listeners and component delegates that can be associated with the selected component. In order to generate necessary handler method - just double-click the corresponding row.
You can type text in the search field for quick search of the attributes:
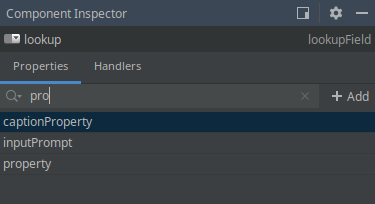
For some types of selected elements the + Add button is shown that provides a way to quickly add a related sub-element, such as table action, column or form field. If the selected element is:
-
Table,Gridor one of their actions and columns - Add → Column, Add → Group, Add → Action are available. -
Formor one of its columns and fields - Add → Column, Add → Field are available. -
DataLoadCoordinator- Add → onScreenEvent trigger and other triggers are available.
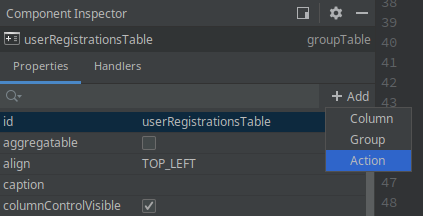
-
- Support for Custom UI Components
Screen Designer allows to integrate a custom UI component implemented in an add-on or project by adding special annotations to component’s definition. Properly annotated component will be displayed in the Component Palette panel, and its properties will be editable in the Component Inspector panel. Custom UI components are supported for projects based on CUBA platform versions 7.1.7 and later, or 7.2.5 and later.
Read more about custom component UI metadata in the Developer’s Manual.
- Source Code Inspections
-
Studio inspects the screen layout for errors and inconsistency, checks the internal and external references. It will alert you with warnings or by highlighting XML elements in the following cases:
-
The screen layout cannot be assembled due to an XML error.
-
Components property paths and names do not correspond to the application data model.
-
Components size conflicts: conflicting
width,heightandexpandattribute values. -
dataContaineranddataLoaderattributes don’t reference any existing data containers or data loaders. -
Fields inside a
formdon’t define thepropertyXML attribute explicitly: in this case, theidwill be used aspropertyimplicitly. -
The
formelement semantic error: fields are duplicated or located out of thecolumn. -
The number of columns in a
gridLayoutdoes not match the stated number. -
Duplicated element attribute in an extended screen, when attributes are declared identically in both parent and extended screens.
-
Elements in an extended screen are named not like in parent screen or placed incorrectly.
-
messagesPackdescriptor attribute does not belong to a valid package which contains at least onemessages_xx.propertiesfile. -
Outdated XSD reference.
-
idvalues are not unique within the screen. -
and other problems
CUBA inspections can be configured in the Settings window (File > Settings > Editor > Inspections).
-
- Source Code Intentions and Generate Menu
-
Intention action is a context-sensitive action that can be invoked by developer from the source code editor by pressing Alt+Enter (Option+Enter). Intentions help with refactorings, code generation, navigation and other tasks. You can read more about intention actions here: https://www.jetbrains.com/help/idea/intention-actions.html.
The Generate menu contains context-sensitive actions helping to generate various code constructs. It can be invoked by pressing Alt+Insert (Cmd+N). Read more about this menu here: https://www.jetbrains.com/help/idea/generating-code.html.
Studio-bundled intentions and items of the generate menu facilitate working with screen components. Use Alt+Insert (Cmd+N) and Alt+Enter (Option+Enter) to find out the features for working with particular UI and data components.
-
For example, to add a new field to a Form component, you can move the cursor inside the
formelement and do one of the following:-
Press Alt+Insert (Cmd+N), select Add field, then choose the value of the
propertyattribute,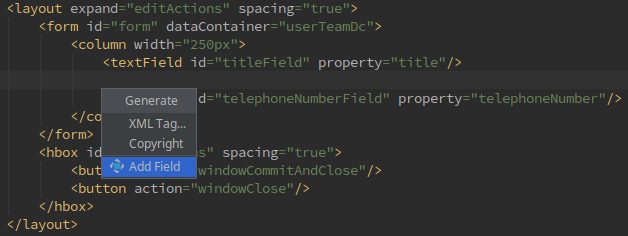
-
Type
fieldand press TAB, then choose the value of thepropertyattribute.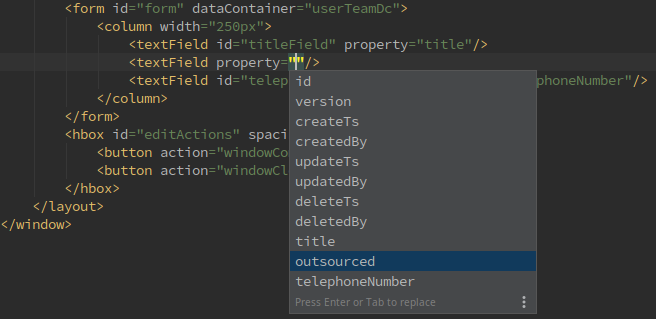
-
-
Another example is adding the new localized caption to one of components. You can type in the source code the message key of the localized message that doesn’t exist yet. The referencing element will be highlighted in red. Then press Alt+Enter (Option+Enter) and choose Create message in the message bundle:
-
5.4.3. Working with Screen Controllers
This section describes the features that Studio provides for working with the source code of screen controllers.
Gutter icons enable quick switching to the corresponding XML descriptor, locating the XML definition of an injected component and other navigation options.
- Top actions panel
-
Actions panel is located on the top of the controller source code editor. It displays the following actions:
-
Descriptor - navigates to the corresponding screen descriptor.
-
<entity class name> - navigates to the entity associated with current browser or editor screen.
-
Main Menu - allows you to include the current screen to the main menu or to navigate to the main menu configuration.
-
Inject - helps to inject dependencies to the controller class, described below.
-
Generate Handler - provides subscribing the controller to various events and generating components' delegates, described below.
-
- Dependency injection
-
Dependency injection is the main way of getting references to visual components and API endpoints in the screen controller code. Of course, you can write a field of the required type and annotate it manually, but Studio has a special window that allows you to select an object from the list and create the appropriate field automatically. This window can be opened:
-
by clicking the Inject action on the top actions panel,
-
or by pressing Alt+Insert (Cmd+N) and selecting Inject… in the Generate popup menu:
The following objects can be injected into controllers:
-
Visual and data components defined in the XML descriptor,
-
Screen API interfaces,
-
Infrastructure interfaces,
-
Middleware services,
-
Other Spring beans defined in the project,
-
Configuration interfaces,
-
SLF4J Logger instance.
-
- Event handlers and delegates
-
There are two ways to add logic related to the screen lifecycle and components behavior to the screen controller: event handlers and component delegates. These two are implemented differently in the framework but used similarly in the Studio UI.
By creating event handlers you can execute code at various points in the screen lifecycle and react to user actions. A handler is a controller method annotated with
@Subscribeand having the event as a parameter.Using delegates you can provide code that will be used by various screen mechanisms instead of their standard implementations. For example, you can provide your own function to commit data or to select icons for table rows. A delegate is a controller method with a specific signature and annotated with
@Install.You can create event handlers and delegates in Studio:
-
by clicking the Generate Handler action on the top actions panel,
-
or by pressing Alt+Insert (Cmd+N) and selecting Generate Handler in the Generate popup menu:
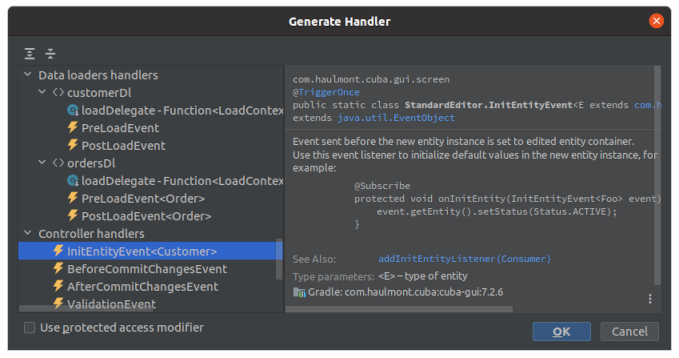
Each event or delegate in the window is provided with a description on the right which is extracted from the event’s Javadoc.
The following events and delegates are available in the opened window:
-
Controller handlers represent the lifecycle of the screen.
-
Component handlers allow you to react on buttons clicks, table selections, actions etc.
-
Frame handlers represent the lifecycle of the outer frame component of this screen.
-
Data context handlers allow you to react on the data context changes and execute code before and after data commit.
-
Data container handlers enable receiving notifications on changes in the state of data containers and entities.
-
Data loader handlers enable implementing your own or customizing standard logic of loading data for screen components.
-
5.4.4. Working with Application Menu
Application menu configuration is stored in the web-menu.xml configuration file located in the web module of the project. To edit main menu configuration, use the Generic UI → Main Menu item in the CUBA project tree:
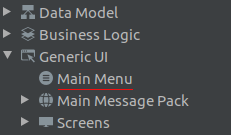
The menu designer allows you to visually configure the application main menu structure. The Structure tab displays the graphical designer, while the XML code of the menu can be edited on the Text tab.
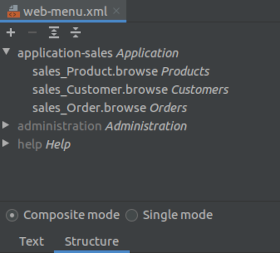
|
Tip
|
Menu designer is available only for users with active CUBA Studio subscription. |
- Main Menu Modes
The menu can be created in two modes:
-
In the Single mode the menu contains items from the project’s
web-menu.xmlfile only. In this case you need to create all items, including those existing in the app components if necessary, but you have full control over the menu structure. -
In the Composite mode the menu contains items from the project’s
menu.xmlplus from the menu configuration files of all application components. This mode helps to easily include all inherited items and insert the project’s specific items at any place of the menu structure. The inherited menu items can not be edited.Additionally, on the Text tab, you can define for the menu items the
ìnsertBeforeorinsertAfterattribute. These attributes define where to insert the current item. These attributes help to combine the project menu items with the items inherited from the application components in the Composite mode.For example, if you want to place your menu structure to the left of the Administration item, set
insertBefore="administration"for the root item of your hierarchy.In the visual designer you can just drag-and-drop menu items in the tree to change their location in the menu structure.
The list of menu configuration files is defined by the cuba.menuConfig application property which is updated when you select the mode.
When you are switching menu from Composite to Single mode, Studio suggests you to retain menu items inherited from platform and add-ons:
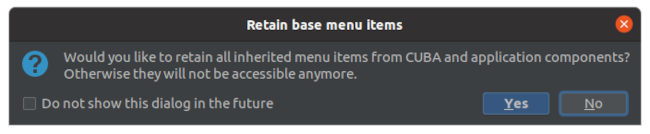
If you decide to retain inherited menu items, their structure will be copied to your project and you will be able to customize them as you like (e.g. add icons, change captions).
If later at some point you decide to switch main menu back to Composite mode, note that you will need to manually remove all duplicated menus and items from your project’s configuration. Otherwise, the menu would become broken as menu structure doesn’t allow duplicated items.
- Adding menu items
In order to add a menu item, select an existing item (or the configuration file to create a top-level item) and click . The Menu Item editor window will be opened in a modal window.
After the new menu item is created, you can drag-and-drop it in the tree to change its location in the menu structure.
You can create the following types of menu items:
- Screen
-
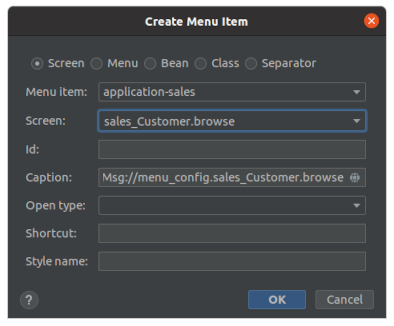
A menu item which opens an application screen.
The following properties are specific to a Screen item:
-
Screen - non-unique ID of screen that is opened by this menu item.
-
Open type - defines whether the screen should be opened in a new tab or in a modal window (
NEW_TABorDIALOG).NEW_TABis used by default.
-
- Menu
-
A menu item which contains other items (submenu).
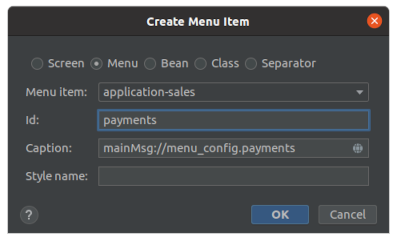
- Bean
-
A menu item which invokes a method of a managed bean. The bean should be located in the web project module.
The following properties are specific to a Bean item:
-
Bean - the name of bean which can be obtained by
AppBeans(e.g.cuba_Messages). -
Bean method - the name of method from bean to be invoked.
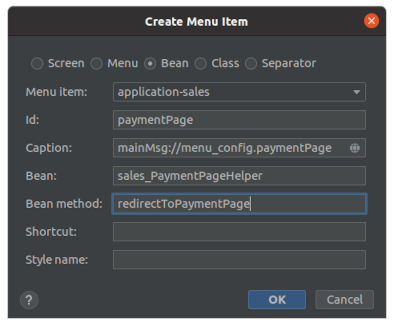
-
- Class
-
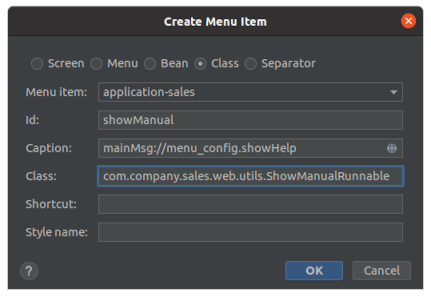
A menu item which executes the method of a given class.
The following properties are specific to a Class item:
-
Class - a fully qualified name of class which implements one of supported interfaces:
-
java.lang.Runnable, -
java.util.function.Consumer<Map<String, Object>> -
or
com.haulmont.cuba.gui.config.MenuItemRunnable.
-
-
- Separator
A horizontal line separating menu items.
- Common parameters
The following parameters are available for various types of menu items:
-
Menu item - parent menu or sub-menu to place menu item into.
-
Id - an arbitrary unique ID of the item. This attribute is not mandatory, however it’s recommended to assign it if you plan to manage menu configuration dynamically.
-
Caption - localized item caption. By pressing the globe button you can open Localized Message dialog and enter localized captions for all supported locales.
-
Shortcut - a keyboard shortcut which triggers the menu item. Possible modifiers (ALT, CTRL, SHIFT) are separated by a "-", for example ALT-C.
-
Style name - defines a style name for the menu item. See Themes for details.
The following parameters become available for editing on the right panel of the designer after the menu item is created:
-
Icon - icon of the menu element.
-
Description - a localized text shown as a tooltip on mouse hover. By pressing the globe button you can open Localized Message dialog and enter localized description text for all supported locales.
-
Params - screen parameters passed to the
init()method of the opening screen’s controller. -
Permissions - allows you to restrict access to a menu item. If a user does not have permissions to access the item, it is not displayed. Note that there is a simpler way to manage access - with help of role’s screen permissions.
Please proceed to the Developer’s Manual for more detailed explanation of mentioned parameters.
5.4.5. Working with Themes
Studio facilitates creation of theme extensions and custom themes in your project.
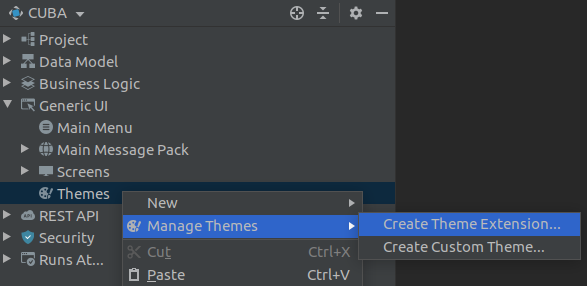
When you create a theme extension or a custom theme, a special directory structure in the themes subfolder of the app-web module is created and new Gradle tasks supporting building the theme are added to the build.gradle file.
The created themes will be displayed in the Themes section of the project tree.
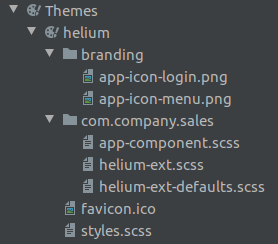
After extending or creating a theme, you can modify its variables manually in the SCSS file or in the visual editor:
-
In the context menu of the new theme select Open Variables File item.
-
From the main menu: CUBA → Advanced → Manage themes → Edit %ThemeName% Theme Variables.
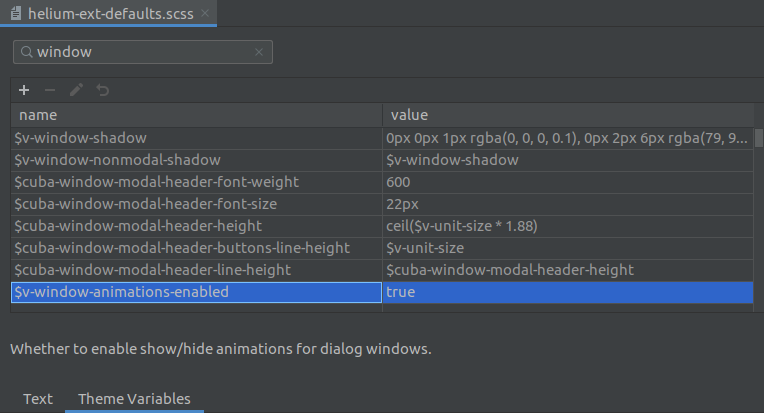
|
Tip
|
Visual editor for the theme variables is available only for users with active CUBA Studio subscription. |
5.5. Frontend UI
Studio allows to generate Frontend UI module and components. @cuba-platform/front-generator npm package is used to perform the generation.
5.5.1. Creating Frontend UI Module
Right-click on Project > Modules in the CUBA project tree and select Manage modules > Create 'front' module.
Studio will install the Frontend Generator in modules/front/generation folder (it may take a while). Then you will see a preset selection screen. Select a preset based on the framework you are going to use. You can also expand Advanced section and set a specific version of Frontend Generator to be used.
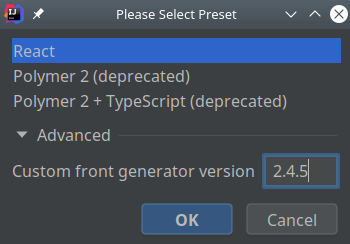
|
Warning
|
Polymer presets are deprecated. |
The generated Frontend UI application (the frontend client) will be placed into the modules/front directory.
To remove the front module right-click Project > Modules and select Manage modules > Remove 'front' module.
5.5.2. React-based Frontend UI components
If you have created a front module using the React template, you will be able to add React components. Expand Data Model in the CUBA project tree and right-click on an entity class. Select New > Frontend Component.
You can choose between the following options:
-
Entity cards - component that allows to browse the entities.
-
Entity management - components that allow to browse and edit the entities.

5.5.2.1. Blank Component
This is an empty React class-based component. Use it if you need a "clean slate" for creating your own component.
Once you click Next you will be presented with the following options screen.

-
Directory - destination directory for the component to be generated into.
-
Add to menu - whether to create a navigation menu item for the generated component.
-
Component class name - the name of the component class.
5.5.2.2. Entity Cards
Read-only list of entities displayed as cards.
Once you click Next you will be presented with the following options screen.

-
Directory - destination directory for the component to be generated into.
-
Add to menu - whether to create a navigation menu item for the generated component.
-
Entity - the entity that should be displayed by the component.
-
Component class name - the name of the component class.
-
Entity view - the view that should be used by the component.
5.5.2.3. Entity Management
CRUD (list + editor) screens for specified entity. Use it if you need to allow browsing, adding, removing and editing entities. Selecting this option will allow you to generate 3 components:
-
Edit component - allows user to edit an entity instance.
-
List component - allows user to view the list of entities and open the Edit component for a selected entity instance.
-
CRUD component - component that renders a List component or an Edit component depending on whether the route path contains an
entityIdparameter.
Once you click Next you will be presented with the following options screen.
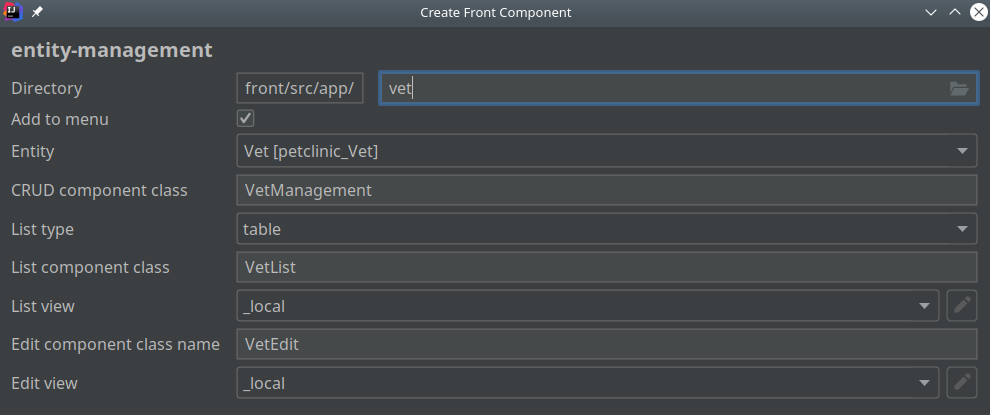
-
Directory - destination directory for the components to be generated into.
-
Add to menu - whether to create a navigation menu item.
-
Entity - the entity that the screens are being created for.
-
CRUD component class name - the name of the CRUD component class.
-
List type - list component is available in one of the following flavors (we call it list types):
-
list
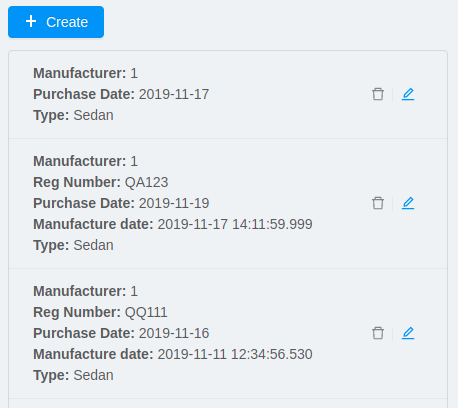
-
cards
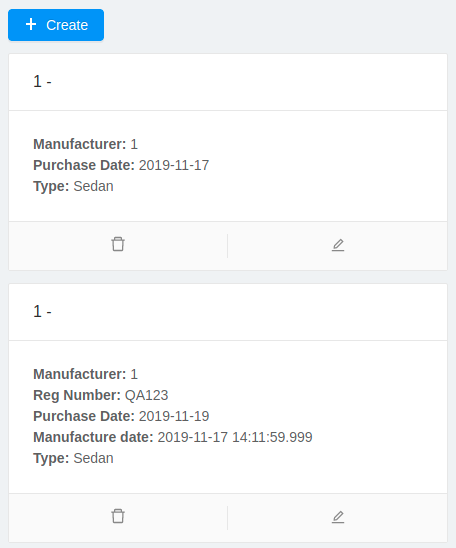
-
table
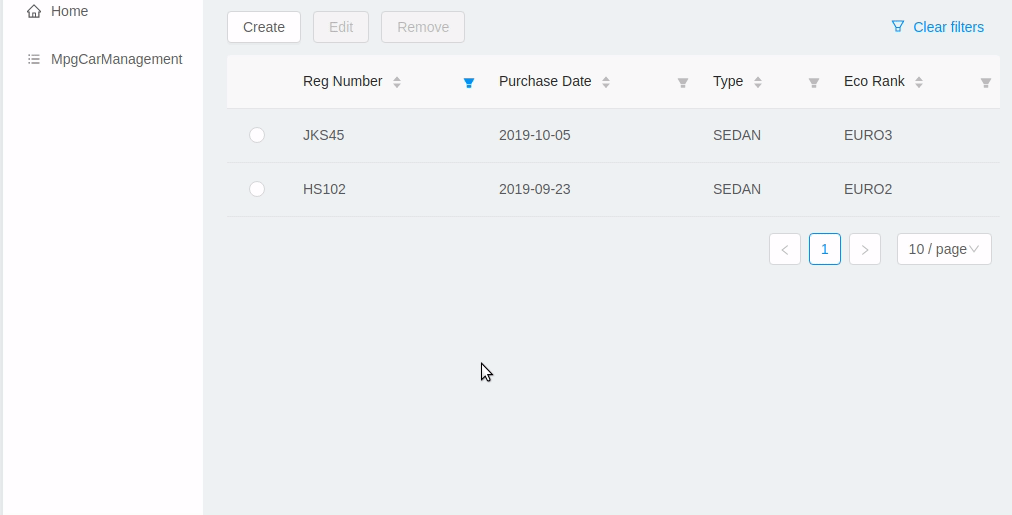
-
-
List component class - the name of the List component class.
-
List view - the view that should be used by the List component.
-
Edit component class name - the name of the Edit component class.
-
Edit view - the view that should be used by the Edit component.
5.6. REST API
REST API is a CUBA add-on that provides your application with the ability to perform CRUD operations, execution of predefined JPQL queries, service methods and other possibilities via the REST web services. REST API is also a standard way how the frontend UI communicates with the server. Read more about this add-on in the official documentation.
In order to use REST API functionality in your project, install the add-on by using the CUBA Add-Ons Studio window.
Studio provides the following support for the REST API functionality:
-
Automatically generating required application properties.
-
Creating and displaying configuration files in the CUBA project tree.
-
Assisting with registering service methods to be exposed via REST API.
- Client credentials
When Studio adds the REST API add-on to the project, it automatically generates unique values for the cuba.rest.client.id and cuba.rest.client.secret application properties and puts them to the web-app.properties file. These properties define credentials used by the REST API client to authenticate itself (client application, not the CUBA user) to the server. Note that it is recommended to change both of these values in the production environment.
- Project tree section
Once you have added the REST API add-on to the project, CUBA project tree starts to display an additional REST API section:

The following configuration files are displayed in this section:
-
rest-queries.xml- contains predefined JPQL queries. -
rest-services.xml- contains list of service methods that are exposed externally and can be invoked via the API.
If mentioned files don’t exist yet, you can create them by right-clicking the REST API project tree section and using the Create REST Queries Configuration and Create REST Services Configuration context menu items:
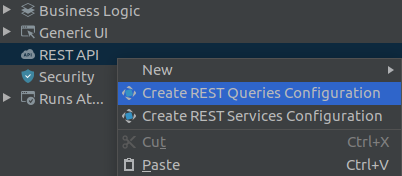
Created configuration files are automatically registered in the web-app.properties application properties file. After that content of these files can be modified manually.
- Exposing middleware service methods
To be able to call middleware service methods via REST API, you need to register them in the rest-services.xml configuration file.
To quickly register required service method in the configuration, use the intention action provided by the Studio:
-
Open service interface class and move cursor to the required method.
-
Press Alt+Enter (Option+Enter) to see the list of available intention actions.
-
Choose the Register rest method action in the popup.
-
The signature of the selected method will be put to the
rest-services.xml, and you will be able to navigate from the service interface to the XML by using appearing "arrow" line marker on the gutter:
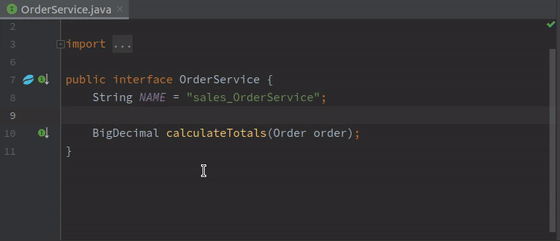
5.7. Security
Starting from 7.2.0 version, CUBA allows developers to define roles and access groups at design time, in addition to roles and groups created at run-time in the running application. At the moment Studio provides support for design-time role definitions.
Studio displays classes that define design-time roles in the CUBA project tree, under Security section:
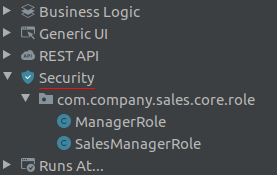
5.7.1. Creating Role Definitions
You can create new design-time role definitions by right-clicking the Security section and choosing the New → Role context menu action. The New Role dialog appears:
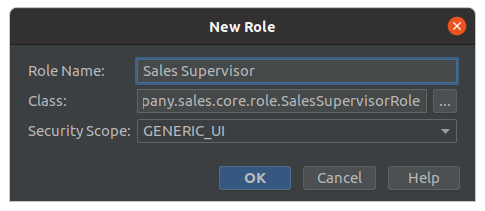
-
Role Name - enter the name of the role. It is a technical name that can be used later in the code.
-
Class - enter the name of the class defining the role. It will be filled automatically after you enter role name.
-
Security Scope - choose which type of the client role permissions should be applied to:
-
GENERIC_UI - permissions are applied to the Generic User Interface.
-
REST - permissions are applied to the REST API client.
-
After clicking OK the role definition class will be created. You can specify role permissions manually in the source code by using rules explained in the corresponding section of the Developer’s Manual. Users with active CUBA Studio subscription can construct role definition by using a visual designer.
5.7.2. Using Role Designer
The code editor for the define-time role definitions is integrated with the Role Designer. Role Designer provides UI controls that allow you to visually configure role settings and all necessary permissions. You can edit the source code directly or use Designer’s controls to generate the code for you.
The Role Designer represents a tab sheet with tab switch control located at the bottom of the code editor. The following tabs are available:
-
Text - displays and provides editing of the Java/Kotlin source code.
-
Definition - defines basic role attributes.
-
Screens - defines permissions for menu items and screens.
-
Entities - defines CRUD permissions for entities and entity attributes.
-
Specific - defines role specific permissions and provides editing of the project’s specific permission configuration.
|
Tip
|
Role Designer is available only for users with active CUBA Studio subscription. |
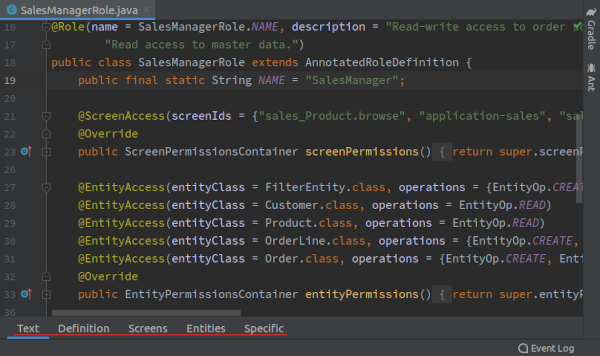
5.7.2.1. Definition Tab
The Definition tab provides editing of basic role attributes.
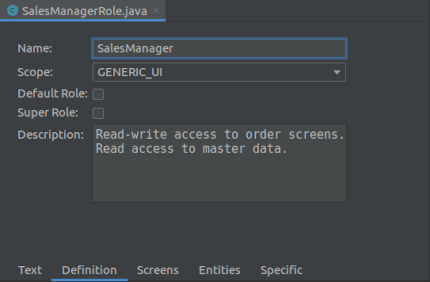
-
Name - enter the unique name of the role. It is a technical name that can be used later in the code.
-
Scope - choose which type of the client role permissions should be applied to:
-
GENERIC_UI - permissions are applied to the Generic User Interface.
-
REST - permissions are applied to the REST API client.
-
-
Default Role - the role is assigned to new users automatically. This flag allows you to grant a certain set of permissions to each new user by default.
-
Super Role - users having this role become super users with all permissions granted.
-
Description - free text description of the role, it will be shown in the Role Browser and Editor screens of the running application.
|
Warning
|
Note that role name identifies design-time roles in the database, therefore it should not be changed after the role has been assigned to any users (or a database migration will be required). |
5.7.2.2. Screens Tab
The Screens tab of the role designer provides editing of the permissions for the following application elements:
-
Menus and items in the main menu.
-
Other screens (not directly available through the main menu).
-
UI components inside of the screens.
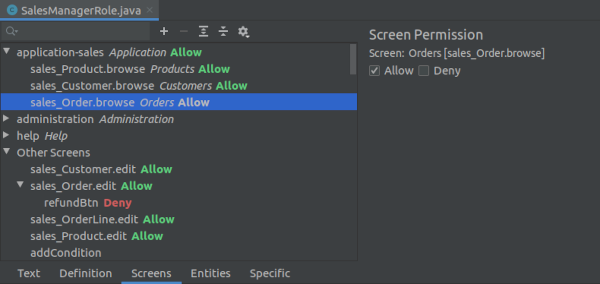
The tree on the left displays the structure of the main menu, both project-defined screens and inherited screens from platform and add-ons. The Other Screens group in the tree displays all remaining application screens that are not directly available through the main menu. Screen list can be filtered by name with help of search text box located above of the tree. If any component permissions were defined for a screen, they are displayed as sub-nodes of the screen node.
All menu items and screens are denied by default. By choosing the item on the left and clicking Allow on the right side of the panel you will add the permission to the role to open the corresponding menu item or screen.
A toolbar is displayed above the screens tree. It contains the following actions:
-
Add Component Permission (+) - create permission for a component in the selected screen.
-
Delete Component Permission (-) - delete previously defined component permission.
-
Expand All, Collapse All - expand or collapse tree nodes.
-
Settings → Show Assigned Only - toggle displaying screens and menu items that don’t have permissions specified.
- Component Permissions
Component permissions allow you to hide or make read-only particular UI components of a screen, regardless of whether they are bound to entities or not. By default components are fully available to the user. In order to define a component permission, select node related to the screen where this component is located and press + (Add Component Permission) button. The Create Component Permission dialog will appear:
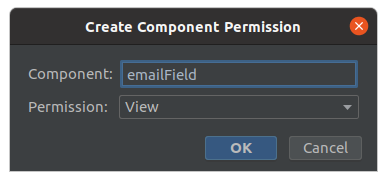
-
Component - enter component ID. This field provides auto-completion, you can press Ctrl+Enter to see list of the possible options.
-
Permission - specify permission level for the component:
-
Modify - component is visible and editable.
-
Deny - component is hidden.
-
View - component is visible but not editable (applicable e.g. to form fields).
-
After clicking OK the permission will be created and added to the tree as a sub-node of the containing screen.
5.7.2.3. Entities Tab
The Entities tab of the role designer provides editing of the permissions for entities and entity attributes.
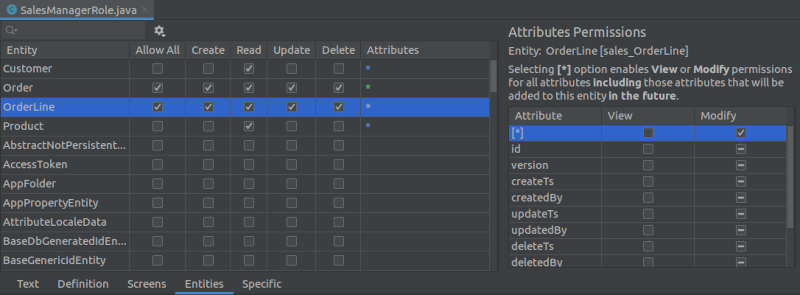
The table on the left side of the panel displays entities defined in the project as well as entities inherited from platform and add-ons. Entity list can be filtered by name with help of search text box located above of the table.
A toolbar is displayed above the entities table. It contains the following actions:
-
Show Inherited from Platform and Add-Ons - toggle to hide or display inherited entities.
-
Show Assigned Only - toggle to show or hide all entities, including those which don’t have permissions defined.
All entity operations are denied by default. Using check boxes in the table you can allow particular operations (Create, Read, Update and Delete) for the selected entity.
The table on the right displays attribute permissions for the selected entity. All entity attributes are denied to view and modify by default. By clicking View and Modify checkboxes you can set desired access level for the selected attribute.
The wildcard  option in the attributes table allows you to mark all attributes as available for View or Modify, including those attributes that will be added to the selected entity in the future. Note that you can combine in one entity wildcard Modify for most attributes with View permission as an exception for a few selected attributes.
|
Warning
|
Wildcard attribute permissions option is convenient, but you should use it with care. By using it you are assuming that you will never in the future add a new privileged attribute to the selected entity that shouldn’t be visible or editable by the current role. |
The Allow All checkbox in the entities table permits all CRUD operations and allows Modify for all attributes, making the selected entity fully accessible for the current role.
5.7.2.4. Specific Tab
The Specific tab of the role designer provides the following capabilities:
-
Granting specific permissions to the currently edited role.
-
Editing the project’s configuration of the specific permissions and categories.
Specific permissions are permissions on arbitrary named functionality, not necessarily linked to screens or entity CRUD. Categories are used to hierarchically group several semantically related permissions together. Learn more about using specific permissions in the developer’s manual: specific permissions, permissions.xml.
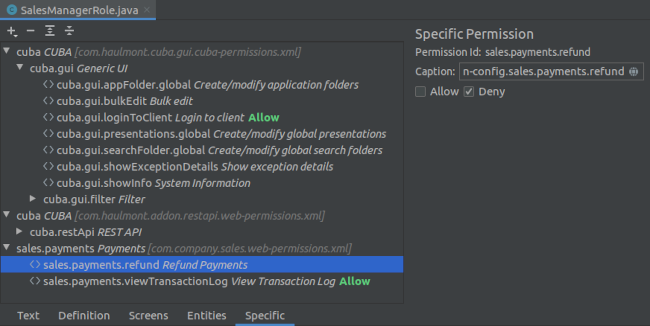
The tree on the left side of the panel displays specific permissions and categories defined in the project or inherited from platform and add-ons. You can search permissions by name by focusing the tree and typing search text.
Right side of the panel contains the following controls:
-
Permission Id - unique identifier of the permission.
-
Caption - localized caption of the permission. Can be edited for permissions and categories defined in the project.
-
Allow and Deny - grant or revoke permission for the current role.
All specific permissions are denied by default.
The toolbar above the table contains the following controls:
-
New → Permission - allows you to declare a new project-defined specific permission.
-
New → Category - allows you to declare a new project-defined category.
-
Delete - deletes selected project-defined category or permission.
-
Expand All, Collapse All - expands or collapses permission tree items.
- Defining new specific permissions
In order to define new specific permission in your project, first you should create an enclosing category. Use the + → Category action on the toolbar. The Create Specific Category dialog appears:
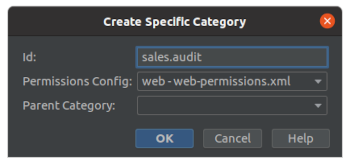
-
Id - unique identifier of the category. It’s recommended to use compound identifiers for nested categories, e.g.
sales→sales.audit→sales.audit.bills. -
Permissions Config - configuration file where category will be defined.
-
Parent Category - parent category or empty if no parent.
After clicking OK new category will be added to the tree. Select the new category and define localized caption by using the Caption field on the right side of the panel.
To create new permission, use the + → Permission button on the toolbar. The Create Specific Permission dialog appears:
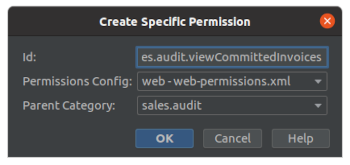
-
Id - unique identifier of the permission. This is the identifier that will be used in your code to check the permission.
After clicking OK the new permission will be added to the tree. Select the permission and define localized caption by using the Caption field on the right side of the panel.
Project-defined categories and permissions are registered in the web-permissions.xml configuration file. You can jump to source code by right-clicking the permission item in the tree and choosing the Jump to Source item:

6. Integration with the IntelliJ IDEA Ultimate Edition
The IntelliJ IDEA Ultimate Edition is a commercial IDE containing many additional features useful for CUBA application development: support for CSS and JavaScript, JPA, Spring, Docker, Database access and so on.
Studio can be installed like a regular plugin into the IDEA Ultimate Edition. It integrates with some of the Ultimate IDEA features improving development experience.
6.1. Turning off Conflicting Features
Some Studio features may conflict with those of IntelliJ Ultimate Edition or some third-party plugins.
For example, to avoid conflicts of gutter icons provided by the CUBA Studio with ones shown by the Ultimate IDEA Spring plugin, do the following:
-
Open Main menu > Settings > Editor > General > Gutter Icons,
-
Uncheck Injection points and Producers for Disposer methods options,
-
Apply the changes.
6.2. Enabling the JPA Support
The JPA (Java Persistence Annotation) support is provided by the Java EE: EJB, JPA, Servlets plugin.
|
Warning
|
The functionality described below is not available in the standalone CUBA Studio or IntelliJ IDEA Community Edition. |
The JPA support provides the following features useful for CUBA application development:
-
JPQL highlighting, auto completion and inspections,
-
JPA Console (for projects based on CUBA 7.1 or later),
-
Code inspections in the entities source code,
-
ER diagram,
-
Other features described at the JetBrains site.
To make use of these features you need to setup two things in your project:
-
Setup a Data Source for the main data store
-
Add JPA facets to all project modules
Studio helps to perform these tasks quicker. Instructions below are actual for the IDEA 2019.2 version.
6.2.1. Setup Data Source
You can setup the Data Source manually through the Database tool window located on the right side of the IDE. Studio also provides data source detection when the project is opened:
In case if you’ve missed the notification, it is also recorded in the Event Log tool window which can be opened by clicking the appropriate button in the right corner of the screen.
Press Configure to open the pre-filled Data Sources and Drivers dialog.
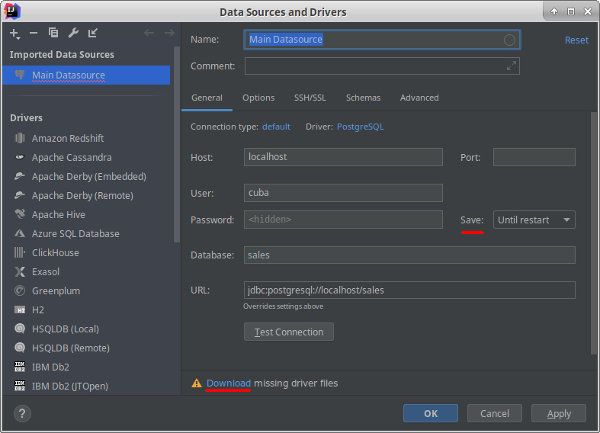
The Data Source detection mechanism automatically discovers parameters based on main data store settings and fills Driver and other connection properties. However you need to configure the database driver in the "Data Sources and Drivers" dialog:
-
Press the Download missing driver files link in the bottom of the dialog. Driver files will be downloaded automatically.
-
Press Test Connection to ensure that connection properties were discovered correctly. Change properties if necessary.
-
Set value of the Save field to Forever. Otherwise the password will be forgotten after IDE restart.
-
Close the dialog by pressing OK button.
If JPA facets are already created, assign the new Data Source to them by opening Persistence tool window. Make a right click on every facet → Assign Data Sources… → change Data Source → OK.
6.2.2. Setup JPA facets
Every module in the project should have a JPA facet, otherwise features related to the JPQL language will not be available in that module.
- JPA facet auto-detection
-
Studio helps you with facet auto-detection. When opening a new project for the first time, you will see the Frameworks Detected notification in the right corner of the IDE:
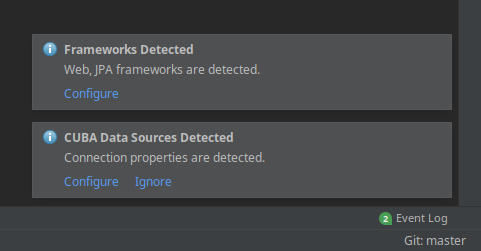
If JPA facets were already set up in your project, the notification won’t appear. To get the notification, you can go to the Main Menu → File → Project Structure dialog and remove existing facets. Then reopen the project and perform a Gradle project refresh (Gradle tool window → Reimport All Gradle Projects button).
In case if you’ve missed the notification, it is also recorded in the Event Log tool window which can be opened by clicking the appropriate button in the right corner of the screen:
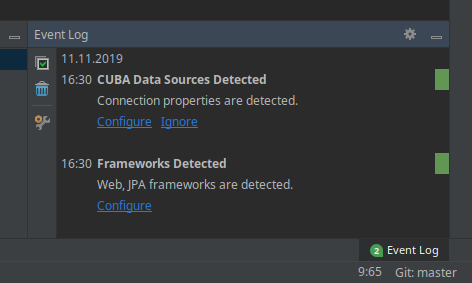
Click the Configure link, and the Setup Framework dialog appears.
Untick items in the Web group and press OK:

To check the facet configuration, open the Persistence Tool Window located on the left side of the IDE window. Then expand one of nodes, e.g. one that corresponds to the app-global module, and expand the Entities sub-node. You should see the list of entities defined in your project or inherited from application components:
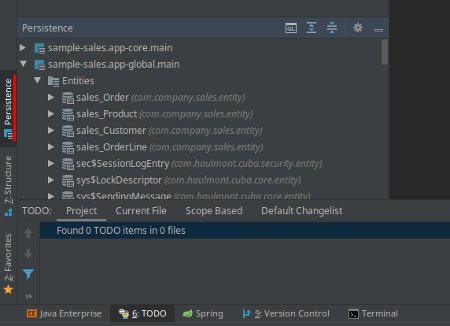
- Manual JPA facet setup
-
You can also setup or tweak JPA facets manually through the File → Project Structure dialog.
-
Open the Project Structure dialog,
-
Select Facets in the left menu,
-
Remove all existing JPA facets,
-
For all modules in your project: global, core, gui, web, portal - do the following actions:
-
Press "+" (Add) icon,
-
Choose JPA facet type,
-
Choose the sub-module ending with "main", e.g. "sample-sales.app-global.main". Press OK.
-
In the bottom right of the dialog change Default JPA Provider to CUBA EclipseLink.
-
Repeat these steps for other modules.
TipDon’t forget to set Default JPA Provider field to CUBA EclipseLink in the bottom, otherwise JPA Console won’t work.
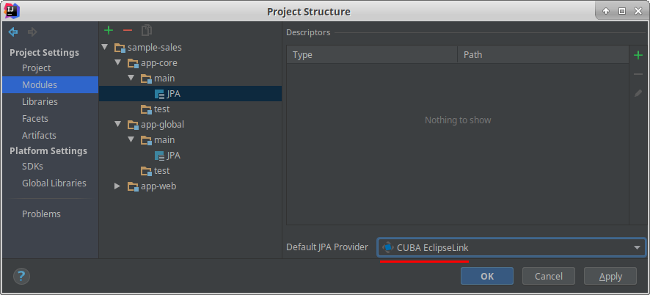
-
6.2.3. Feature Examples
JPQL syntax highlighting, auto completion and inspections work automatically in Java and XML files for modules where JPA facet is configured:
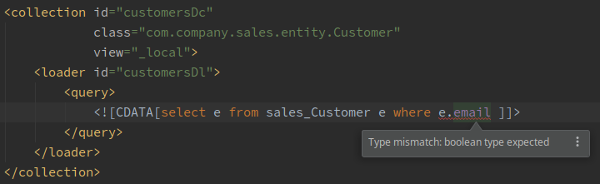

The ER diagram can be opened from the Persistence tool window: right click any module → Entities → ER Diagram. You may want to deselect the Superclasses option on the top to disable displaying common base classes:
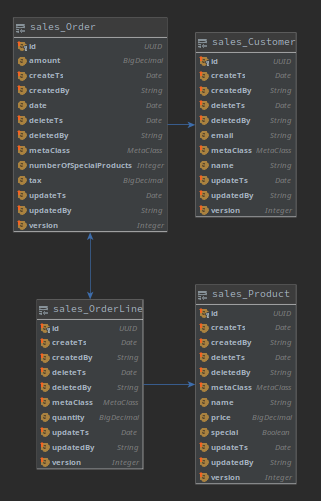
- JPA Console
|
Tip
|
Note that JPA Console is available only for projects based on CUBA 7.1 or later. |
JPA Console can be opened from the Persistence tool window: expand any module → choose Entities and then press the Console button:

Console window will open. Now you are able to invoke JPQL queries on your development database: