Preface
This document serves as a guide for using the full-text search (FTS) add-on of the CUBA platform.
Target Audience
This manual is intended for developers building CUBA applications with full-text search support. It is assumed that the reader is familiar with the Developer’s Manual.
Additional Materials
This guide, as well as any other CUBA platform documentation, is available at https://www.cuba-platform.com/documentation.
CUBA full-text search add-on is based on the Apache Lucene framework, therefore familiarity with the framework will be beneficial. See http://lucene.apache.org/core.
Feedback
If you have any suggestions for improving this manual, feel free to report issues in the source repository on GitHub. If you see a spelling or wording mistake, a bug or inconsistency, don’t hesitate to fork the repo and fix it. Thank you!
1. FTS Add-on Overview
Full-text search (FTS) capabilities of the CUBA platform provide unstructured search within the values of entity attributes and content of uploaded files.
A distinctive aspect of full-text search implementation in CUBA is its focus on business applications with complex data models. Particularly, search results include not only the entities that directly contain the search string but also the related entities which use this attribute when being displayed. For example, if an Order entity contains a link to a Customer and the search string contains the name of the customer, then search results will include both the Customer and the related Order. This behavior is logical for a user who typically sees the name of the customer in the order editing screen.
Search results are filtered according to the limitations applied by the framework’s security subsystem. I.e. if the current user’s access group does not allow access to certain entity instances, such instances will not appear in search results.
Full-text search add-on contains two mutually related mechanisms: indexing and search.
1.1. Indexing
If the FTS add-on is added to the application, and the fts.enabled property is enabled, then each time when an indexable entity is being saved to the database its identifier gets added to the indexing queue – SYS_FTS_QUEUE table.
To have the indexing process running automatically in the background, the scheduled task needs to be created and activated. Then separate asynchronous process periodically extracts identifiers of changed entities from the queue, loads entity instances and indexes them. Indexing is performed using the Apache Lucene library. Lucene document contains the following fields:
-
Entity name and instance identifier.
-
all– concatenation of the entity attributes being indexed, which includes only local andFileDescriptortype attributes. If the attribute hasFileDescriptortype, the system will index the content of the corresponding file. Local attributes may have the following types: string, number, date, enumeration. -
links– concatenation of entities identifiers contained in indexed attributes having a reference type.
Indexed attributes are the attributes of the entity and related entities (if any), which are declared in the FTS descriptor.
Index is stored in the file system; by default, it is located in the ftsindex subfolder of the application work folder (defined by the cuba.dataDir property); for a standard deployment, this folder is tomcat/work/app-core/ftsindex. Index location can be changed using the fts.indexDir property.
1.2. Searching
Search is performed according to the following rules:
-
If the search term is included in quotation marks, the system searches for the corresponding phrase – the same set of words in the same order ignoring the punctuation.
-
If the search term begins with "*", the system searches for the term as a substring in any part of a word in indexed data.
-
Otherwise, search is performed by matching the search term with the beginnings of the words in indexed data.
For Russian and English languages search accounts for word forms.
Search algorithm contains two stages:
-
First, the search term is looked for in the
allfield of Lucene documents. All found entities are added to the results list. -
If the first stage produces results, the identifiers of found entities are then searched in the
linksfield of Lucene documents. All entities found at the second stage are also added to the list of search results.
|
Warning
|
If the search string contains several words (not enclosed in quotation marks) the system will search each word separately using OR condition. I.e. search results will include the entities containing at least one of the entered words. |
1.3. Indexing and Searching Example
Let us consider the simple case of linked Order and Customer entities mentioned above.
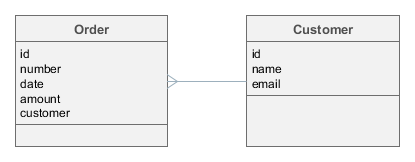
In this case, if all object attributes are indexed, indexing of two related instances of Order and Customer will create two Lucene documents with approximately the following content:
id: Order.id = "b671dbfc-c431-4586-adcc-fe8b84ca9617"
all: Order.number + Order.date + Order.amount = "001^2013-11-14^1000"
links: Customer.id = "f18e32bb-32c7-477a-980f-06e9cc4e7f40"
id: Customer.id = "f18e32bb-32c7-477a-980f-06e9cc4e7f40"
all: Customer.name + Customer.email = "John Doe^john.doe@mail.com"Let’s assume our search string is "john":
-
First, the search is performed in
allfields of both documents. The system will find theCustomerentity and will include it in search results. -
Then, the system will search for the identifier of the previously found customer in the
linksfields of all documents. The system will find theOrderand will add it to search results as well.
2. Installation
To install the add-on in your project follow the instruction below.
-
Double-click Add-ons in the CUBA project tree.

-
Select Marketplace tab and find Full Text Search add-on.
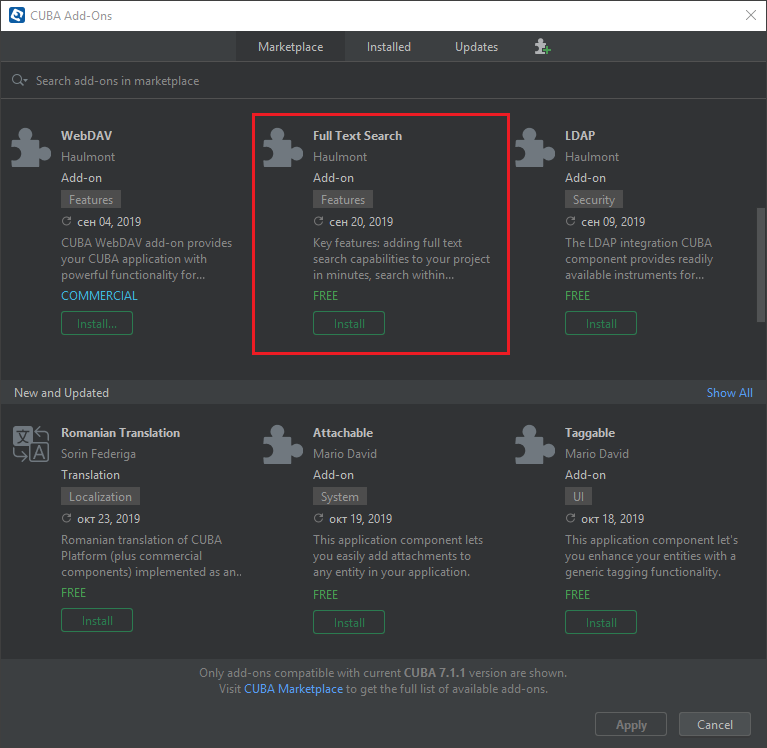
-
Click Install button and then Apply & Close.
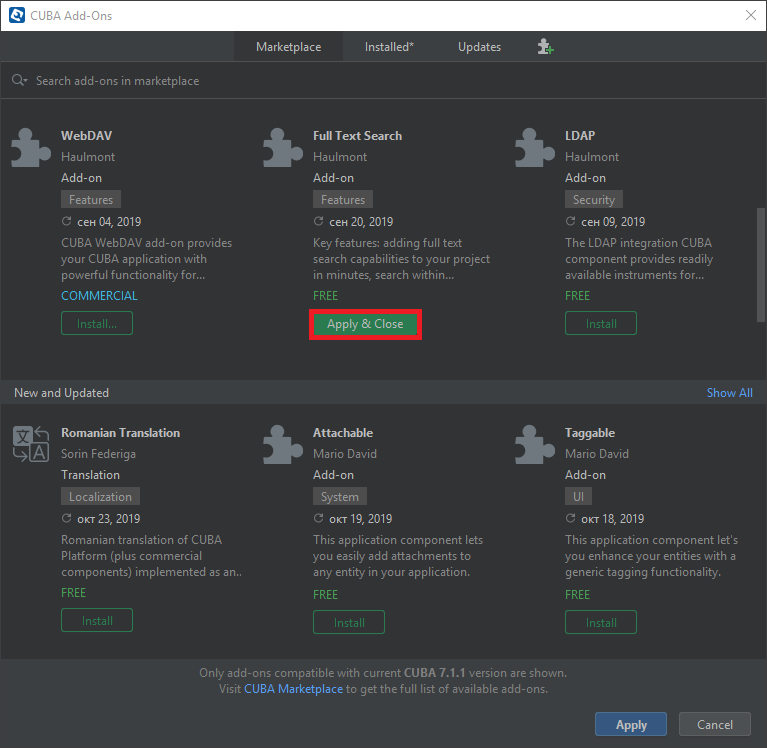
-
Click Continue in the dialog.

The add-on corresponding to the used platform version will be installed.
3. Quick Start
This chapter describes the example of using the full-text search add-on in the Library sample application, which source code is available at GitHub.
We will split the task into the following stages:
-
Enable search functionality for the project, configure the indexing process and verify that it works.
-
Adjust the FTS configuration file to include entities from the sample Library data model.
-
Use the
BookPublicationentity and the functionality of file upload described in the File Storage section of the Developer’s Manual to illustrate search function for the loaded files.
3.1. Project Setup
-
Download and unzip the source repository of the library application, or clone it using git:
git clone https://github.com/cuba-platform/sample-library-cuba7
-
Open the Library project as described in the Opening an Existing Project section of the CUBA Studio User Guide.
-
Add the Full Text Search add-on to your project via CUBA Add-Ons window as described in the Installation section.
-
Create the database on the local HyperSQL server: click CUBA → Create database main menu item.
-
Run the application: click the
 button next to the selected
 CUBA Applicationconfiguration in the main toolbar. The link in the Runs at… section of the CUBA project tree will help to open the application in a web browser directly from Studio. -
Open the library application.
The username and password are
admin/admin. -
To enable full-text search functionality, open Administration → Application properties in the application main menu, find and open the
ftslist of properties in the table. Open the fts.enabled property using double-click and select true in the Current value field. Figure 2. fts.enabled property
Once the steps above are completed, full-text search functionality will be added to the application and ready to work. If you log out of the system and then log in again, a search field will appear in the top right panel of the main application window. Full-text search can also be used in the Filter UI component.
However, search will not produce any results because the data has not been indexed yet.
To start one-off indexing of the current state of the database (i.e. the entities listed in the FTS configuration file by default), open the Administration → JMX Console, find the app-core.fts:type=FtsManager JMX bean and consequently invoke reindexAll() first and then processQueue().
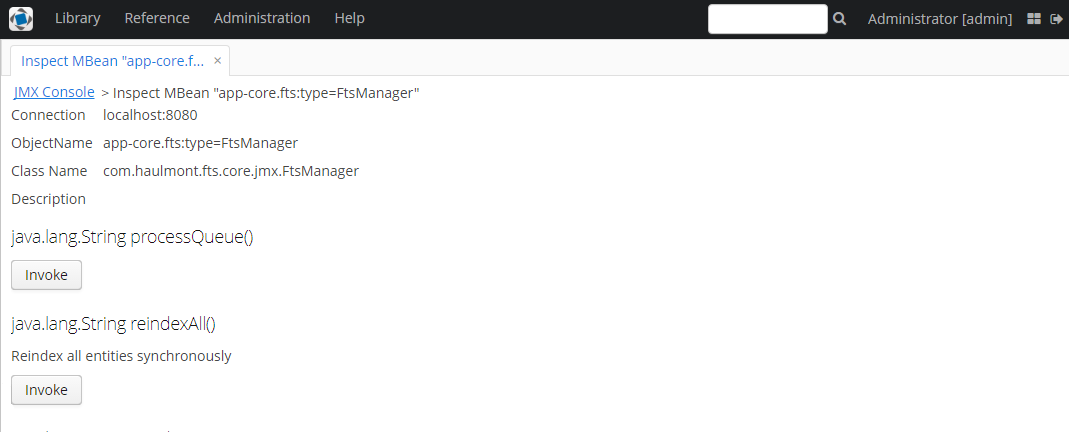
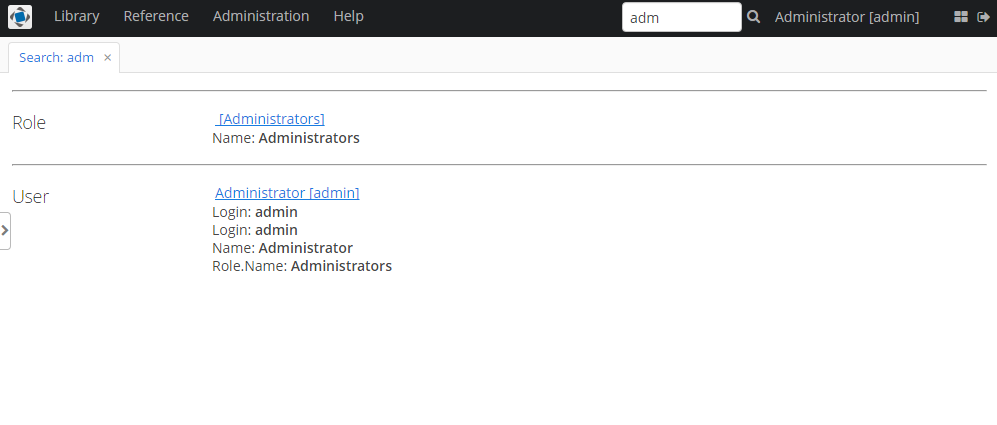
After this, searching the "adm" string should give the following results:
3.2. Configuring Invocation of Indexing Process
You can use the framework’s scheduled tasks mechanism to invoke the indexing process on a scheduled basis.
First, you will need to activate the task starting functionality itself. Add the following property to the app.properties file of the project core module:
cuba.schedulingActive = trueRestart the application server, log into the system as admin, open the JMX Console screen, find and open the app-core.cuba:type=Scheduling JMX bean and make sure that the Active attribute is set to true.
Then open the Administration → Scheduled Tasks screen, click Create and fill in the following attribute values for a new task:
-
Defined by: Bean
-
Bean name: cuba_FtsManager
-
Method name: processQueue()
-
Singleton: true
-
Period, sec: 30
Save the task, select it in the table and click Activate. From now on, the system will start indexing changed entities every 30 seconds.
|
Warning
|
Automatic indexing does not cover the entities created before its start. To put such entities to the indexing queue use |
3.3. Setting up Configuration File
When you add fts base project, the new fts.xml file is created with the following content in the source text directory of the core module:
<fts-config>
    <entities>

        <entity class="com.sample.library.entity.Author">
            <include re=".*"/>
        </entity>

        <entity class="com.sample.library.entity.Book">
            <include re=".*"/>
        </entity>

        <entity class="com.sample.library.entity.BookInstance">
            <include re=".*"/>
        </entity>

        <entity class="com.sample.library.entity.BookPublication">
            <include re=".*"/>
        </entity>

        <entity class="com.sample.library.entity.LibraryDepartment">
            <include re=".*"/>
        </entity>

        <entity class="com.sample.library.entity.LiteratureType">
            <include re=".*"/>
        </entity>

        <entity class="com.sample.library.entity.Publisher">
            <include re=".*"/>
        </entity>

        <entity class="com.sample.library.entity.Town">
            <include re=".*"/>
        </entity>

    </entities>
</fts-config>
This is the FTS configuration file, which in our case enables indexing of all domain model entities with all their attributes.
The following property is automatically added to the app.properties file of the application core module:
cuba.ftsConfig = +com/sample/library/fts.xmlAs a result, indexing will include both the entities defined in the framework’s com/haulmont/fts/fts.xml and the project’s fts.xml files.
Restart the application server. From now on, full-text search should work for all entities of the application model as well as entities of the framework security subsystem: Role, Group, User.
3.4. Uploaded Files Content Search
Now we need to provide the possibility of file upload for each book publication and to add uploaded files to the BookPublication browse screen.
Let us customize BookPublication entity. Firstly we add a new file attribute which is a many-to-one ASSOCIATION to FileDescriptor entity. FileDescriptor is the descriptor of the uploaded file (not to be confused with java.io.FileDescriptor) that enables referencing the file from the data model objects.
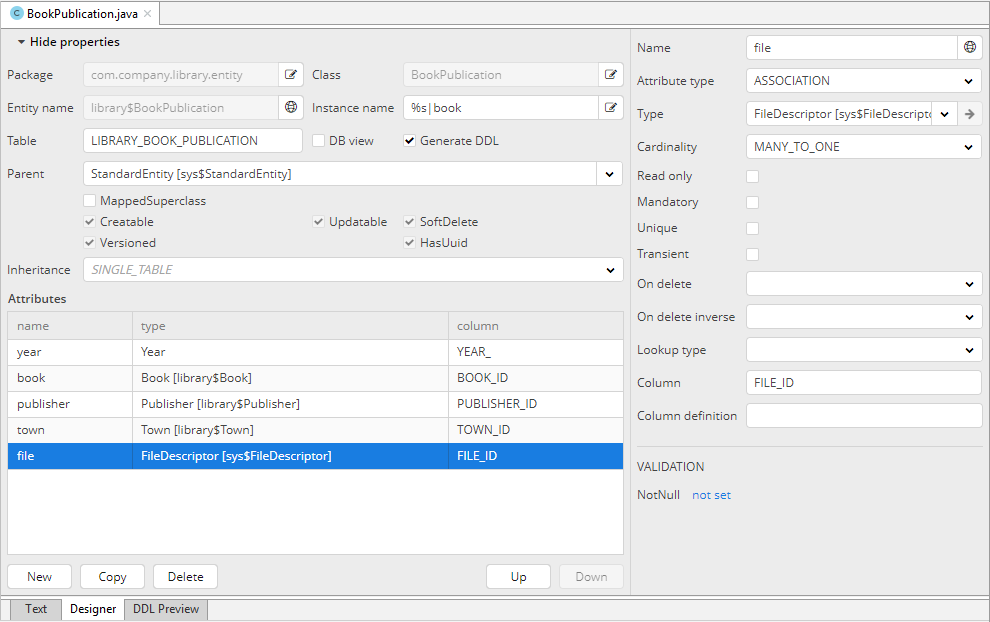
Save the changes and append the new attribute to the existing bookPublication.full view. Then, add the File attribute to the BookPublication browse and edit screens. To do this, put the cursor to the line containing the attribute and press Alt+Enter. Select Add entity attribute to screens and in the appeared dialog select screens that you want the new attribute to be added.
Generate new DB scripts, update the database and restart the application server. If DB is recreated, full-text search becomes disabled by default. Check the Value checkbox again in JMX Console, reindex all files, process indexing queue, log out and log in back.
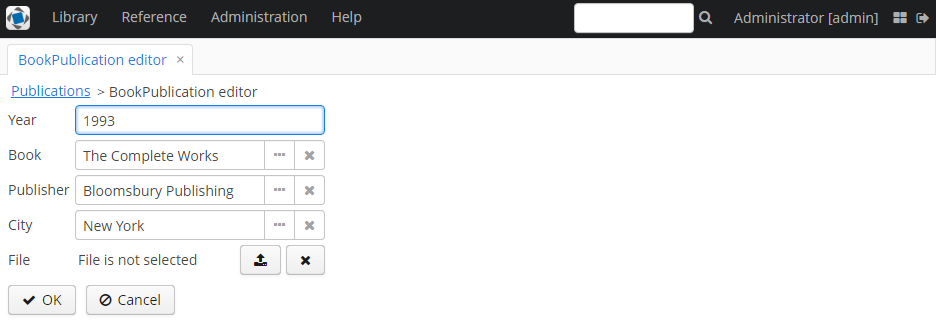
As far as we have added the new attribute, the table of publications on BookPublication browser screen now contains one more column: File. To fill it in, open any line for editing, upload a text file using the new upload field and click OK. By default, CUBA supports RTF, TXT, DOC, DOCX, XLS, XSLX, ODT, ODS, and PDF file formats.
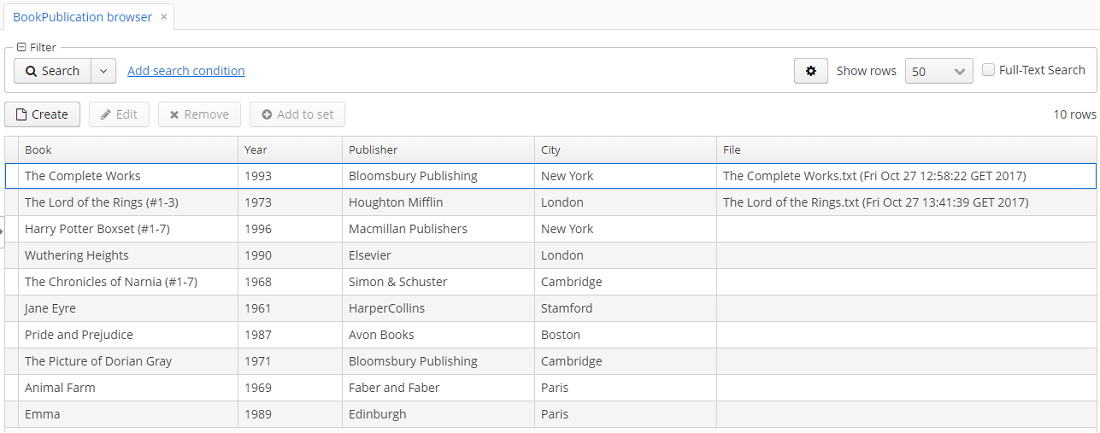
New files appeared in the table. The appearance of the new column can be adjusted.
Open the JMX Console screen, open the app-core.fts:type=FtsManager JMX bean and invoke sequentially reindexAll() and processQueue() to re-index the existing instances in the database and files according to the new search configuration. All new and changed data will be indexed automatically with a delay depending on the scheduled task interval, i.e. not longer than 30 seconds.
As a result, Full-text search will now output all the entries including external files contents.
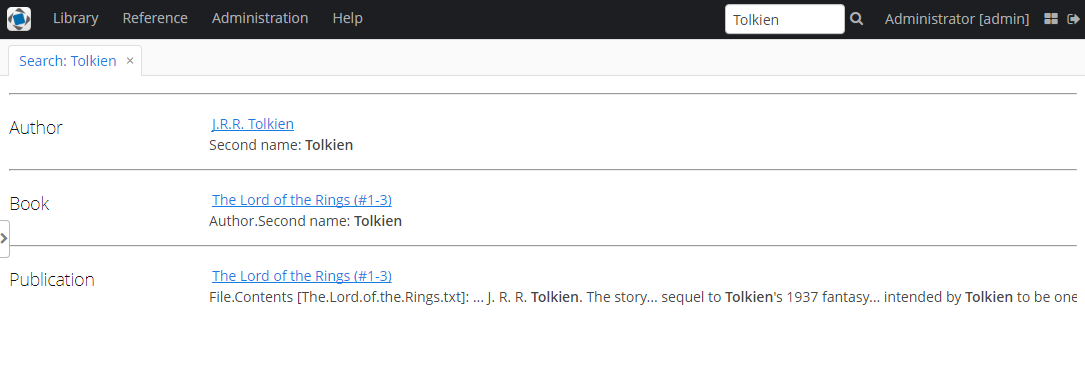
You can find more information on FileStorageAPI and FileDescriptor in corresponding chapters of the main manual.
3.5. Running and configuring entities reindexing
If full-text search was added to the project when some data is already added to the database, then this data should be indexed. You can add entities to the indexing queue with methods of app-core.fts:type=FtsManager JMX-bean. A convenient way to invoke JMX-bean method is JMX Console screen of Administration menu.
JMX-bean app-core.fts:type=FtsManager provides two methods for adding entities to the indexing queue:
-
reindexAll()– synchronously adds entities described in FTS config to the indexing queue. In case of large amounts of data this process can take a lot of time, so using theasyncReindexAll()is recommended. -
asyncReindexAll()– entities are added to the indexing queue asynchronously in batches with theFtsManager.reindexNextBatch()method. The batch size is defined by the fts.reindexBatchSize configuration parameter.FtsManager.reindexNextBatch()method should be invoked by the scheduled tasks mechanism or by Spring scheduler. Indexing is not performed until indexing queue building is completed.
Appendix A: FTS Configuration File
The full-text search configuration file is an XML file, which is usually located in the src directory of the core module and contains the description of indexed entities and their attributes.
The file is specified in the cuba.ftsConfig application property.
The file has the following structure:
fts-config – root element.
fts-config elements:
-
entities– a list of entities to be indexed and searched.entitieselements:-
entity – indexed entity description.
entityattributes:-
class– entity Java class. -
show– defines whether this entity should appear in the search results. Thefalsevalue is used for connecting entities which are not of interest to the user, but are required, for example, to link uploaded files and entities of the domain model. Default istrue.
entityelements:-
include– determines whether to include a single or multiple entity attributes in the index.includeattributes:-
re– regular expression to select attributes by name. -
name– attribute name. It can be a reference attributes path (divided by period). The type is not checked. However, if the name is defined by a path, then two options are possible.-
The final attribute must be a non-embeddable entity. Including non-entity type attribute does not make sense here, as it must be indexed within its owning entity.
-
The final attribute must be a non-entity field of the embedded entity. For example, if the indexed entity has an
addressfield of theAddresstype (embeddable entity) then the attribute name should beaddress.cityoraddress.street, but not theaddress.
-
-
-
-
-
exclude– excludes attributes previously included byincludeelement. Possible attributes are the same as ininclude. -
searchables– a Groovy script to add arbitrary entities associated with the changed one to the indexing queue.For example, when a
CardAttachmentinstance is either added or removed, the associatedCardinstance should also be re-indexed. The reason is that theCardinstance itself will not be added to the queue, as it has not been changed (it stores a collection ofCardAttachmentinstances). Thus it will not be shown in search results if matching data is found in its linked entity – a newly addedCardAttachment.The following objects are passed into the script at invocation:
-
searchables– the list of entities that should be appended. -
entity– the current entity instance, which is being added to the queue automatically.
Script example:
<entity class="com.haulmont.workflow.core.entity.CardAttachment" show="false"> ... <searchables> searchables.add(entity.card) </searchables> </entity> -
-
searchableIf– a Groovy script to exclude certain instances of the indexed entity from the queue.For example, you may not want to index old versions of documents.
When running the script, the
entityvariable – the current entity instance – is passed into it. The script should return a boolean value:trueif the current instance should be indexed, andfalseotherwise.Script example:
<entity class="com.haulmont.docflow.core.entity.Contract">
    ...
    <searchableIf>
        entity.versionOf == null
    </searchableIf>
</entity>
FTS configuration file example:
<fts-config>
    <entities>

        <entity class="com.sample.library.entity.Author">
            <include re=".*"/>
        </entity>

        <entity class="com.sample.library.entity.Book">
            <include re=".*"/>
        </entity>

        <entity class="com.sample.library.entity.BookInstance">
            <include re=".*"/>
        </entity>

        <entity class="com.sample.library.entity.BookPublication">
            <include re=".*"/>
        </entity>

        <entity class="com.sample.library.entity.Publisher">
            <include re=".*"/>
        </entity>

        <entity class="com.sample.library.entity.EBook">
            <include name="publication.book"/>
            <include name="attachments.file"/>
        </entity>

        <entity class="com.haulmont.workflow.core.entity.CardAttachment" show="false">
            <include re=".*"/>
            <exclude name="card"/>

            <searchables>
                searchables.add(entity.card)
            </searchables>
        </entity>

    </entities>
</fts-config>
Appendix B: Application Properties
This section lists the application properties that are relevant to the full-text search add-on.
- cuba.ftsConfig
-
Additive property defining an FTS configuration file of the project.
The file is loaded using the
Resourcesinterface, so it can be located in classpath or in the configuration directory.Used in the Middleware block.
Example:
cuba.ftsConfig = +com/company/sample/fts.xml
All properties that are described below are runtime parameters stored in the database and available in the application code via the FtsConfig configuration interface.
- fts.enabled
-
The flag enabling the FTS functionality in the project.
Can be changed via the Enabled attribute of the
app-core.fts:type=FtsManagerJMX bean.Default value:
false
- fts.indexDir
-
An absolute path to the directory storing indexed files. If not specified, the
ftsindexsubdirectory of the application work directory (defined by the cuba.dataDir property) is used; in the default deployment configuration, it is tomcat/work/app-core/ftsindex.Default value: unspecified
- fts.indexingBatchSize
-
A number of records extracted from the indexing queue per one invocation of
processQueue().This limitation is relevant to the situation when the indexing queue contains a very large number of records, for example, after executing the
reindexAll()method of theapp-core.fts:type=FtsManagerJMX bean. In this case, indexing is done in batches, which takes more time, but creates a limited and predictable server load.Default value:
300
- fts.reindexBatchSize
-
A number of records put to the indexing queue per one invocation of
reindexNextBatch().Default value:
5000
- fts.maxSearchResults
-
The maximum number of entries in the search result.
Default value:
100