Preface
BProc add-on is used for modeling and running business processes. Processes are described using BPMN 2.0 notation. The add-on uses Flowable as a business process engine and bpmn-js rendering toolkit for process modeling.
This manual mostly describes features added by the add-on, not features provided by underlying frameworks, so you must be familiar with the Flowable engine.
Also, see the video tutorial on the CUBA YouTube channel.
Release Notes
Release 1.2.2
Resolved issues
-
Update dependencies 3307
Release 1.2.1
Resolved issues
Release 1.2.0
Resolved issues
-
BPM-203 Multi-tenancy support
BProc addon can work together with the multi-tenancy addon. If the multi-tenancy addon is added to the project then BProc screens (modeler, user tasks, process definitions, process instances, etc.) will take user’s tenantId into account.
-
BPM-206 "Extension properties" panel for User Task elements
A special panel is added to the User Task element in the modeler. This panel allows you to add any metadata to the User Task element that later can be retrieved using the
com.haulmont.addon.bproc.service.BprocModelService#getElementExtensionPropertiesmethod. -
BPM-284 It’s impossible to add design-time security roles to user groups
-
BPM-315 Support flowable:useLocalScopeForResultVariable flag on the Service Task properties panel
-
BPM-283 Beans without an interface cannot be selected for service task in the modeler
-
BPM-310 Process variable dropdown list in the multi-instance properties panel should support text input
Important Notes
Database schema has been changed. Don’t forget to update the database.
Breaking Changes
UserGroup and ContentStorage entities now implements the TenantEntity interface. This means that if you had the multi-tenancy addon in your project then be prepared that UserGroup and ContentStorage will be managed taking the tenantId attribute into account.
Release 1.1.3
Resolved issue:
Release 1.1.2
Resolved issue:
Release 1.1.1
Resolved issue:
Release 1.1.0
Breaking Changes
-
bproc_ModelerScreenscreen ID has been changed tobproc_BpmnModelerScreen. If you have security roles that grant permissions to this screen, you have to update the roles. -
modelerUI component has been renamed tobpmnModeler. If you have screens with themodelercomponent, you have to change the component name.
BPMN Viewer UI Component
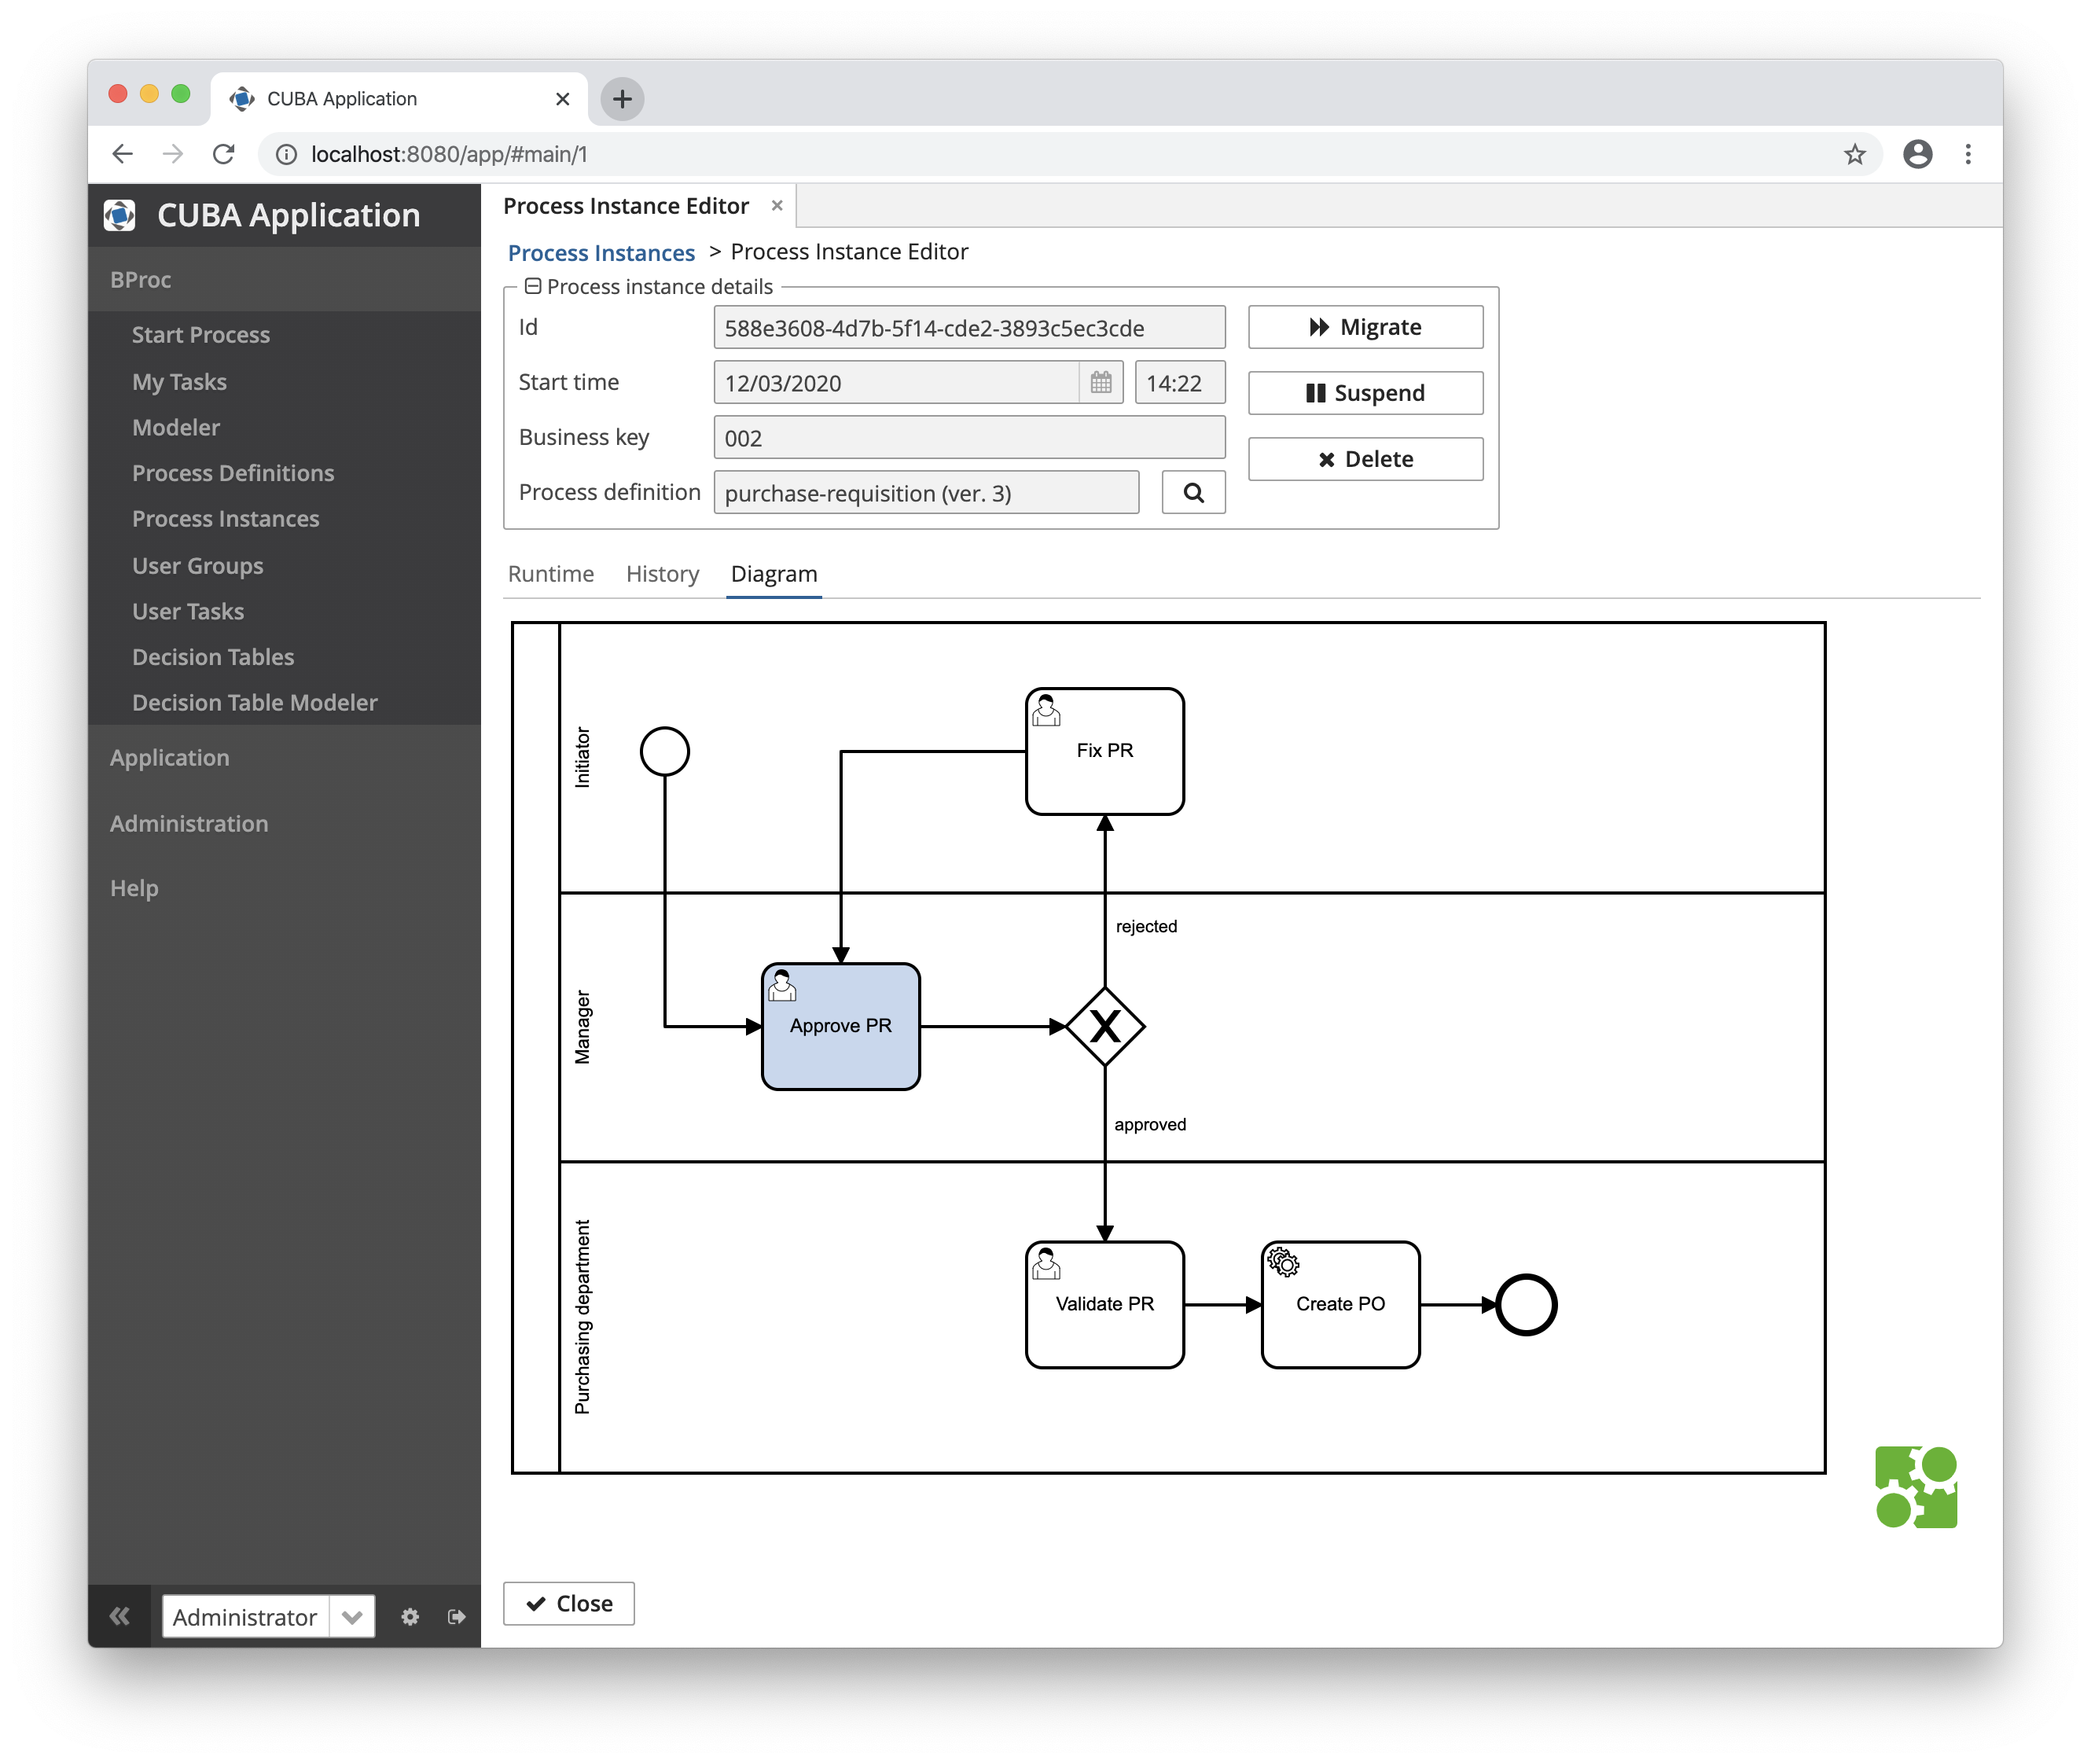
The BPMN Viewer UI component has been introduced. It can be used to display a read-only BPMN process diagram. The component has methods to highlight any model element. An example of its usage can be found in the Process Instance Editor screen. A new tab Diagram displays a process model with the highlighted active node.
Miscellaneous
-
Flowable version was updated to 6.5.0.
-
Two design-time roles were added to BProc:
-
bproc-process-admin - grants access to all BProc screens and entities, including modeler and administration screens.
-
bproc-process-actor - grants access to BProc screens and entities required for starting the process and working with user tasks.
-
1. Installation
1.1. Installation of Trial Version
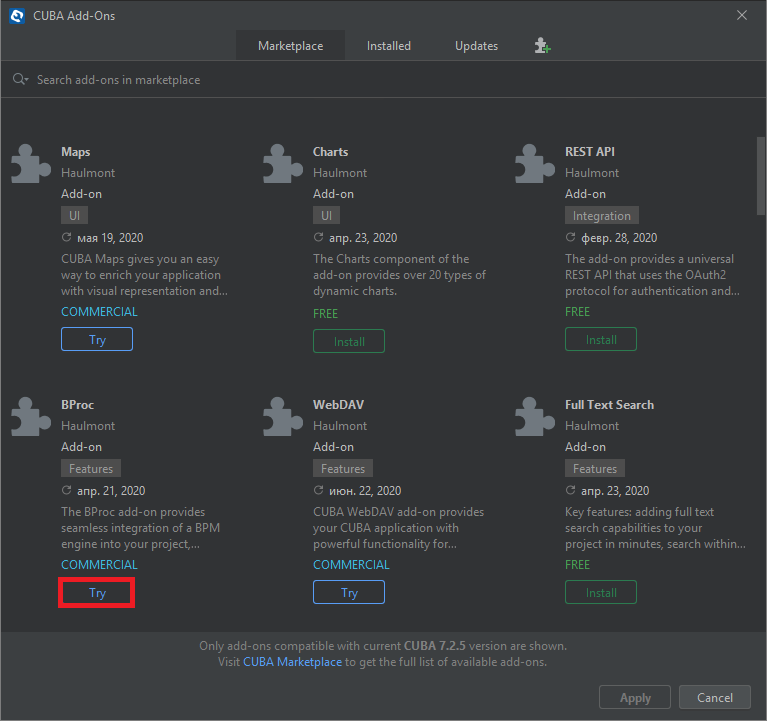
If you do not have a subscription for the add-on, you can install a trial version that is available for 30 days.
-
Launch CUBA Studio. You can download it from the CUBA website. Please ensure that you have Studio version 13.2 or newer.
-
Go to CUBA → Marketplace in the main menu.

-
Find the required add-on and click Try next to it.
-
If you are not signed in CUBA Studio yet, click Sign In in the appeared window.
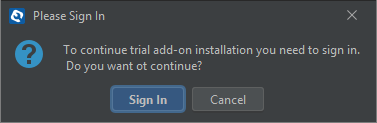
Register or log in on the website. If you were already logged in on the website, proceed to the next step.
-
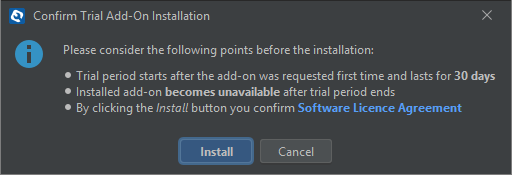
Read the instructions and click Install.
-
Click Apply. A trial version of the add-on will be installed into your application.
When the trial period is expired, CUBA Studio will inform you. Keep being signed in CUBA Studio to not miss the end of the trial period.
|
Please pay attention that you won’t be able to run your application with the expired trial version of the add-on. |
1.2. Installation of Purchased Add-on
If you have a subscription for the add-on follow the steps below. Please ensure you have Studio version 12 or newer installed.
-
Double-click Add-ons in the CUBA project tree.

-
Select Marketplace tab and find BProc add-on.
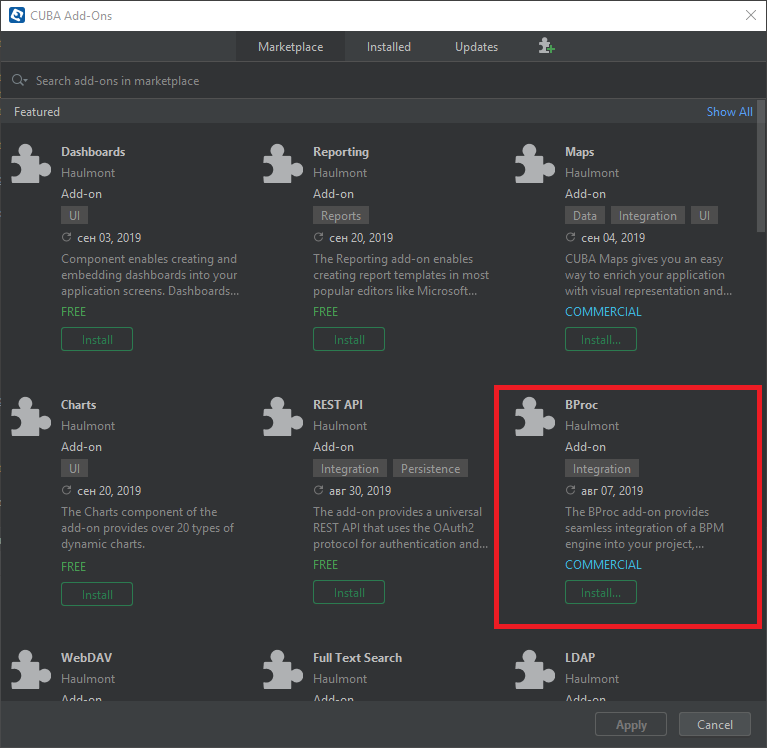
-
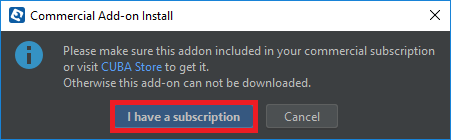
Click Install button and confirm that you have a subscription in the appeared dialog.
-
Click Apply & Close button and then Continue in the dialog.
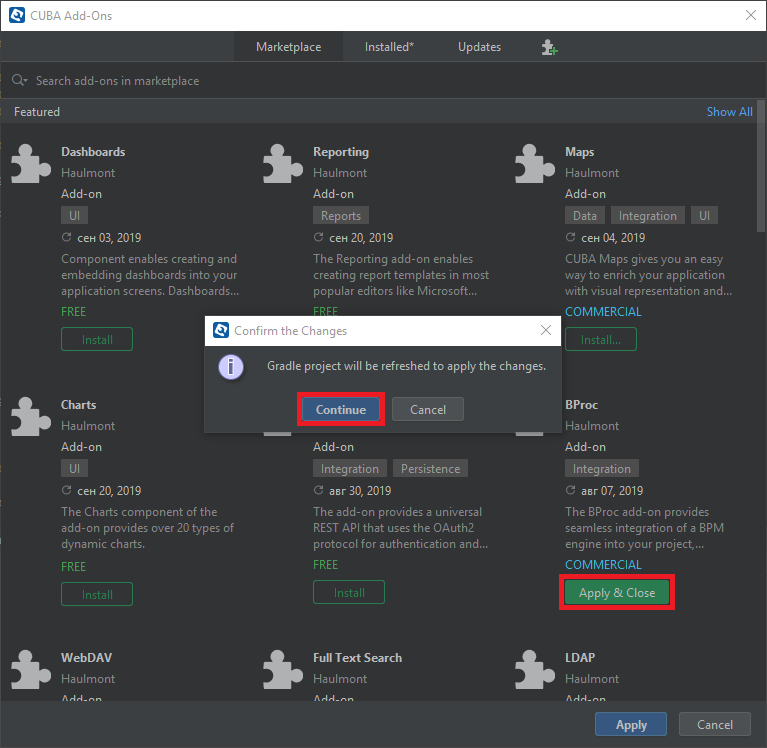
BProc add-on will be installed in your project.
1.3. Manual Installation
Use this way of installation in case you build your project from the command line or your subscription does not include Studio Premium Subscription.
Adding Premium Repository
Open build.gradle file and add one more repository:
-
If the main repository is
repo.cuba-platform.com, addhttps://repo.cuba-platform.com/content/groups/premiumbuildscript { // ... repositories { // ... maven { url 'https://repo.cuba-platform.com/content/groups/premium' credentials { username(rootProject.hasProperty('premiumRepoUser') ? rootProject['premiumRepoUser'] : System.getenv('CUBA_PREMIUM_USER')) password(rootProject.hasProperty('premiumRepoPass') ? rootProject['premiumRepoPass'] : System.getenv('CUBA_PREMIUM_PASSWORD')) } } } } -
If the main repository is Bintray, add
https://cuba-platform.bintray.com/premiumbuildscript { // ... repositories { // ... maven { url 'https://cuba-platform.bintray.com/premium' credentials { username(rootProject.hasProperty('bintrayPremiumRepoUser') ? rootProject['bintrayPremiumRepoUser'] : System.getenv('CUBA_PREMIUM_USER')) password(rootProject.hasProperty('premiumRepoPass') ? rootProject['premiumRepoPass'] : System.getenv('CUBA_PREMIUM_PASSWORD')) } } } }
Providing Credentials
Your license key consists of two parts: the first part before the dash is a repository user name, the part after the dash is a password. For example, if your key is 111111222222-abcdefabcdef, then the user name is 111111222222 and the password is abcdefabcdef. In case of Bintray, the user name must be followed by @cuba-platform.
You can provide the credentials in one of the following ways:
-
The recommended way is to create a
~/.gradle/gradle.propertiesfile in your user home directory and set properties in it:premiumRepoUser=111111222222 bintrayPremiumRepoUser=111111222222@cuba-platform premiumRepoPass=abcdefabcdef -
Alternatively, you can specify the credentials in the CUBA_PREMIUM_USER and CUBA_PREMIUM_PASSWORD environment variables.
-
When you run Gradle tasks from the command line, you can also pass the properties as command-line arguments with the
-Pprefix, for example:gradlew assemble -PpremiumRepoUser=111111222222 -PpremiumRepoPass=abcdefabcdef
Adding Component
-
In the
build.gradlefile specify the component artifacts in the dependencies section as follows:com.haulmont.addon.bproc:bproc-global:<add-on version>where
<add-on version>is compatible with the used version of the CUBA platform.Platform Version
Add-on Version
7.2.x
1.1.1
7.1.x
1.0.3
For example:
dependencies { //... appComponent("com.haulmont.addon.bproc:bproc-global:1.1.1") } -
Specify the add-on identifier
com.haulmont.addon.bprocin theweb.xmlfiles of thecoreandwebmodules in theappComponentscontext parameter:<context-param> <param-name>appComponents</param-name> <param-value>com.haulmont.cuba com.haulmont.addon.bproc</param-value> </context-param> -
If you run Gradle tasks from the command line run
gradlew assemble.
The add-on will be included in your project.
2. Quick Start
This section describes how to model and run a simple business process for a refund.
Three persons will be involved in the process:
-
an employee who asks for the refund;
-
a manager who approves the refund;
-
an accountant who actually transfers money to employee account.
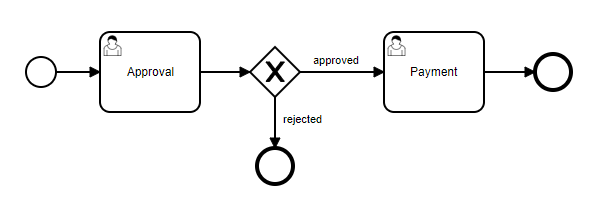
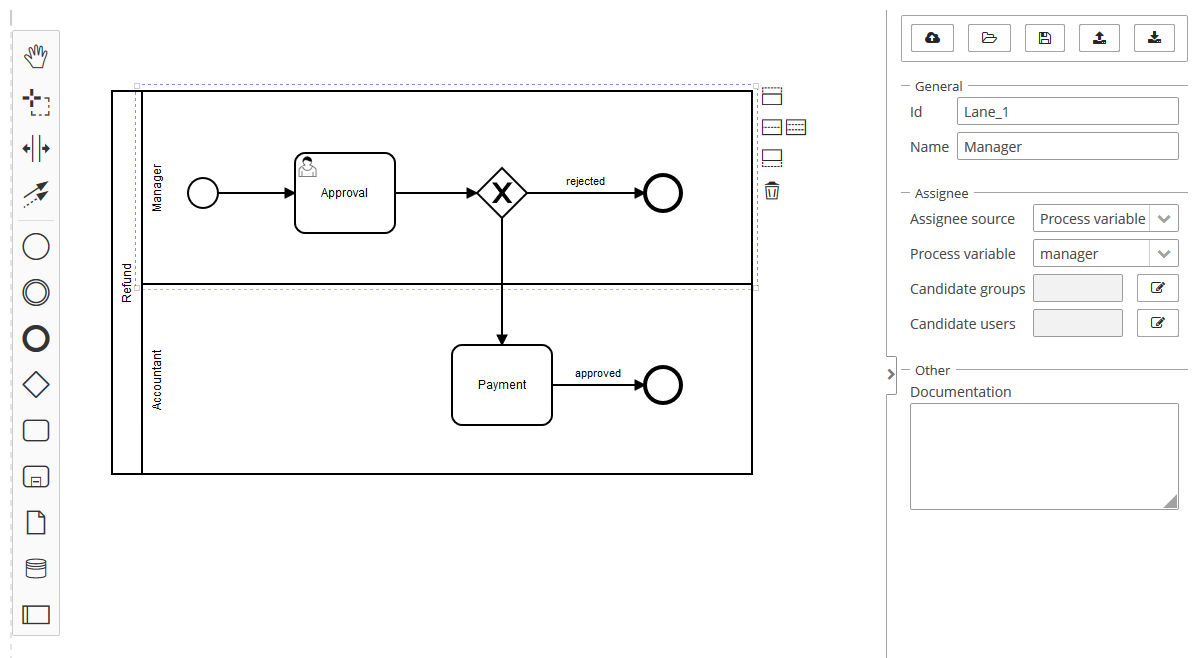
The model that we are going to create:
Let’s start modeling the process. Open the BProc → Modeler screen.
| For projects created on CUBA 7.2+ BProc provides design-time roles: bproc-process-admin (grants access to all BProc screens and entities, including modeler and administration screens) and bproc-process-actor (grants access to BProc screens and entities required for starting the process and working with user tasks). BProc → Modeler screen will be available to the admin user and to users with the bproc-process-admin role. |
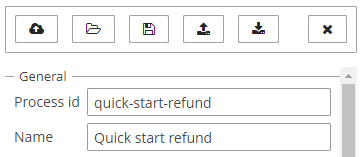
When the modeler is first opened, the properties panel on the right displays properties of the process itself. Modify the fields:
-
Process id:
quick-start-refund -
Process Name:
Quick start refund
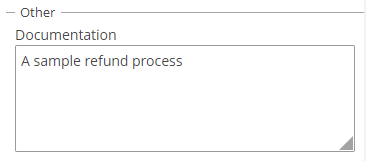
Find the Documentation text area in the properties panel and write a process description there:
Click on the StartEvent element on the canvas. Properties of the StartEvent element will be displayed on the properties panel. The Form section is used to describe the form that will be displayed to users when they start the process. There are several values available under the Form type drop-down list:
-
No form — a process should be started programmatically.
-
Input dialog — form fields are defined in the process model. The form is generated in the runtime when the user starts a process or completes a user task.
-
CUBA screen — a reference to a standard framework screen (see the CUBA Screen Process Form section for details).
-
Custom — used if you need to render a form in a non-standard way (see the Custom Process Form section for details).
Let’s specify the Input dialog as a start process form. Select the Input dialog form type.
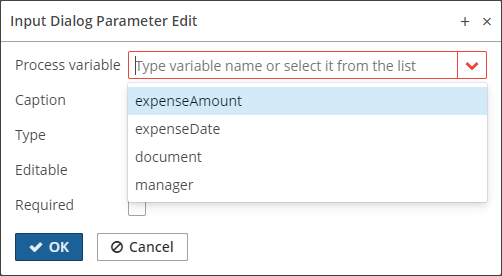
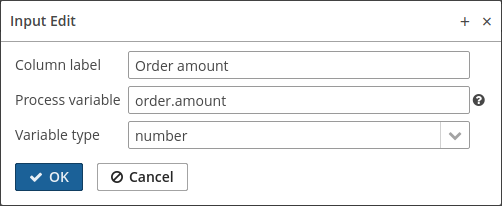
Create a new input dialog parameter. In the Input Dialog Parameter Editor specify the following properties:
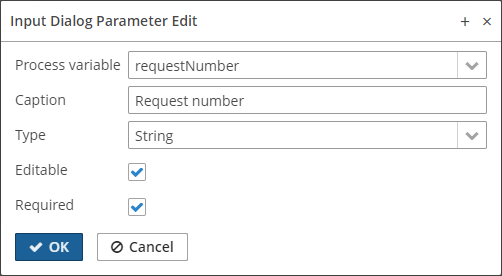
Note that the Process variable lookup field allows you to enter the value in it. If you want to associate the dialog parameter with the process variable that hasn’t been used before, then type the variable name and press Enter. If you want to display an existing variable, select its name from the drop-down list (we’ll see it shortly).
Create three more input dialog parameters:
-
expenseAmount(type isDecimal (double), editable and required) -
expenseDate(type isDate, editable and required) -
document(type isFile, editable and required)
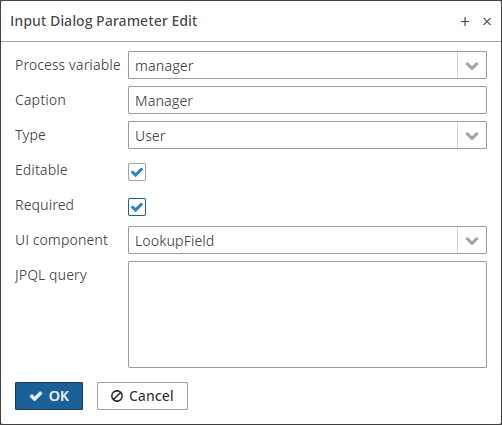
After that create an input dialog parameter manager with the User type (it must be required and editable). For the User type, additional fields are displayed in the editor: they are used for specifying a UI component for user selection (lookup field or picker field) and an optional JPQL query for filling the lookup field or a screen for selecting users in case of picker fields. We’ll use the LookupField component and will leave the JPQL query field blank — that means that the default query select e from sec$User e will be used.
Input dialog parameters section should look this way:
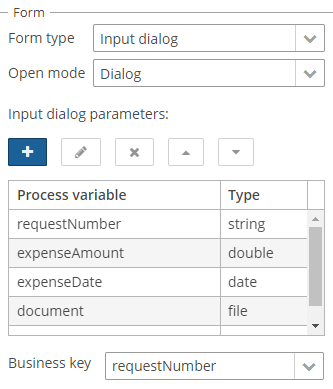
On the bottom of the panel there is a Business key lookup field. A business key is a domain-specific identifier of a process instance. Select the requestNumber field.
When a process is started input dialog parameters will be written into corresponding process variables.
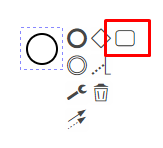
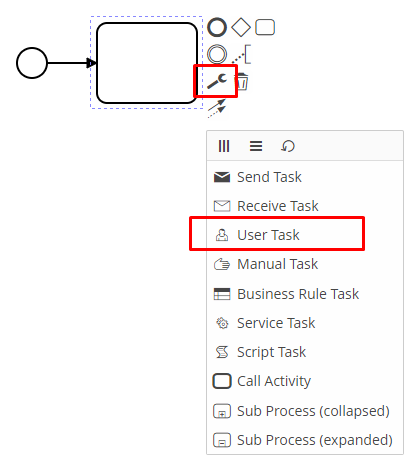
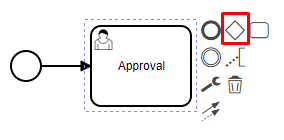
After you’ve specified the start form, create the Approval user task. If the start event node is selected on the canvas, you can click the Append task icon in the pop-up menu:
Then click the Change type icon (a wrench) and select the User Task there.
Type a task name: Approval. You can do that both right on the element node or in the Name field of the properties panel.
On the properties panel specify a task id: approval.
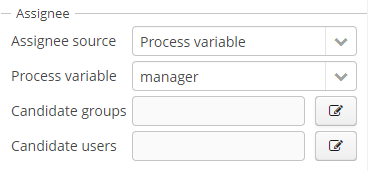
There are several ways to specify task assignee (see Single User Assignment). In this current case, we’ll use the Process variable assignee source. After you select this source a Process variable lookup field will be displayed. All form fields and process variables with the type User will be displayed there. We have only one such field, it is manager defined in the start event process form. Select it.
For the Approval task we also must specify a process form. It will be an input dialog again. The dialog will display process variables from the start event form and one more new parameter.
Create a new input dialog parameter and in the Process variable drop-down list select the requestNumber variable.
Make the field non-editable by unselecting the Editable check box.
In the same way create input dialog parameters for expenseAmount, expenseDate and document variables. They all must be non-editable.
Add a new dialog parameter with the comment process variable name and the Multiline string type. The field must be editable and non-required. This field will be used by the manager if the manager wants to make some notes when approving or rejecting the refund request.
At the Approval step, the manager has two options: to Approve and to Reject the request. An easy way to support this is to use outcomes (for details see User Task Outcomes). For each outcome a button will be displayed on the form and the result will be stored in a special process variable.
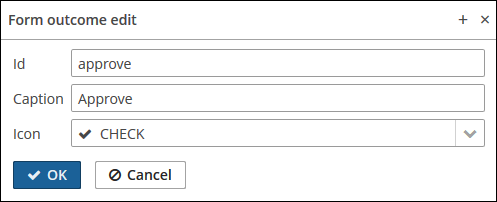
Create a new outcome using the corresponding button of the Outcomes section. In the outcome editor specify an outcome id approve, a caption Approve and select an icon CHECK in the icons list.
Then create a second outcome: the id is reject, the caption is Reject, the icon is BAN.
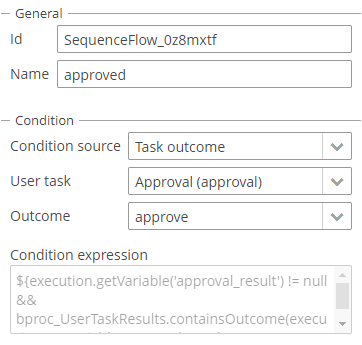
After the Approval task is completed, the process must decide which path to chose using the outcome value. Let’s create an exclusive gateway. Click the Approval task element and click the Append Gateway action of the context menu.
Two sequence flows should leave the exclusive gateway: one for EndEvent element and another for new user task called Payment. Give names to sequence flows: approved and rejected.
To specify a condition for the approved flow, click on the element and in the sequence flow properties panel select the Task outcome value in the Condition source lookup field. Select an Approval user task and the approve outcome.
Do the same for the rejected sequence flow, but select a reject outcome value for it.
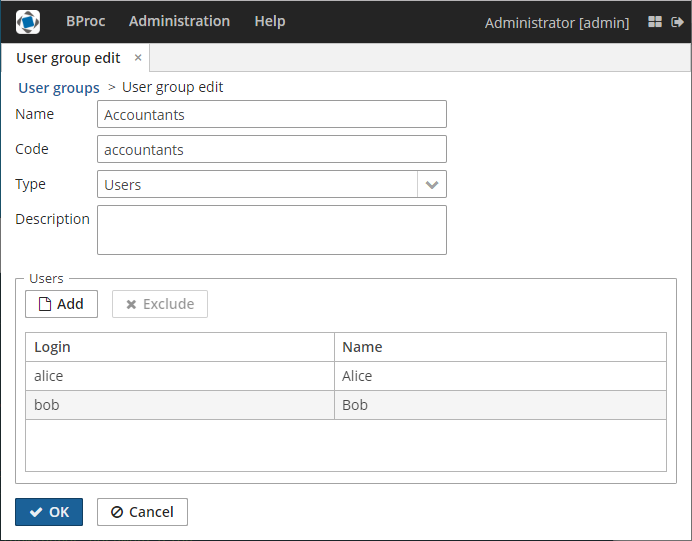
For the Payment task, we will implement the following behavior: the task should be displayed for all accountants and any of them will be able to take this task for himself. To achieve this we should not specify a particular assignee for the user task but should specify Candidate groups or Candidate users. We’ll use the Candidate groups option but first, we must create a user group for accountants. User groups are managed using the BProc → User Groups screen (read more about user groups here: User Groups). Open the user groups screen and create a new group called Accountants. The group code is accountants. Change group type to Users and add several users to the group. Commit the screen and go back to the modeler.
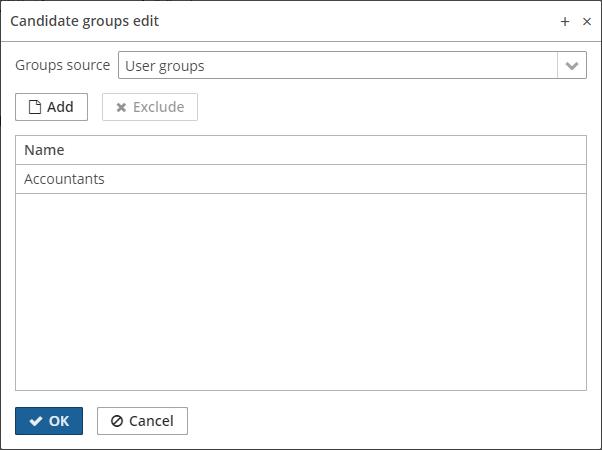
In the modeler click the edit button near the Candidate groups field. The dialog will be opened. The Groups source value should be User groups. Add the Accountants group and close the dialog.
Configure an input dialog for the Payment task. Add existing requestNumber, expenseAmount, expenseDate, document and comment fields. Make them all non-editable.
The last thing we need do is to specify who can start this process. Click on the free space on the canvas to display process properties. Similar to the Payment task we’ll define Candidate groups in the Starter candidates section.
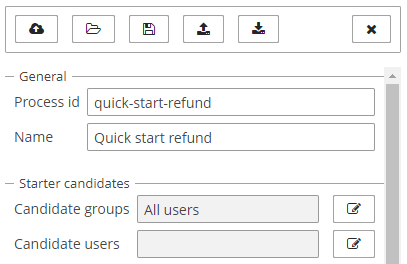
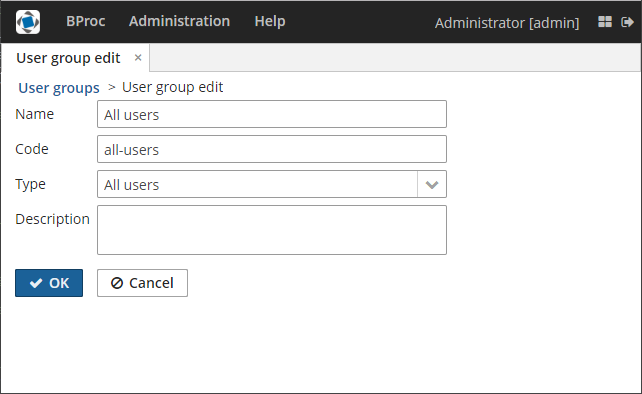
If we want the process to be started by any user we may create and use a special user group. Open the User groups screen and create a new group called All users. Set its Type to All users, this will mean that this group will automatically include every user. In the modeler select the All users group for process starter candidates.
The process model is ready to be deployed to the process engine. Click the Deploy process button on the buttons toolbar.

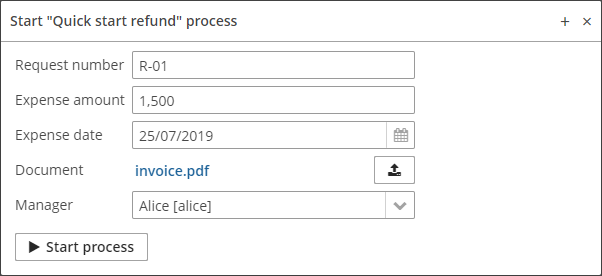
To start the process open the BProc → Start Process screen. This screen displays process definitions available for starting by the current user. Double click on the Refund process line or select it and click the Start process button.
A start form will appear. Fill the fields, select the manager and click the Start process button.
The manager will see assigned tasks in the BProc → My Tasks screen. If the screen is not available then check that the manager has the bproc-process-actor role.
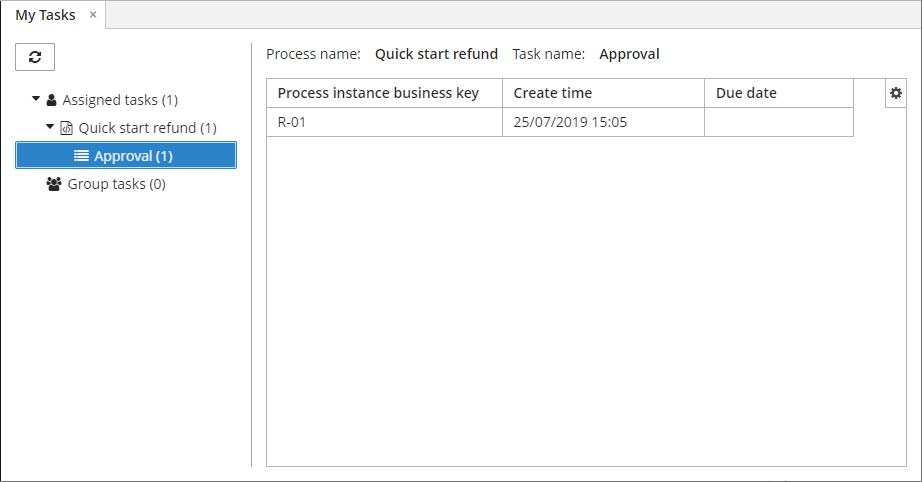
Double-click on the task.
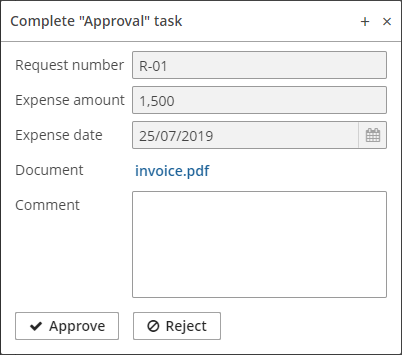
Some fields on this form are read-only as we configured in the modeler and there are two buttons for outcomes: Approve and Reject. Enter the comment and click the Approve button.
Log in on behalf of any user who is a member of the Accountants user group. Open the BProc → My Tasks screen. You’ll see that the table is empty, but in the filter, there is an indicator that the user has a group task that can be claimed. Select the Group tasks type and click the Apply button.
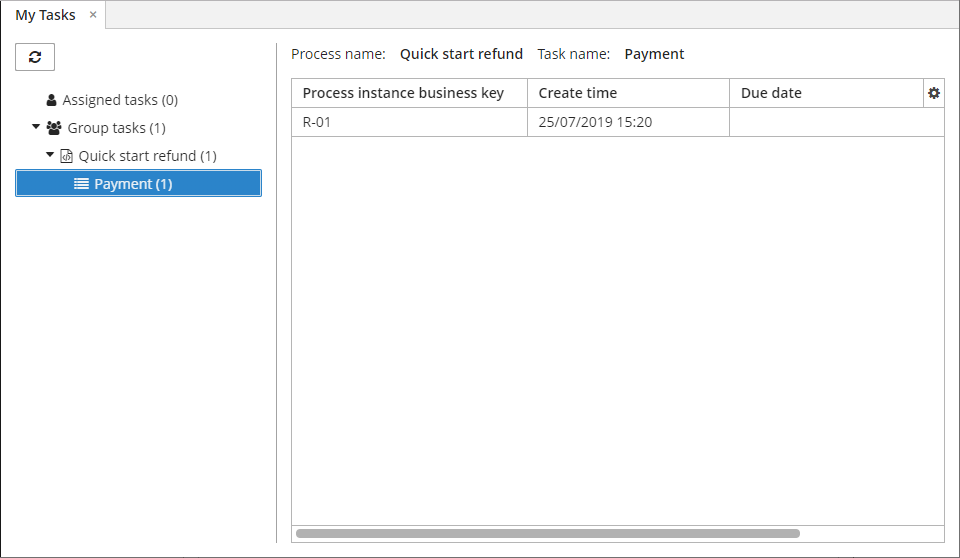
All users of the Accountants group will see the Payment task among their group tasks until any of accountants claims it. Open the task form. The form is read-only - you cannot do anything with the task until you claim it. On the bottom of the form there are two buttons: Claim and resume and Claim and close.
Claim and resume button will remove the task from group task lists of other users and will leave the task form on the screen. The form will become editable and buttons for completing the task will be displayed.
Claim and close will remove the task from other users task lists, the process form will be closed. The task will appear in the Assigned tasks list for the current user. Click the Claim and close button.
Select the Payment tasks node from the Assigned tasks group. Open the task form and complete the task using the default Complete task button (when we don’t specify task outcomes in the model, this default button is displayed).
The process is completed.
3. Process Forms
Process forms are screens displayed to users. They may be configured for StartEvent and UserTask model elements. There are several process form types:
-
CUBA screen
-
Input dialog
-
No form
-
Custom
3.1. Input Dialog Process Form
Parameters of input dialogs are defined right in the process model. If you click on StartEvent or UserTask model element, then on the properties panel you will be able to configure a related process variable, datatype, parameters ordering, etc. When users start processes or complete tasks, input dialogs are automatically rendered based on the configuration you provided in the model.
The input dialog parameter editor looks as follows:
Supported parameter types are:
-
String
-
Multi line string
-
Number
-
Boolean
-
Date
-
Date with time
-
User
-
User list
-
Entity
-
Entity list
-
File
-
Platform enum
-
Custom enum
Depending on the selected type, additional components can be displayed. For example, for Entity and Entity list types you should select an entity class from the drop-down list, a UI component (LookupField or PickerField) and optionally a lookup screen or JPQL query (default values will be used if these fields are left blank).
User and Users list types work like Entity and Entity list types with the sec$User meta class. An additional piece of functionality in the modeler related to these field types is that you will be able to select these parameters as assignee value of UserTask elements.
3.2. CUBA Screen Process Form
In many cases you’ll probably need a process form with a complex layout and behavior. In this case, instead of input dialog forms (which are defined right in a process model) you can use an existing CUBA screen. To be used as a process form, the screen controller should be annotated with the @ProcessForm annotation.
The @ProcessForm annotation indicates that the screen must appear in the process forms lookup in the modeler.
3.2.1. Process Variables in CUBA Screen Form
A @ProcessVariable annotation may be placed on injected UI components or on regular class fields.
This annotation has two effects:
-
The value of the process variable will be written to this field when the process form is opened. In case of the UI component, the value of the process variable will be set to the UI component.
-
If you configure the ProcessFormContext with the
saveInjectedProcessVariables()method, then the values of annotated fields will be saved as process variables when the process is started or the user task is completed.
@ProcessVariable
private Date orderDate;

@Inject
@ProcessVariable(name = "approver")
private LookupField<User> approverLookup;
A @ProcessVariable annotation may have an optional name attribute. The value of this attribute is the process variable name. If the name attribute is missing, then a field name is used as a process variable name.
3.2.2. Using the ProcessFormContext
A ProcessFormContext object can be injected to the process form screen controller.
@Inject
private ProcessFormContext processFormContext;
The ProcessFormContext contains information about a process definition to be started (when the form is used for starting the process) or a user task to be completed. The ProcessFormContext also contains methods for starting the process and task completion. Without the ProcessFormContext the process form is barely useful.
You will use different methods of the ProcessFormContext when working with start process forms and task process forms.
An example of how to start the process:
processFormContext.processStarting() (1)
    .withBusinessKey("order-123") (2)
    .addProcessVariable("order", order) (3)
    .addProcessVariable("approver", order.getManager())
.start(); (4)| 1 | Creates a ProcessStarting instance. |
| 2 | Sets the business key to the process instance. |
| 3 | Adds a process variable. |
| 4 | Starts the actual process. |
An example of how to complete the user task:
processFormContext.taskCompletion() (1)
    .withOutcome("reject") (2)
    .saveInjectedProcessVariables() (3)
.complete(); (4)| 1 | Creates a TaskCompletion instance. |
| 2 | Sets the task outcome. |
| 3 | Indicates that values of class fields annotated with the @ProcessVariables should be collected and saved as process variables. |
| 4 | Completes the actual task. |
You can also use the TaskData getTaskData() and ProcessDefinitionData getProcessDefinitionData() methods.
3.2.3. Declare Task Outcomes for the Modeler
In the modeler, for the sequence flow element, we may define a condition by selecting a user task and its outcome from the drop-down list. To fill this list for a user task that uses a CUBA screen process form you may declare a list of possible outcomes in the form controller. Use the outcomes attribute of the @ProcessForm annotation for that:
@ProcessForm(
        outcomes = {
                @Outcome(id = "approve"),
                @Outcome(id = "reject")
        }
)
public class TaskApprovalForm extends Screen {
    //...
}
3.2.4. CUBA Screen Process Form Parameters
CUBA screen process forms can accept external parameters defined in the modeler. For example, you need a form for the next process actor selection. The form must display a lookup field with users and save the result into some process variable. We want to use the form for selecting different actors at different process steps, so the form should have two parameters:
-
variableName -
lookupCaption
The form parameters used by the form are defined in the params attribute of the @ProcessForm annotation:
@ProcessForm(
        params = {
                @Param(name = "variableName"),
                @Param(name = "lookupCaption")
        }
)
These parameters are read by the modeler and are displayed in the modeler when you select the screen.

You can edit the parameters and give them values:
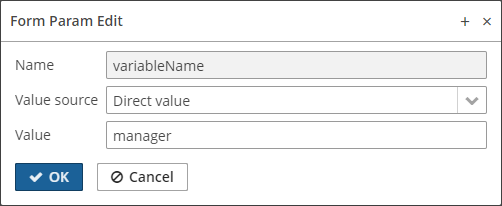
You can provide a direct param value (value source is Direct value) or use one of the existing process variables as a parameter value (value source is Process variable).
Inside the process form controller use the @ProcessFormParam annotation on class fields to get parameter values:
@ProcessFormParam(name = "variableName")
private String variableNameParam;

@ProcessFormParam
private String lookupCaption;
Like the @ProcessVariable annotation, the @ProcessFormParam supports an optional name attribute. If the attribute is not defined, then a field name is used as a parameter name.
Another way to get a full list of process form parameters is to get them from the ProcessFormContext object:
List<FormParam> formParams = processFormContext.getFormData().getFormParams();The source code of the actor selection form:
<?xml version="1.0" encoding="UTF-8" standalone="no"?>
<window xmlns="http://schemas.haulmont.com/cuba/screen/window.xsd"
        caption="msg://caption"
        messagesPack="com.haulmont.bproc.ref.web.screens.forms.actorselection">
    <data>
        <collection id="usersDc" class="com.haulmont.cuba.security.entity.User" view="_minimal">
            <loader id="usersDl">
                <query><![CDATA[select u from sec$User u order by u.name]]></query>
            </loader>
        </collection>
    </data>
    <layout spacing="true">
        <form width="400px">
            <lookupField id="userLookup" optionsContainer="usersDc" width="100%"/>
        </form>
        <hbox spacing="true">
            <button id="completeTaskBtn" icon="font-icon:CHECK" caption="msg://completeTask"/>
        </hbox>
    </layout>
</window>@UiController("ref_ActorSelectionForm")
@UiDescriptor("actor-selection-form.xml")
@LoadDataBeforeShow
@ProcessForm(
params = { (1)
@Param(name = "variableName"),
@Param(name = "lookupCaption")
}
)
public class ActorSelectionForm extends Screen {
@Inject
private ProcessFormContext processFormContext;
@Inject
private LookupField<User> userLookup;
@ProcessFormParam (2)
private String variableName;
@ProcessFormParam (2)
private String lookupCaption;
@Subscribe
private void onBeforeShow(BeforeShowEvent event) {
userLookup.setCaption(lookupCaption); (3)
}
@Subscribe("completeTaskBtn")
private void onCompleteTaskBtnClick(Button.ClickEvent event) {
processFormContext.taskCompletion()
.addProcessVariable(variableName, userLookup.getValue()) (4)
.complete();
closeWithDefaultAction();
}
}| 1 | Declares the list of parameters that will be shown in the modeler. |
| 2 | Indicates that the parameter value that was defined in the process model should be injected into this class field. |
| 3 | Updates the lookup field caption with the value defined in the process model. |
| 4 | Saves the value of the users lookup field to the process variable which name was defined in the form param in the modeler. |
3.2.5. Process Form Output Variables
In the CUBA Screen process form, process variables can be set. For example, you may complete the task this way:
processFormContext.taskCompletion()
    .addProcessVariable("variableName", "variableValue")
    .complete();
When you model the process, it may be useful to know which variables are set by the form in order to reuse them later in the process model. A way to achieve this is to use the outputVariabes attribute of the @ProcessForm annotation:
@ProcessForm(
        outputVariables = {
                @OutputVariable(name = "nextProcessActor", type = User.class),
                @OutputVariable(name = "comment", type = String.class)
        }
)
Often there are cases when a process variable is set only when the task is completed using a particular outcome. To declare this, place the outputVariables annotation attribute to the @Outcome annotation.
@ProcessForm(
        outcomes = {
                @Outcome(
                        id = "approve",
                        outputVariables = {
                                @OutputVariable(name = "nextActor", type = User.class) (1)
                        }
                ),
                @Outcome(
                        id = "reject",
                        outputVariables = {
                                @OutputVariable(name = "rejectionReason", type = String.class) (2)
                        }
                )
        },
        outputVariables = {
                @OutputVariable(name = "comment", type = String.class) (3)
        }
)| 1 | The nextActor variable may be set when the task is completed with the approve outcome. |
| 2 | The rejectionReason variable may be set when the task is completed with the reject outcome. |
| 3 | The comment variable may be set in any case. |
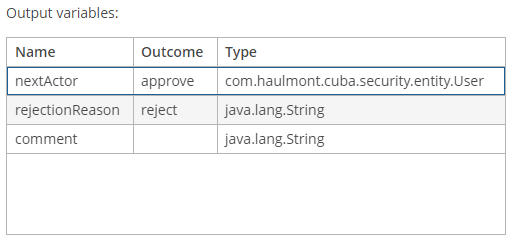
At the moment, this output variables information is for the reference only. It is displayed in the corresponding section in the element properies panel when you select the process form:
3.2.6. Restrict Process Form Usage
By default, all process forms screens are available within any process model. If some screen is intended to be used in particular processes only, then you should specify processes keys in the allowedProcessKeys attribute of the @ProcessForm annotation.
@ProcessForm(allowedProcessKeys = {"process-1", "process-2"})The form will be available only for process with process-1 and process-2 keys (Process id in the modeler).
3.2.7. Process Forms Examples
3.2.7.1. Start Process Form Example
The process form can be used as a start form. The form displays two fields:
-
A text field to enter the order number.
-
A users drop-down list to select the manager (the manager may be the next process actor).
Screen XML descriptor:
<?xml version="1.0" encoding="UTF-8" standalone="no"?>
<window xmlns="http://schemas.haulmont.com/cuba/screen/window.xsd"
        caption="msg://caption"
        messagesPack="com.company.qs.web.screens.form.startapproval">
    <data>
        <collection id="usersDc" class="com.haulmont.cuba.security.entity.User" view="_minimal">
            <loader>
                <query>select u from sec$User u order by u.name</query>
            </loader>
        </collection>
    </data>
    <layout expand="actionsPanel" spacing="true">
        <form>
            <textField id="orderNumber" caption="msg://orderNumber"/>
            <lookupField id="managerLookup" optionsContainer="usersDc" caption="msg://manager"/>
        </form>
        <hbox id="actionsPanel" spacing="true">
            <button id="startProcessBtn" caption="msg://startProcess" icon="font-icon:PLAY"/>
        </hbox>
    </layout>
</window>
Screen controller:
@UiController("qs_StartApprovalForm")
@UiDescriptor("start-approval-form.xml")
@LoadDataBeforeShow
@ProcessForm (1)
public class StartApprovalForm extends Screen {

    @Inject
    @ProcessVariable (2)
    private TextField<String> orderNumber;

    @Inject
    @ProcessVariable(name = "manager") (3)
    private LookupField<User> managerLookup;

    @Inject
    private ProcessFormContext processFormContext; (4)

    @Subscribe("startProcessBtn")
    protected void onStartProcessBtnClick(Button.ClickEvent event) {
        processFormContext.processStarting()
                .withBusinessKey(orderNumber.getValue()) (5)
                .saveInjectedProcessVariables() (6)
                .start();
        closeWithDefaultAction();
    }
}| 1 | The @ProcessForm annotation indicates that this screen is a process form and the screen will be available in the modeler. |
| 2 | We declare that the injected UI component (the orderNumber text field) is a process variable. Since we develop a start process form, the variable has no value yet, but the annotation will be used on process start (we’ll see it later). |
| 3 | The same as 2, but here the process variable name (manager) differs from the field name (managerLookup). |
| 4 | ProcessFormContext is the object that we’ll use to start the process. |
| 5 | When we start the process, we can pass an optional process instance business key. We use the order number here. |
| 6 | The saveInjectedProcessVariables() indicates that values of the fields annotated with the @ProcessVariables should be saved as process variables on process start. |
Instead of using saveInjectedProcessVariables() method you can explicitly set process variables:
processFormContext.processStarting()
    .withBusinessKey(orderNumber.getValue())
    .addProcessVariable("orderNumber", orderNumber.getValue())
    .addProcessVariable("manager", managerLookup.getValue())
    .start();
3.2.7.2. Task Process Form Example
The task process form will display a couple of fields:
-
The first one will display a value of the existing process variable (
orderNumber). -
The second field will be used for the new process variable (
comment).
There will be two buttons (Approve and Reject) that complete the user task with the corresponding outcome.
<?xml version="1.0" encoding="UTF-8" standalone="no"?>
<window xmlns="http://schemas.haulmont.com/cuba/screen/window.xsd"
        caption="msg://caption"
        messagesPack="com.company.qs.web.screens.form.taskapproval">
    <layout expand="actionsPanel" spacing="true">
        <form>
            <textField id="orderNumber" caption="msg://orderNumber" editable="false"/>
            <textField id="commentField" caption="msg://comment"/>
        </form>
        <hbox id="actionsPanel" spacing="true">
            <button id="approveBtn" caption="msg://approve" icon="font-icon:CHECK"/>
            <button id="rejectBtn" caption="msg://reject"  icon="font-icon:BAN"/>
        </hbox>
    </layout>
</window>@UiController("qs_TaskApprovalForm")
@UiDescriptor("task-approval-form.xml")
@ProcessForm(
outcomes = { (1)
@Outcome(id = "approve"),
@Outcome(id = "reject")
}
)
public class TaskApprovalForm extends Screen {
@Inject
@ProcessVariable (2)
private TextField<String> orderNumber;
@Inject
@ProcessVariable(name = "comment") (3)
private TextField<String> commentField;
@Inject
private ProcessFormContext processFormContext;
@Subscribe("approveBtn")
protected void onApproveBtnClick(Button.ClickEvent event) {
processFormContext.taskCompletion()
.withOutcome("approve")
.saveInjectedProcessVariables() (4)
.complete();
closeWithDefaultAction();
}
@Subscribe("rejectBtn")
protected void onRejectBtnClick(Button.ClickEvent event) {
processFormContext.taskCompletion()
.withOutcome("reject")
.addProcessVariable("comment", commentField.getValue()) (5)
.complete();
closeWithDefaultAction();
}
}| 1 | The form defines two possible outcomes that may be used in sequence flow node condition in the modeler. This information is used by the modeler only. |
| 2 | The orderNumber variable has been already set on process start. Because of the @ProcessVariable annotation, the value of the orderNumber process variables will be set to the orderNumber text field when the form is displayed. |
| 3 | The comment variable is not set yet, but the @ProcessVariable annotation will be taken into account when we complete the task in the button click listener. |
| 4 | Values of all field annotated with the @ProcessVariable will be saved as process variables on task completion. |
| 5 | An alternative way to define process variables. Instead of using the saveInjectedProcessVariables() method you may define process variables directly. |
3.2.7.3. StandardEditor Process Form Example
This example demonstrates how to use a StandardEditor as a process form. This may be useful in a case when you store some entity in a process variable and want to view or edit entity fields using the task process form.
Let’s suppose that we added a Start process button to the standard Order entity editor. The Start process button starts the process programmatically and puts the edited Order entity instance to the process variables.
@Subscribe("startProcessBtn")
protected void onStartProcessBtnClick(Button.ClickEvent event) {
    Order order = getEditedEntity();
    Map<String, Object> processVariables = new HashMap<>();
    processVariables.put("order", order); (1)
    bprocRuntimeService.startProcessInstanceByKey("order-approval",
            order.getNumber(),
            processVariables);
}| 1 | Put the edited entity to the order process variable. |
The XML descriptor of the process form that is defined for the next user task may look like this:
<?xml version="1.0" encoding="UTF-8" standalone="no"?>
<window xmlns="http://schemas.haulmont.com/cuba/screen/window.xsd"
        caption="msg://editorCaption"
        focusComponent="form"
        messagesPack="com.company.qs.web.screens.form.orderedittaskform">
    <data>
        <instance id="orderDc"
                  class="com.company.qs.entity.Order"
                  view="order-edit">
            <loader/>
        </instance>
    </data>
    <dialogMode height="600"
                width="800"/>
    <layout expand="taskActions" spacing="true">
        <form id="form" dataContainer="orderDc">
            <column width="250px">
                <textField id="numberField" property="number"/>
                <dateField id="dateField" property="date"/>
                <pickerField id="managerField" property="manager">
                    <actions>
                        <action id="lookup" type="picker_lookup"/>
                        <action id="clear" type="picker_clear"/>
                    </actions>
                </pickerField>
            </column>
        </form>
        <hbox id="taskActions" spacing="true">
            <button id="completeTaskBtn" caption="msg://completeTask"/> (1)
        </hbox>
    </layout>
</window>| 1 | The only thing that differs the form XML descriptor from regular entity editor is that we replaced the editActions panel (Ok and Cancel buttons) with the panel that contains the Complete task button. |
Process form screen controller:
@UiController("qs_OrderEditTaskForm")
@UiDescriptor("order-edit-task-form.xml")
@EditedEntityContainer("orderDc")
@LoadDataBeforeShow
@ProcessForm (1)
public class OrderEditTaskForm extends StandardEditor<Order> {

    @ProcessVariable
    protected Order order; (2)

    @Inject
    protected ProcessFormContext processFormContext;

    @Subscribe
    protected void onInit(InitEvent event) {
        setEntityToEdit(order); (3)
    }

    @Subscribe("completeTaskBtn")
    protected void onCompleteTaskBtnClick(Button.ClickEvent event) {
        commitChanges() (4)
                .then(() -> {
                    processFormContext.taskCompletion()
                            .complete();
                    closeWithDefaultAction();
                });
    }
}| 1 | The @ProcessForm annotation indicates that the screen can be used as a process form. |
| 2 | We inject the order variable. |
| 3 | By the time the InitEvent listener is fired, values of the @ProcessVariable fields must be already set. We invoke the setEntityToEdit() method of the StandardEditor class - this method reloads the order entity with the view required for the editor screen and sets the entity to the data container. |
| 4 | When the Complete task button is clicked, the editor is commited, and if the commit was successful (all required fields are filled, etc.), the task completion is performed. |
3.3. Custom Process Form
Custom process forms may be used if you need to render a form in a non-standard way. For custom process form the following fields may be provided:
-
Form id
-
A list of form parameters
-
A list of outcomes
If you use an alternative UI technology (e.g. react) then you’ll need to get the form information and render the form using this information. Form information can be obtained using the BprocFormService. The BprocFormService has methods:
-
FormData getStartFormData(String processDefinitionId) -
FormData getTaskFormData(String taskId)
If you need to render custom forms in Start Process screen or My Tasks screen then you need to define and register the ProcessFormScreenCreator for the Custom form type:
@Component("samples_MyCustomProcessFormScreenCreator")
public class MyCustomProcessFormScreenCreator implements ProcessFormScreenCreator {

    @Inject
    private ScreenBuilders screenBuilders;

    @Override
    public Screen createStartProcessScreen(CreationContext creationContext) {
        return screenBuilders.screen(creationContext.getFrameOwner())
                .withScreenId(creationContext.getFormData().getScreenId())
                .withOpenMode(OpenMode.DIALOG)
                .build();
    }

    @Override
    public Screen createUserTaskScreen(CreationContext creationContext) {
        return screenBuilders.screen(creationContext.getFrameOwner())
                .withScreenId(creationContext.getFormData().getScreenId())
                .withOpenMode(OpenMode.DIALOG)
                .build();
    }
}
Then this ProcessFormScreenCreator must be registered as a renderer creator of forms with type Custom. This may be done on application startup using the registerScreenCreator method of the ProcessFormScreenCreators bean:
@Component("samples_CustomFormScreenCreatorRegister")
public class CustomFormScreenCreatorRegister {

    @Inject
    private ProcessFormScreenCreators processFormScreenCreators;

    @Inject
    private MyCustomProcessFormScreenCreator myCustomProcessFormScreenCreator;

    @Inject
    private Logger log;

    @EventListener
    public void appStarted(AppContextStartedEvent event) {
        processFormScreenCreators.registerScreenCreator("custom", myCustomProcessFormScreenCreator);
        log.info("MyCustomProcessFormScreenCreator registered");
    }
}
A ProcessFormScreenCreator and a bean that registers a ProcessFormScreenCreator must be located in the web module.
|
4. User Task
4.1. Single User Assignment
There are several ways to specify a task assignee. You can expand the Assignee source drop-down list on the UserTask element properties panel and find the follows:
-
Expression
You will need to write an expression that evaluates an id of the User who must be an assignee. If you know that a user entity is stored in a process variable called
managerthen the expression will be${manager.id}. You also may invoke Spring bean method that returns a user id:${demo_MyBean.evaluateManager(methodParam1, 'methodParam2')} -
Process variable
If you select the
Process variableassignee source then the LookupField component will be displayed in the element properties panel. This lookup field will contain all process variables with theUsertype (input dialog parameters with theUsertype and process variables with theUsertype defined in the Start event properties panel). A process may be started programmatically without using the start process form and process variables values may be passed using the API. In this case, if you need to assign a user task to the person from one of the process variables, you can either write an explicit expression for the assignee or add an info about the process variable to the Process variables section. -
User provider
If the assignee is evaluated in runtime you may use a user provider. User providers are Spring beans that implement the
UserProviderinterface. An interface has aUser get(String executionId)method. The method returns a User who should become a task assignee. Here is an example of a user provider that reads a process variable with the user login and finds a user with this login in the database.@Component("ref_MyUserProvider") public class MyUserProvider implements UserProvider { @Inject private DataManager dataManager; @Inject private BprocRuntimeService bprocRuntimeService; @Override public User get(String executionId) { String userLogin = (String) bprocRuntimeService.getVariable(executionId, "userLogin"); return dataManager.load(User.class) .query("select u from sec$User u where u.login = :login") .parameter("login", userLogin) .one(); } }
A UserProvider class must be placed to the core module.
|
4.2. Multi-instance Tasks
A user task may be assigned not to a single user, but to multiple users as well. For example, you may need several people to approve the contract. Approvers may do their work in parallel or one after another. See Multi-instance (for each) section of Flowable documentation for basic information.
Let’s look at the user tasks element in process XML:
<userTask id="someTask" name="Some Task" flowable:assignee="${assignee}">
  <multiInstanceLoopCharacteristics isSequential="true"
     flowable:collection="${collectionVariable}" flowable:elementVariable="assignee" >
  </multiInstanceLoopCharacteristics>
</userTask>
In the modeler, you’ll have to fill the expression for the Collection field of the multiInstanceLoopCharacteristics element and the elementVariable field. After that use the elementVariable value as an assignee for the user task element.
BProc modeler helps you to fill all these attributes in case you have a list of users in the form field or in the process variable. A user task model element (as long as ServiceTask, Sub-process, and some other elements) has a Multi instance section in the properties panel. When you change the multi-instance type from None to Parallel or Sequential, new fields appear on the panel. Let’s suppose that in the start process form you defined a field lawyers with the User list type. This field value holds a collection of users. For the current user task you may select a Process variable collection source and then select a lawyers field in the Process variable lookup.
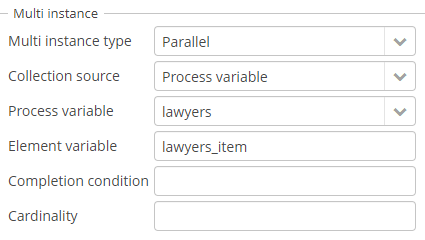
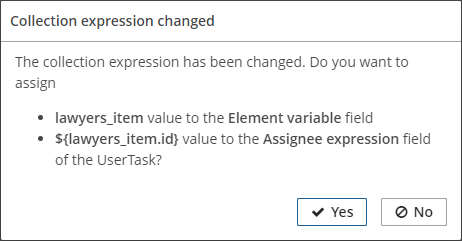
If you do that the system will suggest you fill Сollection, Element variable and Assignee expression fields mentioned above automatically.
4.3. Task Candidate Users and Groups
For the user task you may specify a list of potential task assignees (see the User assignment section of the Flowable documentation). A task with candidates appears in the Group tasks list for each candidate. After any of the candidates claims the task, the task moves to the Assigned tasks list of the user who claimed the task and disappears from the Group tasks list of other candidates.
Candidates are defined using Candidate groups or Candidate users fields on the user task properties panel.
In the Candidate groups edit dialog, the Group source should be defined. The possible group source values are:
-
User groups. A list of
UserGroupshould be selected. See the User Groups section for the information about user groups. -
User groups provider. Use this type if the groups should be evaluated programmatically. A Spring bean that implements the
UserGroupListProviderinterface should be selected. The bean must implement theList<UserGroup> get(String executionId)method that evaluates and returns a list of user groups. The bean must be located in the core module. -
Expression. Explicitly provide an expression used by the process engine. The expression should return a list o user group ids. It will be written to the
flowable:candidateGroupsattribute of the<userTask>element.
In the Candidate users edit dialog the Users source should be defined. The possible source values are:
-
Users. A list of
Usershould be selected. -
Users provider. Use this type if the users list should be evaluated programmatically. A Spring bean that implements the
UserListProviderinterface should be selected. The bean must implement theList<User> get(String executionId)method that evaluates and returns a list of users. The bean must be located in the core module. -
Expression. Explicitly provide an expression used by the process engine. The expression should return a list of user ids. It will be written to the
flowable:candidateUsersattribute of the<userTask>element.
4.4. User Task Outcomes
When users complete user tasks they often have to make some decision (approve or reject, yes or no, etc.). After they do it, the process should go one or another way. You may use task outcomes for modeling such cases. For Input dialog process forms outcomes are defined in the Outcomes panel in the Form properties section, for CUBA screen forms the outcomes are defined in the form controller.
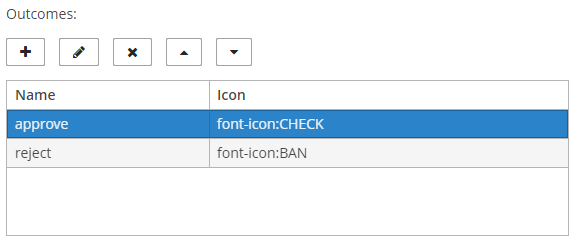
When an outcome is created we may define a name, a caption and an icon for it:

When we complete the task, these outcomes will be displayed as buttons in the input dialog window:

When the user clicks on one of the outcome buttons, the task is completed and the decision is written to a special process variable. The process variable name is built according to the following name pattern: <user task id>_result. The variable value holds information about users who completed the task and outcomes they selected.
As an example of how to use outcomes let’s take the process:
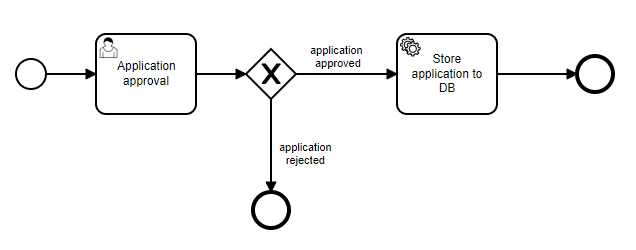
The Application approval task has two outcomes: approve and reject. We need to specify conditions for sequence flows after the exclusive gateway element.
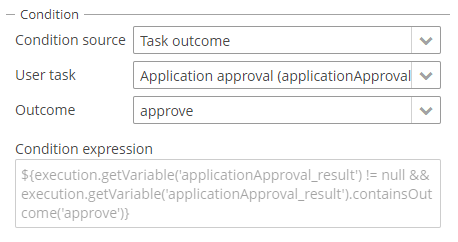
The first option is to write a condition expression. The second one is to select an outcome from the drop-down list.
Change the Condition source to the Task outcome and select the task and its outcome in drop-down lists:
If the user task is a multi-instance task then you’ll need to specify an additional parameter for a sequence flow condition:
This parameter is Condition type. It has several possible values:
-
Anyone completed with the outcome.
-
Everyone completed with the outcome.
-
No one completed with the outcome.
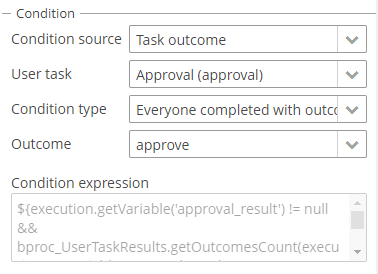
For the screenshot above, the process will continue its execution using this sequence flow only if all of the parallel approvers completed the task with the approve outcome.
5. Pools and Lanes
Using pools and lanes element you can define assignees for the all user tasks on the lane. Every user task on the lane without an explicitly defined assignee will inherit the assignee value from the lane.
To display the properties panel for the lane select the lane on the canvas. In the example below, the manager process variable is assigned to the selected lane Manager:
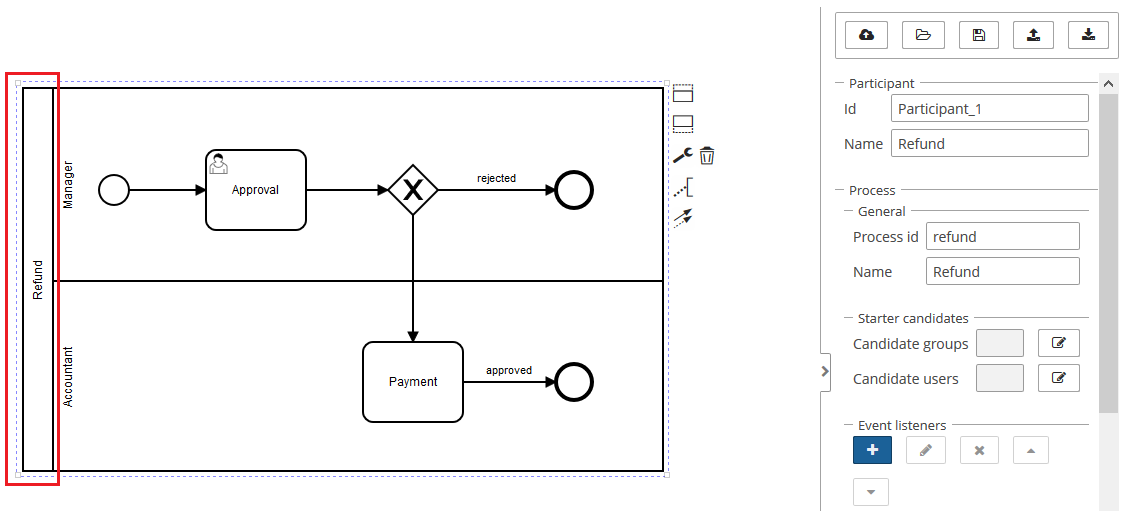
To display the process properties for the model with an added pool element you need to click on the header of the pool element.
6. User Groups
User groups are managed using the BProc > User groups screen. A single user may be a member of many groups. A group can have one of the following types:
-
Users. For the group of Users type users should be explicitly selected.
-
Roles. For the group of Roles type a set of security roles should be defined. Users are considered to be a member of the user group if they have one of the selected roles.
-
All users. Group of this type will automatically contain all users.

7. Service Task
Flowable engine gives you the following ways to declare how Java logic for the service task should be invoked:
-
Specifying a class that implements
JavaDelegateorActivityBehavior. -
Evaluating an expression that resolves to a delegation object.
-
Invoking a method expression.
See Java Service Task in Flowable docs for details.
7.1. Spring Bean Service Task
BProc add-on adds one more way to define a service task. It allows you to select a Spring bean, the bean method and provide parameter values for the selected method. Bean name and methods are selected from drop-down lists. After a method is selected a panel for entering method argument values is displayed.
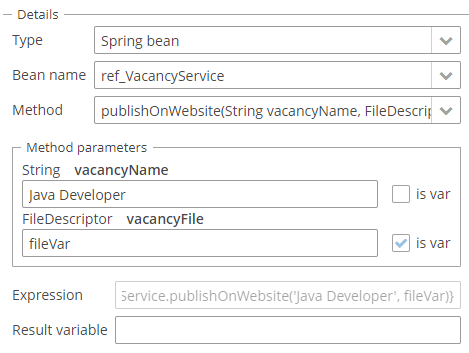
The panel for the Spring bean helps to build an expression for bean method invocation. In case of method from the screenshot above, the expression will be:
${ref_VacancyService.publishOnWebsite('Java Developer', fileVar)}
Pay attention to the is var check box. It makes sense mostly for string parameters. If the check box is not selected then the argument value will be written to the resulting expression in apostrophes. If the check box is selected the no apostrophes will be added and a variable with a provided name will be passed to the method.
${ref_MyBean.someMethod('description')} - this expression will use the string value description to the method.
${ref_MyBean.someMethod(description)} - this expression will use the value of the variable named description to the method.
7.2. Java Delegate Service Task
If you select the JavaDelegate class in the Type lookup then the JavaDelegate class drop down list field will appear. The list will contain a list of classes that implement the org.flowable.engine.delegate.JavaDelegate interface. See Java Service Task Implementation section of the Flowable documentation.
If the selected JavaDelegate class contains fields of org.flowable.common.engine.api.delegate.Expression type (see Field Injection in Flowable documentation) then field names will appear in the Fields table.
Here is an example of a Java class that sends an email:
public class SendEmailJavaDelegate implements JavaDelegate {

    private Expression addressee; (1)
    private Expression emailSubject;
    private Expression emailBody;

    private static Logger log = LoggerFactory.getLogger(SendEmailJavaDelegate.class);

    @Override
    public void execute(DelegateExecution execution) { (2)
        User addresseeValue = (User) addressee.getValue(execution); (3)
        if (addresseeValue == null || Strings.isNullOrEmpty(addresseeValue.getEmail())) {
            log.error("Cannot evaluate addressee email");
            return;
        }
        String emailSubjectValue = (String) emailSubject.getValue(execution);
        String emailBodyValue = (String) emailBody.getValue(execution);
        EmailService emailService = AppBeans.get(EmailService.class);
        emailService.sendEmailAsync(new EmailInfo(addresseeValue.getEmail(),
                emailSubjectValue,
                emailBodyValue));
    }
}| 1 | We declare three fields. Values of the fields are defined in the process model. |
| 2 | The execute method is invoked when the process reaches the service task. |
| 3 | Evaluate the value of the expression. |
Class that implements the JavaDelegate interface must be placed to the core module.
|
The properties panel for the service task will look this way:
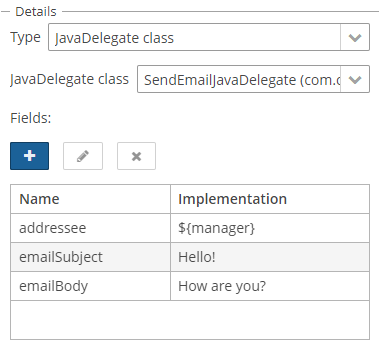
Field editor:
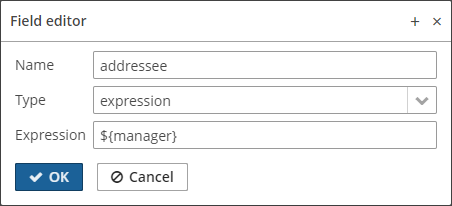
For the addressee field we select the expression field type. In our example the manager process variable contains a user.
8. Model Drafts
When you click the Deploy process button in the model editor, the process will be deployed to the Flowable engine and will be available for starting. If you don’t want it to be deployed and just want to save the process to get back to it later, then you can do it use the Save draft button. To open a draft use the Open draft button.

9. Event Listeners
When you need to get notified of some process engine event (task assigned, activity completed etc.) there are several approaches.
First, you may define an execution listener or a task listener for the particular process node. See the Execution Listener section of Flowable documentation for details. In the execution listener editor, the drop-down list for selecting a class contains classes that implement the org.flowable.engine.delegate.ExecutionListener interface. In case of task listener there are classes implementing org.flowable.engine.delegate.TaskListener there. If the class contains injected fields then these fields will be automatically added to the Fields section of the listener editor.
Second, you can declare global event listeners provided by the Flowable framework (see the Event handlers in Flowable documentation). You’ll find the Event listeners section on the project properties panel.
BProc add-on additionally introduces a set of Spring application events (see the Events section in CUBA documentation). The following events are published:
-
UserTaskAssignedEvent
-
UserTaskCreatedEvent
-
UserTaskCompletedEvent
-
ActivityStartedEvent
-
ActivityCompletedEvent
-
ProcessStartedEvent
-
ProcessCompletedEvent
Here is an example of event listener that sends an email notification each time a user task is assigned to a user:
@Component(TaskAssignedNotificationSender.NAME)
public class TaskAssignedNotificationSender {

    public static final String NAME = "ref_TaskAssignedNotificationSender";

    @Inject
    protected EmailService emailService;

    @EventListener (1)
    protected void onTaskAssigned(UserTaskAssignedEvent event) { (2)
        User user = event.getUser(); (3)
        TaskData taskData = event.getTaskData(); (4)
        String emailTitle = "New process task " + taskData.getName();
        String emailBodyTemplatePath = "com/haulmont/bproc/ref/notification/task-email-body.template";
        Map<String, Serializable> templateParameters = new HashMap<>();
        templateParameters.put("user", user);
        templateParameters.put("taskData", taskData);
        EmailInfo emailInfo = new EmailInfo(
                user.getEmail(),
                emailTitle,
                null,
                emailBodyTemplatePath,
                templateParameters
        );
        emailService.sendEmailAsync(emailInfo); (5)
    }
}| 1 | Declares that the method is an event listener. |
| 2 | The listener is fired each time the UserTaskAssignedEvent is published. |
| 3 | The UserTaskAssignedEvent contains an information about the user who is assigned to the task. |
| 4 | The UserTaskAssignedEvent contains a TaskData object which holds an information about the user task. |
| 5 | See the Email Sending Guide for details. |
The email body template may be as follows:
Hi ${user.name}!
The task "${taskData.name}" has been assigned.
If you need to get a process variable value in the listener you can do it this way:
Order order = (Order) bprocRuntimeService.getVariable(event.getTaskData().getExecutionId(), "order");By default, the listener is fired when the user task is assigned in any process. If you want to send notifications only for specific process definition you can either check the process definition in the listener method body:
@EventListener
protected void onOtherProcessTaskAssigned(UserTaskAssignedEvent event) {
    if ("some-process".equals(event.getProcessDefinitionData().getKey())) {
        // ...
    }
}
or you may define a SpEL (Spring Expression Language) expression that should match in order to handle the event:
@EventListener(condition = "#event.processDefinitionData.key == 'some-process'")
protected void onOtherProcessTaskAssigned(UserTaskAssignedEvent event) {
    // ...
}
10. Administration Screens
10.1. Process Definitions Screen
Process definition editor displays process definition entity properties, BPMN XML, active process instances of the selected process definition version. To change the process definition version use the Version lookup field.
From the editor, you also can suspend the process definition (the process will not be available for starting until you activate it). In the suspend process definition dialog, you have an option to suspend running process instances as well. In this case, user tasks of suspended instances won’t be displayed in the tasks list, all timers and jobs won’t be executed.
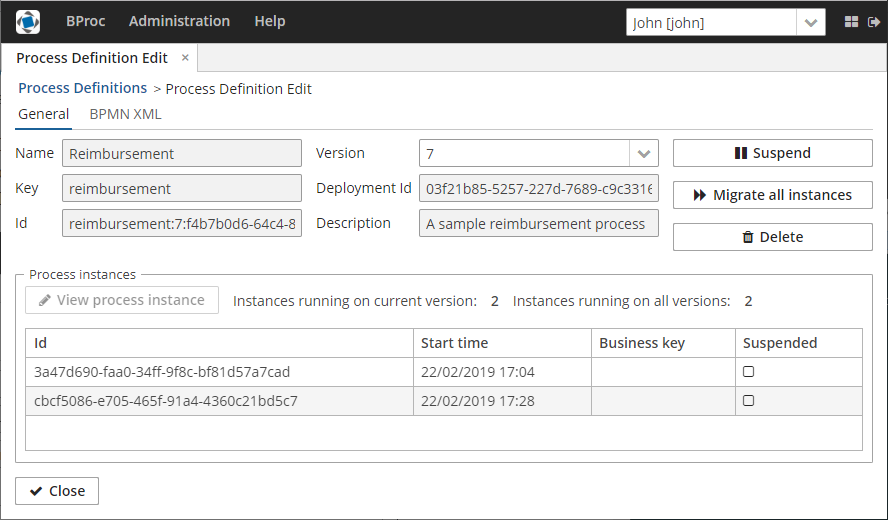
Read the Process Instances Migration section to get information about process instances migration.
10.2. Process Instances Screen
Process instances browser screen may display both active and completed process instances. To switch between them, change the value of the State lookup in the filter and click the Apply button.
In the process instance editor, using actions buttons, you can migrate an instance to a new process definition version, suspend an instance or remove it at all.
The Runtime tab is available only for active process instances and contains information about current process state: active user tasks, execution tree, variable values, failed jobs.
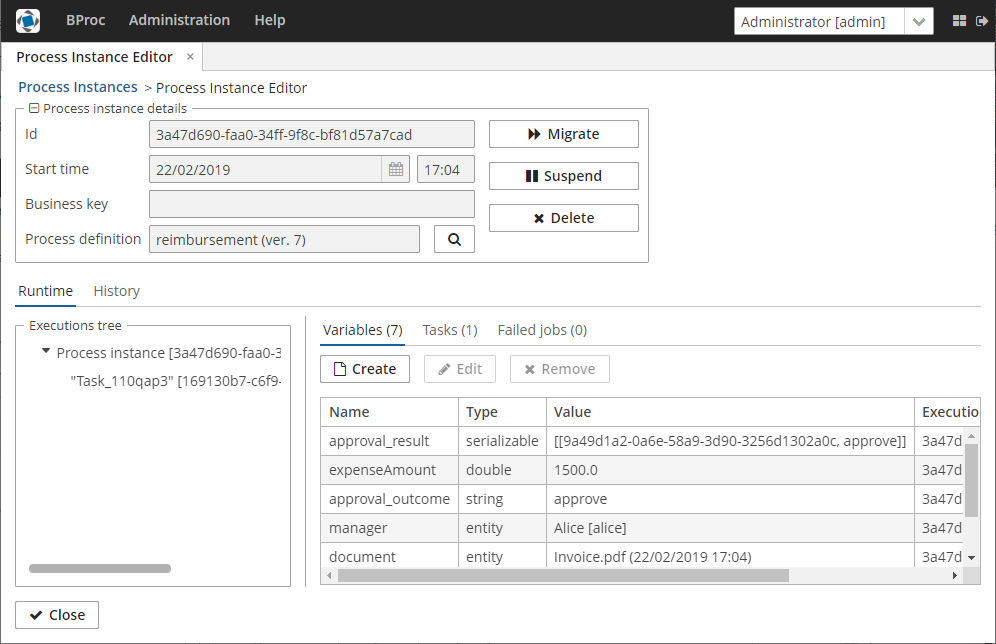
Selecting items in executions tree will modify content of Variables and Tasks tabs. If you select a particular execution, only objects related to this execution will be displayed .
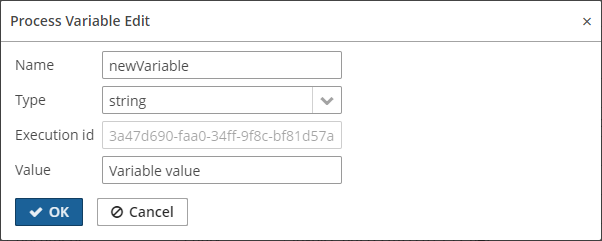
Using the Variables tab You can create, modify and remove process variables. Note, that when you create a new process variable it will be put to the selected execution (if selected).
Using the User tasks tab you can view a list of active tasks and reassign tasks to other users.
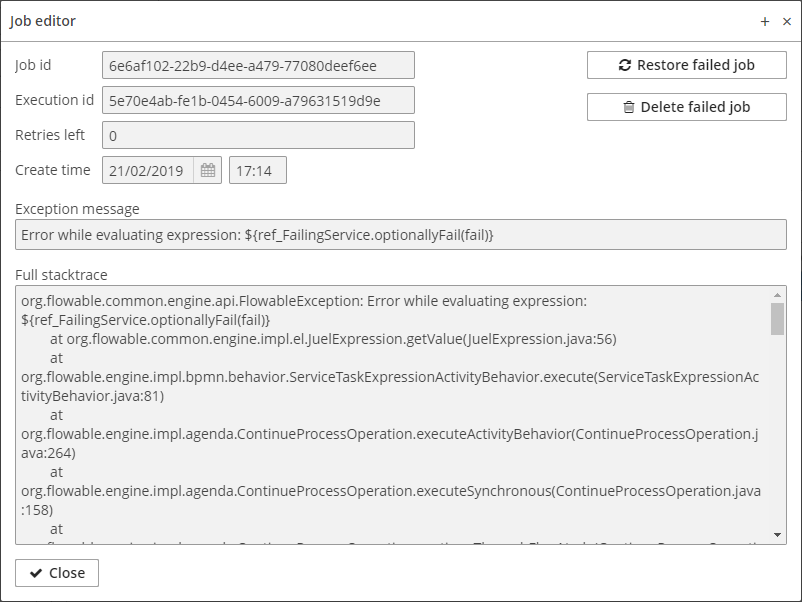
The Failed jobs tab displays the list of jobs that failed with an error. For example, if some service task method threw an exception, this service task will appear in the failed jobs list. From the UI you will be able to see the exception stacktrace and restore the failed job after the cause of the error is fixed.
The History tab contains history information: a list of all user tasks (completed and active), a full list of completed activities and last values of process variables. The History tab is available both for active and for completed process instances.
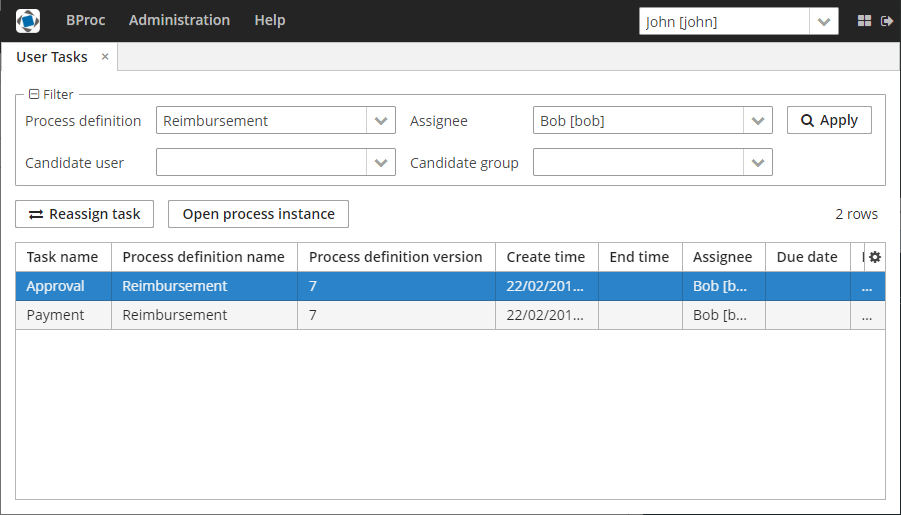
10.3. User Tasks Screen
The screen displays all active user tasks. On the top of the screen, you can filter tasks using various criteria: process definition, task assignee, task candidate, etc.
With the help of this screen you can, for example, find all tasks assigned to a user and reassign them all to another person.
11. Process Instances Migration
After a process model is modified and a new process definition version is deployed, all existing process instances continue using an older version of the process definition. If necessary you can migrate them to the new process definition version.
If you need to migrate all process instances, open the process definition editor, select a required version in the lookup field and click the Migrate all instances button. Before the migration is performed, all instances are validated, and if any instance cannot be migrated, information window is displayed.
To migrate a single instance, find it in the Process Instances screen, open the Process Instance Editor and click the Migrate button.
For more details about the process instance migration see the Process Instance Migration section of the Flowable documentation.
12. BProc API
The Flowable engine is added as a dependency to the core module of BProc add-on (see Application Modules of CUBA Manual). This means that the code in the core module can use the Flowable API directly.
In the web module the Flowable API is not available. If you need to work with a process from the web module, e.g. from a screen controller, you should use the BProc API (this API is also available in the core module, so it can be used everywhere). BProc API is very similar to the Flowable API, many of its methods repeat contracts of Flowable services and invoke Flowable services under the hood.
BProc provides the following services:
-
BprocRepositoryService -
BprocRuntimeService -
BprocTaskService -
BprocFormService -
BprocHistoricService -
BprocManagementService
12.1. Starting the Process Programmatically
You may want to start processes not from the Start Process screen, but from the regular entity editor. Let’s say, we have the Order entity editor. The Order entity has the manager field of the User type. In the process we’re going to start, some user task should be assigned to the order manager, so we must store the manager in a proper process variable. To start the process use the BprocRuntimeService.
If the order editor screen has a button with an id startProcessBtn, then a button click listener that starts the process will look like this:
@Subscribe("startProcessBtn")
protected void onStartProcessBtnClick(Button.ClickEvent event) {
    Order order = getEditedEntity();
    Map<String, Object> processVariables = new HashMap<>();
    processVariables.put("orderId", order.getId()); (1)
    processVariables.put("approver", order.getManager()); (2)
    bprocRuntimeService.startProcessInstanceByKey( (3)
            "order-approval", (4)
            order.getNumber(),  (5)
            processVariables); (6)
}| 1 | We put an edited entity id to the process variable with the orderId name. Later we will be able to find the related process instance and user tasks using this variable value. |
| 2 | The approver variable is used for the user task assignment. |
| 3 | To start the process we use the BprocRuntimeService. |
| 4 | order-approval is the process definition key. |
| 5 | The order number is used as an optional process instance business key. It is not required to use business keys in general case. |
| 6 | The third method argument is a process variables map (contains an order id and the approver user). |
12.2. Getting a List of Process Instances
The next snippet can be used inside the order entity editor to get a list of process instances of order-approval definition related to the edited order entity. The orderId variable should store the order id. It may be passed, for example, on process start (see the Starting the Process Programmatically section).
Order order = getEditedEntity();
List<ProcessInstanceData> processInstances = bprocRuntimeService.createProcessInstanceDataQuery()
    .processDefinitionKey("order-approval")
    .variableValueEquals("orderId", order.getId())
    .list();
The ProcessInstanceData is a not-persistent platform Entity, it can be displayed in standard UI components, i.e. in a Table or a DataGrid.
|
12.3. Getting a List of User Tasks
The next snippet demonstrates how to get a list of user tasks of the order-approval process, that are assigned to the current user and are related to the edited Order entity:
Order order = getEditedEntity();
List<TaskData> tasks = bprocTaskService.createTaskDataQuery()
    .processDefinitionKey("order-approval")
    .taskAssignee(userSession.getCurrentOrSubstitutedUser())
    .processVariableValueEquals("orderId", order.getId())
    .orderByTaskCreateTime()
    .desc()
    .list();
The TaskData is a not-persistent platform Entity, it can be displayed in standard UI components, i.e. in a Table or a DataGrid.
|
12.4. Complete a User Task
An example how to complete a user task from the code:
bprocTaskService.completeWithOutcome(tasksData, // TaskData instance
    "approve",  // outcome
    processVariables); // process variables map
13. Automatic Models Deployment
BPMN processes and DMN tables may be automatically deployed on application startup.
-
bproc.flowable.autoDeployBpmnResourcesLocationPatterndatabase application property defines the filter for searching BPMN models. The default property value is
classpath*:bproc/model/bpmn/**/*.bpmn20.xmlThis means that all files with names ending with .bpmn20.xml and located under the bproc/model/bpmn package of the core module will be deployed when the application is started.
-
bproc.flowable.autoDeployDmnResourcesLocationPatterndatabase application property defines the filter for searching DMN table models. The default value is
classpath*:bproc/model/dmn/**/*.dmn.xmlThis means that all files with names ending with .dmn.xml and located under the bproc/model/dmn package of the core module will be deployed when the application is started.
Only files that were modified since last application start will be deployed.
14. DMN
An introduction to DMN can be found in Flowable DMN documentation.
BProc add-on provides a decision table modeler that can be found under the BProc → Decision Table Modeler menu.
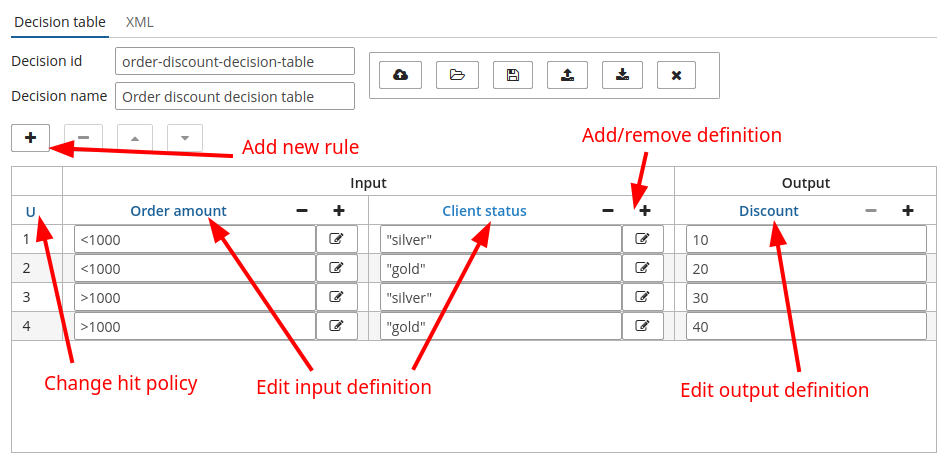
In the model editor, you can add new input and output columns, edit column variable names, types and captions.
Using the action buttons panel you can deploy the decision table to the DMN engine or save the table definition draft if you wish to continue working on it later.
In the input entries expressions the == operator may be omitted. Also, don’t forget to wrap string values in input entries expressions in double quotes.
The decision table result will be stored in the corresponding process variable. Properties panel of sequence flow element in the BPMN modeler has an interface for working with decision table results.

You can select a business rule task, its output variable and possible values from drop-down lists.
15. Process Engine Configuration
You can configure the Flowable process engine by handing the BeforeProcessEngineInitEvent application event. The event is fired before the process engine is built and started. You need to get an instance of the ProcessEngineConfiguration from the event and define required settings there.
@Component("qs_MyEngineInitializer")
public class MyEngineInitializer {

    @EventListener (1)
    public void onBeforeProcessEngineInit(BeforeProcessEngineInitEvent event) {
        ProcessEngineConfiguration processEngineConfiguration = event.getProcessEngineConfiguration(); (2)
        ((ProcessEngineConfigurationImpl) processEngineConfiguration).setAsyncExecutorNumberOfRetries(1); (3)
    }
}| 1 | A listener for the BeforeProcessEngineInitEvent event. See Event handling in beans in CUBA documentation. |
| 2 | Get the ProcessEngineConfiguration from the event instance. |
| 3 | Configure the process engine. E.g. set the number of times a job will be retried before it is moved to the deadletter table. |