Preface
This manual describes the CUBA Platform Business Process Management subsystem.
We assume that the reader is familiar with the CUBA Platform Developer’s Manual which is available at https://www.cuba-platform.com/manual.
CUBA business process management subsystem is based on the Activiti framework, therefore general knowledge of the framework is beneficial. See http://www.activiti.org to learn more about Activiti. Processes are defined according to the BPMN 2.0 notation, so it is assumed that the reader is familiar with the notation. More information about BPMN 2.0 specification can be found at http://www.bpmn.org.
If you have any suggestions for improving this manual, feel free to report issues in the source repository on GitHub. If you see a spelling or wording mistake, a bug or inconsistency, don’t hesitate to fork the repo and fix it. Thank you!
1. Quick Start
In this chapter, we will create a small project to demonstrate how to use the business processes subsystem. As an illustration, we will implement a contract approval process software.
Commonly an approval process involves the following steps:
-
A user creates the
Contractobject, defines actors and initiates an approval process. -
An actor with the
Controllerrole receives the task to validate an attached contract. -
If the validation is passed then the contract is transferred to the users with the
Managerrole assigned, otherwise the process will be terminated withNot validstate. -
After the associated managers approve or reject the contract it turns, respectively, into the
ApprovedorNot approvedstate.
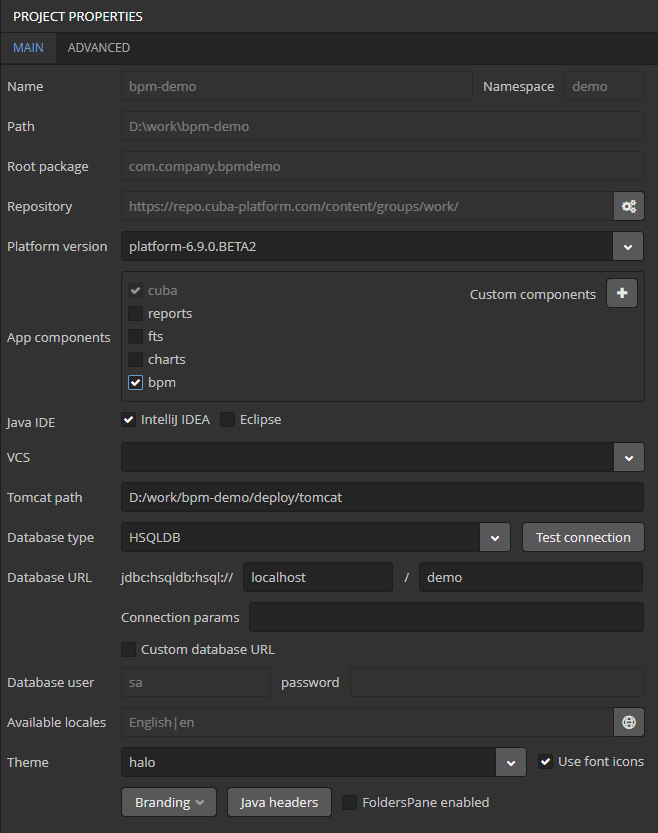
1.1. Creating the Project
-
Create a new project in Cuba Studio:
-
Project name:
bpm-demo -
Project namespace:
demo -
Root package:
com.company.bpmdemo
-

-
Open the project properties window (Project properties section, Edit button).
-
Activate the BPM subsystem in the App components list.
-
Press OK button at the Project properties page. The system will ask you for the confirmation. Agree.
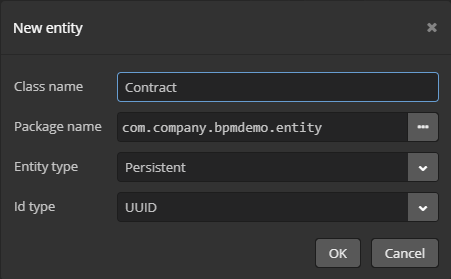
1.2. Creating the Data Model
Go to the Data model tab and press New > Entity. The class name is Contract.
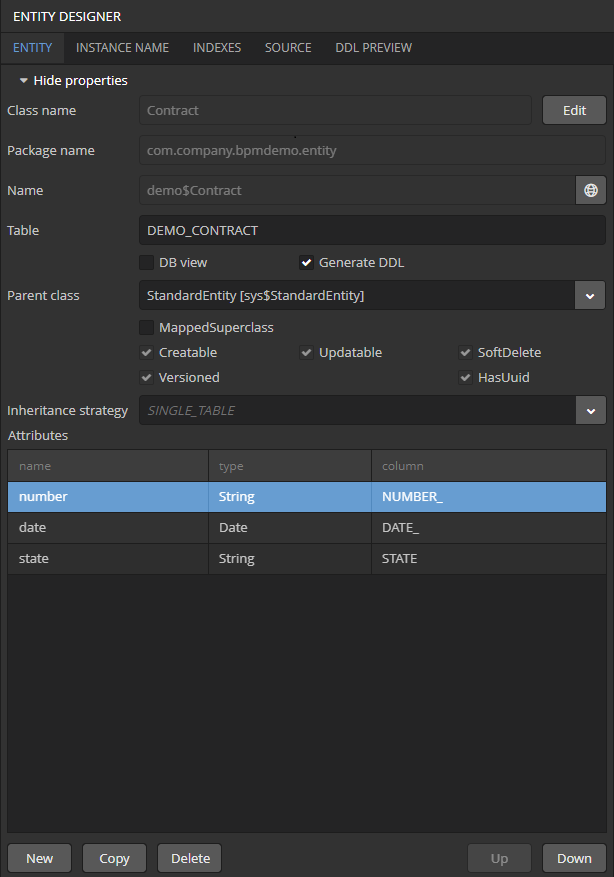
Create the following entity attributes:
-
number(Stringtype) -
date(Datetype) -
state(Stringtype)
Go to the Instance name tab and add the number attribute to Name pattern attributes.
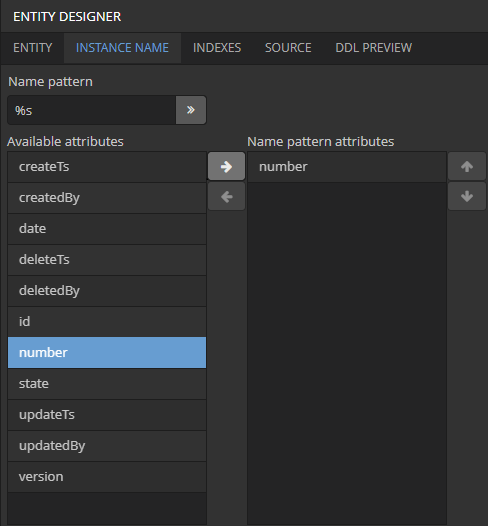
Press the OK button to save the entity.
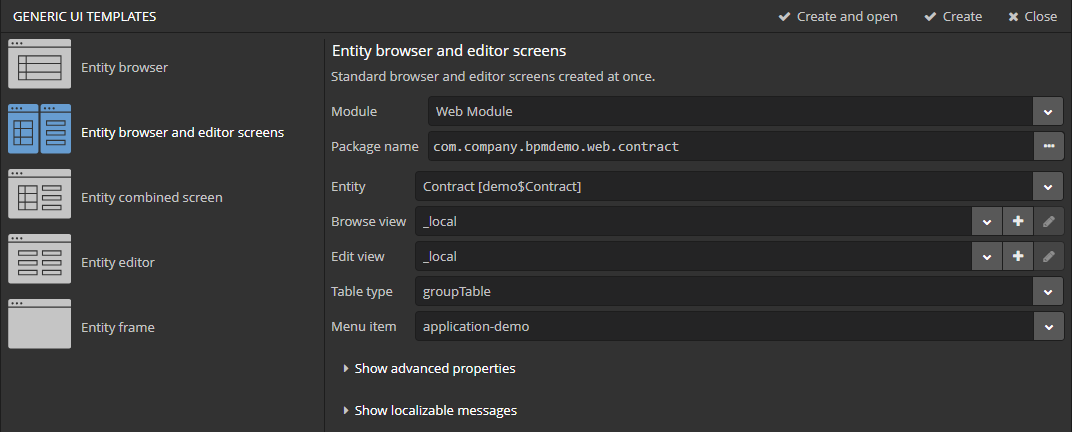
1.3. Creating Standard Screens
Select the Contract entity in the Data model section and click New > Generic UI screen. In the list of screen templates, select Entity browser and editor screens and click Create. Close the list of templates.
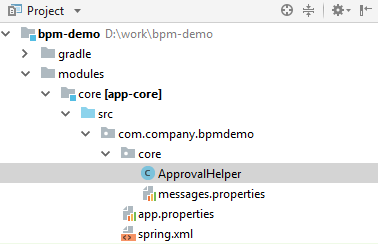
1.4. Creating ApprovalHelper Bean
The updateState() method of the ApprovalHelper bean will be invoked from the contract approval process for setting a contract state.
Method parameters:
-
entityId- contract entity identifier -
state- contract state
Open the project in an IDE. Create ApprovalHelper class in the com.company.bpmdemo.core package.
package com.company.bpmdemo.core;
import org.springframework.stereotype.Component;
import com.company.bpmdemo.entity.Contract;
import com.haulmont.cuba.core.Persistence;
import com.haulmont.cuba.core.Transaction;
import javax.inject.Inject;
import java.util.UUID;
@Component("demo_ApprovalHelper")
public class ApprovalHelper {
@Inject
private Persistence persistence;
public void updateState(UUID entityId, String state) {
try (Transaction tx = persistence.getTransaction()) {
Contract contract = persistence.getEntityManager().find(Contract.class, entityId);
if (contract != null) {
contract.setState(state);
}
tx.commit();
}
}
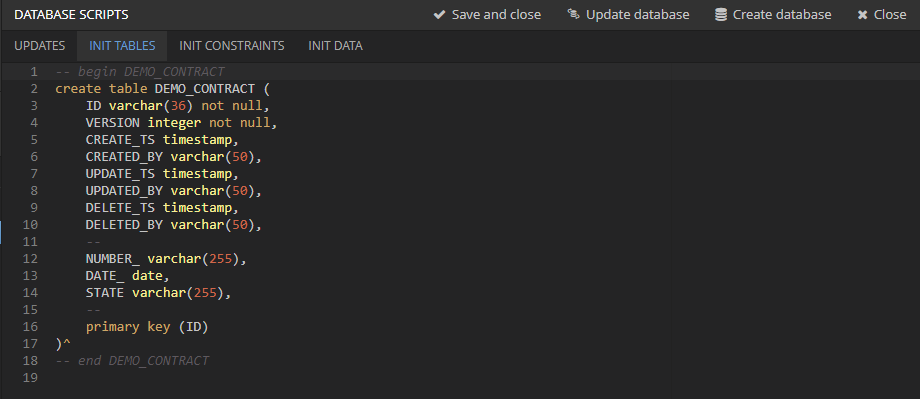
}1.5. Creating the Database and Running the Application
Click the Generate DB scripts button on the Data model section. Then click the Create database button on the Database scripts page.
Start the application server using Run → Start application server menu command.
Open the application in a web browser at http://localhost:8080/app or just click the link on the Studio status panel.
1.6. Creating the Process
In this section, we will create and deploy the process.
1.6.1. Creating the Process model
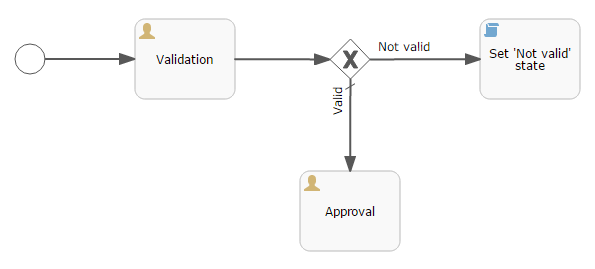
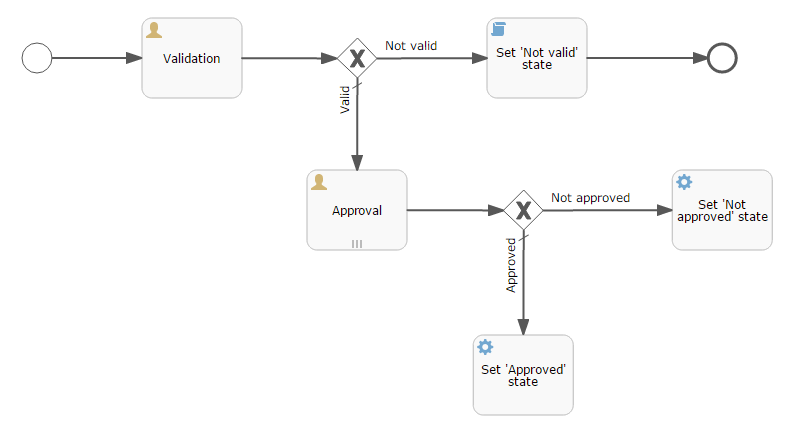
The final version of the process model will look like this:
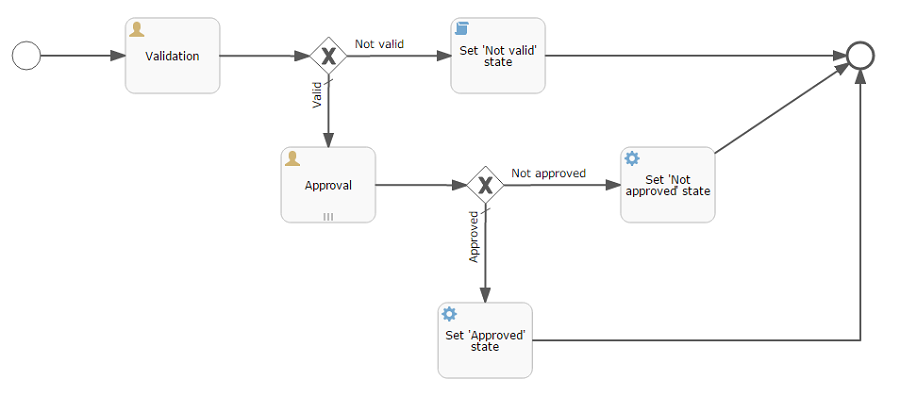
Let’s take a look at the steps needed to create the model.
In the web interface of the running application, open the BPM → Process Models screen and click Create. Enter Contract approval for the model name and click OK. Model Editor will be opened in a new browser tab.
|
Tip
|
A notification with a clickable link is shown in case of creating or copying the process model. In case of clicking the Edit button, the process model editor is shown in the new tab. |
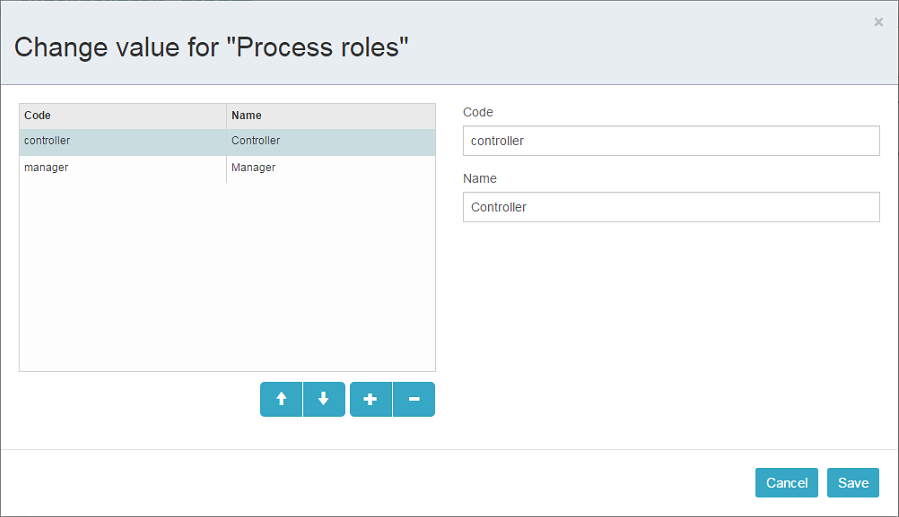
Select the Process roles property in the model properties panel. The Process roles edit window will be opened.

Two types of actors participate in the process: a manager and a controller. Create two roles: Controller and Manager.
Drag and drop the Start event node from the Start Events group to the workspace.
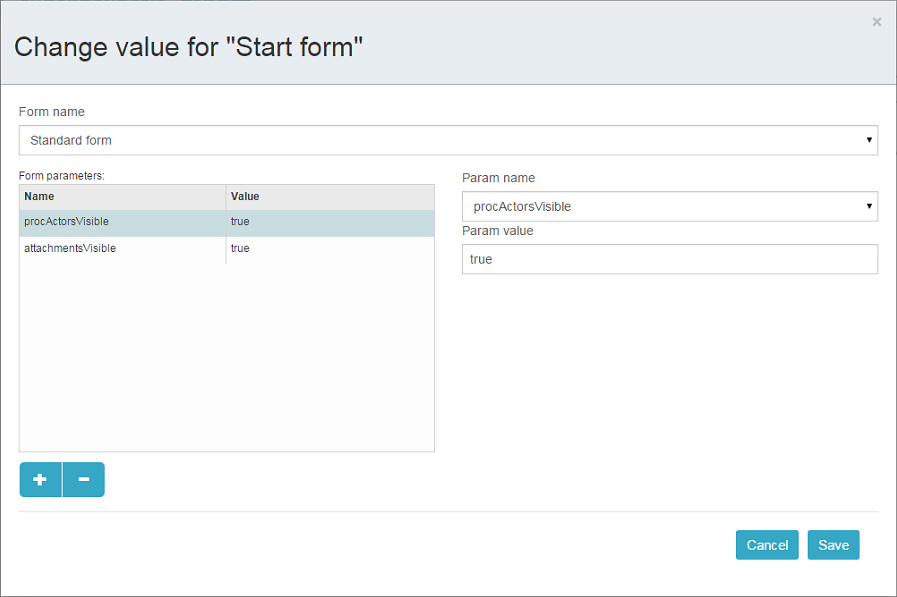
We need to display a form to select process actors when the process starts. Select the start event node. Select the Start form in its properties panel - a form selection window will appear. Select Standard form in the Form name field. Then add two form parameters:
-
procActorsVisiblewithtruevalue indicates that a table for process actors selection will be displayed on the form. -
attachmentsVisiblewithtruevalue indicates that a table for uploading attachments will be displayed on the form.
Add the User task node from the Activities group to the model. Name it Validation.

Select this node and assign the controller value to the Process role property at the properties panel. This way we define that the task will be assigned to a process actor with the controller role.

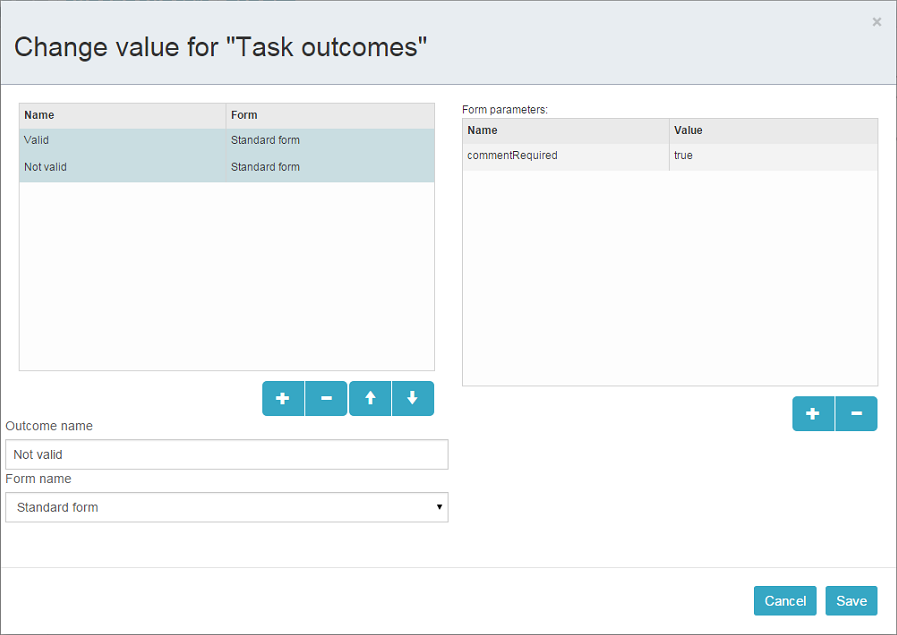
Next, select the Task outcomes property. The window for task outcomes edit will be opened. Outcomes define possible user actions when users receive tasks. Create two outcomes: Valid and Not valid. Define the Standard form for both outcomes. Add form parameter commentRequired=true for the Not valid outcome, because we want to make a user add a comment in case of invalid contract.
Depending on the controller’s decision we have to send the contract to managers approval or to finish the process with the Not valid state. The Exclusive gateway node from the Gateways group is used to control the process flow. Add it to the workspace and then add two more elements: Script task with Set 'Not valid' state name and User task with Approval name. Name the flow to the Script task as Not valid and the flow to the User task as Valid.
Select the Not valid flow. Expand the Flow outcome dropdown list from the properties panel. It shows outcomes from the tasks before the gateway. Select the Not valid value.

Now, if the Not valid outcome is selected, a transition to this flow will be performed.
The Valid flow should be marked as the default flow (if no other flows condition is true). Select the Valid flow and tick the Default flow property.
|
Warning
|
There must be no value selected in the Flow outcome dropdown list for the flow marked as default. |
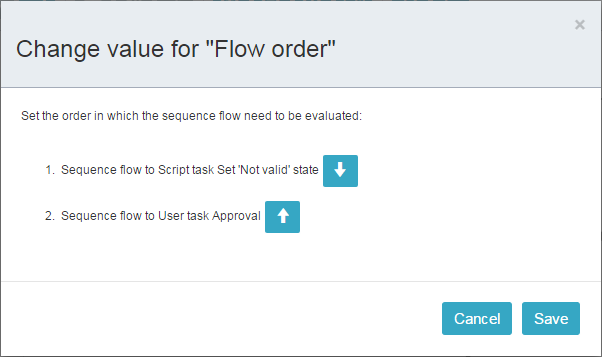
Next, select the Exclusive gateway and open its Flow order property editor. Make sure that the Not valid flow is on the first place in the list. Change the flows sequence if necessary.
Let’s move on to the Set 'Not valid' state node. We need to set the state property of the Contract entity to the Not valid value. Select the node. Set the Script format property value to groovy. Click on the Script property field - the script editor will be opened. Copy and paste the following code there:
def em = persistence.getEntityManager()
def contract = em.find(com.company.bpmdemo.entity.Contract.class, entityId)
contract.setState('Not valid')
You can use process variables and persistence and metadata platform objects (see Developer’s Manual) in scripts. The entityId variable is created on process start and stores an identifier of the linked entity.
After the contract state is changed, the process should be finished. Let’s add the End event node from the End events group to the workspace and connect the node with the Set 'Not valid' state.
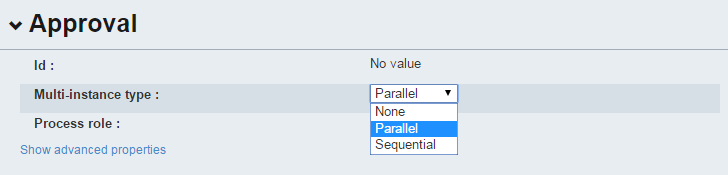
Let’s go back to the Approval task. Define the manager process role for it like we did for the first task. In order for the task to be assigned to many managers simultaneously, set its Multi-instance type property to Parallel.
Create two task outcomes: Approve and Reject (Task outcomes property). For both outcomes, set the Standard form form and set commentRequired parameter to true for the Reject outcome.
After the approval is completed, either Approved or Not approved status should be assigned to the contract depending on the approval result. Add an Exclusive gateway node after the Approval task. Add two Service task after the exclusive gateway: Set 'Approved' state and Set 'Not approved' state. They will do the same thing as the Script task we have added earlier, but in a different way: by invoking a Spring bean method. Name the flow to the Set 'Approved' state as Approved, and the flow to the Set 'Not approved' state as Not approved.
Select the Not approved flow node and select the Reject value in the Flow outcome list. Now if at least one of the managers performs the Reject action then this outcome will be initiated. Select the Approved flow node and check the Default flow checkbox. This means that if no other flow is initiated then this flow will be used.
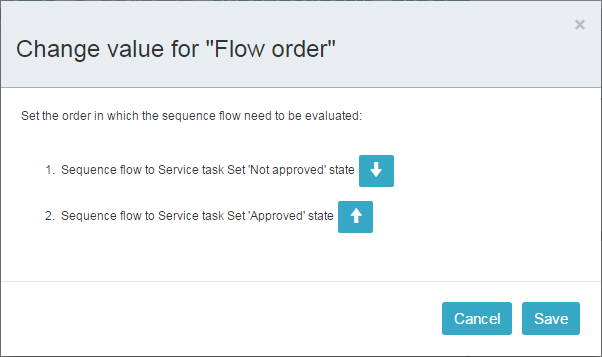
Set the flow order for Exclusive gateway like we did for the previous one. Select Exclusive gateway and open the Flow order property editor. Not approved should be processed first.
Let’s go back to the Service task. Select the Set 'Approved' state node and set its Expression property to the following value:
${demo_ApprovalHelper.updateState(entityId, 'Approved')}Apply the following script for the Set 'Not approved' state:
${demo_ApprovalHelper.updateState(entityId, 'Not approved')}The Activiti engine is integrated with the Spring framework, so we can access Spring managed beans by their names. entityId is a process variable that stores an identifier of the contract which is linked to the process. Its value is set on the process start.
Connect both service tasks with the End event and click the save button. The model is ready and we can move on to the model deployment.
1.6.2. Process Model Deployment
The model deployment process consists of the following steps:
-
Generating a process XML in BPMN 2.0 notation from the model.
-
Deploying the process to Activiti engine internal tables.
-
Creating a
ProcDefinitionobject that relates to the Activiti process. -
Creating
ProcRoleobjects for process roles defined in the model.
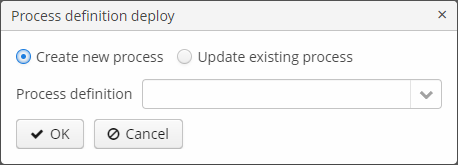
Select the model in the list on the Process Models screen. Press the Deploy button. The model deployment window will be displayed. The model is deployed for the first time, so the Create new process option is selected. You will be able to deploy the model to existing processes for further model changes. Click OK. The process definition is created.
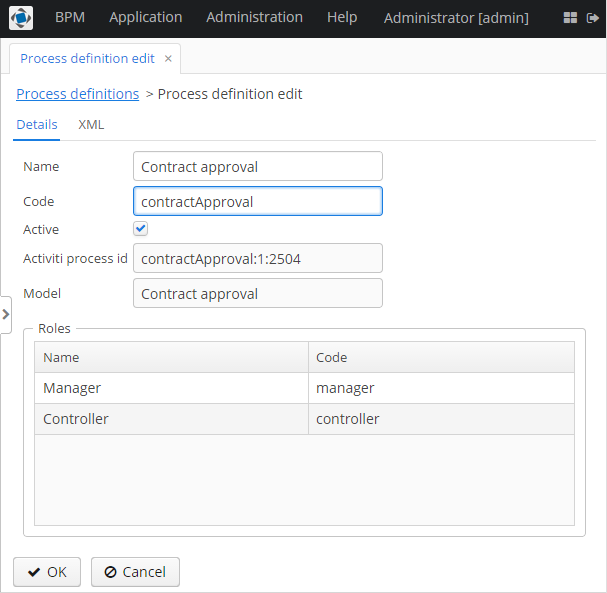
Open the screen BPM → Process Definitions. Open the Contract approval item for editing. The Code field value is contractApproval. Remember this value - we will use it to identify the process definition later in this chapter.
1.7. Adapting Screens to the Process
In this section, we will add an ability to work with the contract approval process to the contract editor screen.
1.7.1. Contract Editor Screen Layout
Find the contract-edit.xml screen in the Screens panel in Studio and open the screen for editing. Go to the XML tab and completely replace its content with the following code:
<?xml version="1.0" encoding="UTF-8" standalone="no"?>
<window xmlns="http://schemas.haulmont.com/cuba/window.xsd"
        caption="msg://editorCaption"
        class="com.company.bpmdemo.web.contract.ContractEdit"
        datasource="contractDs"
        focusComponent="fieldGroup"
        messagesPack="com.company.bpmdemo.web.contract">
    <dsContext>
        <datasource id="contractDs"
                    class="com.company.bpmdemo.entity.Contract"
                    view="_local"/>
        <collectionDatasource id="procAttachmentsDs"
                              class="com.haulmont.bpm.entity.ProcAttachment"
                              view="procAttachment-browse">
            <query>
                <![CDATA[select a from bpm$ProcAttachment a
                            where a.procInstance.entity.entityId = :ds$contractDs
                            order by a.createTs]]>
            </query>
        </collectionDatasource>
    </dsContext>
    <dialogMode height="600"
                width="800"/>
    <layout expand="windowActions"
            spacing="true">
        <fieldGroup id="fieldGroup"
                    datasource="contractDs">
            <column width="250px">
                <field property="number"/>
                <field property="date"/>
                <field editable="false"
                       property="state"/>
            </column>
        </fieldGroup>
        <groupBox id="procActionsBox"
                  caption="msg://process"
                  orientation="vertical"
                  spacing="true"
                  width="AUTO">
            <frame id="procActionsFrame"
                   screen="procActionsFrame"/>
        </groupBox>
        <groupBox caption="msg://attachments"
                  height="300px"
                  width="700px">
            <table id="attachmentsTable"
                   height="100%"
                   width="100%">
                <columns>
                    <column id="file.name"/>
                    <column id="author"/>
                    <column id="type"/>
                    <column id="comment"
                            maxTextLength="50"/>
                </columns>
                <rows datasource="procAttachmentsDs"/>
            </table>
        </groupBox>
        <frame id="windowActions"
               screen="extendedEditWindowActions"/>
    </layout>
</window>
Go to the Layout tab. The resulting screen layout is shown below:
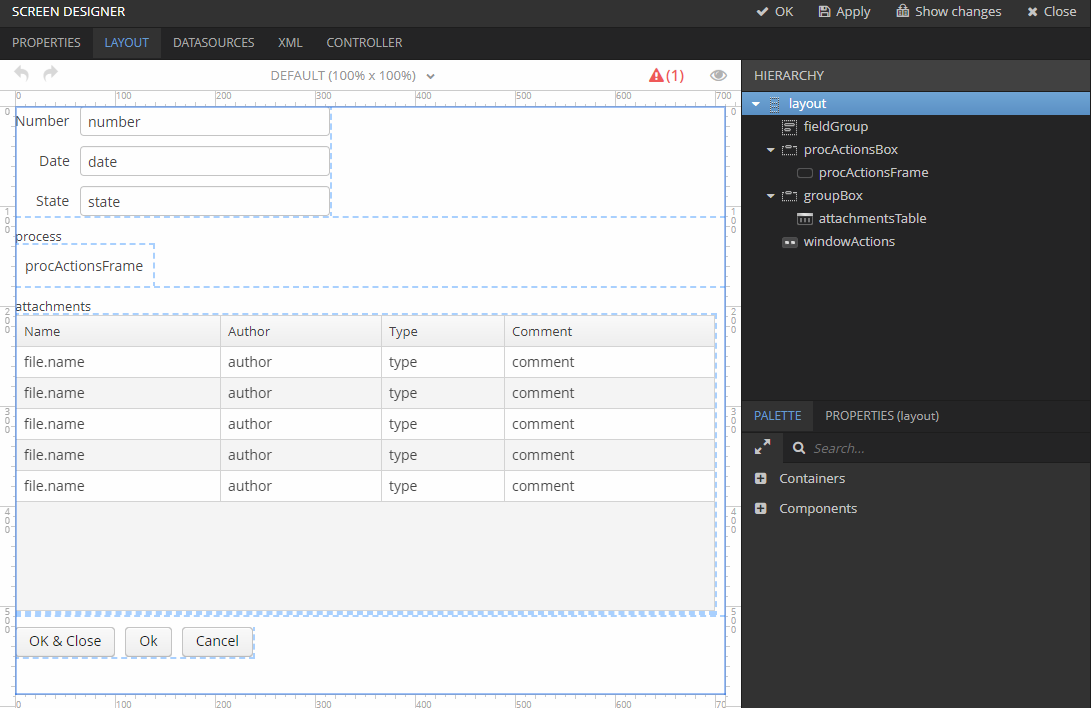
The screen contains a FieldGroup for contract editing, a frame for displaying process actions, and a table with process attachments.
1.7.2. Contract Editor Controller
Go to the Controller tab and replace its content with the following code:
package com.company.bpmdemo.web.contract;

import com.haulmont.cuba.gui.components.AbstractEditor;
import com.company.bpmdemo.entity.Contract;
import com.haulmont.bpm.entity.ProcAttachment;
import com.haulmont.bpm.gui.procactions.ProcActionsFrame;
import com.haulmont.cuba.gui.app.core.file.FileDownloadHelper;
import com.haulmont.cuba.gui.components.Table;

import javax.inject.Inject;

public class ContractEdit extends AbstractEditor<Contract> {
    private static final String PROCESS_CODE = "contractApproval";

    @Inject
    private ProcActionsFrame procActionsFrame;

    @Inject
    private Table<ProcAttachment> attachmentsTable;

    @Override
    public void ready() {
        FileDownloadHelper.initGeneratedColumn(attachmentsTable, "file");
        initProcActionsFrame();
    }

    private void initProcActionsFrame() {
        procActionsFrame.initializer()
                .standard()
                .init(PROCESS_CODE, getItem());
    }
}
Click OK to save the changes.
Let’s examine the controller code in details.
The ProcActionsFrame is the frame that displays process actions available to the user at the moment. On initialization, the frame searches for a related ProcInstance object by two parameters: process code and entity instance. If the ProcInstance object is not found then a new instance is created and the frame displays the start process button. If the related process instance is found then the frame searches for an uncompleted process task for the current user and displays buttons for process task actions. See ProcActionsFrame for details.
In the contract editor, the process actions frame initialization is performed in the initProcActionsFrame() method. The main part of the method is the invocation of the init(PROCESS_CODE, getItem()). The PROCESS_CODE stores a process code (contractApproval - we saw this value during the model deployment, see Process Model Deployment). The second argument getItem() is the current contract.
The standard() initialization does the following:
-
initializes standard process actions predicates that will be invoked before the process is started and before process tasks are completed. The predicates commit the entity editor.
-
initializes standard listeners that will show notifications like "Process started" or "Task completed" and refresh the
procActionsFrameafter the process is started or process task is completed.
1.8. Working With the Application
Hot deploy mechanism is enabled in Studio by default, so all changes in screens should already be applied to the running application. If hot deploy is disabled, restart the server using the Run → Restart application server menu command.
1.8.1. Creating Users
In order to demonstrate the process, create three users in the Administration → Users screen:
-
login:
norman, First name:Tommy, Last name:Norman -
login:
roberts, First name:Casey, Last name:Roberts -
login:
pierce, First name:Walter, Last name:Pierce
1.8.2. Creating a Contract and Starting the Process
-
Open the Application → Contracts screen and create a new contract. Fill in the Number and Date fields and click Save.
-
Click Start process button, the start process form should appear. During the model creation we defined the
Standard formwith attributesprocActorsVisible=trueandattachmentsVisible=truefor the Start event node. That’s why now we see the form with the process actors and attachments tables. -
Enter a comment and add actors: the controller is
normanand the two managers arepierceandroberts. -
Add an attachment by using an Upload button from the attachments table.
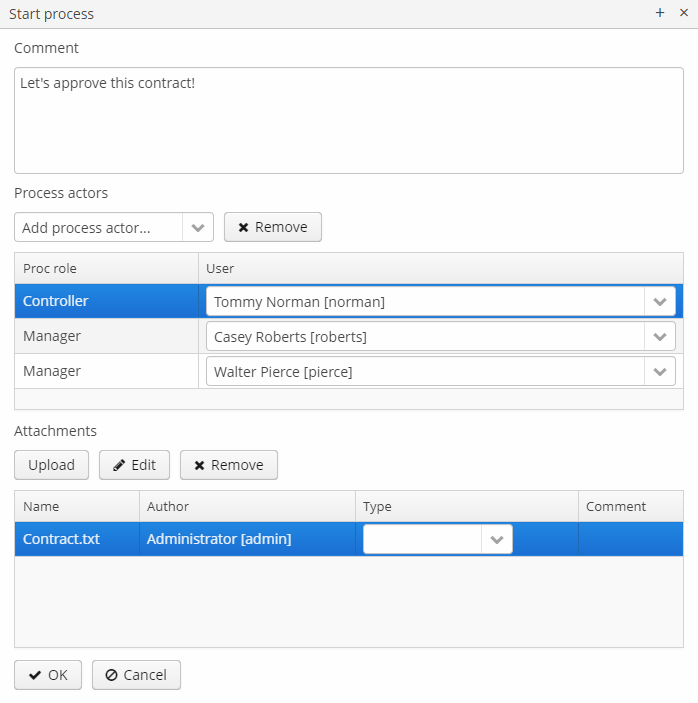
-
Press OK. Now the process is started.
1.8.3. Controller Validation Stage
Log in as norman.
When the process reaches the User task node, a ProcTask object is created. This object is linked to the particular process actor. The BPM subsystem has a screen for displaying uncompleted tasks for the current user: BPM → Process Tasks.
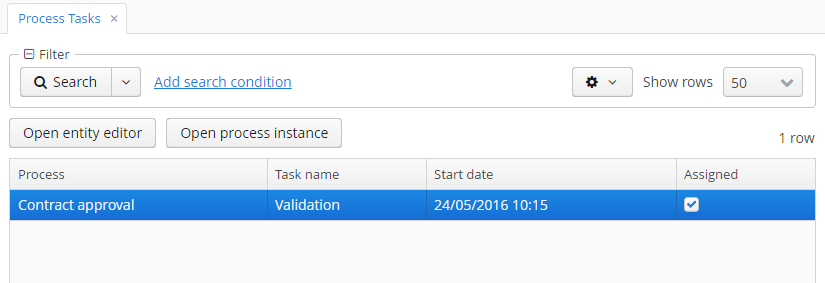
We see that the user norman has one uncompleted task Validation of the Contract approval process. Select it and click the Open entity editor button. The contract edit screen will appear:
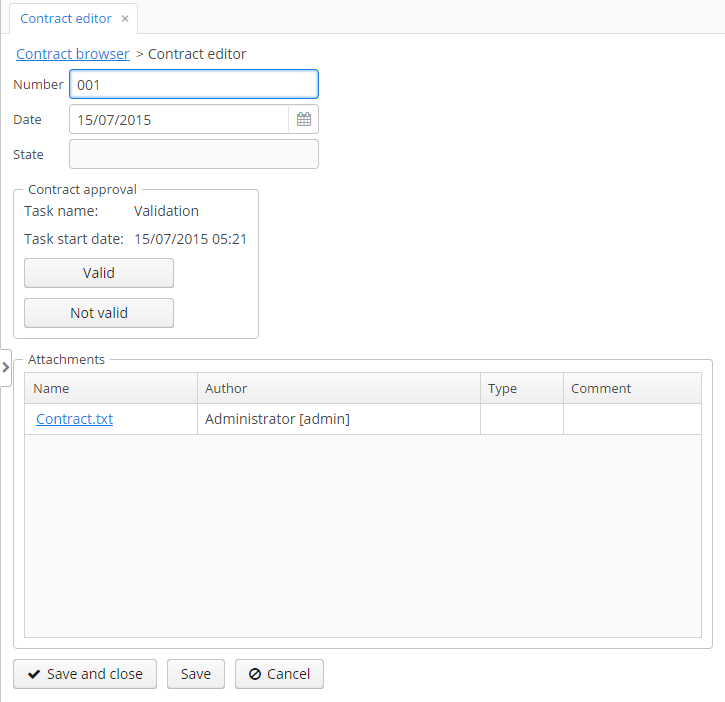
The current user (norman) has an uncompleted task (ProcTask), so the procActionsFrame displays available process actions. When we were defining the Validation UserTask node, we set two possible outcomes: Valid and Not valid. That’s why two buttons are added to the procActionsFrame.
Click the Valid button and enter a comment in the opened window:
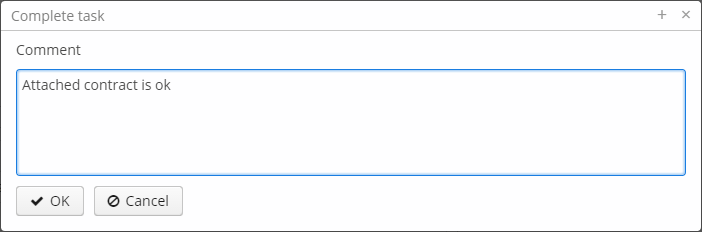
Click OK.
After the successful validation, the contract should go to the parallel approval by managers.
1.8.4. Manager Approval Stage
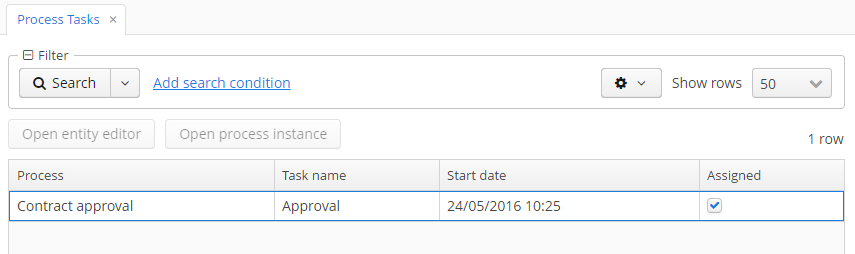
Log in as the pierce user.
Open the list of tasks for the current user: BPM → Process tasks. You can see the Approval task.
Select the task and this time click the Open process instance button. The system screen for working with the process instance will be opened.
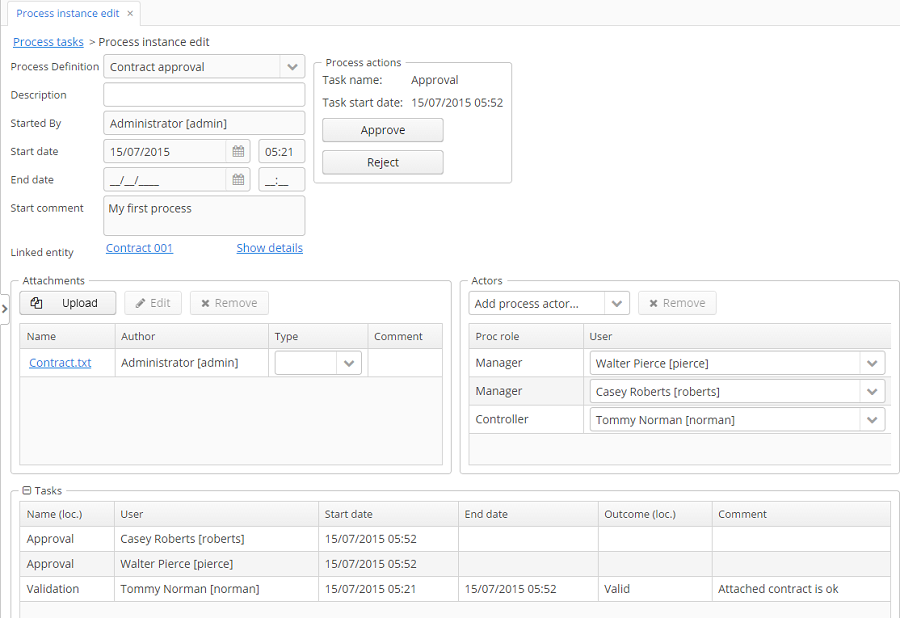
It displays the information about the process start time, initiator, attachments list, actors and process instance tasks list. The screen also allows you to open a linked entity editor and execute a process action.
Pay attention to the Tasks table. The previous task Validation has been completed with the Valid outcome, and two new Approval tasks have been created for managers pierce and roberts.
Approve the contract pressing the Approve button.
Then log in as roberts. Open the contract from the list in Application → Contracts.
User roberts has an uncompleted task, so the procActionsFrame displays Approve and Reject actions. Click the Reject button.
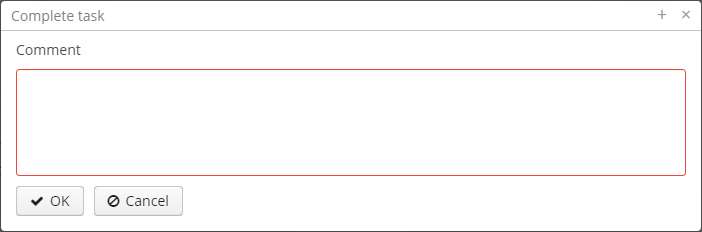
When we were defining the Reject outcome in the model designer, we set the commentRequired form parameter to true, therefore you see that the comment is required in the task complete form. Enter the comment and press OK.
One of the managers has rejected the contract, so the Not approved state should be assigned to the contract. Let’s check it. Open the contract.
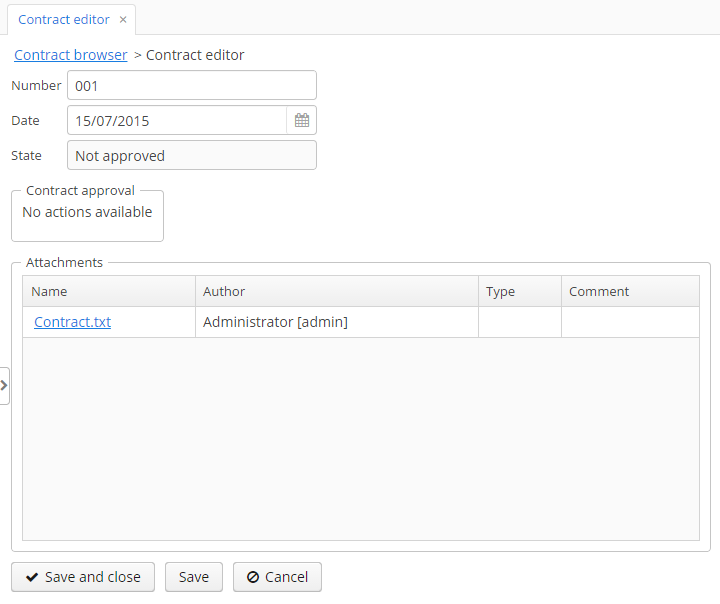
The approval process is completed with the Not approved state.
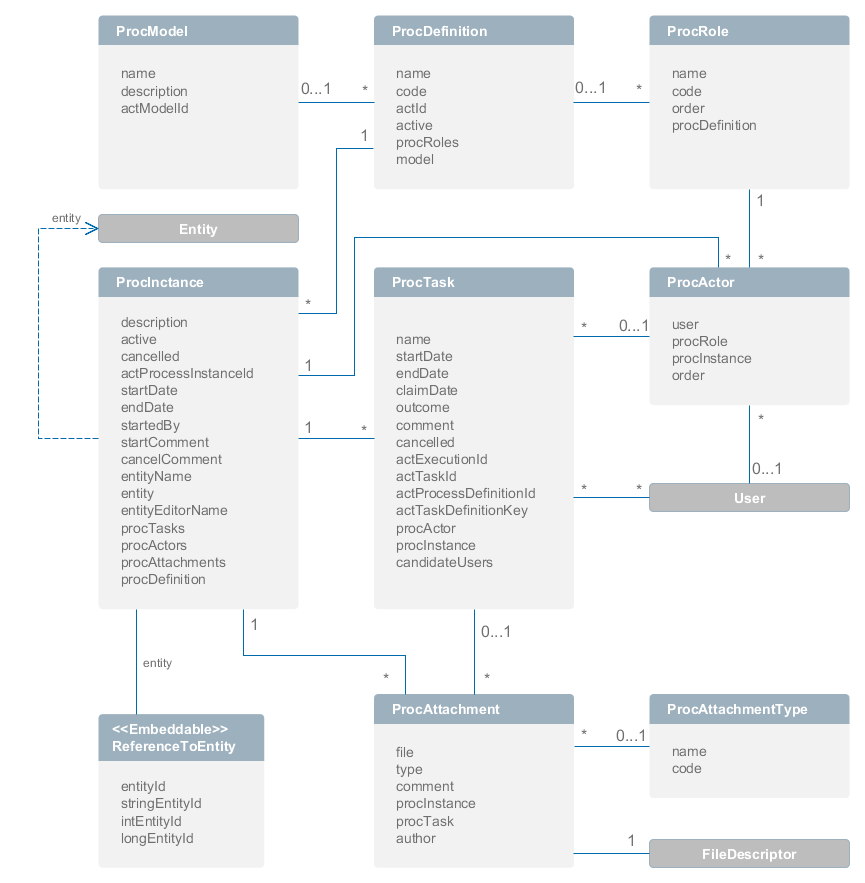
2. Data Model
|
Tip
|
Attributes with names starting with |
-
ProcModel -
The process model. Model attributes:
-
name- the model name. -
description- the model description. -
actModelId- ID of a model from Activiti engine, stored inACT_RE_MODELtable.
-
-
ProcDefinition -
The process definition. Entity attributes:
-
name- the process name. -
code- the process code. It can be used to determine an entity instance from the application code. -
actId- ID of a process from Activiti. -
active- defines, whether a new process instance start is allowed for the currentProcDefinition. -
procRoles- collection of objects that defines process actors. -
model- the reference to a model.
-
-
ProcRole -
The process role. Objects of this type are created automatically on process deployment.
ProcRoledefines a process actor type. Entity attributes:-
name- the role name. -
code- the role code. It can be used by an application for a role identification. -
order- the order number. It can be used by an application to display roles in an appropriate order. -
procDefinition- the reference to a process definition.
-
-
ProcInstance -
The process instance.
ProcInstancecan be started both with a link to a project entity and without a link. For example, the contract approval process instance can be linked with a contract entity. Entity attributes:-
description- the description of a process instance. -
startDate- the process instance start date. -
endDate- the process instance end date -
startedBy- the user who started a process. -
active- the indicator that shows if a process was started but hasn’t been completed yet. -
cancelled- the indicator that shows if a process was canceled. -
actProcessInstanceId- the identifier of the correspondingProcessInstancefrom Activiti. -
startComment- the comment on process start. -
cancelComment- the comment on process cancel. -
entityName- the linked entity name. -
entityId- the linked entity ID. -
entityEditorName- the screen name that will be used to edit the linked entity. -
procTasks- the process tasks collection. -
procActors- the process actors collection. -
procAttachments- the process attachments collection.
-
-
ProcActor -
The process participant. The entity defines an executor with a particular role for a process instance. Entity attributes:
-
user- the reference to a user. -
procInstance- the reference to a process instance. -
procRole- the reference to a process role. -
order- the order number. The field is used to define the order of actors for a sequential task for multiple users.
-
-
ProcTask -
The process task. Objects of this type are automatically created when a process reaches the User task node. Entity attributes:
-
name- the task name. -
startDate- the task start date. -
claimDate- the claim date. The field is used in a case of a task without an explicit process actor. -
endDate- the task end date. -
outcome- the task completion result. -
comment- the task completion comment. -
procActor- the executor. -
actTaskId- the Activiti task ID. This field is used to report the Activiti engine about task completion. -
actExecutionId- the Activiti execution ID. This field is used for process variables read/write. -
actTaskDefinitionKey- in a process XML it is anidattribute of theUserTaskelement. It is used for building a name of a variable that stores the task result ([task_id]_result). See Transitions Depending on Task Outcomes. -
cancelled- the identifier that shows if the task was completed on process cancelation. -
candidateUsers- the list of possible process actors for a group task. -
procInstance- the reference to a process instance.
-
-
ProcAttachment -
The process attachment. Entity attributes:
-
file- the reference to FileDescriptor. -
type- the attachment type (ProcAttachmentType). -
comment- the comment. -
author- the reference to the author of an attachment. -
procInstance- the reference to a process instance. -
procTask- the optional reference to a process task.
-
-
ProcAttachmentType -
The attachment type. Entity attributes:
-
code- the attachment type code. -
name- the attachment type name.
-
2.1. Working with BPM Entities
CUBA provides a handy way of working with the entities of the BPM data model: the BpmEntitiesService service. Its methods will simplify the following typical operations:
-
findProcDefinitionByCode()- finds the ProcDefinition by process definition code. -
findActiveProcInstancesForEntity()- returns the list of ProcInstance entities by process definition code. -
findActiveProcTasks()- returns the list of ProcTask instances available for the passed process instance and user. -
findProcRole()- finds the ProcRole instance by process definition code and the process role code. -
findActiveProcTasksForCurrentUser()- returns the list of ProcTask instances available for the passed process instance and the current user. -
createProcInstance()- creates a new process instance, see [process_runtime_service_usage].
3. Functionality
The BPM subsystem employs the Activiti Engine for execution of business processes. The modified editor from Activiti Explorer is used to model processes using BPMN 2.0 notation. In addition to Activiti framework capabilities, the BPM subsystem provides additional functionality which is described in this section. The description of the Activiti framework is out of scope of this manual and can be found at https://www.activiti.org/userguide/.
3.1. BpmActivitiListener
The BpmActivitiListener event listener is automatically added to the process when a model is created. BpmActivitiListener implements the ActivitiEventListener interface (see http://www.activiti.org/userguide/#eventDispatcher). The listener is responsible for creating and modifying BPM entities when some process events occur (e.g. a user task entering, process cancellation, task completion, etc). This is the listener that creates ProcTask objects and sets the endDate value for a ProcInstance.
3.2. Process Roles
Process roles define process actor types, e.g. "operator" or "manager". To open the process roles editor, select the Process roles property in the model properties panel. Information about the roles will be written to the process XML (extensionElements section of the process element) during the model deployment.
Process roles definition:
<process id="testProcess" name="Test process">
    <extensionElements>
         <cuba:procRoles>
            <cuba:procRole name="Manager" code="manager"/>
            <cuba:procRole name="Operator" code="operator"/>
        </cuba:procRoles>
    </extensionElements>
</process>
3.3. Start Process Form
To define a form that will be displayed on the process start, use the Start form property of the Start event node. Read mode about forms at the Process Forms section.
Process start form definition:
<startEvent id="startEvent">
  <extensionElements>
    <cuba:form name="standardProcForm">
      <cuba:param name="procActorsVisible" value="true"></cuba:param>
    </cuba:form>
  </extensionElements>
</startEvent>
3.4. User Task
To define the task assignee, select one of the process roles in the Process role property of the User task node. When a process reaches the User task, process actors with the given role will be found among all the process actors, and the task will be assigned to them.
Process role from a task:
<userTask id="managerApproval" name="Manager approval">
    <extensionElements>
        <cuba:procRole>manager</cuba:procRole>
    </extensionElements>
</process>
If you want the task to be assigned to multiple users, then set Parallel or Sequential value to the Multi-instance type property of the User task node.
- Setting a User Task assignee
-
There is also an ability to specify the task assignee in the assignee property of the User Task node. The property value may contain a string with an identifier of CUBA user:
da8159cc-757f-7f59-6579-7f629ac02f72, a variable that contains a string with a user id:${variableName}, or an expression that invokes the service that returns a user id:${someService.getSomeUserId()}. Keep in mind, that the procRole property still must be defined. When the process reaches such User Task, aProcActorinstance for the specified user and process role is searched. If it doesn’t exist a newProcActorobject is created. To specify the assignee in the model designer, select the User Task, click the Show advanced properties link and click into the Assignments property editor. A new dialog will appear, fill the Assignee property there.
Set the Claim allowed property if you don’t want the task to be immediately assigned to the particular user, but to appear in the list of available tasks for the group of users. Then, one of the candidates will be able to claim the task. Task candidates are defined amongst process actors with the corresponding Process role property.
A task without an explicit executor:
<userTask id="managerApproval" name="Manager approval">
    <extensionElements>
        <cuba:claimAllowed>true</cuba:claimAllowed>
    </extensionElements>
</process>
3.5. Task Outcomes
Commonly, a user is expected to make a decision on the task, e.g. to approve or to reject the contract. The next route through the process depends on this decision. The Task outcomes property of the User task node is used to define the list of outcomes. The name and form that should be displayed when an outcome is selected can be defined for each outcome separately. Parameters that should be passed to the form can be defined as well (see Process Forms).
Task outcomes:
<userTask id="managerApproval" name="Manager approval">
    <extensionElements>
        <cuba:outcomes>
            <cuba:outcome name="approve">
                <cuba:form name="standardProcessForm">
                    <cuba:param name="commentRequired">true</cuba:param>
                    <cuba:param name="attachmentsVisible">true</cuba:param>
                </cuba:form>
            </cuba:outcome>
            <cuba:outcome name="reject">
                <cuba:form name="someOtherProcessForm">
                </cuba:form>
            </cuba:outcome>
        </cuba:outcomes>
    </extensionElements>
</process>
3.6. Transitions Depending on Task Outcomes
BPMN 2.0 notation doesn’t provide a way to define multiple outcomes for a User task. To make a process to continue in a required direction, the Exclusive gateway is used. Its outgoing flows have conditions that operate with the results of the preceding task. When a user completes the task, its result is written to the process variable with the name generated as [taskId]_result. The variable type is ProcTaskResult.
Methods of the ProcTaskResult class:
-
count(String outcomeName): int- returns the number of users who completed the task with the given outcome. -
exists(String outcomeName): boolean- returnstrueif there are users who completed the task with the given outcome.
The result object of the task completion is used in the Flow condition expression of gateway outgoing flows.
Example
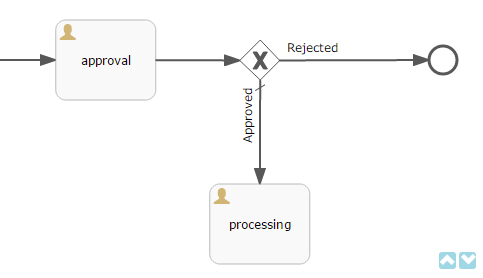
Suppose that the approval task was assigned to multiple users in parallel. There are two outcomes defined for the task: approve and reject. When all users have completed the task, the process goes to the exclusive gateway. We want to implement the following behavior: if anyone chooses the reject option then go to the Rejected flow; if everyone approved the task then go to the Approved flow.
- Defining a Condition in a Flow Outcome Field
-
The simplest way to define the flow condition is to select the name of the previous task outcome in the Flow outcome property of the flow node. The flow will be activated if there was at least one task completion with the selected outcome.
- Defining a Complex Condition for the Flow Node
-
If you need to implement more complex condition for the outcome, you can define it in the Flow condition field. For example, "More than 5 users selected the Reject option" condition looks as follows:
${approval_result.count('reject') > 5}
3.7. Script Evaluation
The Script task node is used to evaluate a script. The system analyzes the content of the Script property value. If the value is a valid file path and the file exists, then the script from the file will be executed, otherwise the Script field will be evaluated.
Note that you can use persistence and metadata objects in scripts.
3.8. Middleware Beans Methods Invocation
The Service task node is used to invoke a service method. Activiti engine is integrated with the Spring framework, so you can access middleware beans by their names. To invoke a method of a managed bean use the following expression to the Expression field:
${beanName.methodName(processVarName, 'someStringParam')}You can use process variables as method arguments, including the variables automatically created on process start (entityId, bpmProcInstanceId, etc. as described in ProcessRuntimeService).
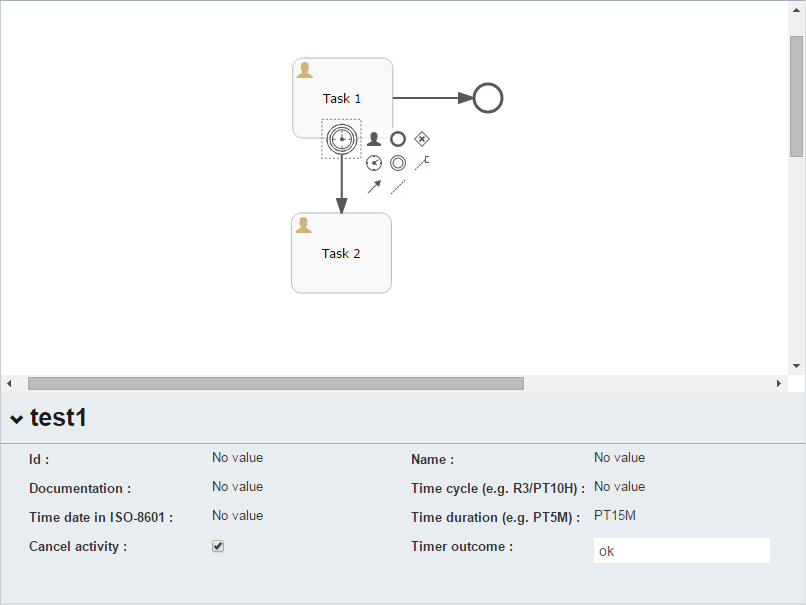
3.9. Completing a Task by Timer
To complete a task after a certain time interval, you should:
-
Add the Boundary timer event node to the task node.
-
Draw the flow from the timer node to another required node.
-
Define an expression for the time interval in the Time duration property of the timer node. For example
PT15Mis an expression for 15 minutes interval. -
Set the Cancel activity property to true. It will cancel the current task when the timer is fired.
-
In the Timer outcome property, define the task outcome that should be used when the task is completed by the timer.
Defining an outcome for the timer:
<boundaryEvent id="managerApprovalTimer" cancelActivity="true" attachedToRef="managerApproval">
    <extensionElements>
        <cuba:outcome>approve</cuba:outcome>
    </extensionElements>
</boundaryEvent>
By default, the Job executor for processing timers is disabled. To enable it, set the application property bpm.activiti.asyncExecutorEnabled = true.
3.10. Localization
A process may contain localized messages that are used to display task or outcomes in the user interface.
To open the localized messages editor, select the Localization property in the model properties panel.
To localize the task name, create a record with the task id as a key.
To localize the task outcome name, create a record with an expression like TASK_ID.OUTCOME_NAME as a key.
To localize the process role name, create a record with the role code as a key.
Localized messages:
<process id="testProcess" name="Test process">
    <extensionElements>
        <cuba:localizations>
            <cuba:localization lang="en">
                <cuba:msg key="key1" value="value1"/>
                <cuba:msg key="key2" value="value2"/>
            </cuba:localization>
            <cuba:localization lang="ru">
                <cuba:msg key="key1" value="value1"/>
                <cuba:msg key="key2" value="value2"/>
            </cuba:localization>
      </cuba:localizations>
    </extensionElements>
</process>
3.11. Submodels
A Sub model node of the Structural group allows using an existing model as a part of a new model without creating a separate process instance. While deploying the process, submodel elements are being inserted into the current model, and the process XML is produced from the result of this concatenation.
3.12. Custom Elements in Model Designer
BPM subsystem enables creating custom elements for process model designer. Basically, a custom element is a ServiceTask that eliminates the need to type long expressions for method invocation, like ${app_MyBean.someMethod(argument1, 'argument2')}. Below is an example of custom element creation.
Suppose, there is a middleware bean with the app_DiscountManager name. There is a makeDiscount(BigDecimal discountPercent, UUID entityId) method in the bean. The method updates the contract amount by subtracting the discount.
In this example, we will create a custom model element that will invoke the method. The discount percent will be defined as a parameter of the model element.
Open the model elements editor with the menu item BPM → Model Elements Editor.
Click the Add group button and enter the group name - Discounts.
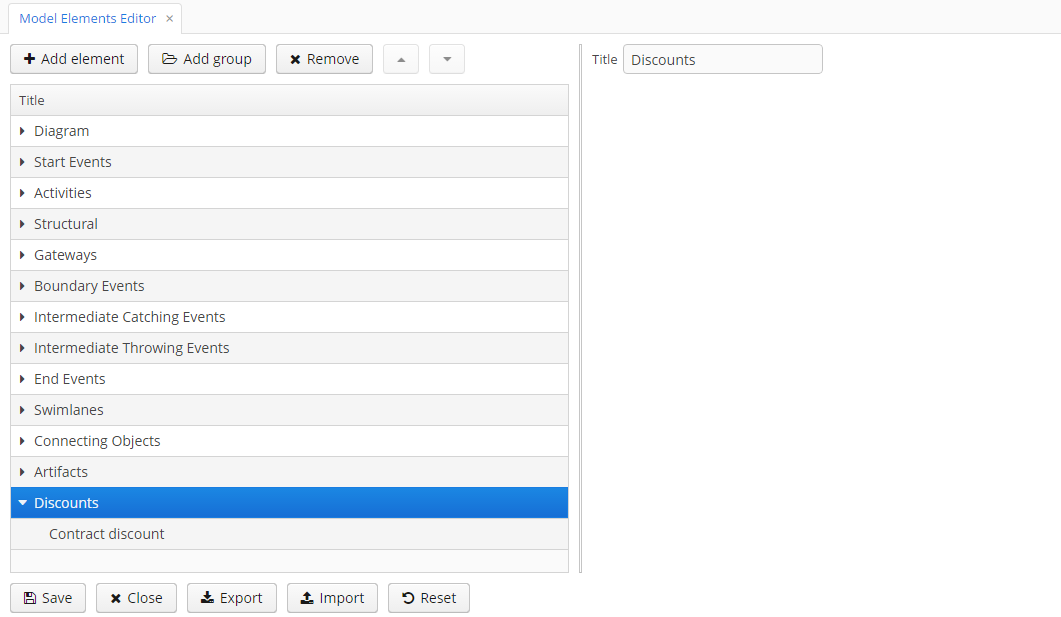
Select the created group and click the Add element button.
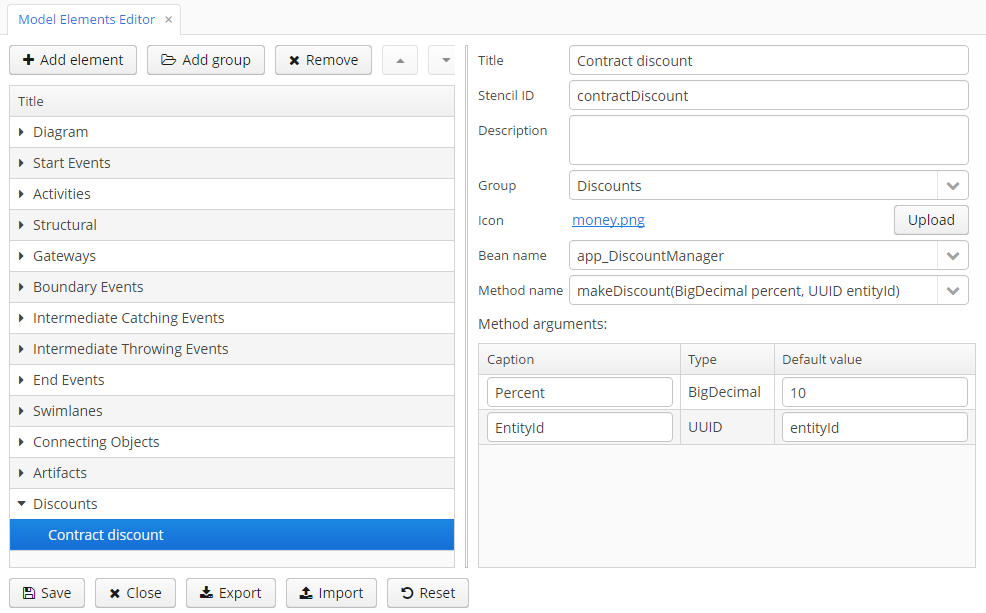
Enter the following values for element properties:
-
Title: Contract discount
-
Element ID: contractDiscount
-
Icon: click the Upload button and select the icon file (optional)
-
Bean name: select the app_DiscountManager
-
Method name: select the makeDiscount
|
Warning
|
The Bean name lookup contains only beans that implement an interface. The Method name lookup contains methods of implemented interfaces. |
The Method arguments table will contain method arguments. You can change a caption and an argument default value.
Save the elements set by clicking the Save button.
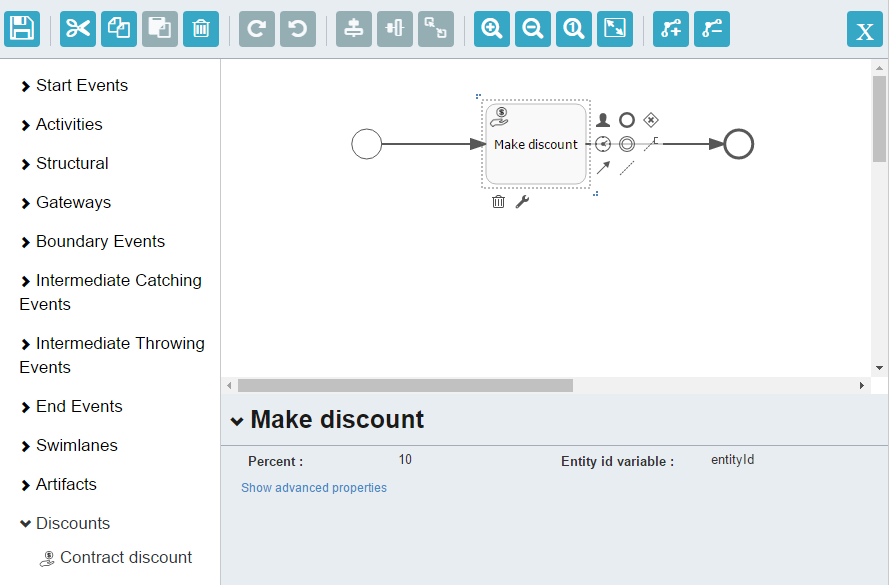
Open the process model editor (BPM → Process Models). There are the Discounts group and the Contract discount element in the elements list. Drag and drop the new element to the model and select it. You’ll see that fields for discount percent and process variable name for entity identifier appeared.
|
Tip
|
|
During the process deployment, a custom element will be transformed to a serviceTask:
<serviceTask id="sid-5C184F22-6071-45CD-AEA9-1792512BBDCE" name="Make discount" activiti:expression="${app_DiscountManager.makeDiscount(10,entityId)}"></serviceTask>The elements can be exported to a ZIP archive and then restored from the archive. It may be useful when new elements are created on a developer’s machine and then imported to the production server. Import and export are performed with the corresponding buttons on the elements editor screen.
The Reset button removes all custom groups and elements and reverts the elements set to its initial state.
4. Main Services
This section only contains general description of the services. Detailed service methods description is available in Java classes documentation.
4.1. ProcessRepositoryService
It is designed to work with process definitions. The service is used to:
-
load a process definition from XML
-
undeploy a process from Activiti engine
-
transform the JSON model to BPMN XML
To access the service functionality on middleware, use the ProcessRepositoryManager bean.
4.2. ProcessRuntimeService
It is designed to work with process instances. The service methods allow you to:
-
cancel a process
-
complete a task
-
assign a task to the user
When a process is started, the following process variables are created automatically:
-
bpmProcInstanceId-ProcInstanceobject ID -
entityName- linked entity name -
entityId- linked entity ID
To access the service functionality on middleware, use the ProcessRuntimeManager bean.
4.3. ProcessFormService
The service is used to provide information about:
-
task outcomes
-
forms that should be displayed for outcomes
-
forms to appear on process start and cancel
To access the service functionality on middleware, use the ProcessFormManager bean.
5. UI Components
This section contains description of user interface components provided by the BPM subsystem.
5.1. ProcActionsFrame
The ProcActionsFrame is designed to work with process actions. After the frame is initialized, the following components will be automatically displayed:
-
the start process button, in case if the process is not started yet
-
the buttons for task outcomes, in case the process is started and the current user has an active task
-
the cancel process button
-
the task information panel (name and creation date)
A predicate can be assigned to each of the process actions in order to check if the action can be performed (e.g. the predicate commits an editor, and if the commit failed, the process action is not performed). The post-action listener can also be defined (e.g. the listener will close the editor and show a notification).
The ProcActionsFrame must be linked with the ProcInstance. The linking is performed during frame initialization.
An example of frame initialization:
procActionsFrame.initializer()
        .setBeforeStartProcessPredicate(this::commit)
        .setAfterStartProcessListener(showNotification(getMessage("processStarted"), NotificationType.HUMANIZED))
.init(PROCESS_CODE, entity);-
The
initializer()method returns an object that is used for frame initialization. -
The
setBeforeStartProcessPredicatemethod sets the predicate that will be evaluated before the process start. If the predicate returnsfalsethen the process start will be interrupted. -
The
setAfterStartProcessListenermethod defines a listener that will be invoked after the process start action is performed. -
The
initmethod has two parameters: process code and entity instance. When this method is invoked, a search for theProcInstanceobject that is related with the entity instance and has a reference to theProcDefinitionwith the given code is performed. If theProcInstanceexists then the frame is linked to it, otherwise a newProcInstanceobject is created.
The easiest way to initialize the ProcActionsFrame is to use the standard() initializer:
procActionsFrame.initializer()
        .standard()
        .init(PROCESS_CODE, entity);
The standard initializer does the following:
-
creates predicates that commit entity editor before start process and complete task actions
-
creates listeners that show notifications like "Process started" or "Task completed" and refresh the
ProcActionsFrame
Below is the list of methods used for customizing the frame.
- Process life cycle
-
-
initializer()- returns a new instance of frame initializer.
-
init()- tries to find the process instance by the specified process code and the entity reference. If the process instance is not found then a new one is created. Then the UI for available actions for the current user and the process instance is initialized.
-
- Process configuration
-
-
setStartProcessEnabled()- defines whether the process can be started.
-
setCancelProcessEnabled()- defines whether the process can be cancelled.
-
setCompleteTaskEnabled()- defines whether the task can be completed.
-
setClaimTaskEnabled()- defines whether the task can be assigned to a user by himself.
-
setTaskInfoEnabled()- defines whether the layout with the localized task name and its start date is enabled.
-
setButtonWidth()- sets the width of the action control button. The default value is 150 px.
-
addActionButton()- allows adding a custom button to the frame alongside with buttons that were automatically generated.
-
- Predicates
-
-
setBeforeStartProcessPredicate()- sets the predicate that will be evaluated before the process start. If the predicate returnsfalsethen the process start will be interrupted.
-
setBeforeCompleteTaskPredicate()- sets the predicate that will be evaluated before the task completion. If the predicate returnsfalsethen the task completion will be interrupted.
-
setBeforeClaimTaskPredicate()- sets the predicate that will be evaluated before the task is claimed to a user. If the predicate returnsfalsethen the task assignment will be interrupted.
-
setBeforeCancelProcessPredicate()- sets the predicate that will be evaluated before the task cancellation. If the predicate returnsfalsethen the task will not be cancelled.
-
- Process and task listeners
-
-
setAfterStartProcessListener()- defines a listener that will be invoked after the process start action is performed.
-
setAfterCompleteTaskListener()- defines a listener that will be invoked after the task complete action is performed.
-
setAfterClaimTaskListener()- defines a listener that will be invoked after the task claim action is performed.
-
setAfterCancelProcessListener()- defines a listener that will be invoked after the process cancel action is performed.
-
- Variables and parameters suppliers
-
-
setStartProcessActionProcessVariablesSupplier()- sets the process variables suppliers. Process variable suppliers return a map of process variables that must be added to Activiti process instance on process start.
-
setCompleteTaskActionProcessVariablesSupplier()- sets the process variables suppliers. Process variable suppliers return a map of process variables that must be added to Activiti process instance on task completion.
-
setStartProcessActionScreenParametersSupplier()- sets the process form screen parameters suppliers. These screen parameters suppliers return a map of screen parameters that will be passed to the process form displayed byStartProcessAction.
-
setCompleteTaskActionScreenParametersSupplier()- sets the process form screen parameters suppliers. These screen parameters suppliers return a map of screen parameters that will be passed to the process form displayed byCompleteTaskAction.
-
- ProcActionsFrame API
- Initializer API
-
init - setAfterCancelProcessListener - setAfterClaimTaskListener - setAfterCompleteTaskListener - setAfterStartProcessListener - setBeforeCancelProcessPredicate - setBeforeClaimTaskPredicate - setBeforeCompleteTaskPredicate - setBeforeStartProcessPredicate - setButtonWidth - setCancelProcessEnabled - setClaimTaskEnabled - setCompleteTaskActionProcessVariablesSupplier - setCompleteTaskActionScreenParametersSupplier - setCompleteTaskEnabled - setStartProcessActionProcessVariablesSupplier - setStartProcessActionScreenParametersSupplier - setStartProcessEnabled - setTaskInfoEnabled
5.2. Process Forms
- ProcForm Interface
-
When you declare user task outcomes or the start event node in the model editor, it is possible to set a form that will be displayed to the user. The form class should implement the
ProcForminterface.The methods of the
ProcForminterface:-
getComment(): String- returns the value that will be written to thecommentfield of theProcTaskobject or to thestartCommentfield ofProcInstanceif the form is displayed on a process start.
-
getFormResult(): Map<String, Object>- returns a list of objects that will be added to process variables after the form commit.
-
- A List of Forms for a Process Model Designer
-
A list of forms available in the process model designer is built according to the configuration files that are defined in the
bpm.formsConfigapplication property. To add a new process form, do the following:-
Create and register a screen for the form. Screen controller must implement the
ProcForminterface. -
Create an XML file, e.g.
app-bpm-forms.xml, which will contain a description of custom forms, and place it under thesrcdirectory of the web or gui module. For example:<?xml version="1.0" encoding="UTF-8"?> <forms xmlns="http://schemas.haulmont.com/cuba/bpm-forms.xsd"> <form name="myCustomForm" default="true"> <param name="someParam" value="hello"/> <param name="otherParam"/> </form> </forms>myCustomFormhere is a screen id.The above configuration also describes available form parameters with their names and default values.
A form with the
default="true"attribute will be used as the default form in the model. -
Override the
bpm.formsConfigproperty in theweb-app.propertiesfile.bpm.formsConfig = bpm-forms.xml app-bpm-forms.xml
-
- API
6. Examples
The source code of examples, described in this section, can be found in the bpm-samples project at GitHub. You may clone this project, import it with the CUBA Studio and examine all samples.
6.1. Task Execution Sample
This sample demonstrates the following:
-
How to programmatically create process actors on process start using the
ProcActionsFrame -
How to pass process variables to the process instance using the
ProcActionsFrame -
How to get and modify standard process actions created by the
ProcActionsFrame(e.g. change "Start process" button caption) -
How to start a process programmatically without the
ProcActionsFrame -
How to automatically update the
processStatefield each time the process moves further using theActivitiEventListener
The sample uses the Task execution - 1 process model:
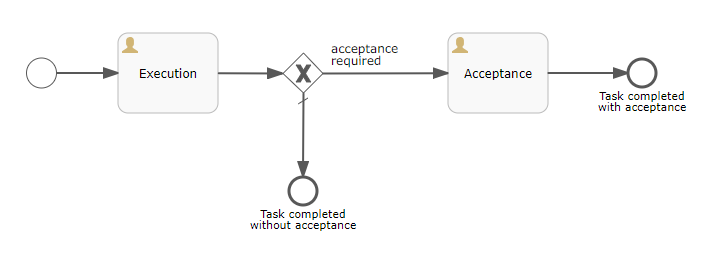
To test the sample, use the Application - Tasks screen.
In this example, we don’t use the StandardProcForm to assign process actors. We do it with the help of the before start process predicate of the ProcActionsFrame. See the setBeforeStartProcessPredicate() method usage in the TaskEdit.java
See the setStartProcessActionProcessVariablesSupplier() usage in the TaskEdit.java as an example of how to pass process variables at process start using the ProcActionsFrame. The acceptanceRequired process variable will be used by one of process gateways to decide whether the task must be accepted by the initiator or the process must be completed.
The changeStartProcessBtnCaption() demonstrates that you can get and modify process actions generated by the ProcActionsFrame. In this method the standard button caption "Start process" is replaced by the custom one.
The startProcessProgrammatically() method demonstrates how to start a new process instance without the ProcActionsFrame.
public void startProcessProgrammatically() {
    if (commit()) {
        //The ProcInstanceDetails object is used for describing a ProcInstance to be created with its proc actors
        BpmEntitiesService.ProcInstanceDetails procInstanceDetails = new BpmEntitiesService.ProcInstanceDetails(PROCESS_CODE)
                .addProcActor("initiator", getItem().getInitiator())
                .addProcActor("executor", getItem().getExecutor())
                .setEntity(getItem());

        //The created ProcInstance will have two proc actors. None of the entities is persisted yet.
        ProcInstance procInstance = bpmEntitiesService.createProcInstance(procInstanceDetails);

        //A map with process variables that must be passed to the Activiti process instance when it is started.
        //This variable is used in the model to make a decision for one of gateways.
        HashMap<String, Object> processVariables = new HashMap<>();
        processVariables.put("acceptanceRequired", getItem().getAcceptanceRequired());

        //Starts the process. The "startProcess" method automatically persists the passed procInstance with its actors
        processRuntimeService.startProcess(procInstance, "Process started programmatically", processVariables);
        showNotification(getMessage("processStarted"));

        //refresh the procActionsFrame to display complete tasks buttons (if a process task appears for the current
        //user after the process is started)
        initProcActionsFrame();
    }
}
The UpdateProcessStateListener.java is an implementation of the org.activiti.engine.delegate.event.ActivitiEventListener. This listener is registered as a process-level listener. It does the following: each time a new process step is reached, the processState field of the related com.company.bpmsamples.entity.Task entity is updated with the current process step name.
That’s how process-level event listeners configuration looks in the process model.
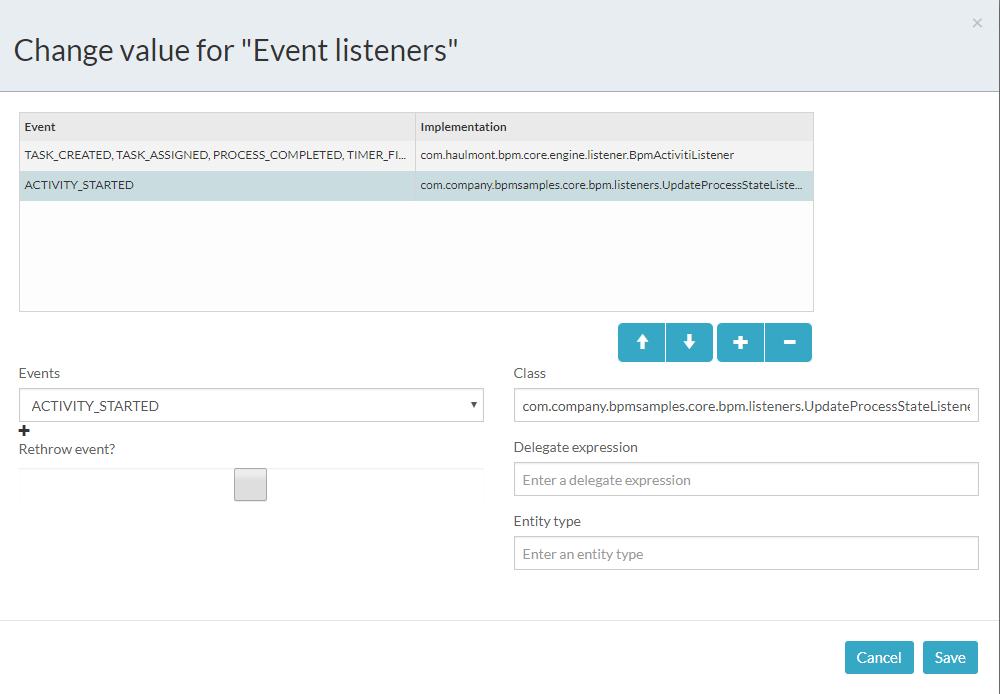
To open this window click somewhere in the modeler, click the Show advanced properties link and then go with the Event listeners property.
See the comments in the source code at GitHub for details.
The Task entity editor XML descriptor: task-edit.xml
The Task entity editor Java controller: TaskEdit.java
Activiti event listener that updates processState: UpdateProcessStateListener.java