Preface
This manual describes the Business Intelligence integration add-on which is designed to integrate CUBA applications with Pentaho Platform.
We assume that the reader is familiar with the CUBA Platform Developer’s Manual, which is available at https://www.cuba-platform.com/manual.
If you have any suggestions for improving this manual, feel free to report issues in the source repository on GitHub. If you see a spelling or wording mistake, a bug or inconsistency, don’t hesitate to fork the repo and fix it. Thank you!
1. Overview
The Add-on provides the following functionality:
-
Generic screens for registering and running Pentaho reports. The access to registered reports can be restricted using CUBA security roles.
-
A visual component for embedding Pentaho reports to any application screen.
-
Single Sign-On between your CUBA application and Pentaho. It works as follows:
-
Users should have the same login names in the CUBA application and Pentaho.
-
When a user opens a report, the application generates a ticket for the user and pins username and the ticket to the Pentaho request. The ticket is stored in the user session.
-
CUBA plugin on the Pentaho server detects the ticket coming with the request and calls back the application to check if the ticket is valid.
-
If the ticket is valid, the plugin authorizes the user on the Pentaho server with roles that configured for the user in Pentaho.
-
2. Setting Up Pentaho
-
Download and install Pentaho Community Edition.
-
Download Saiku Analytics plugin (Meteorite BI) from http://www.pentaho.com/marketplace/ and install it.
-
Move the
saikufolder to the$PENTAHO_HOME$/pentaho-server/pentaho-solutions/systemdirectory, where$PENTAHO_HOMEis the directory where Pentaho is installed. -
The Saiku plugin doesn’t work with the latest version of Pentaho Server. Do the following to fix the problem:
-
Remove the
cpf-core-6.0.0.0-353.jarandcpf-pentaho5-6.0.0.0-353.jarlibraries from$PENTAHO_HOME$/pentaho-server/pentaho-solutions/system/saiku/libfolder. -
Copy the newer versions of these libraries from any other folder of your Pentaho distribution (for example,
$PENTAHO_HOME$/pentaho-server/pentaho-solutions/system/sparkl/libor…/cgg/lib) to$PENTAHO_HOME$/pentaho-server/pentaho-solutions/system/saiku/libfolder:cpf-core-7.1.0.0-12.jar cpf-pentaho-7.1.0.0-12.jar cpk-core-7.1.0.0-12.jar cpk-pentaho5-7.1.0.0-12.jarTipThe
cpk-core…andcpk-pentaho…libraries may not exist in your Pentaho version. In this case, use only thecpf-coreandcpf-pentaholibraries.
-
-
Access the
http://licensing.meteorite.biand sign up for a new account. Once you have validated your account, create a new company and generate the community license for it:-
Login to the system and click the CREATE NEW LICENSE button.
-
On the new license page, set the license type to COMMUNITY_EDITION.
-
Save and download the license. Rename the file to
license.licand then copy it to the$PENTAHO_HOME$/pentaho-server/pentaho-solutions/system/saiku
-
-
Download and install Pentaho Data Integration tool.
-
Change Pentaho default port to 18081:
-
Navigate to
$PENTAHO_HOME/pentaho-server/tomcat/conf. -
Change default Tomcat port to 18081 in the
server.xml:
<Connector URIEncoding="UTF-8" port="18081" protocol="HTTP/1.1" connectionTimeout="20000" redirectPort="18443" /> -
-
Change the Tomcat shutdown port to 8015 in the
server.xmlto avoid collision with CUBA default shutdown port:<Server port="8015" shutdown="SHUTDOWN"> ... </Server> -
Setup authentication of CUBA users in Pentaho:
-
Download cuba-bi-pentaho-1.5.0.jar and copy it to
$PENTAHO_HOME$/pentaho-server/tomcat/webapps/pentaho/WEB-INF/lib. -
Download cuba-bi-pentaho-1.5.0-plugin.zip, unpack it and copy the
saiku-cuba-bifolder to$PENTAHO_HOME/pentaho-server/pentaho-solutions/system. -
Create new
cuba-pentaho-community-authentication.xmlfile in the$PENTAHO_HOME/pentaho-server/pentaho-solutions/systemfolder with the following content:<?xml version="1.0" encoding="UTF-8"?> <!--+ | Application context containing FilterChainProxy. +--> <beans xmlns="http://www.springframework.org/schema/beans" xmlns:xsi="http://www.w3.org/2001/XMLSchema-instance" xmlns:util="http://www.springframework.org/schema/util" xmlns:sec="http://www.springframework.org/schema/security" xmlns:pen="http://www.pentaho.com/schema/pentaho-system" xsi:schemaLocation="http://www.springframework.org/schema/beans http://www.springframework.org/schema/beans/spring-beans-4.3.xsd http://www.springframework.org/schema/util http://www.springframework.org/schema/util/spring-util-4.1.xsd http://www.springframework.org/schema/security http://www.springframework.org/schema/security/spring-security-4.1.xsd http://www.pentaho.com/schema/pentaho-system http://www.pentaho.com/schema/pentaho-system.xsd" default-lazy-init="true"> <!-- ======================== FILTER CHAIN ======================= --> <!-- if you wish to use channel security, add "channelProcessingFilter," in front of "httpSessionContextIntegrationFilter" in the list below --> <bean id="filterChainProxy" class="org.springframework.security.web.FilterChainProxy"> <constructor-arg> <util:list> <sec:filter-chain pattern="/webservices/**" filters="securityContextHolderAwareRequestFilterForWS,httpSessionPentahoSessionContextIntegrationFilter,httpSessionContextIntegrationFilter,cubaAuthenticationFilter,basicProcessingFilter,anonymousProcessingFilter,sessionMgmtFilter,exceptionTranslationFilterForWS,filterInvocationInterceptorForWS" /> <sec:filter-chain pattern="/api/repos/**" filters="securityContextHolderAwareRequestFilterForWS,httpSessionPentahoSessionContextIntegrationFilter,httpSessionContextIntegrationFilter,cubaAuthenticationFilter,basicProcessingFilter,requestParameterProcessingFilter,anonymousProcessingFilter,sessionMgmtFilter,exceptionTranslationFilterForWS,filterInvocationInterceptorForWS,preFlightFilter" /> <sec:filter-chain pattern="/api/**" filters="securityContextHolderAwareRequestFilterForWS,httpSessionPentahoSessionContextIntegrationFilter,httpSessionContextIntegrationFilter,cubaAuthenticationFilter,basicProcessingFilter,requestParameterProcessingFilter,anonymousProcessingFilter,sessionMgmtFilter,exceptionTranslationFilterForWS,filterInvocationInterceptorForWS" /> <sec:filter-chain pattern="/plugin/reporting/api/jobs/**" filters="securityContextHolderAwareRequestFilterForWS,httpSessionPentahoSessionContextIntegrationFilter,httpSessionContextIntegrationFilter,basicProcessingFilter,requestParameterProcessingFilter,anonymousProcessingFilter,sessionMgmtFilter,exceptionTranslationFilterForWS,filterInvocationInterceptorForWS,preFlightFilter" /> <sec:filter-chain pattern="/plugin/**" filters="securityContextHolderAwareRequestFilterForWS,httpSessionPentahoSessionContextIntegrationFilter,httpSessionContextIntegrationFilter,basicProcessingFilter,requestParameterProcessingFilter,anonymousProcessingFilter,sessionMgmtFilter,exceptionTranslationFilterForWS,filterInvocationInterceptorForWS" /> <sec:filter-chain pattern="/**" filters="securityContextHolderAwareRequestFilter,httpSessionPentahoSessionContextIntegrationFilter,httpSessionContextIntegrationFilter,httpSessionReuseDetectionFilter,logoutFilter,authenticationProcessingFilter,cubaAuthenticationFilter,basicProcessingFilter,requestParameterProcessingFilter,anonymousProcessingFilter,sessionMgmtFilter,exceptionTranslationFilter,filterInvocationInterceptor" /> </util:list> </constructor-arg> </bean> <bean id="cubaAuthenticationProvider" class="com.haulmont.addon.bi.pentaho.CubaAuthenticationProvider"/> <!-- ======================== AUTHENTICATION ======================= --> <bean id="authenticationManager" class="org.springframework.security.authentication.ProviderManager"> <constructor-arg> <util:list> <ref bean="cubaAuthenticationProvider"/> <pen:bean class="org.springframework.security.authentication.AuthenticationProvider"/> <ref bean="anonymousAuthenticationProvider" /> </util:list> </constructor-arg> <property name="eraseCredentialsAfterAuthentication" value="false" /> <property name="authenticationEventPublisher"> <ref bean="defaultAuthenticationEventPublisher" /> </property> </bean> <bean id="cubaAuthenticationFilter" class="com.haulmont.addon.bi.pentaho.CubaPentahoAuthenticationFilter"> <property name="userRoleDao"> <ref bean="userRoleDaoTxn" /> </property> <property name="authenticationManager"> <ref bean="authenticationManager" /> </property> <property name="extraRoles" ref="extraRoles" /> <property name="cubaConnectionUrl" value="http://localhost:8080/app"/> </bean> </beans>TipSpecify URL of your CUBA application in the
cubaConnectionUrlproperty of thecubaAuthenticationFilterbean:<property name="cubaConnectionUrl" value="http://localhost:8080/app"/> -
Edit
pentaho-spring-beans.xmlinpentaho-solutions/systemand add the line<import resource="cuba-pentaho-community-authentication.xml" />after the<import resource="applicationContext-spring-security.xml" />line:<import resource="applicationContext-spring-security.xml" /> <import resource="cuba-pentaho-community-authentication.xml" />
-
-
Start Pentaho Server:
-
Navigate to the
$PENTAHO_HOME/pentaho-serverdirectory. -
Run
start-pentaho.bat
-
3. Quick Start
We have created a small project to demonstrate how to enrich your CUBA application with BI reports. This demo application for customers and orders management contains an embedded Saiku report running on Pentaho server.
3.1. Setting Up Sample CUBA Application
-
Clone or download the sample project from https://github.com/cuba-platform/cuba-bi-demo.git
-
Open the project in an IDE or in CUBA Studio, run the
createDbcommand and start the application server.
3.2. Loading Data to Star Schema
In our Pentaho report we will use aggregated data from multiple database tables. This data will be stored in additional tables and then loaded to the Star Schema. In our case, the Star Schema will consist of one fact table (Orders) and two dimension tables (Customer and Product), providing the ability to drill into the report hierarchy.
3.2.1. Loading Data For the Impatient
You can use the ready star schema delivered with the demo project.
-
Make sure you have the demo project opened in Studio . The import procedure explained below will access the project’s HSQL database.
-
Run Pentaho Data Integration tool:
-
Navigate to the directory where Pentaho Data Integration is installed.
-
Run
spoon.bat.
-
-
Open
$BI_DEMO_PROJECT/demo/kettle/bidemo.kjb, where$BI_DEMO_PROJECTis the directory where the demo project is located. -
Click Run to update the Star Schema.
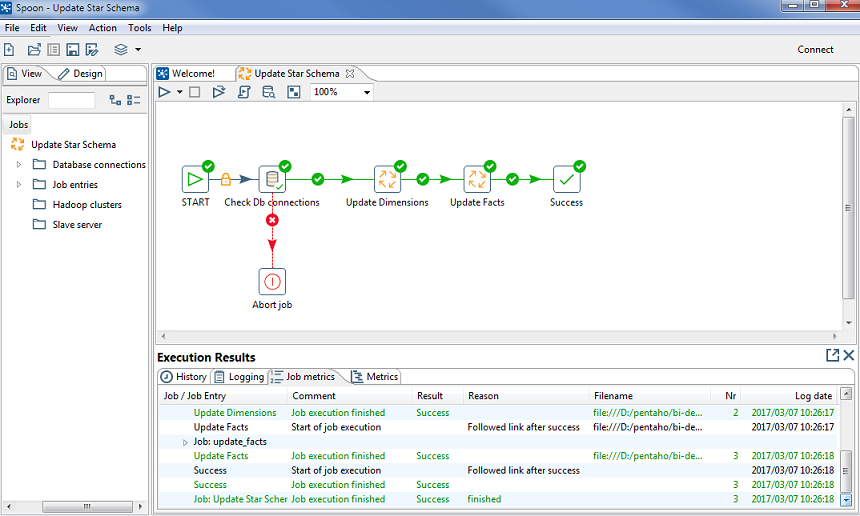 Figure 1. Star Schema
Now you can proceed to creating the analysis report.
3.2.2. Create Database Connection
If you want to create the star schema yourself, follow the steps below. For the detailed instructions consult the Pentaho wiki.
-
Start Pentaho Data Integration using
spoon.batfrom$PENTAHO_HOME$/design-tools/data-integration. -
Create new transformation.
-
Create new database connection for the transformation:
-
Enter the Connection Name
-
Connection Type: Hypersonic
-
Access: Native (JDBC)
-
Host Name: localhost
-
Database Name: bidemo
-
Port Number: 19001
-
User Name: sa
-
Leave the Password field empty
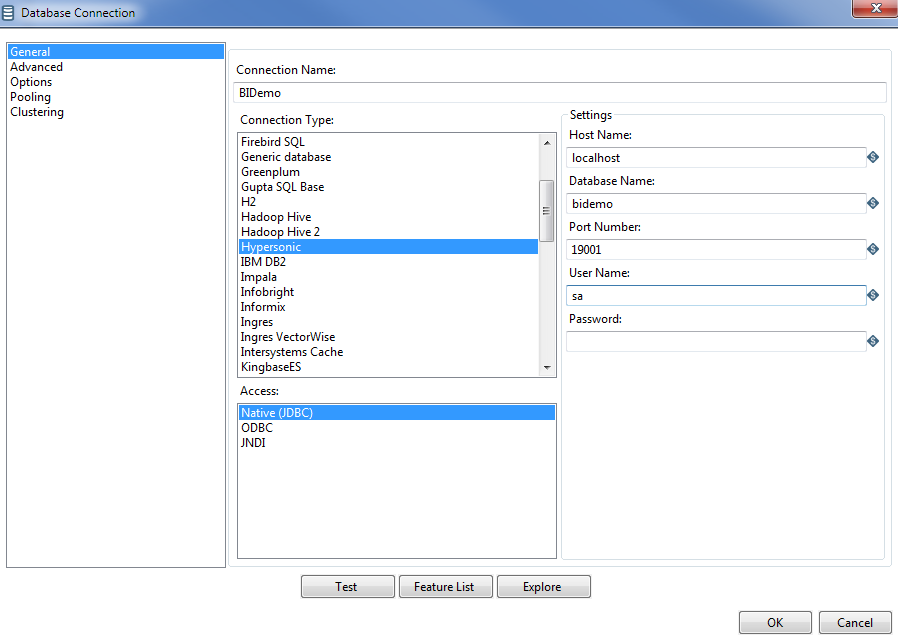 Figure 2. Database connection
 -
3.2.3. Create Dimensions
For the dimensions, we will use Products and Customers. Each product refers to some product line, that is the type of product, e.g. Ford T belongs to the Vintage Cars product line.
Customers belong to certain cities, they, in turn, refer to some countries, the countries are grouped into territories.
-
First, create the Product transformation. Drag and drop the Table input node onto the worksheet and define the fields we need for the report: product
id,nameandproduct_line_id.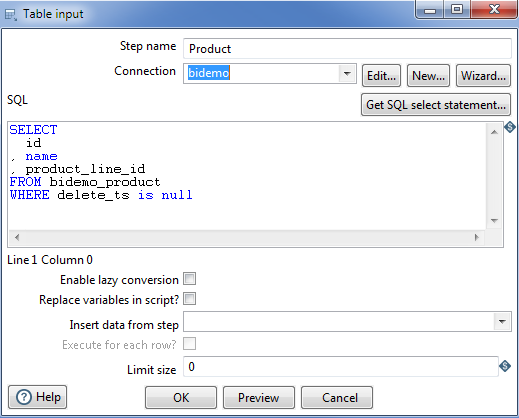 Figure 3. Product table input
 -
Then create an Insert/Update node for products:
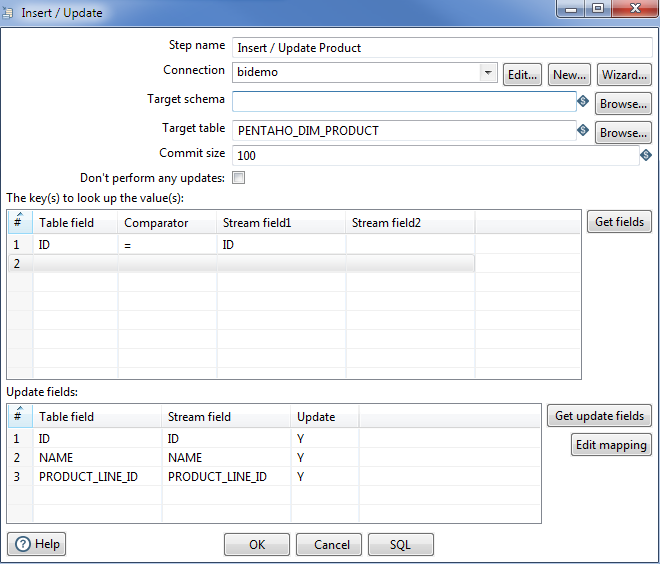 Figure 4. Insert/Update Product
 -
Create the transformation for product lines:
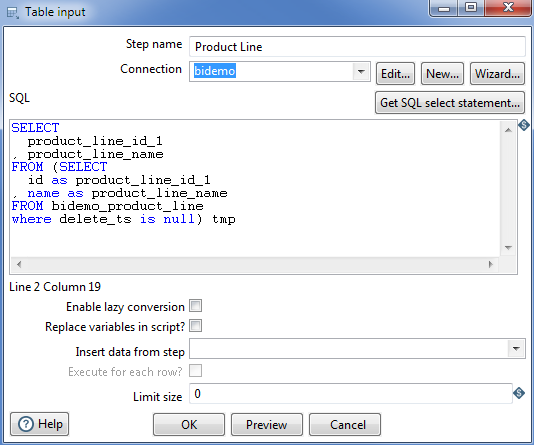 Figure 5. Product transformation
 -
Finalize the first transformation with the Update node:
 Figure 6. Update Product
 -
Create the Customer transformation in the same way, including City and Territory levels, and add it to the Product one:
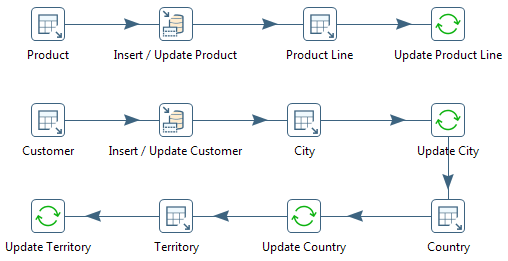 Figure 7. Customer transformation
 -
When the transformation is ready, wrap it in the corresponding job, using the START and Success nodes and the Abort job exit node in case of an error:
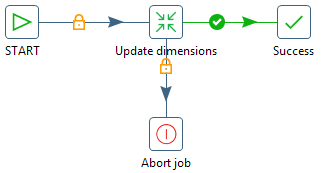 Figure 8. Dimensions job
3.2.4. Create Facts
For the Facts measure we will take the Orders and Order Lines.
-
First, create the Order Line transformation. Drag and drop the Table input node onto the worksheet and define the fields we need for the report:
id,product_id,quantityandorder_id: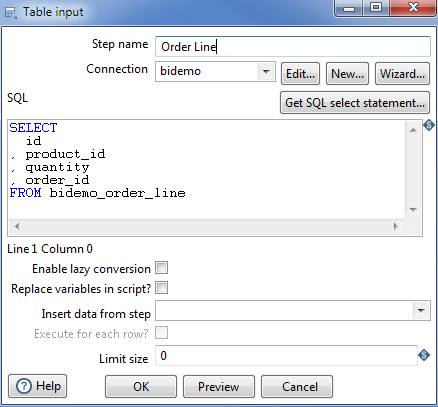 Figure 9. OrderLine table input
 -
Then create an Insert/Update node for order lines:
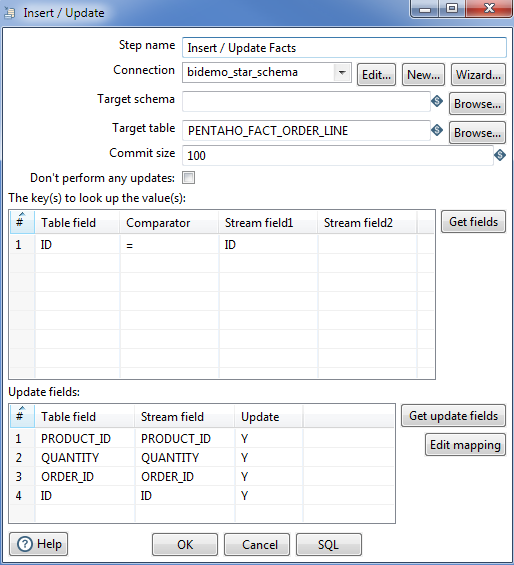 Figure 10. Insert/Update OrderLine
 -
Create the transformation for orders:
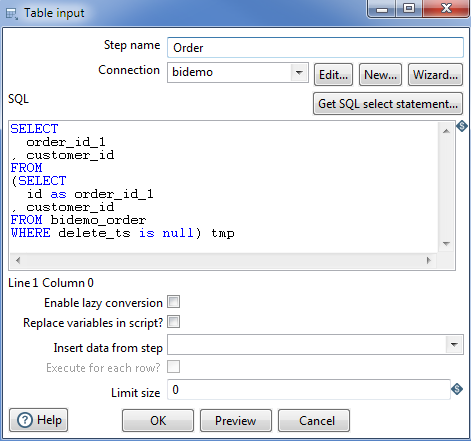 Figure 11. Order transformation
 -
Finally, update the customers IDs in the table:
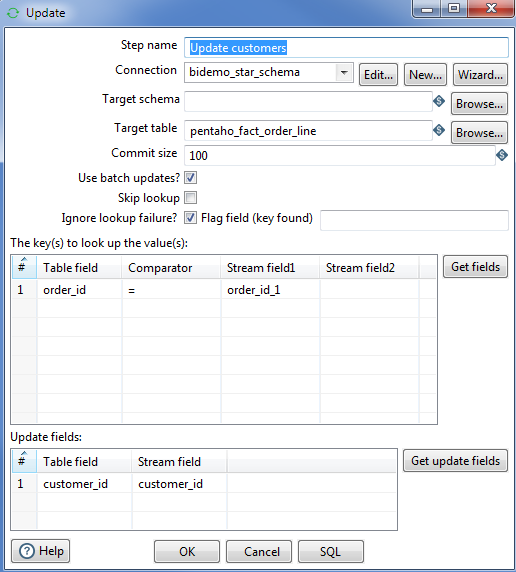 Figure 12. Update customers
 -
The Facts transformation is now ready:
 Figure 13. Facts transformation
 -
Wrap the transformation in the corresponding job:
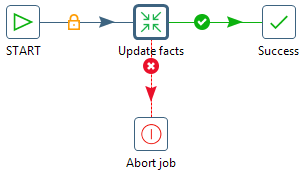 Figure 14. Facts job
3.2.5. Create Star Schema
Now let’s assemble the dimensions and facts jobs into the complete star schema:
-
Add the START node to start the job.
-
Start the job with the Check Db connections condition.
-
In case the DB is not connected, add the Abort job node for the job.
-
Then add consequently Update Dimensions and Update Facts jobs that we have designed earlier.
-
Finalize the job with the Success node and run the job:
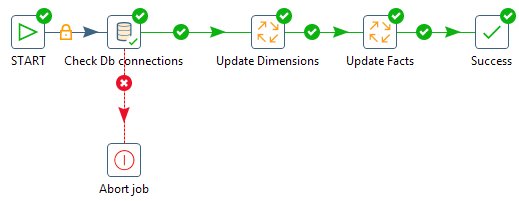 Figure 15. Star Schema job
 -
Save all the job and transformation files in the project folder for further use.
3.3. Configure Pentaho Analysis Report
-
Open Pentaho console:
http://localhost:18081/pentahoand login asAdmin/password. -
Click File → Manage Data Sources.
-
Click the settings button and select New Connection:
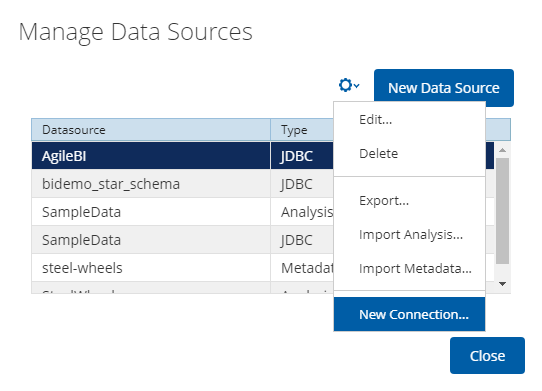 Figure 16. Database connection
 -
Create connection to HSQLDB:
-
Host Name:
localhost -
Database Name:
bidemo -
Port Number:
19001 -
User Name:
sa
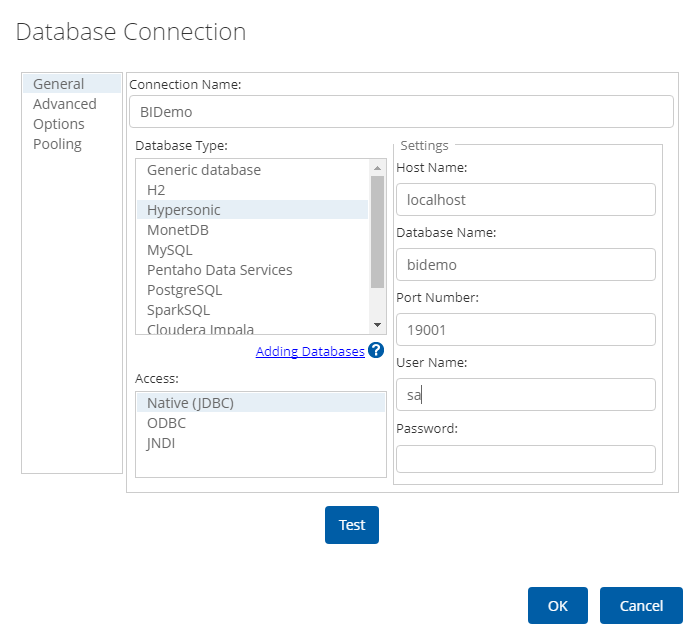 Figure 17. Database connection
 -
Now you can either use the analysis report delivered with the demo project or create it yourself following the steps below.
3.3.1. Using Demo Report
Below is the easiest way to see what the Saiku report looks like, you only have to import ZIP-files with the analysis and the report structure.
-
Click Import Analysis.
-
Select
BIDemoData Source and import$BI_DEMO_PROJECT/demo/pentaho/BiDemo.zipMondrian File. The report structure will be imported.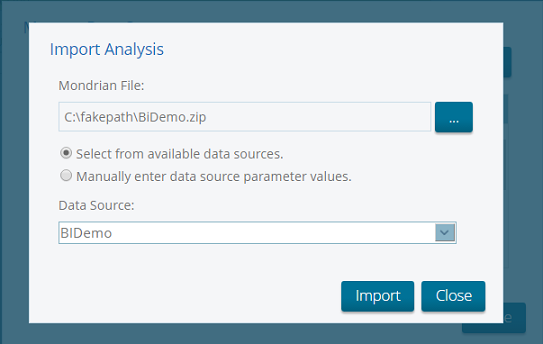 Figure 18. Import analysis
 -
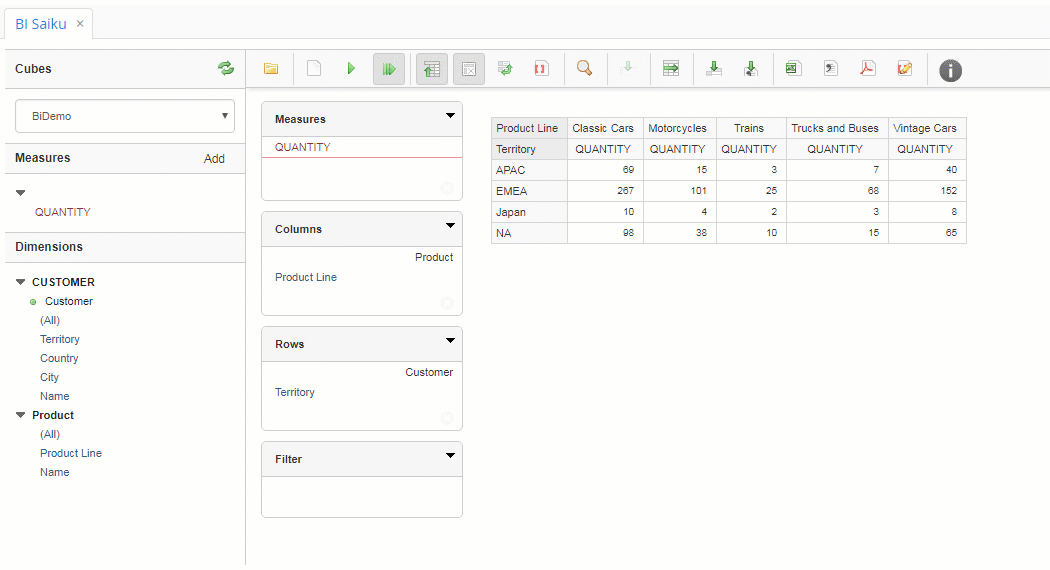
Click New → Saiku Analytics → Create a new query. Select
BiDemocube and fill measure, columns, and rows as on the screen: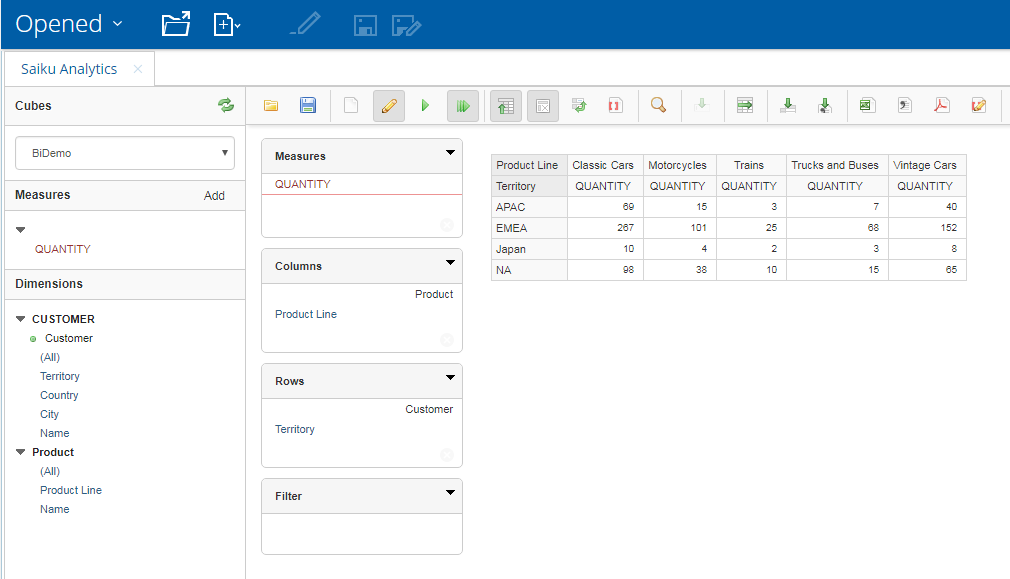 Figure 19. Create query
 -
Save report in the directory
/home/adminwith the nameProductsByTypeAndLocation.
Now you can open the Saiku report in the CUBA application.
3.3.2. Create Data Source and Analysis Report Manually
- Create Data Source
-
-
Click New Data Source.
-
Select the Source Type: Database Table(s).
-
Select the new
BIDemoconnection in the list of available connections. -
Select Reporting and Analysis as the aim of this data source.
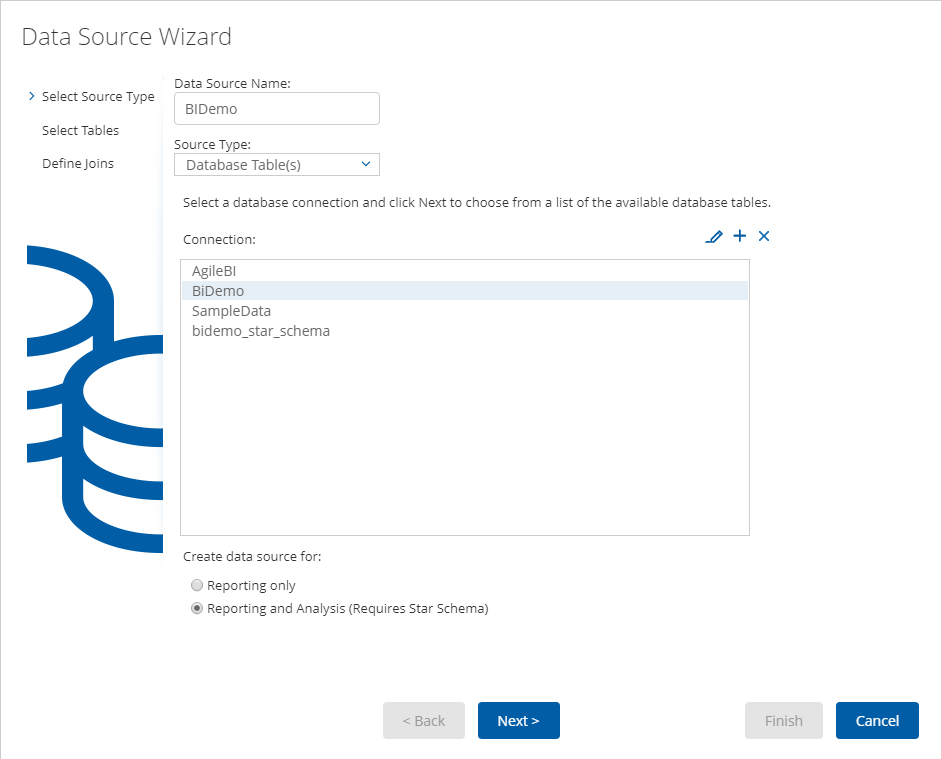 Figure 20. Data source wizard
 -
Select the dimensions and the fact tables we have created in Spoon:
"PENTAHO_DIM_CUSTOMER","PENTAHO_DIM_PRODUCT","PENTAHO_FACT_ORDER_LINE":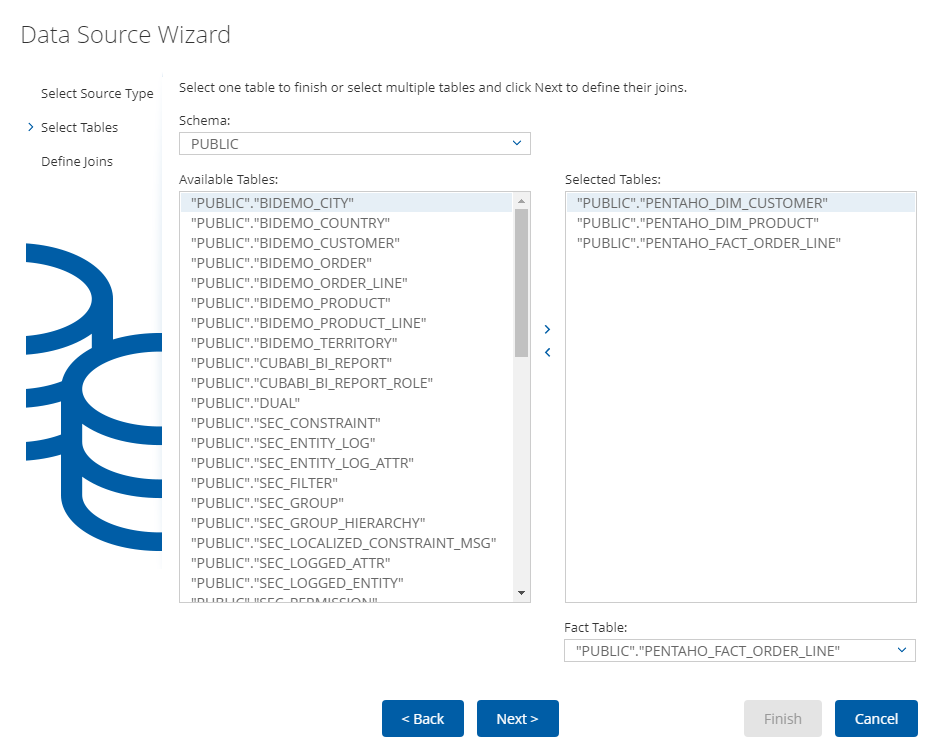 Figure 21. Data source wizard
 -
Define Joins for selected tables:
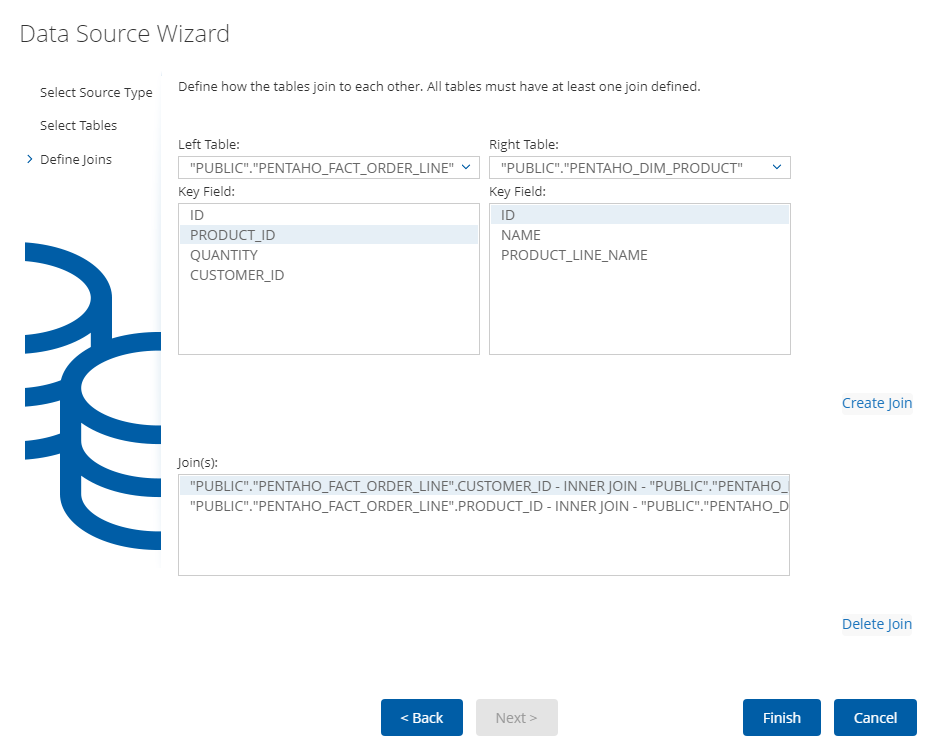 Figure 22. Data source wizard
 -
Customize the dimensions hierarchy:
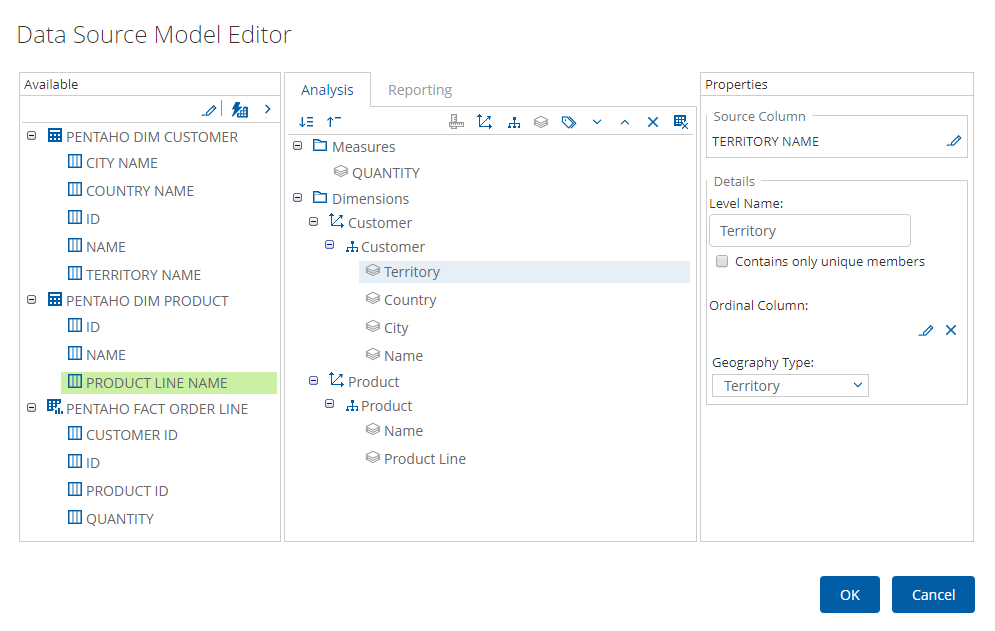 Figure 23. Data source model editor
 -
Save the data source. Select it in the list of available datasources and export the created analysis for the further use:
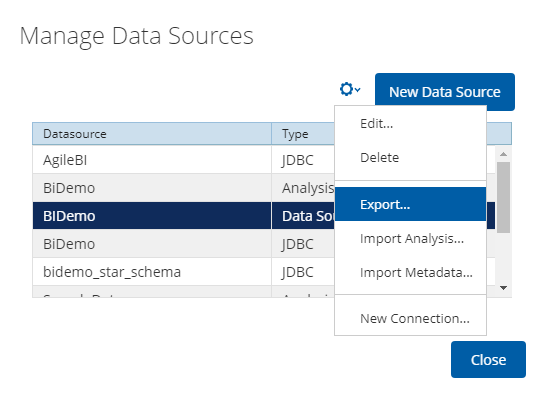 Figure 24. Export data source
-
- Create Analysis Report
-
-
Click New → Saiku Analytics → Create a new query. Select
BiDemocube and fill measure, columns, and rows as on the screen:
Figure 25. Create query -
Save report in the directory
/home/adminwith the nameProductsByTypeAndLocation.
Now you can open the Pentaho report in the CUBA application.
-
4. Adding BI to Your Application
-
Install the add-on in your project.
-
Double-click Add-ons in the CUBA project tree.
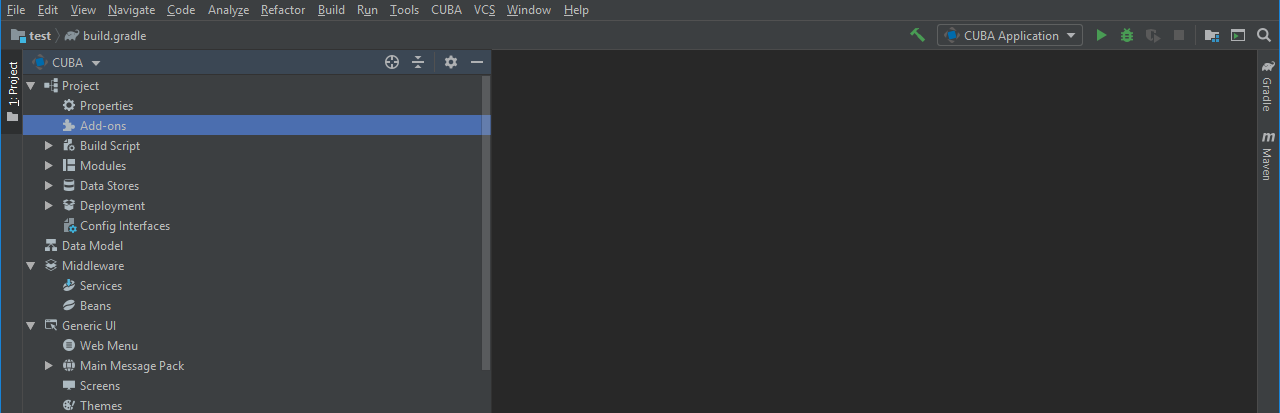 Figure 27. Add-ons in CUBA project tree
 -
Select Marketplace tab and find Business Intelligence add-on.
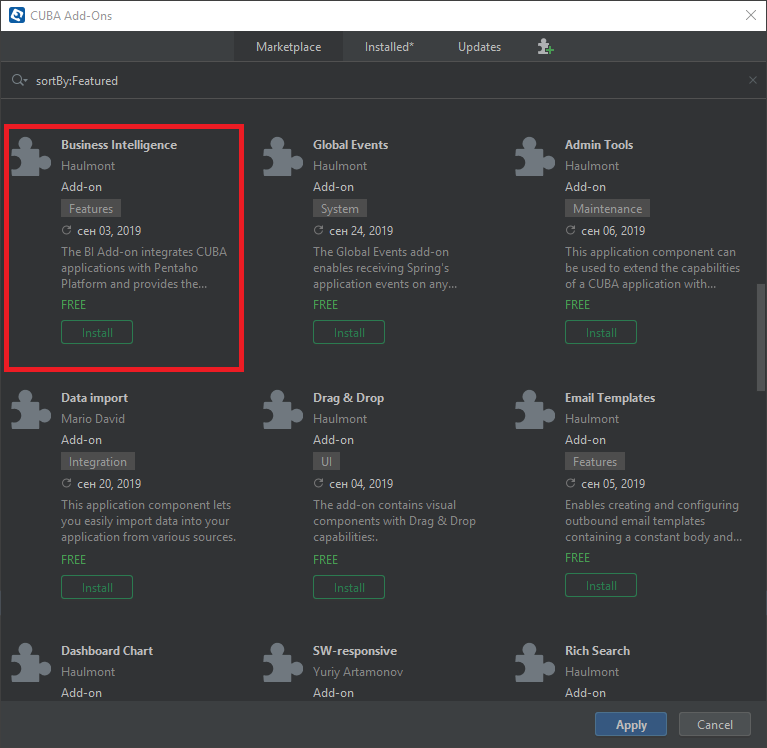 Figure 28. Marketplace window
 -
Click Install button and then Apply & Close.
 Figure 29. Apply & Close button
 -
Click Continue in the dialog.
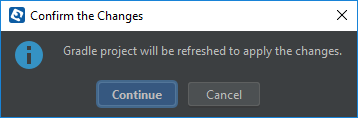 Figure 30. Confirm dialog
The add-on corresponding to the used platform version will be installed.
-
-
Add
cuba.web.mainTabSheetModeproperty to yourweb-app.propertiesfile in order to keep report content while switching application tabs:cuba.web.mainTabSheetMode = MANAGED -
Register your BI report in the BI > BI Reports screen provided by the add-on. Click Create and set the path to your Pentaho report:
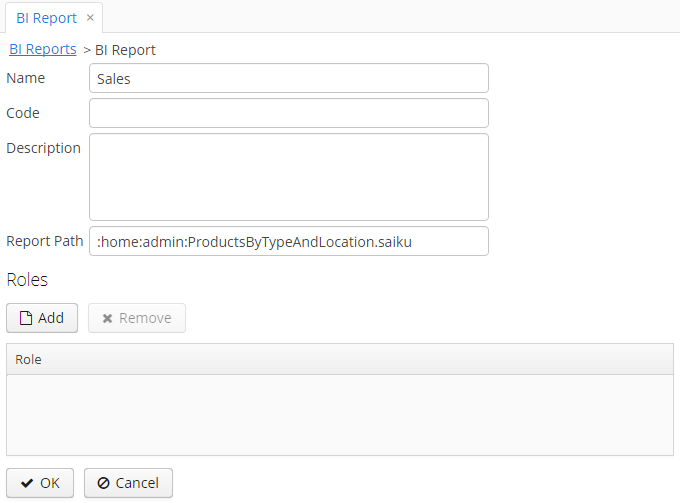 Figure 31. BI Reports screen
The list of roles allows you to make the report available to certain users only. If the list is empty, the report is available to all.
Now users can run the report in the BI > Run BI Reports screen.
-
Another option is to embed BI reports to application screens using the
biComponentvisual component provided by the add-on. For example:<cubabi:biComponent id="biComponent" height="100%" reportPath=":home:admin:ProductsByTypeAndLocation.saiku" width="100%"/>The
reportPathattribute is the path to the report file in Pentaho User Console. Also, add thecubabinamespace to thexmlnsattribute of thewindowelement:xmlns:cubabi="http://schemas.company.com/cubabi/0.1/ui-component.xsd"